Board Layout
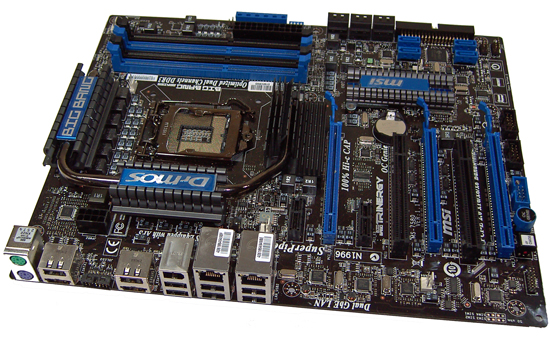
It's pleasing to see MSI sticking with their blue/black theme for the Trinergy. Most of the layout is identical to the GD80/GD-65 motherboards. Notable changes over the lower priced boards from MSI's P55 series are the addition of the NF200 bridge chip and the liberal use of tantalum capacitors (other than the supplied soundcard). Every conventional can type capacitor has been replaced with tantalum types for decoupling, providing lower impedance at high frequencies and also making the board less prone to capacitor related failures long-term.
MSI's confidence in this design is such that they offering an 8 year warranty promotion (non-transferable) on the Trinergy if you pre-order now and register within 30 days. Most enthusiasts will probably be rid of the board well before the warranty expires so they are unlikely to call upon it outside a couple of years. Still, it's good to see this level of confidence (providing MSI does not go the way of the Dodo in the meantime). Normal orders outside MSI's promotion will be subject to a standard 3 year warranty period.
All of the power rails are suitably over-engineered at first approximation, using eight ~30 amp FETs for CPU VCC. Other primary rails like VTT and VDIMM seem to be capable of supplying 50-60 amps peak each - plenty of overclocking overhead. Each of these rails support dynamic power saving which switches off phases to reduce power consumption in light loading conditions. Most overclocking enthusiasts tend to switch off power saving features generally and it appears MSI's engineers do the same thing when you enable OC Genie. The bundled Control Center software also makes some of the power saving menus unavailable when the system is overclocked. We guess this is a good way of ensuring users don't encounter random system crashes when the system is overclocked.
Onboard cooling service is provided by solid screw mounted heatsinks, with the CPU PWM and NF200 sections linked together with a heatpipe. Fin height does not infringe on larger CPU coolers and should allow heatsink mounting in north-south or east-west configurations easily. As always, if overclocking you'll want to keep system temperatures in check and use a fan to cool the heatsink assembly. A small fan pointing at any section of the heatsink should suffice in most situations as the heatpipe seems to transfer heat very well between each portion of the heatsink.
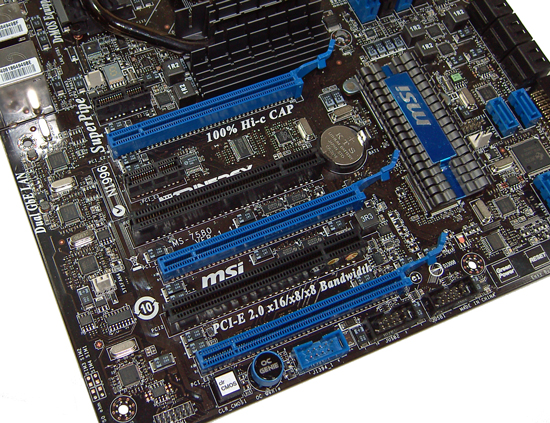
The topmost slot is PCI-E x1 and is configured to accept MSI's bundled soundcard. The blue PCI-E slots placed below are all strung from the NF200 chipset, supporting x16 bandwidth to the first slot in all configurations. If PCI-E slots two and four are populated, both will run at x16 bandwidth unless the third PEG slot is occupied. If all three PEG slots are populated, the PCI-E slots run at x16-x8-x8 bandwidth. Two PCI slots are placed in between the PCI-E slots, and at least one is available for use when all PCI-E slots are occupied. Spacing for the PCI slots in multi-GPU configurations will hinder airflow somewhat.
The lower edge of the board is home to CMOS clear and OC Genie buttons as well as a TPM, one 1394, and two USB headers. Power, reset, and green power buttons are located at the bottom right hand corner of the board using MSI's favored touch sensitive buttons. To the right you'll find the front panel control header block for power, reset buttons, and activity LEDs.
Do note that if the last PCI-E slot is used, access to all buttons and connectors at the lower edge of the board becomes very limited. The power and reset buttons users can work around by using the front panel header to the same effect, but the CMOS Clear button may become inaccessible depending upon the type of GPU cooler employed. MSI would have done well to include a rear panel CMOS-clear button just in case things go awry.
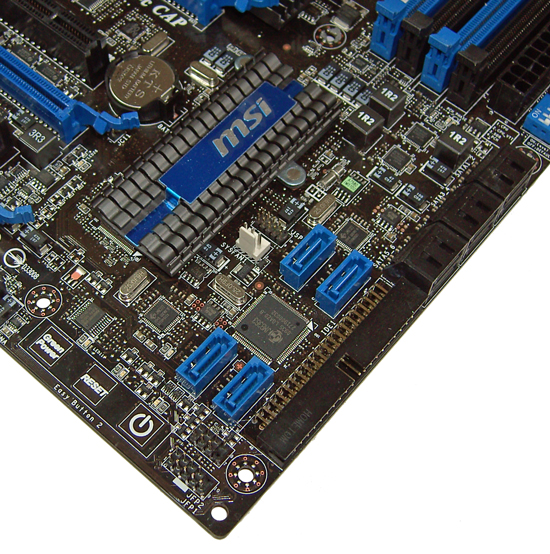
In the lower right hand corner we find an IDE connector, six black right angled SATA ports (Intel P55 PCH), and finally four blue SATA ports (JMicron JMB322) placed in vertical orientation. Unlike the MSI-GD65, the JMicron SATA ports are placed to remain somewhat accessible when GPUs occupy each PCI-E slot.

MSI provides voltage measuring points for all primary rails. A set of leads is included that allows users to plug multimeter leads into the test points for hands free voltage monitoring of each rail. This is the best voltage measurement option we've seen on a board to date. The four DIP switches are 0.1V voltage boost options for CPU VCC and +0.2V for VTT, VDIMM, and PCH rail voltages. The CPU VCC boost is handy in situations where processors are sub-zero cooled and have boot up voltage limits.
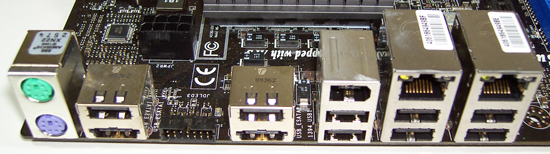
The rear I/O panel connection set is comprised of PS/2 keyboard, PS/2 mouse, OC Dashboard connector, 8 x USB 2.0, 2 x ESATA (USB combo), and 2 x RJ45 LAN ports (Realtek RTL8111DL PCI-E).


12 Comments
View All Comments
a4mula - Wednesday, January 20, 2010 - link
I'm sorry, but did I miss the part of this article where we were trying to come to a consensus on the performance of the NF200 for tri configurations on the limited 1156? Why go with a board that doesn't even come close to saturating the 8x bandwidth limit. Trifire 5870's, QuadfireX dual 5970's. We learned absolutely nothing other than the 1156's 16x pcie to die lanes still bottleneck in a 275 trisli. Where are the real reviews of NF200 + 1156?dia - Wednesday, January 27, 2010 - link
I think you've answered your own question. If 275's are bottlenecked somewhat; going by the fact they 'dont saturate 8x bandwidth', how do you think the higher performance cards will fare?You're probably looking at a 2~5% performance drop maximum on the current cards.
DeepThought86 - Wednesday, December 23, 2009 - link
How about adding stability to all your reviews. Run for 24 with the highest TDP proc that's officlally supported along with the highest TDP video cards that will fit, see if it burns up or not.Rajinder Gill - Thursday, December 24, 2009 - link
I usually run LinX for the stability testing stuff overclocked (along with plenty of application testing). Which is plenty IMHO.Holly - Saturday, December 26, 2009 - link
Well, to be honest, it is and it isn't... These days systems are way too complex to be able to draw really good stability conclusion...Just an example... My old E6300 (the 1.86GHz one) runs perfectly stable 24/7 on 2.975GHz (7x425) at 1.2V flat... and it runs without any troubles... games, C++ compilations, complex Maple calculations...
You'd say it runs perfect... well until I installed SSSE3 optimized Seti@Home application (instead of normal one that was running for like half year on this machine)... and guess what... CPU temperature went up by 5°C (water cooled) compared to previous top and computer went BSOD in couple of minutes. To compensate I had to either drop FSB to 410MHz or raise voltage to 1.224V.
Long story short... we can't hope to be able to really load the cpu 100%... yes, it doesn't idle when you stress it, but in fact how big part of the core is actualy working and how big part is taking a nap?
I would suggest trying mentioned optimized S@H on the system you consider stable (I am not saying it will crash, but the possibility is there)... We use the app at my friend's computer shop and usualy if there is a problem with hardware the machine goes BSOD in few minutes of testing... It's a bit drastic but very fast way to check failed OC.
Merry Xmas,
Holly
sgtpokey - Wednesday, December 23, 2009 - link
Dear Anandtech Staff,You don't have to invent your own nomenclature (OVERVIEW/CONCLUSIONN) for having an "Executive Summary" (or shorten it to "Summary" if you want) leading off the analytical article.
Calling anything other than the concluding section a "Conclusion" is a bit jarring.
Thank you for your time,
sgtpokey
Etern205 - Wednesday, December 23, 2009 - link
When AT first introduced this "overview/conclusion", I can't believe how many readers actually agree with this type of approach. Sure AT is a great site, but it does not mean you will need to agree on everything they do.I still prefer the old fart method
intro-->article w/pics-->benchies-->conclusion/author's pov
strikeback03 - Wednesday, December 23, 2009 - link
They probably have some page hit numbers they could pull out, but I wouldn't be at all surprised to find out that the majority of readers hit the conclusion (whether at beginning or end) before reading any graphs or descriptive text.As far as the board goes, meh, it seems to be a relatively competent, really expensive board mostly designed to stroke the companies' ego rather than provide something useful to 99% of potential users
Kenenniah - Wednesday, December 23, 2009 - link
Conclusion can easily mean the reviewer's conclusion and not the conclusion of the article itself.at80eighty - Wednesday, December 23, 2009 - link
I'm undecided about AT's new "draw your own conclusions' approach