Corsair AX1500i Power Supply Review
by E. Fylladitakis on September 11, 2014 5:00 AM EST- Posted in
- Cases/Cooling/PSUs
- Corsair
- PSUs
- 1500W
External Appearance
Without a doubt, the AX1500i has an imposing presence. It is based on the same subtle visual theme as the rest of the AX series, but the 22.5 cm (8.86 in) long chassis is definitely eye-catching. It goes without saying that the AX1500i will not easily fit inside small cases and compact designs, but that's hardly a problem as this clearly is not a product meant to power anything less than the most advanced gaming computers and workstations. Decorative stickers can be seen on both sides of the chassis, while the sticker with the electrical specifications can be found at the top. The fan guard is a combination of circular and parallel wires, visually complimented by the embossed parallel lines design of the chassis.
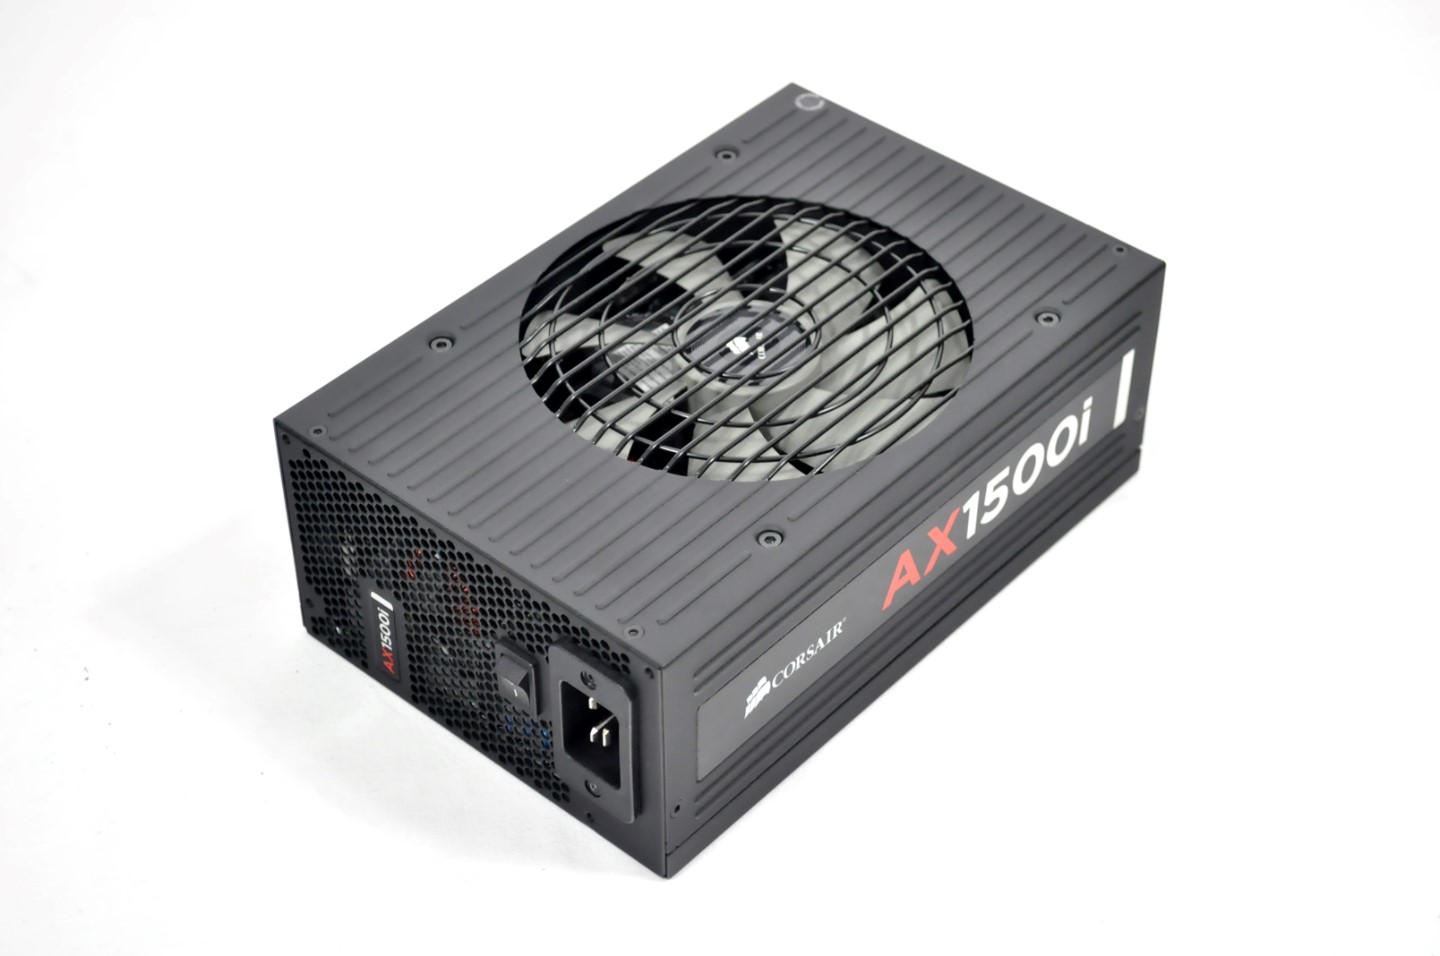
The front of the chassis is littered with the many modular cable connectors, as well as the Corsair Link USB connector and a self-test button. The back is plain, with just the C19 cable plug and a small switch to be found. The switch does appear very small for a unit of this size but actually the AC input does not go through the switch, as with most designs; the switch electronically isolates the AC input by deactivating the inrush current relay. This is a neat trick and actually improves efficiency a little bit as well, as there are no losses on the contacts of the switch.


Internal Design
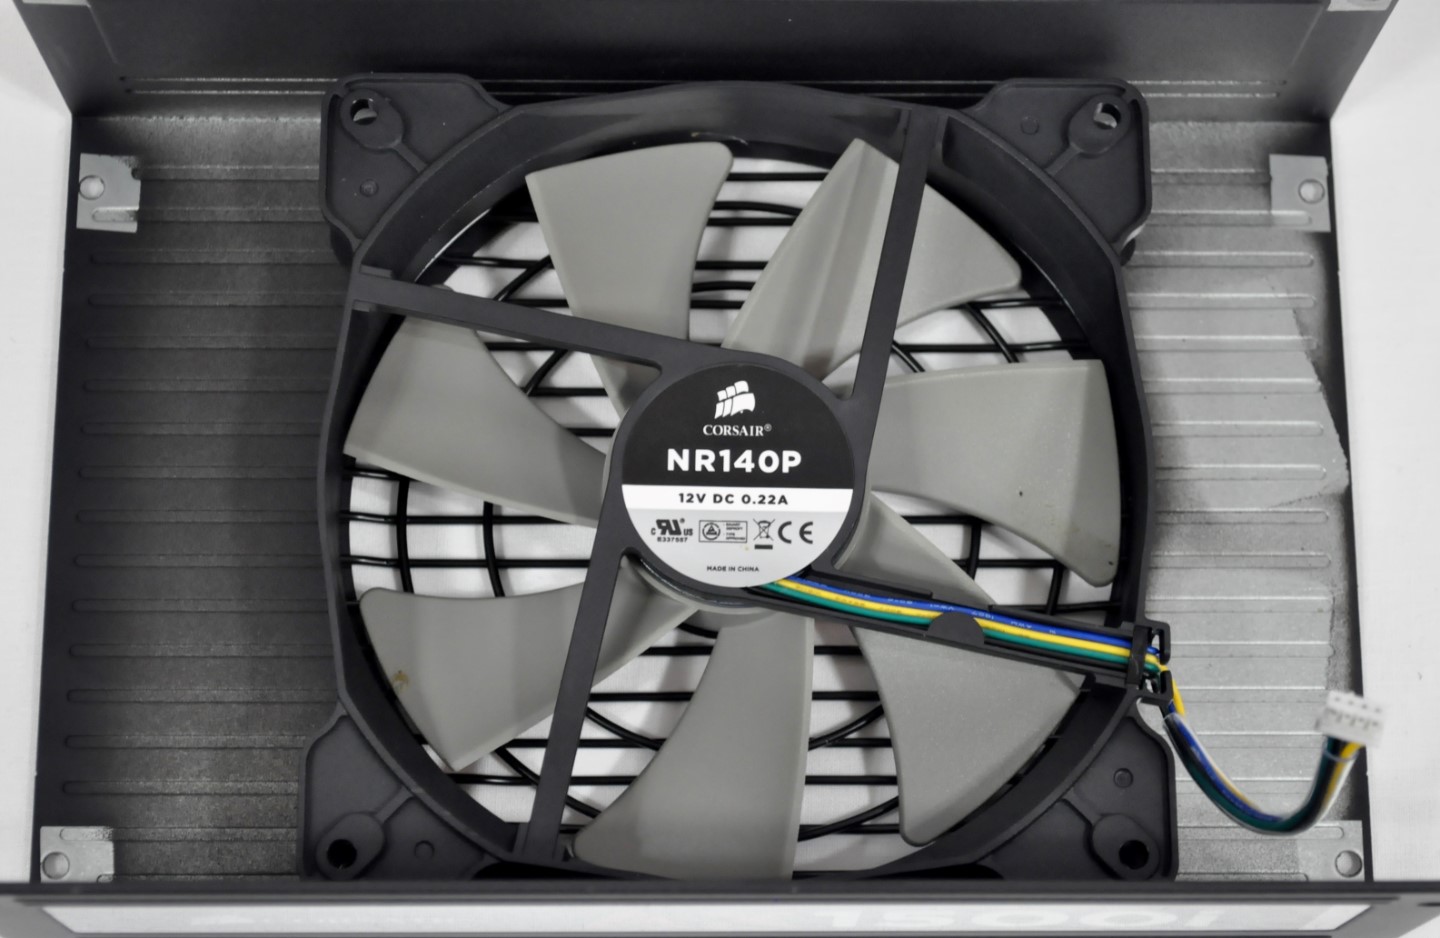
The 140 mm fan responsible for the cooling of this monster is a Corsair-branded NR140P fluid dynamic bearing fan. There is little information about this particular fan to be found in Corsair's website but, after testing the fan, our instrumentation shows that it has a maximum speed of about 2100 RPM and a maximum volume flow of about 75 CFM.
Unsurprisingly, Flextronics is the OEM behind the creation of the AX1500i and it is somewhat similar to the smaller AX1200i. However, there are great differences as well; in order to improve the efficiency to meet 80 Plus Titanium standards, Corsair essentially made the entire unit digital.
The build quality is exceptional, with an immaculate soldering job and a ridiculous amount of glue used to mechanically secure the components and minimize high frequency vibration noises. In fact there is so much glue that many components are literally buried inside lumps of grey stuff. Unfortunately, due to the excessive use of glue, we could not fully identify the number of AC filtering components. We were able to count six Y capacitors, four X capacitors, and three filtering inductors, which is already more than enough, but we suspect that even more of them are hidden under the lumps of glue.
Elsewhere, a metallic shield guards against EMI. It is also worth mentioning that thread locker glue has been used on almost every screw and metallic clips are used to ensure the tight contact of transistors onto the heatsinks, which is definitely not something we see every day – as a matter of fact, not even most top-tier units are so well made.
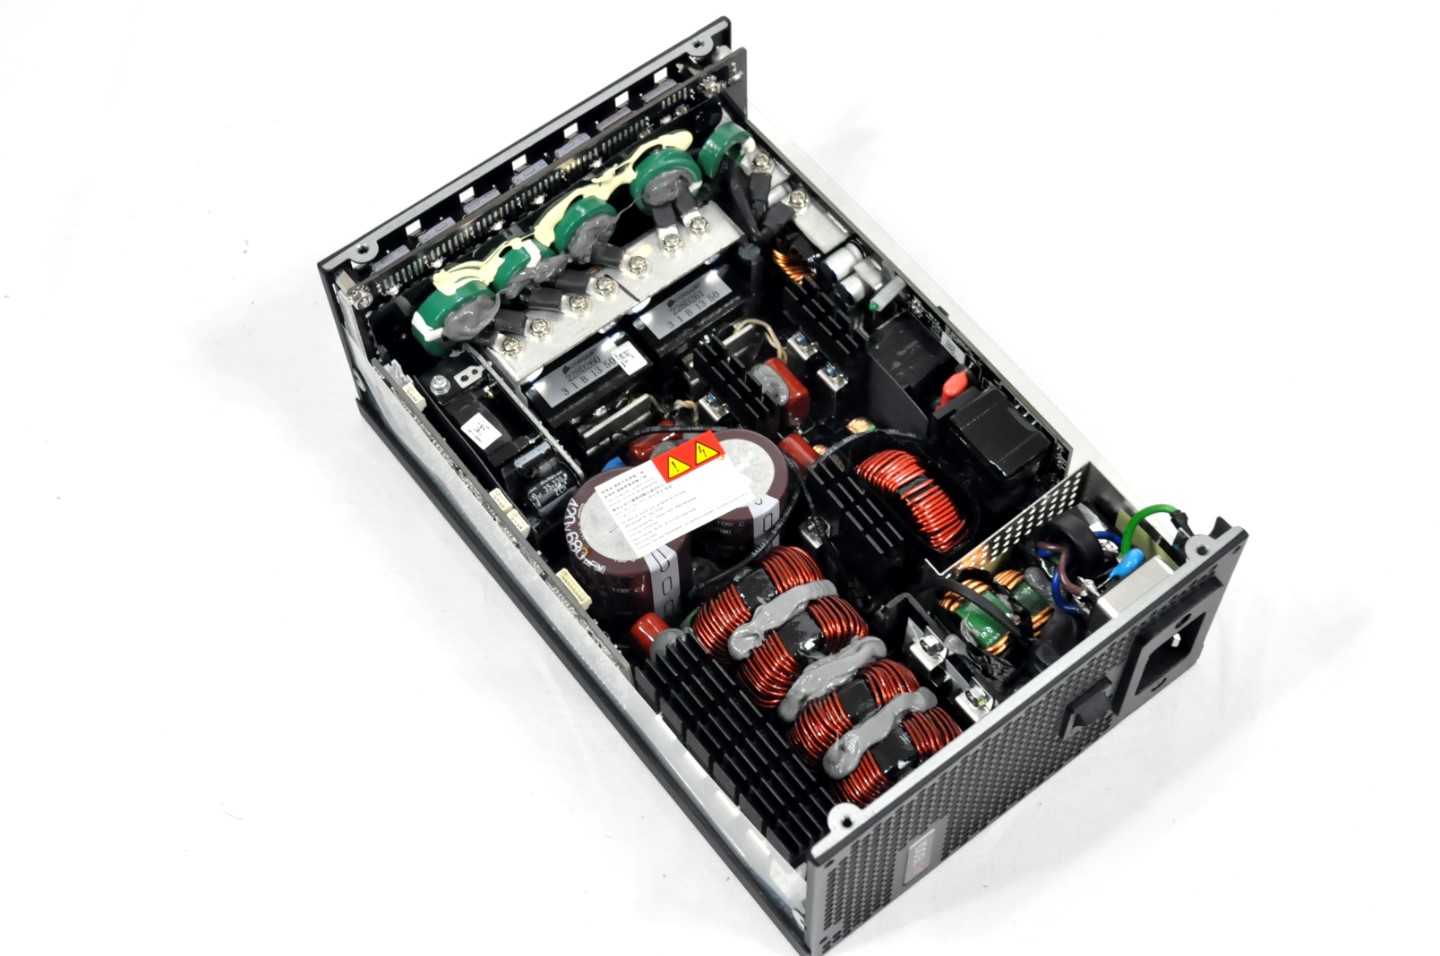
The major changes over the AX1200i, as well as over any other PSU that we have seen to date, are located at the primary rectifier and PFC circuit. Instead of using a rectifier bridge, Corsair is using two transistors for rectification and they have eliminated the PFC diode, replacing it with a digitally controlled circuit that allows for the generation of higher quality waveforms. As for the passive PFC components, there are four large coils and two Nippon Chemi-Con 680 μF capacitors. And when we get to the secondary capacitors, chaos ensues. There are electrolytic capacitors from at least three brands (Nippon Chemi-Con, Rubycon, and Nichicon) and solid capacitors from at least two manufacturers (CapXon and Teapo), and we may have missed some under the mountains of glue.


The second major change lies at the generation of the DC voltage lines. Unlike most other advanced units that generate only a single 12 V line and then convert all minor lines from it, the AX1500i has two virtual LLC converters. The major LLC converter generates the massive 12 V line and the secondary converter generates the 5 V line. The 3.3 V line is then derived from the 5 V line via a typical DC-to-DC converter. Due to the insane amperage, Corsair had to use large metallic bars to distribute the ground on the connector's PCB. A metallic bar also collects the freshly generated 12 V line, but it is then transferred onto the secondary PCB via seven thick wires.
Corsair Link
A couple of years ago, Corsair introduced the Link software that allowed for the monitoring and even partial control of compatible devices. It can be used to monitor and log system parameters, such as the CPU temperature and the speed of fans, as well as to perform certain actions when the appropriate hardware is used. For instance, you can program the lighting of the Hydro H100i to change according to the temperature reading.
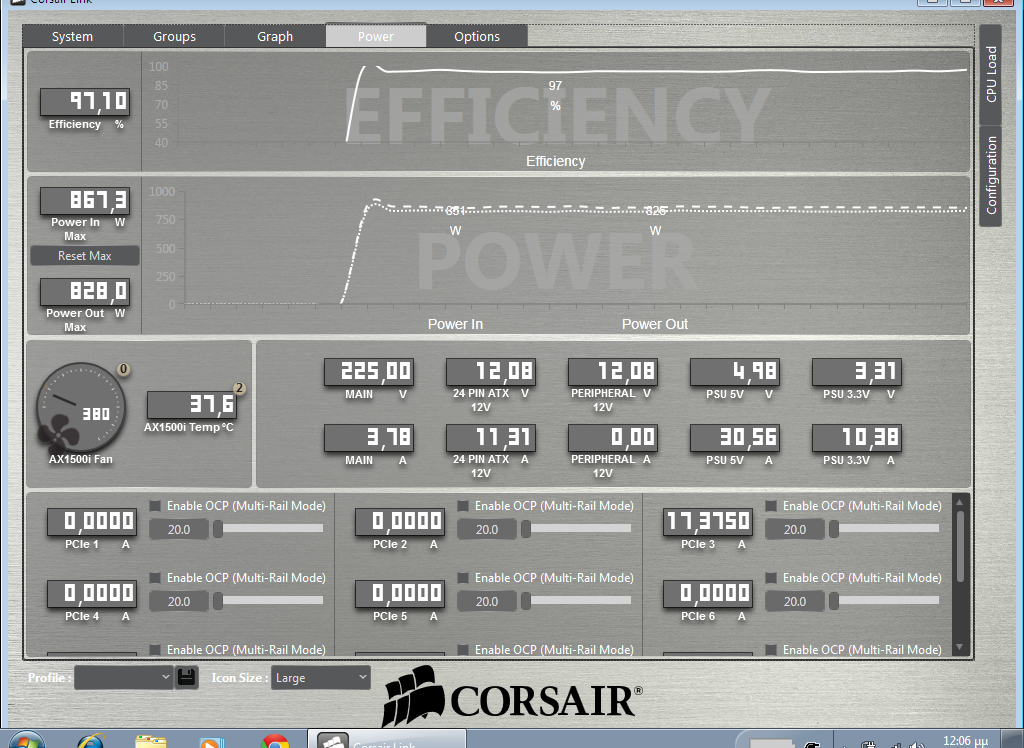
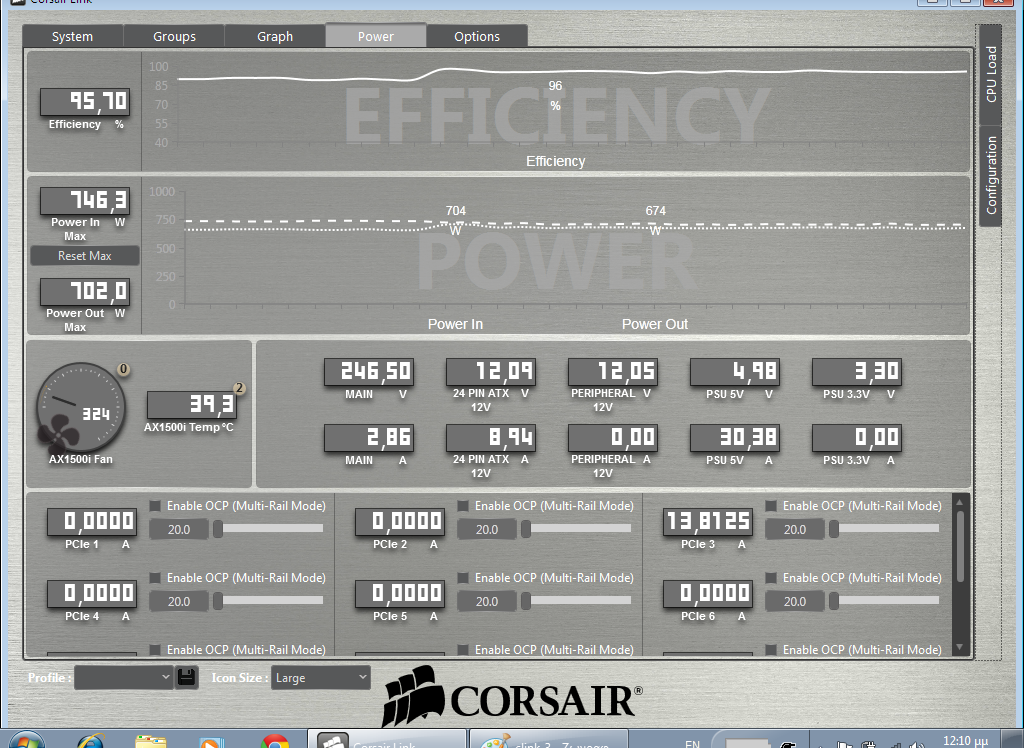
With the AX1500i, Corsair Link can be used to monitor just about every primary parameter; voltage, amperage, and power on both the input and outputs, as well as the internal temperature and the speed of the cooling fan. The user can also create virtual OCPs, limiting the maximum current through certain connectors. As far as accuracy is concerned, the software readings usually are a bit off, but they are precise enough to be useful to the end user. You can see in the following pictures that we are using Link to depict the stability of the AX1500i when the input voltage is changed while the unit is operational; the AX1500i simply kept working without a glitch both when the voltage took a dive from 230 VAC to 127 VAC and when it went up to 248 VAC.

While the software worked well for us, we should mention that the version of Corsair Link with support for the AX1500i is still a Beta, so glitches and software issues could arise. We didn't encounter any during the limited time of our testing, however.


55 Comments
View All Comments
sweetca - Thursday, September 11, 2014 - link
Thank you!tim851 - Thursday, September 11, 2014 - link
>>The advantage of having more power than you need is to let the components breathe better,>>widen the pipeline so to speak.
What? This is audiophile-grade fluffy language. And a load of...
>>You may not need 1500W, but the extra headroom provides for stabilty and overclocking potential.
...bullsh!t.
You either need 1500w or you don't.
If you're overclocked setup draws 600w from the wall, having a 1500w PSU is not going to improve stability or overclocking.
quick brown fox - Thursday, September 11, 2014 - link
Maybe he worded it with some level of ambiguity, but the point he wanted to come across can be easily understood.If your overclocked setup draws 600W from the wall, theoretically you can have a 600W PSU supply all of that without the PSU going out of regulation. However, if you still have some room for additional overclocking (from better cooling), your overclocked setup might draw an additional 50-100W, and your 600W PSU (depending on its quality) won't have that headroom to sustain the additional power draw, which would lead of course to instability.
So what you're avoiding is the PSU becoming a bottleneck when you still have the capability to overclock further.
tim851 - Friday, September 12, 2014 - link
Perhaps that's what he means.But the fluffy language he uses let's me rather suspect he's one of those people who believes a higher powered PSU makes his PC faster. Because moar power!!!
Like the audiophiles who think a super-expensive HDMI cable that is thick as a child's arm is improving colors and clarity of their blu-rays.
DanNeely - Thursday, September 11, 2014 - link
Maybe. If you've got a low power system with a decent smaller PSU this would probably be worse becuase you're in the sweet spot for the smaller PSU and in the low-load suck range on this monster. if you're running a 500W box on a 550W PSU, this would probably do better at full load since the 550 would be in the nearly maxxed out suck zone; OTOH the 550 would probably still do better at idle. You normally get peak efficiency around the 50% point and good performance from 20-80% before falling off at either end (see the curves on pages 3/4).80+ Platinum is the first 80+ spec to set an efficiency requirement at 10% too; and platinum units generally do a lot better at low loads. OTOH since they're all still halo priced; unless you live somewhere with really expensive electricity they're not going to pay for themselves vs more mainstream models.
AnnihilatorX - Friday, September 12, 2014 - link
Different PSUs have different efficiency curves at different power loads, so it is hard to say. Generally they are most efficient between 20-80% load.FriendlyUser - Thursday, September 11, 2014 - link
Great product, but the price is only meant for high-end workstations and the like. I think it would be useful for such extreme products to enumerate the connectors.I am asking this because I was looking at the ASUS Z10PE workstation MB supporting dual Haswell Xeons with massive 150W TDPs. The MB in question requires 1xATX 24pin, 2x8pin EPS AND an optional but recommended 6pin EPS 12V connector for SLI/Crossfire. I haven't yet found a PSU with a 6-pin ATX 12V power connector, and I am almost certain it's not the same as PCIe.
vred - Thursday, September 11, 2014 - link
It is the same as PCIE 6-pin connector. You have not found a PSU with a 6-pin ATX 12V connector, because there is no such connector. :)
vred - Thursday, September 11, 2014 - link
Running this PSU to power my watercooled quad-Titan Black workstation running CUDA calculations. PSU remains surprisingly quiet and mildly warm to touch even under full load.philosofa - Thursday, September 11, 2014 - link
What a beautiful piece of hardware; fantastic to see something pushing so hard at the bounds that define 'well made'. Cheers for the review, was fantastic H/W pr0n to read :D