Intel Z77 Motherboard Review with Ivy Bridge - ASRock, ASUS, Gigabyte, and MSI
by Ian Cutress on May 7, 2012 7:40 PM EST- Posted in
- Motherboards
- MSI
- Gigabyte
- ASRock
- Asus
- Ivy Bridge
- Z77
ASUS P8Z77-V Pro – BIOS
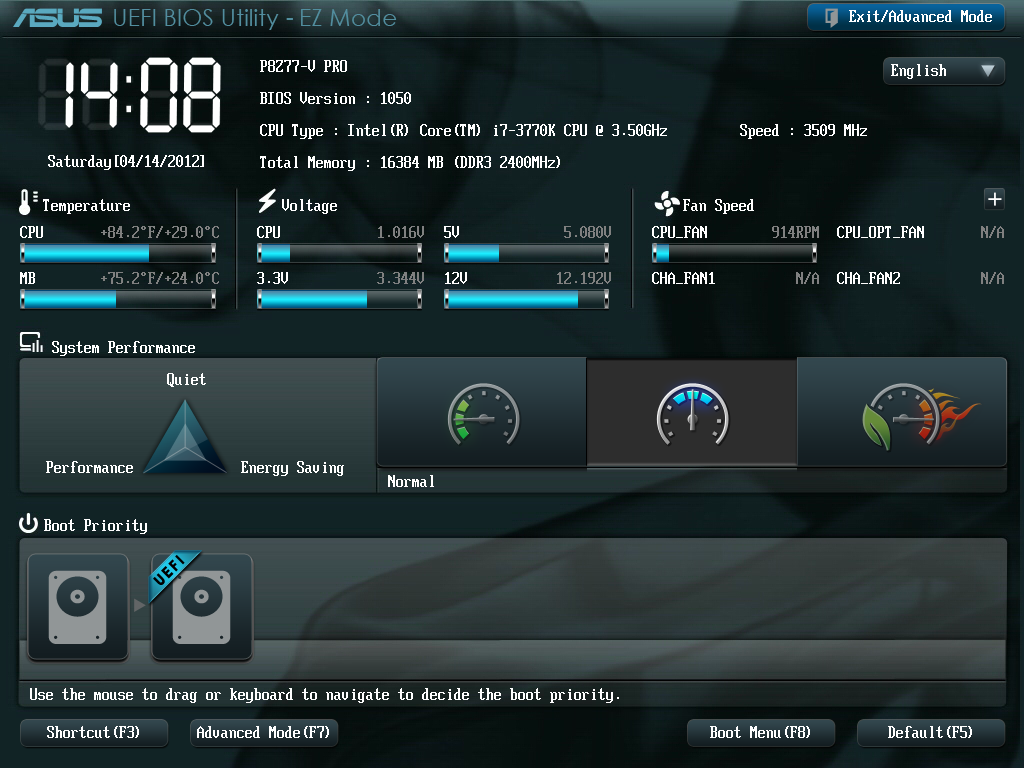
ASUS BIOSes, ever since we went graphical back in P67, have been at the top of presentation and usability of the graphical interface. Therefore, it would have been odd if ASUS had done something vastly different for Z77. Luckily, the same interface greets us – initial entry into the BIOS greets us in EZ mode (I still call it ee-zed, being a Brit), which displays the time, the motherboard, the BIOS version, the CPU, the CPU speed, the memory, temperatures, voltages, fan speeds and the boot order. As an entry screen it is very informative, suitable for most users to implement a power saving or turbo mode, or the boot order.
However, the meat of the BIOS is all in the Advanced mode, where the BIOS takes a more traditional look. Screens of interest here are the AI Tweaker, where overclocks are made. This screens below shows an applied Extreme Memory Profile, with MultiCore Enhancement enabled, memory set at the correct strap and additional voltage applied to the memory as defined in the XMP.

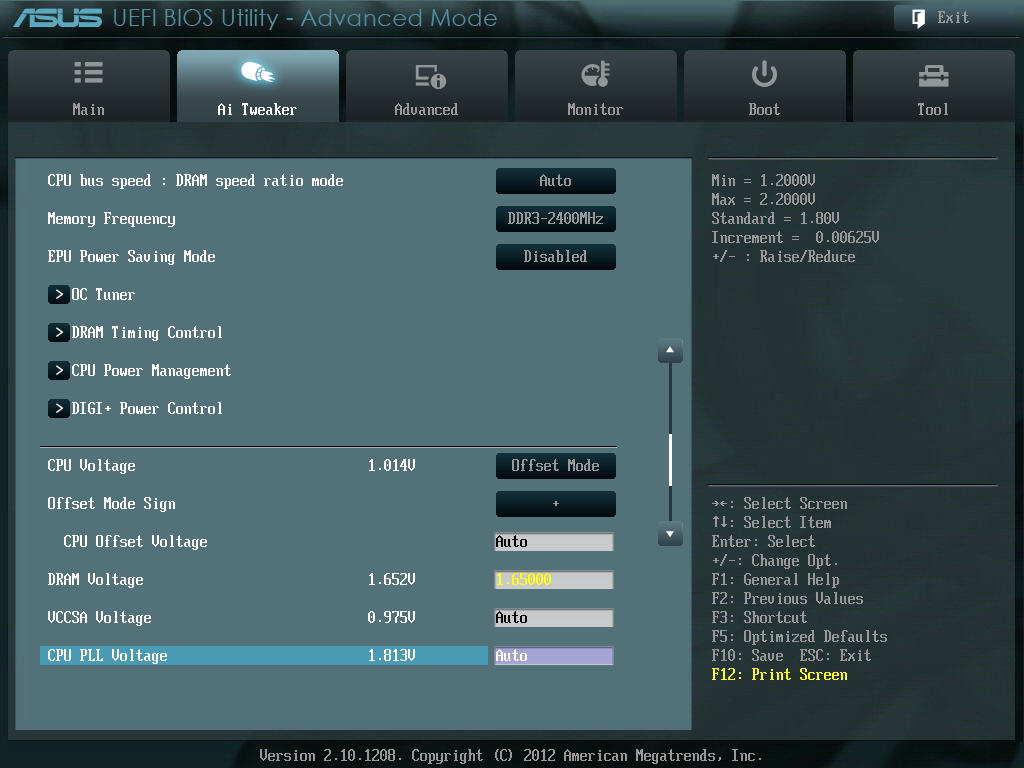
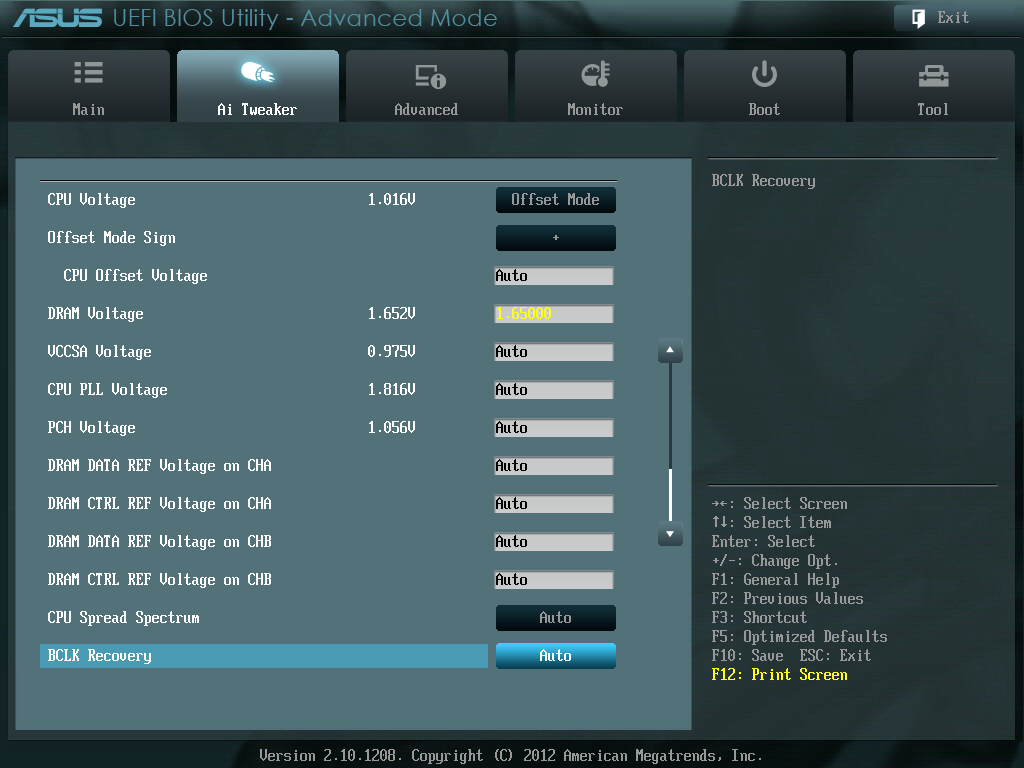
Adjusting memory subtimings occurs in the DRAM Timing Control, and DIGI+ Power Control allows adjustment of load line calibrations as well as current capacities should a user desire extreme overclocks. The CPU, VRM, iGPU and DRAM can all benefit from DIGI+ control
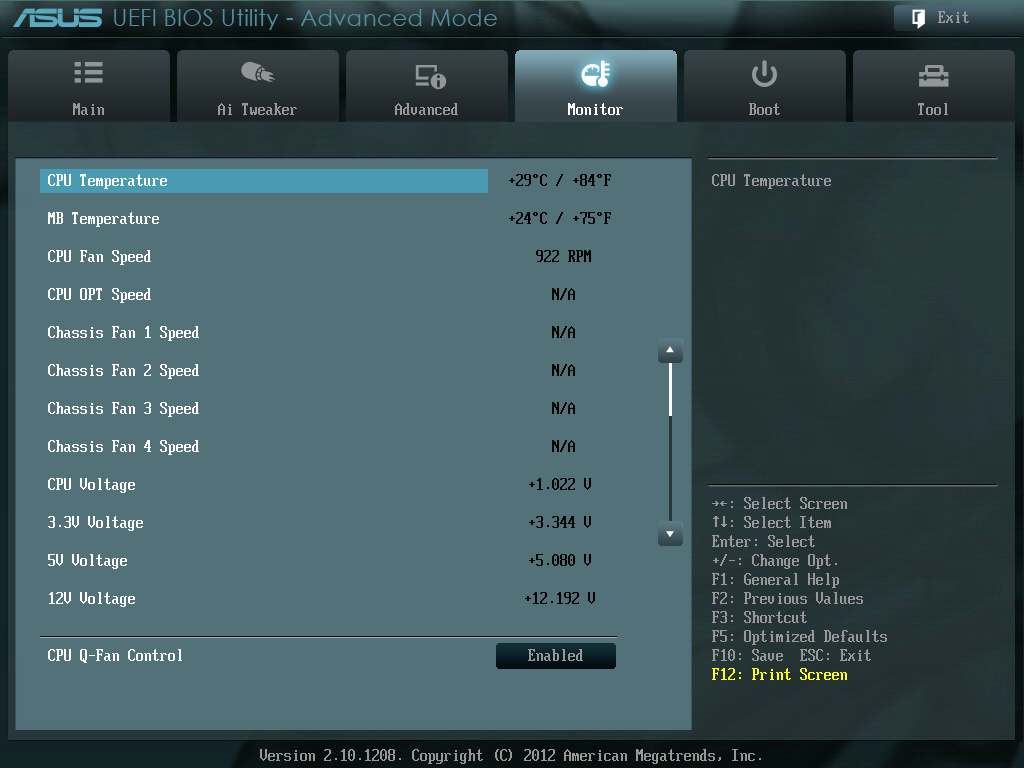
ASUS have had good fan profile options in their software, so the options in the BIOS are a little sparse in comparison to their OS offerings, though this could be down to BIOS limitations. Temperatures and fan settings are found in the Monitor section.


Software
ASUS’ AI Suite software is the stalwart of the operating system options, and over the chipset generations I have grown accustomed to it. ASUS is continually updating features in the software, both in relation to hardware changes but also to ideas and requirements of the users. Having all the software under one heading helps with organization and consistency. Now that it is also a few generations old, it no longer has the annoying delay in loading associated with previous versions.
TurboV Evo is the overclocking function of AI Suite. As in previous versions, there is an automatic overclock function (available in ‘Fast’ and ‘Extreme’ modes) as well as a set of manual options. Personally, I use this part of the software to test overclocks, and then apply them in the BIOS later. Therefore, if an overclock is unstable, it does not cause the system to not boot next time around.
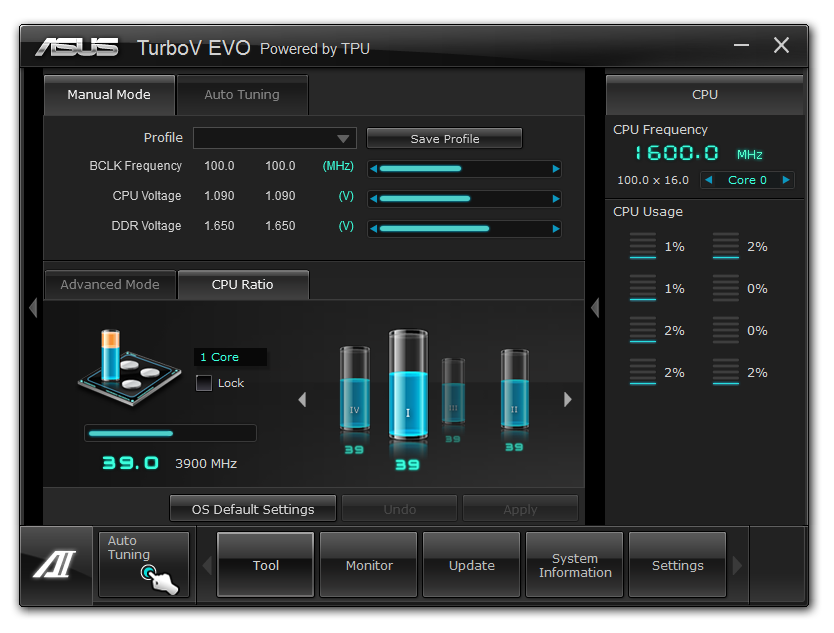
ASUS has adjusted the software relating to DIGI+ in order have a more concerted effort to teaching users about it. Alongside the CPU DIGI+ and VRM DIGI+ options, we have a ‘Smart DIGI’ option that can enable the user to use low power DIGI+ settings, or a set of useful settings for overclockers.
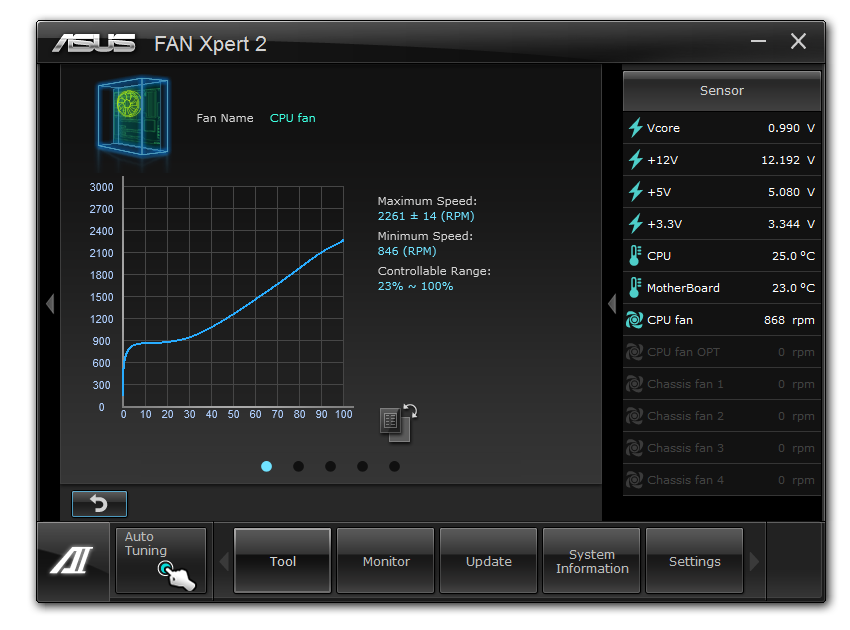
Fan Xpert 2 is an upgraded take on the fan software previously distributed with ASUS products. In this instance, when Fan Xpert is loaded, it asks to be able to test all the fans across their full range of speeds. This allows the software to produce graphs relating applied power with actual RPM and performance. So for example, my CPU fan has a minimum of 846 RPM at 23% applied power, up to 2261 RPM at 100%. Below 23% power invokes the minimum RPM setting:
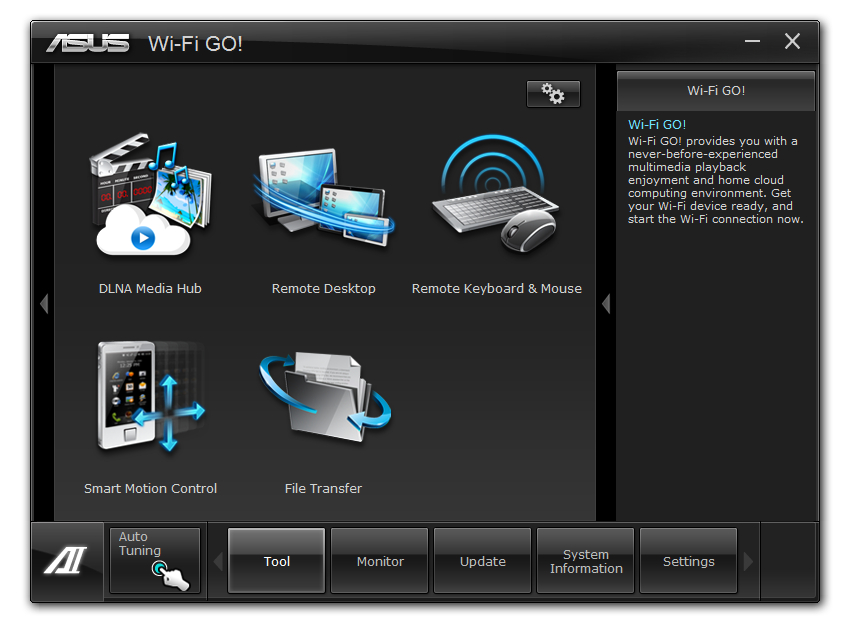
WiFi Go settings also get an upgrade – with the included WiFi module on board a user can set up a multimedia streaming center with the ASUS board in order to send files across to WiFi enabled televisions, or be controlled by tablets with the appropriate apps. File transfer is also available in a similar fashion. The software also allows the PC to act as a wireless access point for the internet.
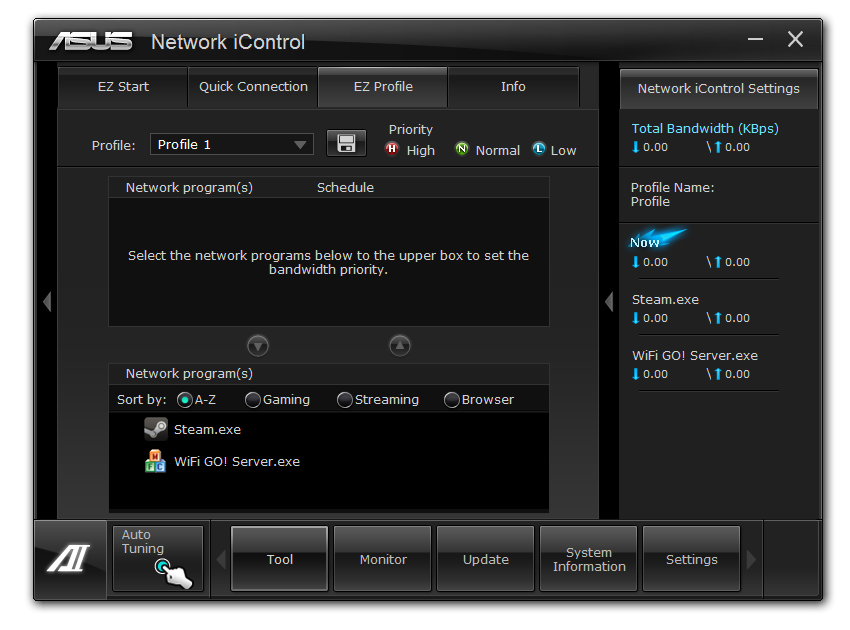
Alongside the quick charging features (Ai Charger+, USB Charger+) which promise to decrease charge time for smartphones, tablets and Apple products, due to the use of Intel network controllers on board, we have software in order to be able to manipulate network traffic. At its simplest level, this means giving priority to certain applications (games) over others (file transfer):
Other smaller features with AI Suite include the BIOS Flashback utility and software to change the initial boot up logo screen. I purposefully saved talking about USB 3.0 Boost until last, as we now have the ability to test it.
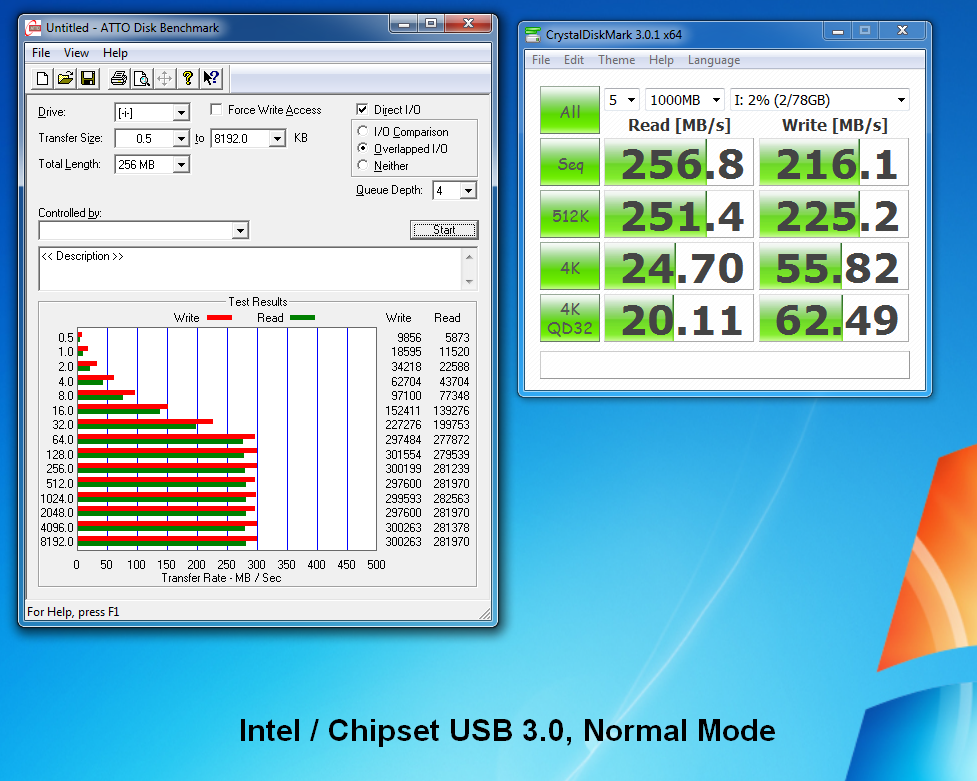
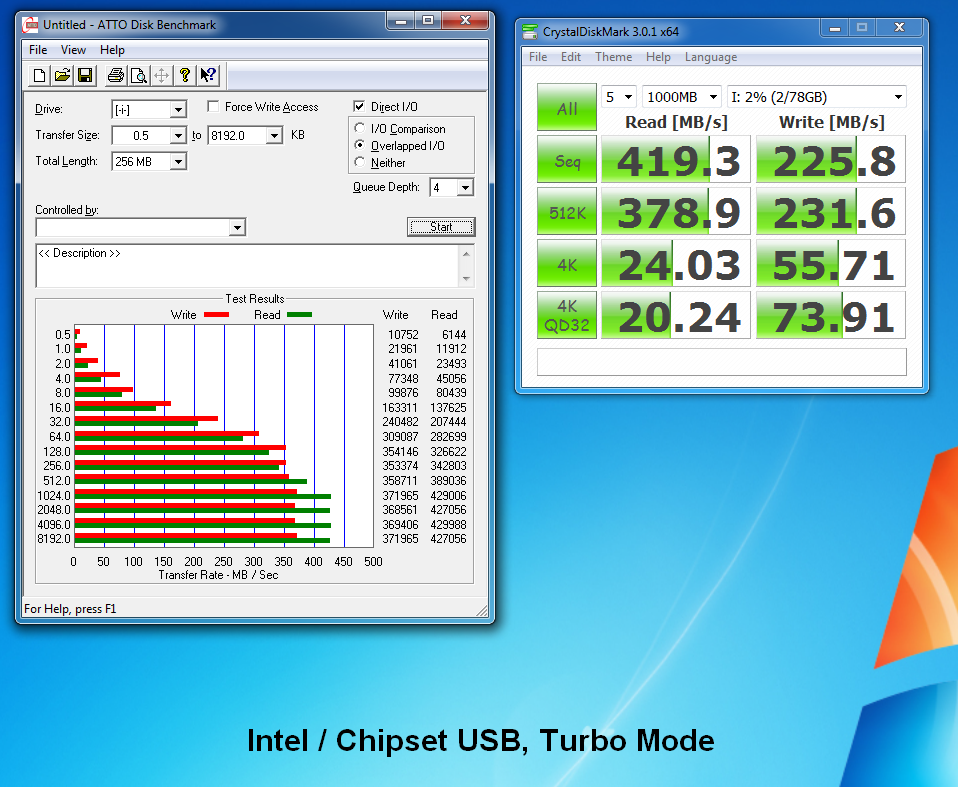
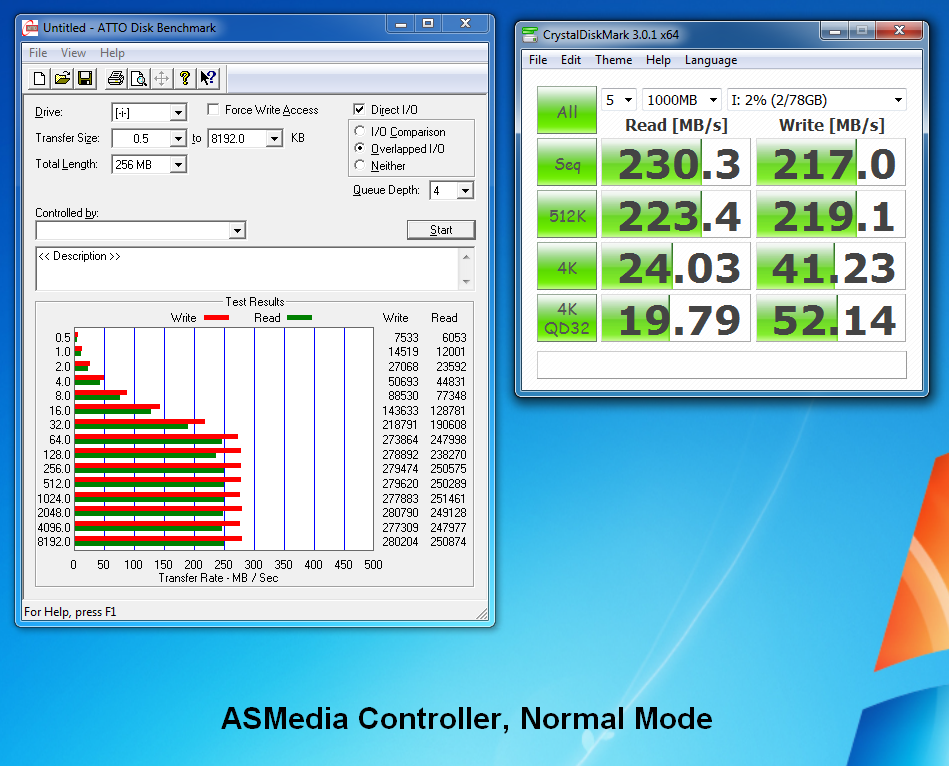
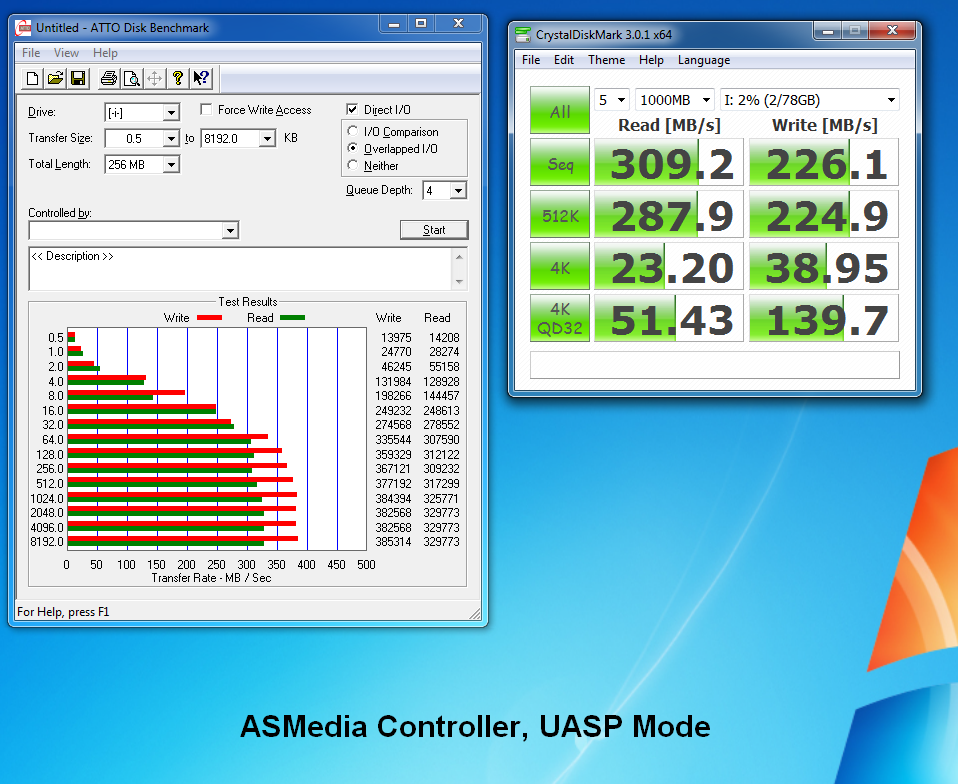
ASUS kindly provided a SATA 3.0 to USB 3.0 hub, along with a high speed SSD to test how their USB 3.0 Boost system in terms of what benefits in can bring over normal USB 3.0. At the heart of the system is the ability to adjust the USB protocol, from the normal Windows protocol, to either a turbo mode (on the chipset USB 3.0) or a USB-attached SCSI protocol (UASP) with a capable device on an ASMedia USB 3.0, or on the Chipset boards with Windows 8.
Both the Turbo and UASP modes offer a different set of commands to the USB in order to improve transfer rates. Initially, I performed my standard CrystalDiskMark test, which uses incompressible data for stress the reads and writes of each of the modes (Intel USB 3.0 Normal, Intel USB 3.0 Turbo, ASMedia USB 3.0 Normal, ASMedia USB 3.0 UASP), followed by our standard USB copy test.
The results ended up with the Intel Turbo mode (which depends on memory speed) outperforming the ASMedia UASP, which seems counter-intuitive. The benefits of UASP are actually outside my own normal usage model for USB – I typically use USB as file storage or as a method of transferring files between systems. The benefits of UASP lie in using a USB device as if it was a drive in the system – in situations where queue depth could be high. With this in mind, I tested all four different USB 3.0 models with ATTO Disk Benchmark and a full suite of CrystalDiskMark:
Alternatively, to put it in a more readable format:
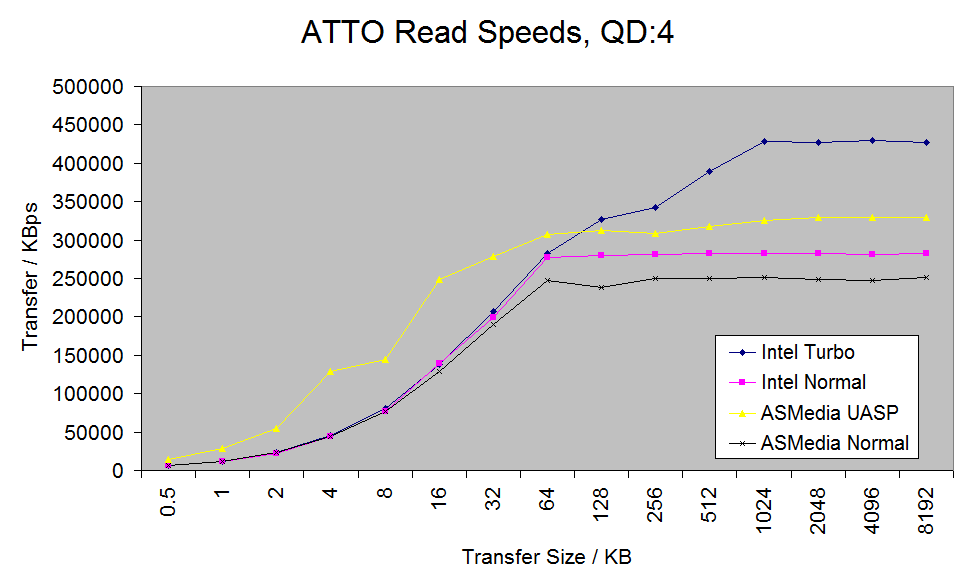
In terms of read speeds at a QD of four, UASP achieves supreme performance when dealing with small (< 64 KB) transfer sizes.
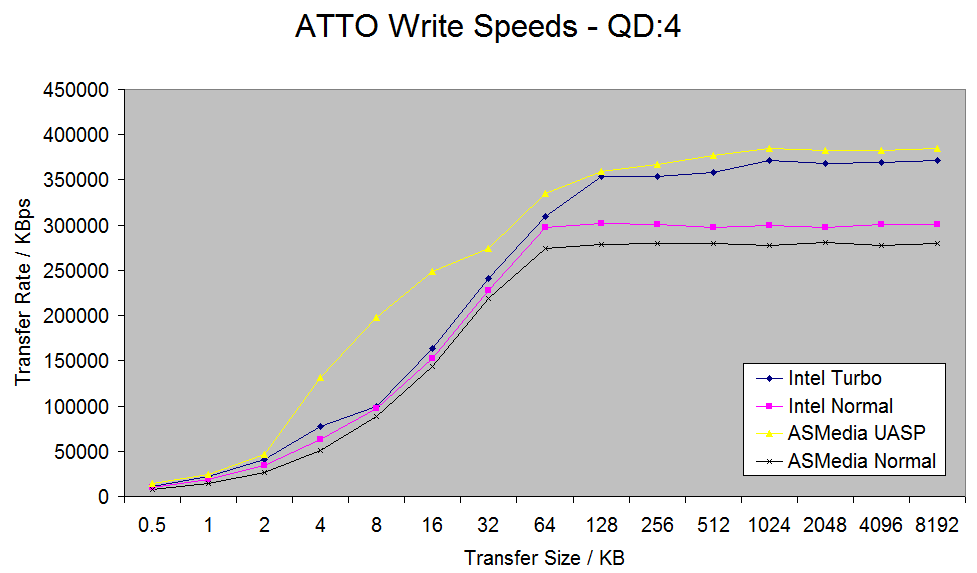
For write speeds, UASP outperforms Turbo across the whole range of Transfer Sizes, again most notably at sub-64 KB transfer sizes.
What we can see is that the add-in controller (ASMedia) with UASP can easily out perform the Intel controller in Normal mode. When the Intel controller is kicked into Turbo mode, it has a direct link to the PCH whereas the ASMedia goes via an x1 PCI-E link. This means under Turbo, the Intel has the advantage at peak loads, but the UASP protocol still wins out under short file transfers due to the efficiency at the command level.


117 Comments
View All Comments
DarkRogue - Tuesday, May 8, 2012 - link
First off, thank you for the review.I am a bit bummed that the UD5H and the Z77 Deluxe were not reviewed, since those were the two I was looking at. Especially since the UD5H can be had for under $200.
Anyway, the voltage ripple/stability charts were quite interesting for me.
But my main concern lies with the Gigabyte's chart. It looks good... but in my eyes, TOO good. It's too perfectly straight. On one hand, I thought, "Wow, this board has awesome VRM or something."
On the other hand, it made me suspicious about why it was so stable. I have to ask, is it measuring the correct voltage?
The reason is because I had a similar finding when I was looking at the vcore requried to OC an IVB CPU (or any CPU, really) on the new Z77 mobos.
Per my thread here: http://forums.anandtech.com/showthread.php?t=22417...
We found that Gigabyte mobos were incorrectly reporting its VTT voltage as the vCore, which resulted in "vcore" readings in CPU-Z and other programs reporting the same, or very similar, 1.0xx voltages regardless of what the CPU OC'd to.
I hope to be able to get some clarification on this.
Only other suggestion I have is to really test more of the features of each motherboard. (mSATA, firewire, audio, etc; how do they compare with other chipsets, how are their drivers, etc..)
Thank you, and keep up the good work!
IanCutress - Tuesday, May 8, 2012 - link
Hi DarkRogue,I have the Deluxe on my test bed right now, so keep your eyes peeled for when I finish the review.
Regarding the voltage reading charts, it merely reads the OS reported voltage. This is loosely a smoothing of what ripple actually happens on board. After consideration, it only serves to show LLC on board, and how the board reacts to requested load by the processor. It's fairly easy for a manufacturer to override this to make sure only a straight line is reported. But, if it is a messy line, then there could be a problem (e.g. check my 990FX review a little while ago).
I'd love the kit to test more features on the boards (mSATA etc), if you've got any kit spare! :) Though keep in mind that each test can't take 2 hrs, or we would end up with 1 board a month reviewed (as we do this part time)! I'm open to suggestions regarding tests if anyone has a good one with a simple output I can report and analyse.
Ian
DarkRogue - Tuesday, May 8, 2012 - link
Thank you for your response, Ian!I wish I had the funds to send in spare items, though. Unfortunately, I'm not quite rich enough, haha. We'll have to be bound by the generosity of the various vendors to this site.
As far as tests go, I imagine some people would be interested in a quick RMAA test of the various audio chipsets. It's of no concern to me, since I insist onboard solutions are never going to be as good as a dedicated external DAC+amp, but it should be good for a lot of people.
I'd also be interested in how the eSATA and Firewire performs, as I'm of the camp that says anything firewire related that isn't Texas Instruments is not worthwhile. The eSATA, mainly it's to see if there are any quirks with the drivers from each manufacturer allowing hotswap properly or not, and whether it causes DPC latency issues. My friend's ASUS board was plagued with problems related to eSATA not allowing him to eject drives, BSOD'ing on resuming from sleep, causing massive DPC latency when a drive was connected, etc. It's these little things that really make or break the experience of a board.
I'd also like to see how well the fan controls are on each motherboard. ASUS' Fan Xpert 2 really drew me in, as it seems no one else can match the level of customization for fans. I dug a bit and found out that Gigabyte's boards not only cannot do this, but it even struggles to stay consistent between its various headers. (One header runs straight +12v no matter what, while the others make the fans spin at different speeds with the same settings.)
ANYWAY, back to the issue at hand - Gigabyte's voltage readings.
As I found in my thread linked above, Gigabyte appears to be reporting the wrong voltage, for some unknown reason. This to me seems to invalidate the test result for the Gigabyte board, because it's incomparable to the others.
I know that the purpose of the test is to test for variation in the voltage to the CPU, not necessarily the exact ripples, but the VTT supplies voltage to a completely different segment than the vcore, unless I'm mistaken. I wouldn't think that the voltage supplied toward the IMC would vary as much when the CPU ramps up and down.
Is there a way to force that program to probe a specific/different voltage reading, or have you already done this and the chart actually does represent Gigabyte's handling of vcore voltage? I wasn't able to figure that out from the article.
Thank you again!
UltraWide - Tuesday, May 8, 2012 - link
Thank you so much for covering the fan control features on each board! I truly appreciate this as it is often left out in other reviews.Keep up the great work!
AeroRob - Tuesday, May 8, 2012 - link
I don't know about anyone else, but I'm really sick of seeing VGA and PS/2 ports wasting space on new motherboads.I know some gamers might think that PS/2 does the job better than USB, and I can appreciate that, but VGA? Who even uses VGA connections anymore? They should be avoided like the plague.
And even if you do insist on using a VGA connection, what's the point of putting a DVI-D connector and a VGA together? Chances are you won't be using both, so just make it a DVI-I connector and throw in one of the cheap DVI>VGA adapters, and use the newly freed up space for a connector that isn't an ancient piece of garbage. Let's see HDMI or DP up there. Move things around so you can perhaps throw an eSATA connector on the back, or more USB ports--you can never have too many USB ports!
Paapaa125 - Wednesday, May 9, 2012 - link
PS/2 has one single thing that makes it superior to USB: you can turn your computer on by clicking space bar on a PS/2 keyboard or clicking mouse button on a PS/2 mouse. USB does not have this feature which is a big problem if your computer case is not easily reachable.Agree about VGA ports. Nobody uses them anymore. Nobody.
AeroRob - Wednesday, May 9, 2012 - link
As I understand it, gamers feel there's an issue with USB's polling rate, and prefer PS/2 for that reason.As for turning on your computer, I never heard about that. I rarely shut my computer completely off, and my wireless USB keyboard can wake it up from sleep just fine. Hell, my computer's so sensitive to any change, just flipping my monitor back on wakes it up (probably due to the built-in USB hub).
mcquade181 - Thursday, May 10, 2012 - link
I know whole organizations that still use VGA, and there are tons of KVM switch boxes in development and testing centres everywhere that only support VGA. Yes I know you can get HDMI and DVI KVM's but most places won't have them yet.I still use VGA occasionally and would be annoyed if it wasn't there.
Paapaa125 - Friday, May 11, 2012 - link
And how many of those organizations are switching to Z77 boards and still keeping their VGA?Ramon Zarat - Tuesday, May 8, 2012 - link
The latest AXTU version does not include XFastRAM anymore. XFastRAM is a stand alone utility now. Also, XFastRAM is much more than a 32bit 4GB RAM limitation extender. It's in fact a RAM disk on steroid, valid for both 32 and 64bit system. It can do the following:1- "Recycle" unused memory beyond 4GB on a 32bit OS into a RAM disk. A RAM disk of up to 32GB can be created on a 32bit OS.
2- RAM disk of up to 8GB on a 64bit OS. Asrock is working on extending that limit on 64bit OS.
3- Can choose any available driver letter to assign to your RAM disk
4- Use part of the RAM disk as a Readyboost drive to accelerate your magnetic boot drive!
5- Easy transfer of either or both the "user" and "system" temp file to RAM disk. No fooling around with Windows configuration.
6- Easy transfer of IE and Firefox cache to RAM disk. XFastRAM take care of everything straight from its interface.
7- Easy transfer of the page file to RAM disk. Again, directly from XFastRAM interface.
8- Possibility to save the RAM disk to hard drive before shutting the PC down.
It's fast (10 000MB/s with CrystalDiskMark on a 2500K @ 4.7 and 8GB of 1866 RAM) , it's free, it's amazingly flexible and can both accelerate your PC and prevent premature wear on your SSD by redirecting a lots of small writes to the temp folders and web cache! You can apparently gain 5X performance in some Photoshop operations when you configure it so use the RAM disk as the temp folder!