MidiLand S4 7100 Plus 5.1 Speakers
by Jim Warren on January 31, 2001 12:43 AM EST- Posted in
- Smartphones
- Mobile
Setup II: The Decoder
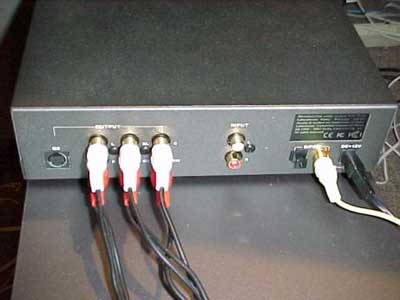
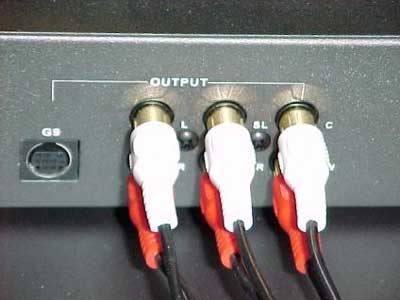
Once the speakers are all wired, the decoder box must be connected to both the subwoofer and the source, most often the computer. The connection to the subwoofer consists of three stereo RCA cables; MidiLand includes three cables with gold plated connectors to maintain the audio quality. Though the manual indicates these are 10’ long, they are more like 4’ long, which limits where the interface box could be placed. To locate it on the tabletop would be a stretch for some of the cabling; at the least it would make installation challenging as there would be no slack to move the subwoofer enclosure or decoder box around with. Ultimately, the easiest location to install the decoder is directly on top of the subwoofer enclosure.
There are three options for connecting the decoder box to the audio source, or computer: one stereo analog connection and either an optical or coaxial digital connection. In the event that the analog connection is used, the system can at most only decode Dolby Pro Logic. A digital connection is required to achieve full Dolby Digital decoding. Included with the system is a stereo minijack to dual RCA adapter intended for the analog connection, though it can also be used to create a connection not described in the users manual.
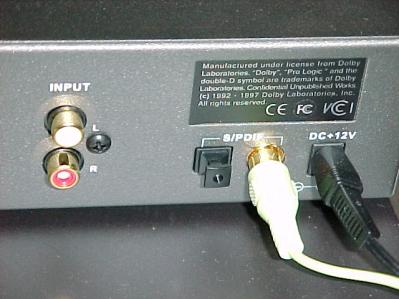
The description of the coaxial connection in the users manual solely relies on the 4’ coaxial cable (mono RCA) included with the package. Many soundcards offer a coaxial digital output, though it is rarely in the form of an RCA connection; this is more often seen in stand-alone audio equipment and DVD players. Some hardware DVD decoders offer the RCA connection, as well as some digital expansion cards, though many users will find themselves turning to their user manuals to try and concoct the proper connection.
Oftentimes, the cable MidiLand includes for the analog connection can be used to access the digital output of a soundcard. It is important to confirm this with the individual user manual, though the appropriate connection corresponds to the left channel (the one that is not colored red) of a stereo RCA to minijack adaptor. This is the connection that accesses the very tip of the minijack against the shield of it, for those wiring their own. The connection can also be achieved using a mono RCA to minijack connection. This interface will work for the SoundBlaster line of cards and the Turtle Beach Santa Cruz, and should work for other soundcards offering a coaxial output via minijack. By using this simple solution, no extra parts are needed. MidiLand could have added a description of this connection to the users manual, though it is often diagrammed in the manuals for individual sound cards.
The last connection option is via an optical (TOSLINK) digital connection. This can allow for interfacing to many consumer level audio products, including a Play Station 2 console. This connection allows the 7100 Plus to extend beyond the computer desktop to other small format listening environments. The two digital connections are not independent; the optical input will override the coaxial input should both be connected.
The final connections to make are the AC power feeds for the decoder and subwoofer. The two units are powered separately, requiring multiple outlets on a power strip. The subwoofer/amplifier unit is powered via a massive inline power brick. This design is better than a wall wart design with the power adapter directly attached to the AC plug, though the weight of this would probably pull it off of any wall. The decoder module does use a wall wart power adaptor; it easily eats up an extra outlet on a conventional power strip bringing the total to at least three. Separate power adaptors also means separate power switches. The sub’s power switch is hidden in the MidiLand S4 logo (it turns green when on), while the decoder box actually has the power switch as its only control accessible without the remote. This is the result of the decoder box really being a separate product that is just now being bundled with 7100’s as the 7100 Plus.
Once all of the connections are made, power can be supplied. One important note stems from the fact that there are two power sources for the system. The components should be energized in the following order: decoder first and amplifier/subwoofer second. This will avoid a popping noise in the speakers when turning on the decoder that could possibly damage them. At this point, the face of the decoder box lights up and reveals its various configuration options. The wireless remote control is the only way to control these options, though it is ready to go out of the box with batteries (2 AAs) preinstalled. Upon understanding of all of the features, it is possible to sit back and listen.


0 Comments
View All Comments