EasyShare DX7590: Kodak's Second Ultra-Zoom Digicam
by Stephen Caston on February 11, 2005 12:03 AM EST- Posted in
- Digital Camera
Recording Features
In all recording modes, the Kodak DX7590 records images as JPEG files with quality settings: Standard or Fine. The resolution options are below:| Setting | Resolution (pixels) |
| 5.0 MP | 2576x1932 |
| 4.4 MP (3:2) | 2576x1716 |
| 4.0 MP | 2304x1728 |
| 3.1 MP | 2048x1536 |
| 1.8 MP | 1552x1164 |
By rotating the Mode Dial, you can select from a very wide array of recording modes. They are Auto, Program, Aperture-priority, Shutter-priority, Manual, Custom, Portrait, Sport, Scene, and Video. In Auto mode, the camera makes all the important exposure settings for you and offers very few adjustable options. For example, there are no options to adjust the ISO, metering, or focus zone settings. However, an exposure compensation can be applied up to +/- 2 stops in 1/3 stop increments by pushing in on the jog dial and rotating it left or right. By releasing the pop-up flash, a flash mode can be selected from the following: Auto, Fill, Red-eye, and Off. The Fill option forces the camera to fire the flash no matter what. A fill flash is often used in situations with backlighting in order to fill in details on your subject. The red-eye option will cause the camera to fire a pre-flash in order to dilate your subject's pupils. This helps to reduce the red-eye effect. As in all the still recording modes, the focus can be selected from Auto, Macro, or Landscape via the focus button (next to the flash button). In macro mode, the DX7590 can focus as close as 3.9". There are also several drive modes available by pressing the drive mode button (next to the focus button): exposure bracketing, First burst, and Last burst. The exposure bracketing option will make the camera take 3 pictures with different exposure values each time the shutter button is pressed. The exposure bracketing interval can be selected via the Menu from +/- 0.3, +/- 0.7, or +/- 1.0. For example, if the exposure compensation is set to "0.0" and the exposure bracketing interval is +/- 0.3, the resulting pictures will be - 0.3, 0.0, + 0.3 EV. By pressing the drive mode button twice, "First burst" will be selected. In First burst mode, the camera will take up to 5 pictures at 2 fps while the shutter button is held down. In "Last burst" mode, the camera will continue taking images at 2 fps for up to 15 seconds while the shutter button is held down. However, when the shutter button is released, the camera will save only the last 4 images taken to memory.
AF control can be selected via the Menu button from Single AF, Continuous AF, or Accessory Lens AF. With Single AF selected, the camera will only focus when the shutter button is half-pressed. When continuous AF is selected, the camera will focus on its own until the shutter button is half-pressed. At this point, the camera will attempt to lock the focus for the shot. With both Single and Continuous AF, the camera is able to use both TTL (through the lens) and hybrid focusing. However, only TTL focusing is available when an accessory lens is attached.
In Program, Aperture-priority, Shutter-priority, and Manual modes, there are several additional options available to the user. For example, in Program mode, the camera sets the appropriate exposure. However, the ISO setting can be selected from Auto, 80, 100, 200, or 400. When the resolution is set to 1.8 MP, ISO 800 will appear as an option as well. In Aperture and Shutter-priority modes, Auto ISO is not an option. When Aperture-priority is selected, the user sets the aperture value by pressing in on the jog dial and rotating it until the desired value appears. This same process is used to set the values in Shutter-priority and Manual modes.
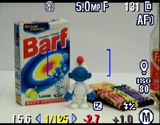 Under-exposed |
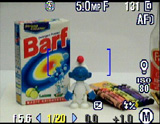 Good exposure |
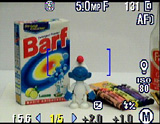 Over-exposed |
When setting the aperture and shutter speed in Manual mode, the current exposure condition will be indicated by a number under the exposure compensation icon. In the examples above, the camera indicates an underexposure by - 2.7 and an overexposure of + 2.0. As you can see, any number higher or lower than +/- 2.0 and the number will turn red to call attention to the photographer.
When the flash is enabled, a flash compensation can be applied up to +/- 1.0 in 0.5 EV increments. To do this, simply select the flash compensation field and push in on the jog dial. Then, rotate it to the left or right. Below are three tables outlining the options available via the Menu button. In Program, Aperture-priority, Shutter-priority, and Manual modes, all of the options below will be displayed. In all of the other still recording modes, the following items are unavailable: White Balance, Exposure Metering, Focus zone, Sharpness, and Reset.
| Record Menu (1/3) | |
| Self-timer | On, off |
| Picture Size | 5.0, 4.4 (3:2), 4.0, 3.1, 1.8 MP |
| Compression | Standard, Fine |
| White Balance | Auto, Daylight, Tungsten, Fluorescent, Open Shade |
| Exposure Bracketing Interval | +/- 0.3, 0.7, 1.0 |
We are a little disappointed to see that manual white balance is unavailable as an option. We would expect that a camera with manual exposure controls would also have a manual WB setting.
| Record Menu (2/3) | |
| Exposure Metering | Multi-pattern, Center-weight, Center-spot |
| Focus Zone | Multi-Zone, Center-Zone, Selectable-Zone |
| AF Control | Continuous AF, Single AF, Accessory Lens AF |
| Color Mode | High, Color, Natural Color, Low Color, Black & White, Sepia |
| Sharpness | High, Normal, Low |
If Multi-pattern metering is selected, the camera will measure light from the entire frame to determine the appropriate exposure. Center-weight metering uses light primarily from the center of the frame to calculate the exposure, while center-spot metering uses a very small portion of the center of the frame.
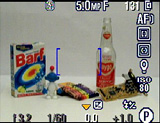
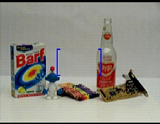
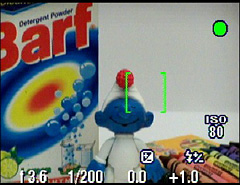 Multi-Zone AF |
 Center-Zone AF |
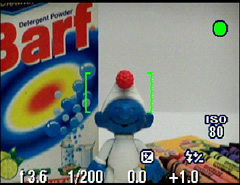
In all still-recording modes, when the shutter button is half-pressed, a set of brackets will appear on-screen to indicate the point of focus. In Auto mode, the camera always uses Multi-Zone AF. However, in the advanced exposure modes, Center-Zone AF or Selectable-Zone can be selected. With Selectable-zone, you can use the joystick to select one of three horizontal focus points.
| Record Menu (3/3) | |
| Reset | Continue, Cancel |
| Set Album (Still) | Clear All, Exit, Select |
| Image Storage | Auto, Internal Memory |
| Setup Menu | Enter |
The Reset option will reset the camera to its factory default settings. The Set Album option allows you to specify a name for the pictures that you are about to take. This can help keep them organized when you look through them later. The Image Storage option allows you to switch between using a flash card and the internal memory. The Auto option simply means that the camera will switch automatically to saving pictures/video clips to the internal memory if there is no card present.
 Auto |
 Advanced modes |
 No Info |
The LCD/EVF display can be toggled between two displays: one with shooting information and one that just displays the live image. While in Auto mode, the following information is visible while shooting: flash mode, resolution, quality, number of pictures remaining, storage, AF mode, exposure compensation, Auto mode icon, and aperture/shutter speed (on half-press). In the advanced recording modes, the following additional information can be seen: aperture and shutter speed (without half-press), flash compensation, ISO, Focus Zone, and Exposure Metering. We are a bit disappointed to see that a live histogram is missing from the feature set on this camera.
Custom recording mode offers an interesting mixture of control. Once Custom mode is selected via the Mode Dial, you can press the Menu button to select from Program, Aperture-priority, Shutter-priority, or Manual. Any changes that you make to settings will be remembered so that the next time you switch to Custom mode, all your last settings will be ready. This option comes in handy if you are frequently shooting with certain settings because you can just switch to Custom mode instead of readjusting all the individual settings. In Portrait mode, the camera will use a large aperture in order to keep the subject in focus and the background blurry. In Sport mode, the camera ensures a fast shutter speed to capture fast-paced subjects.
Scene mode on the DX7590 offers 14 different "scenes" from which to choose. Below is a table with information taken from the User's Guide explaining the settings used by each scene mode:
| Scene modes | |
| Close-up | Macro, Center-Weight Metering, Center-Zone Focus, ISO 100 |
| Landscape | Infinity Focus, Multi-Pattern Exposure Metering, Daylight White Balance, ISO 100 |
| Night Portrait | Multi-Pattern Exposure Metering, Multi-Zone Focus, ISO 140 |
| Night Landscape | Infinity Focus, Daylight White Balance, Center-Weight Metering, Daylight White balance, ISO 100 |
| Snow | +1 Exposure Compensation, Center-Weight Metering, Multi-Zone Focus, ISO 100 |
| Beach | +1 Exposure Compensation, Center-Weight Metering, Daylight White balance, ISO 100 |
| Text | Macro Focus, +1 Exposure Compensation, Center-Weight Metering, ISO 140 |
| Fireworks | 2-second exposure, Infinity Focus, Center-Weight Metering, Daylight White Balance, ISO 100 |
| Flower | Macro Focus, Daylight White balance, Center-Zone Focus, Center-Weight Metering, ISO 140 |
| Manner/Museum | No sounds, no flash, Multi-Pattern Exposure Metering, Multi-Zone Focus, ISO 100 |
| Self-Portrait | Macro Focus, Multi-Pattern Exposure Metering, Multi-Zone Focus, Red-Eye Flash, ISO 100 |
| Party | Multi-Pattern Exposure Metering, Multi-Zone Focus, Red-Eye Flash, ISO 140 |
| Children | Multi-Pattern Exposure Metering, Multi-Zone Focus, ISO 140 |
| Backlight | Multi-Pattern Exposure Metering, Multi-Zone Focus, Fill-Flash, ISO 100 |
It is important to note that in all modes, except Shutter-priority, Manual, and scene modes (Night Portrait, Night Landscape, and Fireworks), the camera is limited to 1/8th sec. as the slowest shutter speed. However, if exposure compensation is applied, the shutter speed can be as slow as 0.5 sec. In Night Landscape and Night Portrait modes, the shutter speed is limited to 0.5 sec. and in Fireworks mode, the shutter speed is fixed at 2 seconds. It is only in Shutter priority and Manual modes that the camera will allow a shutter speed as slow as 16 seconds.
Favorites mode lets you view pictures that you have tagged as "favorites". To do this, you simply press the "Share" button. Then tag the pictures that you like as "favorites". When transferring your pictures to your computer using the bundled EasyShare software, the camera will copy a smaller version of each favorite into the cameras internal memory. After this, you will only see your favorites when you switch to the Favorites mode.
The Final recording mode on the DX7590 is Movie mode. The camera can record video with audio at either 640x480 (12 fps) or 320x240 (20 fps). The video clips are recorded as MOV files and are only limited by the available remaining space. There are a couple of options available via the Menu button that are worth mentioning. For example, Continuous AF can be enabled or disabled. If it is disabled, the camera will lock its focus when the movie clip begins. Also, the Video Length can be selected from Continuous, 5, 15, or 30 seconds.
In all recording modes, the Setup Menu offers several options to adjust camera functionality. Below, we have broken these options down into three tables:
| Setup Menu (1/3) | |
| Return | Enter |
| Quickview | On, Off |
| Advanced Digital Zoom | Continuous, Pause, None |
| Print Warning | Pause, None |
| Sound Themes | Shutter Only, Default, Classical, Jazz, Sci-fi |
The Quickview option determines whether or not images and video clips will be displayed automatically after they are taken. If On is selected, an image/video clip will be displayed for 5 seconds after it is taken. During this time, you can press the Delete button to erase the image/clip without saving it to memory. The option Advanced Digital Zoom allows you to control the behavior of the digital zoom. If Continuous is selected, you can continue to hold the zoom controller in the telephoto position and the camera will switch over to the digital zoom when the optical zoom has reached its limit. If Pause is selected, you must let go of the zoom controller and then press it again to engage the digital zoom. The Print Warning is an interesting feature of the DX7590. If the Pause option is selected, the digital zoom will pause at the final point where an acceptable 4"x6" print could be made from the shot. To zoom in past this point, you must release the zoom controller and press it again. At this point, the zoom indictor will change from blue to red (indicating that image quality may not be acceptable for a 4"x6" print). The Sound Themes are simply preset sounds that play when the camera is turned on, the shutter button is pressed, etc.
| Setup Menu (2/3) | |
| Sound Volume | Off, Low, Medium, High |
| Mode Description | On, Off |
| Date & Time | Set |
| Video Out | NTSC, PAL |
| Orientation Sensor | On, Off |
The Mode Description option simply displays a short description of each mode when you switch to it. For example, when switching to Aperture-priority mode, it will say "Use for Aperture Priority settings". The Orientation Sensor options let you enable or disable the automatic rotation of portrait-style images.
| Setup Menu (3/3) | |
| Date Stamp | Off, Select |
| Video Date Display | None, Select |
| Language | Select |
| Format | Memory Card, Cancel, Internal Memory |
| About | "Kodak DX7590" "Firmware Version X.XXXX" |
For this review, we used Firmware Version 1.0100. The camera was shipped with Version 1.0000.


10 Comments
View All Comments
Locut0s - Saturday, February 12, 2005 - link
I could be wrong but isn't Kodak well known for making relatively low quality consumer and prosumer digital cameras while making really good top of the line digital cameras? By top of the line I mean REALLY top of the line.bpt8056 - Saturday, February 12, 2005 - link
I have been looking at both the Panasonic FZ20 and the Kodak DX7590. I just spoke with the VP of Digital and Film Imaging from Kodak the other day and she basically said that the DX7590 is considered a "prosumer" type of camera, but with simplicity in mind. There's the keyword: simplicity. I like to take good quality pictures and I know the FZ20 is the one to get. However, my wife does all the organizing and printing since she's a consultant from Creative Memories. She wants the process of organizing, printing, ordering, etc. as easy as possible which the Kodak cameras can help her with. Even after repeatedly showing her the procedure with our current camera, she still needs my help and I tend to be busy doing something else.Here's my take on the DX7590 and the FZ20:
FZ20:
Pros
+ High resolution, sharp details
+ Image stabilization
+ Hotshoe
+ TIFF Mode
+ High Zoom (12x)
+ Colors are good, but shows a hint of yellow
+ Chromatic aberration almost nonexistant
Cons
- Poor low-light/indoor shots (external flash can fix this)
- Noise level is nasty above ISO 100 (hence indoor pics won't look too sharp)
- Not quite as compact as DX7590
- Simplicity??
DX7590:
Pros
+ Kodak Color science
+ White balance (the best I've seen)
+ High Zoom (10x)
+ Noise level is pretty good
+ Can be configured as point-and-shoot
+ EasyShare (simplicity)
+ External flash can be used (need to have bracket)
Cons
- Aggressive compression
- Soft details (grass looks muddy)
- Chromatic aberration is apparent
- No image stalization
- No TIFF or RAW mode
The FZ20 will give better results with pictures, but the DX7590 provides a better ease of use.
defter - Saturday, February 12, 2005 - link
Don't forget Panasonic FZ3: small size and 12x zoom with image stabilizer at ~$320.BPB - Friday, February 11, 2005 - link
The Panasonic reviews are impressive. Interesting that it too has slow frame rates for video with sound.One big plus, to my way of thinking, is the Kodak printer dock. We have one and love it, even though the price per print isn't that cheap. Still, it's a lot easier than heading out to a store or emailing to an eshop.
Wesley Fink - Friday, February 11, 2005 - link
#5 - If you are running the native and highest 1600x1200 resulution on your Dell, you are still compressing your image from 2576x1716 to 1600x1200 when you view it. Your Dell screen is less than 2 megapixels, so filling the screen is not any great indication of the quality of a 5 megapixel image. You would likely be better judging quality by viewing actual pixels on screen and scrolling around the image.ironman67 - Friday, February 11, 2005 - link
I've had a Lumix DMC-FZ20 for over a month--Fantastic!!! Pictures taken at medium quality at sharp and detailed even when I enlarge them to fill my 20 in. Dell LCD.BPB - Friday, February 11, 2005 - link
As a DX6490 owner, I think I'd be very happy with this camera. We may sell the 6490 and upgrade. Not being a bigtime photographer, the problems they mention here wouldn't matter much. The few annoyances the 6490 has for us seemed to have been bettered in this model. So, as an average camera schmuck, I think this would be a good camera.But I am going to look into the Lumix mentioned above.
plk21 - Friday, February 11, 2005 - link
I bought my mom the DX6490 (the 4MP version) for Christmas 2003, and it's a GREAT digicam. I'm thinking of getting this one for myself.The Doc is a nice feature for technophobes like my mother, with simple instructions like "Put the camera on the doc, and press the big button". That's one reason I reccomend Kodak cameras to less tech savy people. combined with Picasa2, they're absolutely perfect for those types of people. I get a lot less "support calls" for the Kodaks than other digicams.
Souka - Friday, February 11, 2005 - link
Agree....Also...yet another Kodak review on AT...ugh.... :(
fass mut - Friday, February 11, 2005 - link
for $500 clams..i'd go for the Lumix DMC-FZ20, 12X image stabilized!