Optio X: A Look at Pentax's Ultra Thin 5MP Digicam
by Stephen Caston on February 6, 2005 5:01 PM EST- Posted in
- Digital Camera
Recording Features
In all recording modes, the Optio X records images as JPEG files with quality settings Good (*), Better (**), or Best (***). The resolution options are below:| Resolution (pixels) |
| 2560x1920 |
| 2304x1728 |
| 2048x1536 |
| 1600x1200 |
| 1024x768 |
| 640x480 |
 Default |
 Live Histogram |
 Histogram w/Details |
 No Info. |
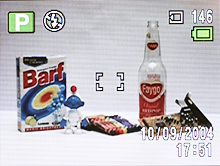
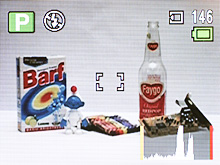
In any record mode, pressing the Display/OK button will cause the camera to cycle through 4 possible displays. The default display includes basic information such as record mode, flash mode, recording medium, number of images recorded, battery status, date/time, exposure compensation, shutter speed, aperture, and focus brackets. If the Display button is pressed, the date and time are removed to make room for a live histogram. In addition to the valuable information that the live histogram provides, the screen will blink in areas of the frame that are overexposed and underexposed. Another press of the Display button causes the following information to be added above the histogram: resolution, quality, white balance, metering mode, and ISO. Another press of the Display button will clear everything except the focus point, shutter speed, and aperture. A final press of the Display button will turn the LCD off.
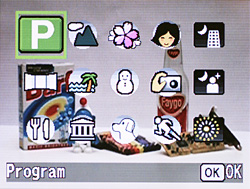
Mode selection screen
The Optio X offers a Program mode and 14 additional preset modes from which to choose for still image recording. To select a recording mode, you must first press up/down on the multi-controller to bring up the mode selection screen. The available modes are displayed in three rows with 5 options on each row. In all recording modes, an exposure compensation can be set to +/- 2 stops in 1/3 stop increments by pressing left/right on the multi-controller. In all still recording modes, the following screen is displayed when the Fn button is pressed:
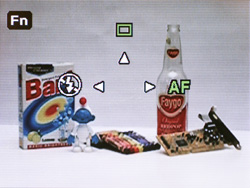
The options to adjust flash, drive, and focus modes are available. For flash mode, the options are Auto, Off, On, Auto w/Red-eye, and On w/Red-eye. The "On" options simply force the camera to use the flash even when there is adequate light for the exposure. This option is frequently used to fill in shadows when shooting outdoors. The Red-eye option causes the camera to fire a pre-flash to dilate the pupils of your subject(s). This helps to prevent red-eye from occurring. The drive mode can be selected from Standard, Self-timer (10 or 2 sec.), Continuous Shooting, Multiple Shooting, Auto Bracket, and Interval Shot. With Continuous Shooting, the camera will continue to take pictures as long as the shutter button is held down. The frame rate will depend on the quality and resolution setting. With Multiple Shooting, the camera takes 4 pictures in a row and saves the images into one JPEG file at 2048x1536. When Auto Bracket is selected, pressing OK will display the current Bracket setting. However, by pressing the OK button again, you can select the specific type of bracketing that you wish to perform. The following menu will be displayed:
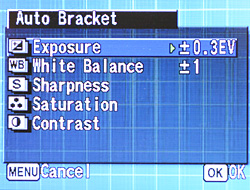
The options are Exposure (+/- 2 stops in 1/3 stop increments), White Balance (+/- 1-5), Sharpness, Contrast, or Saturation. With any option selected, the camera will record three images while varying the indicated setting. Below are the orders in which the settings are varied:
| Exposure | Normal, Underexposed, Overexposed |
| White Balance | Normal, Reddish, Bluish |
| Sharpness | Current, Soft, Hard |
| Contrast | Current, Low, High |
| Saturation | Current, Low, High |
The final drive mode is Interval Shot. You can specify an interval from 10 sec. to 4 minutes in one-second increments. You can also set the interval from 4 min. to 99 min. in one-minute increments. The number of frames can be set from 2 to 99. Finally, the start time can be set from 0 sec. to 23 hours, 59 minutes in one-minute increments. To begin shooting or to start the countdown, simply press the shutter button. The focus mode can be selected by pressing right on the multi-controller when the Fn screen is displayed. The options are Standard, Macro, Super Macro, Infinity, Manual Focus, and AF Area move. In Macro mode, the camera can focus on objects as close as 7.1", but in Super Macro mode, it can focus as close as 2.4". With Infinity selected, the camera will fix its focus to infinity for landscape shots. When Manual Focus is selected, a box appears in the center of the frame. To adjust the focus, you press up and down on the multi-controller until the image appears sharp. While focusing, the portion of the image inside the box will appear full screen (2x magnification) to aid in focusing. With AF Area move, you can use the multi-controller to select one of the 9 focus points that are arranged as a 3x3 grid across the frame.
In all still recording modes, the following screen is displayed when the multi-controller is pushed in:
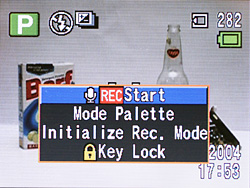
The first option allows you to record a voice memo. This option offers the same functionality as if the camera were in Voice Memo mode. The memos are recorded as WAV files (64 Kbps, 8 KHz) with the next incremental number as the filename. The Mode Palette option is simply another way of getting to the mode selection screen. The option "Initialize Rec.Mode" will reset all the options in the Record menu to their defaults. However, the options under the Setup and Play menus will remain as they are. "Key Lock" is like the Hold button on many consumer electronics. When the keys are locked, the only keys that will respond are the center multi-controller button, shutter button, and zoom controller.
The first mode is Program, which is recommended for general purpose shooting. In Program mode, the user has access to a large array of options. By pressing the Menu button, there are 3 pages of menus available to the user. Many of these options are also available in other shooting modes, but the range of options varies with each mode. Below, we have outlined the menu options in Program mode:
| Program Mode Menu 1/3 | |
| Recorded Pixels | 2560x1920, 2304x1728, 2048x1536, 1600x1200, 1024x768, 640x480 |
| Quality Level | Good, Better, Best |
| White Balance | Auto, Daylight, Shade, Tungsten, Fluorescent, Manual |
| AF Setting | Focusing Area (Multiple, Spot) Focus Limiter (On, Off) |
| AE Metering | Multi-segment, Center-weighted, Spot |
| Sensitivity | Auto, 80, 160, 320 |
 Multiple Focus (locked) |
 Spot Focus (locked) |
The Focusing Area can be selected from either Multiple or Spot. When Multiple is selected, the camera will select a point of focus automatically from one of nine available points. The 9 focus points are arranged as a 3x3 grid. The camera indicates a successful focus by displaying green brackets at the point of focus. If Spot focus is selected, the camera will always focus on the center focus point. When Focus Limiter is enabled, the lens will focus far for landscape shots and near for macro shots. By doing this, the camera is able to focus faster on the subjects. The Optio X offers three different metering options: Multi-segment, Center-weighted, and Spot. With Multi-segment selected, the camera will use light information from the entire frame to calculate the appropriate exposure. If Center-weighted is selected, the camera will measure the light mainly from the center of the frame. When Spot metering is selected, the camera will measure light from a small point at the very center of the frame.
| Program Mode Menu 2/3 | |
| Auto Bracket | Exposure (+/- 2 stops in 1/3 stop increments) White Balance (+/- 1-5) Sharpness Saturation Contrast |
| Interval Shoot | Interval (10 sec. - 99 min.) Number of Shot (2 - 99) Start Time (After 0 min. - 23 hours 59 min.) |
| Movie | Color Mode (Full Color, B&W, Sepia) Time-lapse Movie (Off, x2, x5, x10, x20, x50, x100) |
| Digital Zoom | On, Off |
| Instant Review | 0.5, 1, 2, 3, 4, 5 sec., Off |
| Memory | Flash, Drive, Focus, Zoom Position, MF Position, White Balance, AE Metering, Sensitivity, EV Compensation, Digital Zoom, Display, File # |
The color of movie clips can be selected from Full color, B&W, or Sepia. The Time-lapse Movie option allows you to select the desired delayed frame rate. For example, by selecting "x2", the camera will record only half the frames that it would at normal speed. The result is a video clip that appears to run at twice the normal speed. The Instant Review option allows you to specify how long the camera should display a picture immediately after it is taken. With the Memory options, you can specify which settings the camera should remember when it is powered off and back on again. By default, only the Flash setting and File # will be remembered.
| Program Mode Menu 3/3 | |
| Sharpness | Soft, Normal, Hard |
| Saturation | Low, Normal, High |
| Contrast | Low, Normal, High |
The other 14 still image modes are designed for use with specific environments or subjects. The camera will use specific settings to produce the best results based on the situation. The additional modes are Landscape, Flower, Portrait, Night Scene, Panorama Assist, Surf, Snow, Self-portrait, Night Scene Portrait, Food, Museum, Pet, Sport, and Fireworks. Each mode has a different amount of variable settings via the Menu button.
To switch to Movie mode, you must press the movie mode button on top of the camera. The Optio X records video clips as MOV files at 15 fps with a resolution of 320x240. The duration is only limited by the space remaining on the flash card/internal memory. The color of the movie clips can be selected from Full Color, B&W, or Sepia via the Menu button. While recording, the optical zoom cannot be used, but the digital zoom is available. The Optio X will allow you to take still pictures while you are recording a video clip. There are two ways to do this. You can either press the Still Image record button (top of camera) to switch back to your still image mode. The movie will continue recording and a time indicator will appear on the LCD monitor. The other option is to press in on the multi-controller and a menu will appear with two options: Take Still Image and Key Lock. By selecting "Take Still Image", the camera will record a JPEG file while continuing to record the movie clip. By pressing the Fn button, you can set a 2- or 10-second self-timer. By pressing left/right on the multi-controller, an exposure compensation can be set up to +/- 2 stops in 1/3 stop increments.
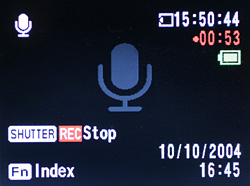
Voice Memo mode can be activated by pressing the Voice Memo button on the top of the camera. To begin recording a memo, simply press the shutter button. Memos are recorded as WAV files and are only limited by the remaining space on the flash card/internal memory. The LCD displays the current date, time, remaining recording time, and current recording time. The display can be disabled by pressing the Display button to save battery power. While recording a voice memo, you can switch over to a still recording mode to take a picture.
A setup menu is available via the Menu button in all recording modes. Below, we have outlined these options in two tables.
| Setup Menu 1/2 | |
| Format | Format, Cancel |
| Sound | Volume (5 increments) Start-up Sound (1-3, Off, User) Shutter Sound (1-3, Off, User) Operation Sound (1-3, Off, User) Self-timer Sound (On, Off, User) |
| Date Adjust | Date Style, Date, Time |
| World Time | Select |
| Language | Select |
| Folder Name | Standard, Date |
The Sound options let you choose a preset sound or select your own sound to be used for different camera operations. If you are selecting your own sound, you simply select which audio clip you want to use and the camera saves the first 2 seconds to its internal memory. The World Time option allows you to specify where you are in relation to your "Hometown". This helps you keep the right time if you are frequently taking pictures in different time zones. The folder naming system can be selected from either Standard or Date. An example of a Standard folder name is "101_PENTX" whereas a Date folder would appear as "101_0126".
| Setup Menu 2/2 | |
| Screen Setting | Change Start-up Screen (Select) Background color (1-6) Brightness Level (6 increments) |
| Video Out | NTSC, PAL |
| USB Connection | PC, PictBridge, PC Camera |
| Sleep Timeout | 2, 1 min., 30 sec., Off |
| Auto Power Off | 5, 3 min, Off |
| Reset | Reset, Cancel |
For the start-up screen, you can disable the default screen or specify a custom image. The USB Connection option allows you change the USB connection to either transfer files from the camera to a computer, connect the camera to a PictBridge compatible printer, or use the camera as a PC camera (webcam). The Sleep Timeout function determines when the camera should turn off the LCD after a period of inactivity in order to save battery power. The Auto Power Off option will power down the camera after a period of inactivity. Finally, the Reset option will reset the camera to its factory default settings.
The Optio X has a menu feature called "My Menu", which is located just after the Setup menu. If you press in on the multi-controller while highlighting any menu option, you are given the choice to add the item to "My Menu". If there is at least one item in the "My Menu" section, pressing the menu button will display "My Menu" automatically instead of a standard menu. By customizing items in the "My Menu" section, you can access frequently used items much faster than wading through the standard menus. You can even prioritize the items to the way you want them


8 Comments
View All Comments
vshah - Thursday, February 10, 2005 - link
my dad has the s410, i have the optio x. i have to admit, the canon is faster and has better image quality. usually what i end up doing is setting the res to 4mp, which is still plenty for printing. this speeds up the camera a bit...why use 4mp on a 5mp camera you ask? i just love the design, and this thing is so easy to carry around with you. i end up taking a lot more photos than i would with another camera. my primary purpose for taking photos (with this camera) is to record memories, and it excels at that.
semo - Monday, February 7, 2005 - link
thanks Souka, that camera looks sweethere in the uk it is about £200 btw.
Souka - Monday, February 7, 2005 - link
#4 Look at the Canon S410. Great image quality, small size, li-ion recharageable batt, CF cards, durable, and good software to boot.I see pricing at about $240 on-line from a variety of vendors....
Quiksel - Monday, February 7, 2005 - link
nice pix of NCSU.... :-Di miss my state days... :'(
~niko ^_^
semo - Monday, February 7, 2005 - link
from last paragraph on page:"However, considering all the downfalls and a price tag of $300+, it might be a better idea to consider other cameras."
what other cameras? i'm absolutely clueless when it comes to cameras. all i know is that i don't want a thin (compact) camera because that means high price and lower quality. i don't care too much about video and a rechargeable battery is a big plus for me. any ideas?
kcma - Monday, February 7, 2005 - link
maybe there'll be a cheaper 3/4 MP version that's almost as good in image quality =PSouka - Sunday, February 6, 2005 - link
Why buy a high MP camera if image quality is poor?TinyTeeth - Sunday, February 6, 2005 - link
310 bucks is cheap for a 5 MP camera. Promising, though it seems to lack some image quality.