Olympus Stylus Verve: Fashion vs Performance
by Stephen Caston on November 4, 2004 12:05 AM EST- Posted in
- Digital Camera
Recording Features
In all recording modes, the Stylus Verve records images as JPG files in one of 7 resolutions. As the lowest resolution option, SQ2 offers 4 sub-settings. The resolution options are listed below:| Setting | Resolution (pixels) |
| SHQ | 2272x1704 |
| HQ | 2048x1536 |
| SQ1 | 1280x960 |
| SQ2 | 1600x1200 |
| 1280x960 | |
| 1024x768 | |
| 640x480 |
The camera is powered on by first setting the Mode Dial to "Record" and then pressing the main power button. To access the camera's shooting modes, you simply press the up arrow button (the Scene button). A list of the 14 available modes is presented. Below, we have assembled a table to describe each mode briefly.
| Mode | Purpose |
| Program Auto | Auto |
| Portrait | Portraits with accurate skin tones |
| Landscape | Large depth-of-field |
| Landscape + Portrait | Large depth-of-field |
| Night Scene | Uses a slow shutter speed |
| Cuisine | Saturation, sharpness, and contrast are boosted for food pictures |
| Beach & Snow | Helps expose pictures properly in reflective situations |
| Self Portrait + Self-timer | Uses self-timer; focus is set automatically after timer delay |
| Behind Glass | Disables flash |
| Self Portrait | Zoom is fixed at wide angle and multi-metering is used; uses iESP focusing |
| Indoor | Image resolution is limited to 1280x960 and lower; ISO is boosted |
| Candle | Flash disabled and image resolution is limited to 1280x960 and lower; ISO is boosted; drive mode is set to "single" |
| Sunset | Flash disabled; saturates colors for rich sunset images; drive mode is set to "single" |
| Fireworks | Flash disabled; focus set to infinity; utilizes a slow shutter speed; drive mode is set to "single" |
Although some of these modes seem a bit superfluous such as "Behind Glass" and "Cuisine" modes, they seem to be more and more common on many current digicams. We found the technique behind the "Indoor" and "Candle" modes to be interesting. When enabled, the camera boosts the ISO level automatically to make it possible to shoot low light pictures. The resolution is limited to a maximum of 1280x960, to reduce the noise in the output image.
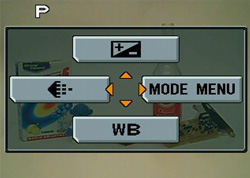
In Program Auto mode, the largest number of options is available. Pressing the right arrow/Flash button causes the camera to cycle through the following available flash modes: Auto, Red-eye reduction, Fill-in, and Off. The left arrow/Macro button cycles through the available macro modes: Macro, Super Macro, and Off. In regular Macro mode, the lens can focus as close as 7.8 inches in both wide and telephoto positions. All four flash modes are available in regular Macro mode. When set to Super Macro mode, the camera fixes the zoom to telephoto and the flash is disabled. Then, the camera can focus as close as 3.1 inches from the subject. The final arrow pad operation is self-timer. The self-timer can be toggled on or off by pressing the down arrow/Self-timer button. The delay is approximately 12 seconds.
Record menu
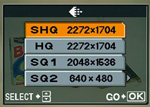 Image quality |
 White Balance |
 Exposure Compensation |
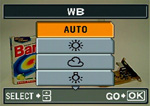
To access all the camera's major functions, you must enter the main menu by pressing the OK/Menu button. You are presented immediately with 4 choices, each of which is selected by pressing one of the arrow buttons. To change the recording quality to one of the options mentioned at the top of this page, you press the left arrow button. The down arrow button brings up a white balance menu. The available options are Auto, Daylight, Overcast, Tungsten, and Fluorescent. From the main menu, the up arrow button displays an exposure compensation screen. The exposure compensation can be adjusted by +/- 2 stops in 1/3 stop increments. Since the live image can be seen behind the dialog, the effect can be seen instantaneously.
However, the majority of the camera's operations can be adjusted by entering the Mode menu via the right arrow button. The camera presents three tabs: Camera, Card, and Setup. The Camera tab offers the following options:
| Camera menu | |
| ESP/Spot | ESP, Spot |
| Drive | Single, Continuous |
| ISO | Auto, 64, 100, 200, 400 |
| Digital Zoom | Off, On |
| AF Mode | iESP, Spot |
| Audio Commentary | Off, On |
| Panorama | Select |
| 2 in 1 | Select |
The E550 offers two light metering modes that are available in most of the scene modes. ESP refers to multi-segment metering where the camera uses several portions of the frame to determine the proper exposure. Spot metering uses a very small portion from the center of the frame to determine the exposure. For general purposes, ESP metering is recommended. However, Spot metering can be very useful in cases where the lighting between the subject and background is very different. Single drive mode allows you to take one picture each time when the shutter button is pressed. With Continuous drive selected, the camera can take up to 7 pictures in SHQ mode at approximately 1.3 fps while the shutter button is held down.
The ISO setting refers to the sensitivity of the camera's sensor to light. If left in Auto mode, the camera will adjust the ISO level automatically for you. In certain scene modes such as "Indoor" and "Candle", the Stylus Verve will boost the ISO level to 500 in order to shoot at reasonable shutter speeds in low light.
The Stylus Verve uses two different methods for auto focusing. The first is called "Spot", which is known as "Center" on some other digicams. With Spot focusing, the camera uses the center brackets as the focus point. In order to focus on a subject that is off center, you must half-press the shutter button with the center over the subject. Then, reframe the image and take the picture. The other focusing option is called "iESP". With "iESP" selected, the camera attempts to detect automatically a focus point over the subject. After half-pressing the shutter button, the camera determines the best focus point and displays it as brackets over the chosen area.
With the Audio Commentary option enabled, the camera will begin recording audio automatically and immediately after a shot is taken. The recording length is approximately 4 seconds. The Panorama option is only available with an Olympus brand xD-Picture card. With Panorama mode, the camera assists in taking pictures that can be combined later with the included software. The "2 in 1" option allows you to take two separate pictures, which are combined in-camera into a single JPEG file. The result is an image with both pictures side-by-side.
The second tab in the Mode menu is the Card tab. The only option available here is "Format", which will format the current flash card. The final tab is called Setup and it includes several options related to camera operation:
| SetUp | |
| All Reset | Off, On |
| Language | English, French, Spanish, Portuguese |
| PW On Setup | Screen (1, 2, 3), Volume (Off, Low, High) |
| Color | Normal, Brown, Blue, Black |
| Volume | Off, Low, High |
| Shutter Sound | Off, 1, 2, 3 (Low, High) |
| REC View | Off, On |
| File Name | Reset, Auto |
| Pixel Mapping | Start |
| LCD Brightness | 15 increments |
| Date/Time | Set |
| Video Out | NTSC, PAL |
The "All Reset" option allows you to choose whether the camera remembers settings after the camera is turned off. By default, this option is set to "On", which means that the camera resets all options to factory default settings. "PW On Setup" gives you the option to select a startup screen. There is a startup sound associated with each of the three options. In addition, the volume can be set to Off, Low, or High. We should mention that it is possible to specify a custom startup screen as well. However, this option is in Playback mode and we will discuss it there. The Color option refers to the coloring of the menus. The Volume option controls the volume of a "beeping" sound during menu navigation. The shutter sound can be turned off or set to one of three options.
With "REC View" set to On, the camera will display a brief review of an image immediately after it is taken. The review lasts approximately 2.5 seconds. However, by pressing the shutter release button halfway, you are able to take another picture without waiting for the review to end. Another way to view previously taken pictures is to press the Quick View button. This mode has all the features of Playback mode without having to switch the Mode Dial to Playback. If "Reset" is chosen from the "File Name" option, file numbering will be reset as opposed to continuing from the last number used. Pixel Mapping appears to be a useful feature. It is designed to fix "hot" or "stuck" pixels, which can appear as brightly colored pixels in the image. In the user's guide, Olympus recommends performing Pixel Mapping once a year.
To switch the camera into Movie mode, simply rotate the Mode Dial one click forward. In movie mode, the Stylus Verve can record video with audio at 15 fps in either 320x240 or 160x120 resolution. The duration of the clip is only limited by the available space on the flash card. Movie mode offers all of the same white balance options of the still recording modes as well as exposure compensation. The only options available via the Mode menu are Metering, ISO, and Digital Zoom. Macro and Self-timer modes are also available. While recording, the optical zoom is disabled. However, the digital zoom can be used.
Typical display
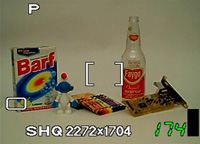
In Record and Movie mode, the Stylus Verve displays the following information on the LCD monitor: recording mode, flash mode, AF brackets, drive mode, resolution setting, and the number of pictures/minutes remaining.
As far as point-and-shoot cameras go, the Stylus Verve offers a very reasonable array of options and recording modes. For the most part, the user interface is very straightforward. The only thing that can be misleading is the behavior of the OK/Menu button. While highlighting a main option such as "AF Mode", you would think that pressing "OK" would open the next set of sub-options, like "iESP" and "Spot. However, to open sub-options, you must press the right arrow button. Pressing the OK/Menu button exits the menu system entirely. Although this can be mildly frustrating at first, we found ourselves adjusting to it in just a short amount of time.


10 Comments
View All Comments
shuttleboi - Thursday, November 4, 2004 - link
When is Anandtech going to review portable storage devices/personal video players?Souka - Thursday, November 4, 2004 - link
grab a Canon S410 for $275 delievered from a variety of online places...jiulemoigt - Thursday, November 4, 2004 - link
you'd think after getting acess to fuji's electronics they'd have really nice optic combined with their really nice lenses... only these look cool but have crappy eletronics and crappy lenses!Foxbat121 - Thursday, November 4, 2004 - link
I bought one for my wife for just $299 (Newegg). It's a nice camera for what it is intended for (point and shoot in a compact design). Overall, it is well worth the money I paid for considering the similar sized cameras are no cheaper either with lower resolution (Canon SD110, 3MP).AtaStrumf - Thursday, November 4, 2004 - link
Looks like a nice little camera. Its a shame its so expensive.stephencaston - Thursday, November 4, 2004 - link
WooDaddy, thanks for the comment. I agree, it is shocking to see such jagged edges in the pictures taken by this camera. As for the details of Olympus's image processing, I'm sorry I can't offer any specifics. Since this is a point and shoot camera, we can only assume that Olympus designed the process this way so that users would not need or want to post-process the images at all. Indeed, if these images are printed at the popular 6x4" format, the problem would be hard to see. And it looks like Olympus knows this.WooDaddy - Thursday, November 4, 2004 - link
Stephen can you comment on this for me?As a previous owner of an olympus camera (back in 1999) it just seems that Olympus doesn't get it when it comes to handle aliasing? Looking at the resolving fine lines page, it looks like their aliasing algorithm or low-pass filter is non-existant. Do you see it too? Suggestions?
WooDaddy - Thursday, November 4, 2004 - link
Good article.I'm glad a review finally came out for this camera... But I'm disappointed that Olympus feels it's worth $399. There are a PLETHORA of other cameras that perform so much better than this one. I agree that the price is too much. Don't be afraid to say that. Hell, I think it's just plain ridiculous. I'm starting to think the limits have been met for the megapixel squeeze; meaning a 4mp sensor in a camera with a tiny/crappy lens just is a waste of money. Especially when the aperture isn't fast nor slow.
Maybe a Foveon sensor in the same package... but nope.
I disagree with #1 though. Viewfinder in compact cameras have always been limiting and inaccurate. I understand the feeling of pressing up a camera against your face just makes you feel good and professional like, but in the digital world where you can take better pictures now, LCD-only is the way to go. Heck I wish I had a big 2.5" screen on mine.
goku21 - Thursday, November 4, 2004 - link
That is one hairy arm =)CasmirRadon - Thursday, November 4, 2004 - link
Very very pretty.You know though, all other negatives aside (did anyone expect it to perform above average?) I got to say that I really don't like the idea of not having a quality viewfinder on these ultracompact cameras. I just plain don't like taking pictures with the LCD screen.