Konica Minolta DiMAGE Z2 & Z3: What is the difference in performance?
by Stephen Caston on September 5, 2004 12:23 PM EST- Posted in
- Digital Camera
Recording Features
* Because the Z2 and Z3 operate so similarly, the features below will refer to both cameras unless otherwise stated.In all recording modes, both cameras record images as JPG files with quality settings: Fine, Standard, or Economy. The resolution options are below:
| Resolution (pixels) |
| 2272x1704 |
| 1600x1200 |
| 1280x960 |
| 640x480 |
Auto Recording Mode (Auto)
Both the Z2 and Z3 offer a wide variety of recording modes from fully automatic to manual exposure. In Auto mode, the camera selects most of the settings automatically to provide the proper exposure. However, the user still has access to some of the camera's options. For example, you can enable the flash (by flipping it up) and choose from Auto, Auto w/red eye, Fill-flash, or Slow (sync). You can enable the macro feature in either Standard or Super Macro mode. In Standard Macro mode, the Z2 can focus on objects as close as 6.7" from the lens in wide angle compared to 3.9" on the Z3. In Super Macro mode, the Z2 can focus on objects as close as 1.7" from the lens compared to 0.4" on the Z3. Pressing the Menu button gives you a few more options:| Drive mode | Single, Self-timer, Continuous, Progressive, Bracketing |
| Image Size | 2272x1704, 1600x1200, 1280x960, 640x480 |
| Quality | Fine, Standard, Economy |
| Auto DSP | On, Off |
| Digital zoom | On, Off |
In Single Drive mode, the camera will take one picture each time the shutter button is pressed. With Self-timer activated on the Z2, the camera will take a picture after counting down from 10 sec. (the Z3 also has a 2 sec. option) after the shutter button is pressed. The Continuous Drive option has two sub-settings: "Continuous advance" and "UHS Continuous advance".
In Continuous advance mode, both the Z2 and Z3 are able to take 5 pictures in a row at the highest resolution and quality setting at 2.5 fps without the flash. With UHS Continuous advance, they can take up to 15 pictures at 10 fps with a resolution of 1280x960 (any quality setting) without the flash.
The Progressive option also has two sub settings: "Progressive capture" and "UHS Progressive capture". With the Z2 set to Progressive capture, the camera will take images at 2.5 fps for as long as the shutter button is held down. However, only the last 5 pictures will be saved to the flash card. The Z3 is similar, but will save the last 6 pictures. With UHS Progressive capture, the camera will continue taking pictures at 10fps with a resolution of 1280x960 for as long as the shutter button is held down. After the shutter button is released, the camera will save the last 12 pictures taken. The Z3 will save the last 15 pictures taken.
The advantage of Progressive drive is that you don't need to know when an action will begin - you can simply hold down the shutter button until an action occurs and then decide when to let go. The last drive option is Bracketing. With bracketing, you are given three options: 0.3, 0.5, or 1.0 EV (exposure value). After selecting an EV, the camera takes 3 pictures: one with a normal exposure, one with an underexposure, and one with an overexposure. For example, if you choose 0.3 EV, the three pictures would be: normal EV, -0.3 EV, and +0.3 EV.
Auto DSP refers to "Automatic Digital Subject Program". Digital Subject Programs are preset modes on the camera: Portrait, Sports action, Landscape, and Sunset. In Auto mode with DSP enabled, the camera will attempt to automatically select one of these presets. For example, if the camera detects that you are taking a portrait, it will select the Portrait DSP automatically. This means that the camera would set the f-stop to a low number (large aperture) and create a small depth of field. If the camera is unable to determine which DSP setting to use or it is disabled in the menu, it will use the default Program autoexposure.
Advanced Recording Modes (P, A, S, M)
The Z2 and Z3 come with the full range of exposure modes: Program, Aperture priority, Shutter priority, and Manual. In Program mode, the camera sets the aperture and shutter speed automatically to provide the proper exposure. In Aperture priority mode, the photographer sets the desired aperture value and the camera automatically picks the corresponding shutter speed needed to record an even exposure. In Shutter priority mode, the photographer picks the desired shutter speed, while the camera picks the aperture. Finally, in Manual mode the camera allows the user to control both the aperture and shutter speed. When the shutter button is pressed halfway, the shutter speed and aperture settings will either turn black or red. Black indicates an acceptable exposure and red indicates either an overexposure or underexposure. In all the advanced exposure modes, there are 3 menu sections with several options.The first menu section offers the following options:
| Drive mode | Single, Self-timer, Continuous, Progressive, Bracketing |
| Image Size | 2272x1704, 1600x1200, 1280x960, 640x480 |
| Quality | Fine, Standard, Economy |
| White balance | Cust. set, Cust. recall, Auto, Preset: Auto, Daylight, Cloudy, Tungsten, Fluorescent, Flash |
| Flash key func. | Flash mode, Drive mode, White balance, Focus mode, Color mode |
In addition to the menu options available in Auto mode, there is a White Balance setting with options: Auto, Daylight, Cloudy, Tungsten, Fluorescent, Flash, and Custom Set (manual). There is also an option to assign the Flash button (next to the Macro button) to cycle through any of the following modes: Flash, Drive, White Balance, Focus, and Color.
On the second menu screen, the following options are available:
| Focus mode | Single AF, Cont. AF, Manual |
| Full-time AF | On, Off |
| Flash mode | Auto flash, Auto Red-eye, Fill flash, Fill+Red eye, Slow sync. |
| Flash comp. | +/- 2 stops in 1/3 increments |
| Metering mode | Multi-segment, Center-weighted, Spot |
With Single AF selected, the camera will lock its focus after half-pressing the shutter button, allowing you to recompose a shot after achieving focus. With Continuous AF selected, when the shutter button is half-pressed, the camera will continue to focus until the picture is taken. This feature is ideal for sporting events where the subject may be changing position frequently. Manual focus is a bit tricky on both cameras because, like most compact cameras, they do not have a focus ring to turn. Instead, while adjusting the focus with the up/down buttons, the screen becomes magnified. On the Z2, the center portion of the screen is magnified. With the Z3, the entire screen is magnified. In our experience, we found it hard to tell when the image was in sharp focus with either camera. With Full-time AF enabled, the camera will continue to focus until the shutter button is half-pressed, at which point the camera will lock its focus. In any recording mode, if you hold down the "Enter" button, selectable focus points will appear on-screen. The Z2 offers 3 focus points, while the Z3 offers 5 focus points from which to choose.
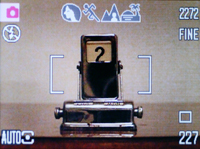 Z2 Auto mode, Normal AF |
 Z3 Auto mode, Normal AF |
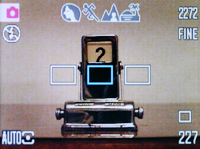 Z2 Auto mode, 3 selectable focus points |
 Z3 Auto mode, 5 selectable focus points |
The Flash mode options are designed to be used when the Flash button has been reassigned to another function. Next, there is a Flash compensation option, available for up to +/- 2 stops in 1/3 stop increments. It's good to see that both cameras offer a few choices for metering. With Multi-segment metering selected, the camera measures 256 areas of the frame to determine the best exposure. With Center-weighted metering, the camera measures the entire frame with added weight in the center. Spot metering is when the camera measures just a small area in the center of the frame. This is often used in difficult lighting situations when the other metering modes may be tricked into incorrectly exposing the subject.
The third menu screen offers the following options:
| Sensitivity | ISO 400, 200, 100, 50, Auto |
| Digital zoom | On, Off |
| Color mode | Natural, Vivid, B&W, Sepia |
| Sharpness | Hard(+), Normal, Soft(-) |
| Contrast | High(+), Normal, Low(-) |
The Sensitivity setting determines how sensitive the camera will be to light. A higher ISO setting corresponds to a higher sensitivity level. If left on Auto, the camera will automatically choose an ISO setting to use. The camera is set to use the Natural color mode by default; however, the other color modes are available as creative options. For example, if Vivid is selected, the images will be recorded with an increased level of saturation. The Sharpness and Contrast options also affect the in-camera processing of recorded images.
DSP Recording Modes (Portrait, Sports action, Landscape, Sunset, Night portrait)
The next 5 modes are Digital Subject Programs: Portrait, Sports action, Landscape, Sunset, and Night portrait. The menu for all 5 DSP modes is identical to the menu in Auto mode with one difference: "Auto DSP" is replaced with "Focus mode". These 5 DSP modes are designed for specific shooting conditions. For example, Portrait mode will blur the background and keep the subject sharp. Sports action mode will utilize the highest possible shutter speed while focusing continuously. Landscape mode is designed for focusing on distant objects. Sunset mode saturates warm tones for pleasing sunset pictures. Night portrait uses the camera's slow sync ability to first illuminate the subject with the flash. After the flash fires, the shutter stays open to allow ambient light to illuminate the background in order to produce a natural, well-lit scene. In the DSP and Advanced recording modes, E.C. (exposure compensation) is available in +/- 2 stops. To apply E.C. in these modes, you simply use the left/right keys to move up or down in 1/3 stop increments.Movie Mode
The Z2 and Z3 have slightly different Movie mode menu options:| Z2 Movie mode menu | |
| Image size | 800x600, 640x480, 320x240, 160x120 |
| Frame rate | 30 fps, 15 fps |
| Optical zoom | On, Off |
| White balance | Cust. set, Cust. recall, Auto, Preset: Auto, Daylight, Cloudy, Tungsten, Fluorescent, Flash |
| Movie mode | Night movie, STD movie |
| Focus mode | Cont. AF, Single AF, Manual |
| Color mode | Natural, Vivid, B&W, Sepia |
| Z3 Movie mode menu 1 | |
| Quality | 640x480 FINE, 640x480 STD, 320x240 STD |
| Frame rate | 30 fps, 15 fps |
| White balance | Cust. set, Cust. recall, Auto, Preset: Auto, Daylight, Cloudy, Tungsten, Fluorescent, Flash |
| Movie mode | Night movie, STD. movie |
| Z3 Movie mode menu 2 | |
| Focus mode | Cont. AF, Single AF, Manual |
| Color mode | Natural, Vivid, B&W, Sepia |
| Digital zoom | On, Off |
Both cameras can record video with audio in QuickTime format, which is limited only by the capacity of the flash card. As you can see, the Z3 does not offer the resolutions 800x600 or 160x120. We should also note that the 30 fps setting on the Z2 is only available for resolutions 640x480 and below. Both cameras allow you to use the optical zoom while recording. However, there is one large difference. The zoom on the Z2 is very audible in movie clips while the Z3 zoom is essentially silent. This is a huge improvement over the Z2. The White balance, Focus mode, and Color mode options are the same as you'll find in any of the advanced recording modes. When recording in Night movie mode, the camera raises its sensitivity in order to capture video in low light situations. Enabling the option Cont. AF will cause the camera to focus continuously as it records. The Manual focus option simply allows the user to focus manually before recording; it does not allow focusing during recording. In the General Image Quality section of this article, we will discuss our impression of each camera's Movie mode in more detail.
In all the shooting modes, you can access a setup menu with 4 sections of options. The following menus show common options between the Z2 and Z3:
| Setup Menu 1 | |
| LCD brightness | (11 levels) |
| Power save | 10, 5, 3, 1 min. |
| Inst. Playback | 10, 2 sec., Off |
| Lens acc. | WideConvertr., None |
| Language | Japanese, English, Dutch, French, Spanish, Chinese |
| Setup Menu 2 | |
| File # memory | On, Off |
| Folder name | Std. form, Date form |
| Noise reduction | On, Off |
| Date/Time set | Enter |
| Date imprint | On, Off |
| Setup Menu 3 | |
| Reset default | Enter |
| Audio signals | 1, 2, Off |
| Focus signal | 1, 2, Off |
| Shutter FX | 1, 2, Off |
| Volume | 3(High), 2, 1(Low), Off |
| Setup Menu 4 | |
| Video output | NTSC, PAL |
| Transfer mode | Data storage, PictBridge |
| Anti-shake (Z3) | Disp + Exp, Exp only, Off |
| Self-timer (Z3) | 10, 2 sec. |
The Z3 offers two additional options in the 4th section of the Setup menu. The first regards the Z3's Anti-shake technology. When Anti-shake is enabled, it will activate during a half-press of the shutter button in situations where the shutter speed may be slow enough to cause blurring. The options are "Display + Exposure", "Exposure", and "Off". If "Display + Exposure" is chosen, pressing the shutter button halfway down will display the effect of Anti-shake and will record the image with Anti-shake applied. The "Exposure" option will apply Anti-shake to the exposure only and will not show the effect on the live image. The other option that the Z3 has added is the ability to set the Self-timer to 2 or 10 seconds.


9 Comments
View All Comments
PaulS - Tuesday, September 21, 2004 - link
Stephen, thanks for the information (and the review!). I'm looking at using either the Z2 or the Z3 for astrophotography where I would need detail derived from dark areas. I like the antishake and separate viewfinder that the Z3 offers, but I think from your comments the picture quality of the Z2 would be better.Thanks again!
stephencaston - Friday, September 17, 2004 - link
There are certainly ways to deal with some of the Z3's shortcomings by doing post-work. However, There isn't a way to deal with the loss of detail in shadow areas.The real question is what issues will a new firmware address? It will be interesting to see what Konica Minolta will do.
PaulS - Friday, September 17, 2004 - link
Until new firmware is released, is it possible to deal with Z3's flaws (e.g. under-exposure, darker images, colour reproduction) using standard image processing software?stephencaston - Thursday, September 16, 2004 - link
Kelh,Both cameras have an accessory shoe that fits Konica Minolta flash units: 2500(D), 3600HS(D), and 5600HS(D). However, these flash units are sold separately. I hope this answers your comment ;-)
Kelh - Thursday, September 16, 2004 - link
One of the things I never find in these reviews is wether the cameras include a flash stand. Sometimes the flashes that come with digicams are not good enough and night pictures look dark.joyce - Wednesday, September 15, 2004 - link
Is it worth the price difference?Here in The Netherlands the difference is about €140,=.
I think it is very much
microsaftcom - Monday, September 6, 2004 - link
what the reviewers call jpeg compression artefacts may be just normal noise... I don't know...Depends on the reviewers...
All cameras have some sort of horizontal lines...
I don't see when it will be a problem.
I think 3 mb for 4 Mpixel pictures show that the compression isn't very effective.
microsaftcom - Monday, September 6, 2004 - link
It seems that Z3's flaws can be dealt with with firmware updates.Perhapos that is why the current new firmware 1.01e is not official yet, even though it solved many problems.
In my mind these cams are uncomparable as one has image stabilisation and thoe other hasn't.
It has to be compared with the panasonic or the canon.
/F
Chaotic42 - Monday, September 6, 2004 - link
I had a Z2 for a brief period of time (I had to return it when my PSU killed my motherboard) and it was an awesome camera.The Z3 looks even better. I would recommend that anyone looking for a high-zoom camera check these out.