Four Multi-GPU Z77 Boards from $280-$350 - PLX PEX 8747 featuring Gigabyte, ASRock, ECS and EVGA
by Ian Cutress on August 22, 2012 9:15 AM ESTGigabyte G1.Sniper 3 Overclocking
Note: Ivy Bridge does not overclock like Sandy Bridge. For a detailed report on the effect of voltage on Ivy Bridge (and thus temperatures and power draw), please read Undervolting and Overclocking on Ivy Bridge.
Experience with Gigabyte G1.Sniper 3
Overclocking on the G1.Sniper 3 was a lot like the experiences we had with the Z77X-UD5H. Automatic overclocking had its issues depending on the memory kit used, whereas manual overclocking was easy to do and hit some good speeds.
Automatic overclocking is performed through the EasyTune6 software, and offers three levels depending on how adventurous a user you are. There is also an additional option called ‘Auto Tuning’, which uses a stress test program in order to find a good overclock given a users cooling and case situation.
Manual overclocking was performed entirely in the BIOS. Gigabyte still needs to refine this part of the overclocking procedure, as CPU voltages, speeds and load line calibration settings all in different menus (with up to four button presses to get between them). However, given the maturity of the 3D BIOS now, it was relatively quick and painless to navigate between them, if a bit slower than optimal for an enthusiastic well trained overclocker.
Methodology:
Our standard overclocking methodology is as follows. We select the automatic overclock options and test for stability with PovRay and OCCT to simulate high-end workloads. These stability tests aim to catch any immediate causes for memory or CPU errors.
For manual overclocks, based on the information gathered from previous testing, starts off at a nominal voltage and CPU multiplier, and the multiplier is increased until the stability tests are failed. The CPU voltage is increased gradually until the stability tests are passed, and the process repeated until the motherboard reduces the multiplier automatically (due to safety protocol) or the CPU temperature reaches a stupidly high level (100ºC+).
Our test bed is not in a case, which should push overclocks higher with fresher (cooler) air. We also are using Intel's All-in-one Liquid Cooler with its stock fan. This is a 120mm radiator liquid cooler, designed to mimic a medium-to-high end air cooler.
Automatic Overclock:
Using Gigabyte’s EasyTune6 software in the operating system, we applied the various overclock options it presents. These are in the form of three levels, each more aggressive than the last. The final option is an Auto Tuning, which applies a stress test to the CPU and gradually raises the voltages and CPU speed until a maximum given the cooling and the quality of the CPU is reached.
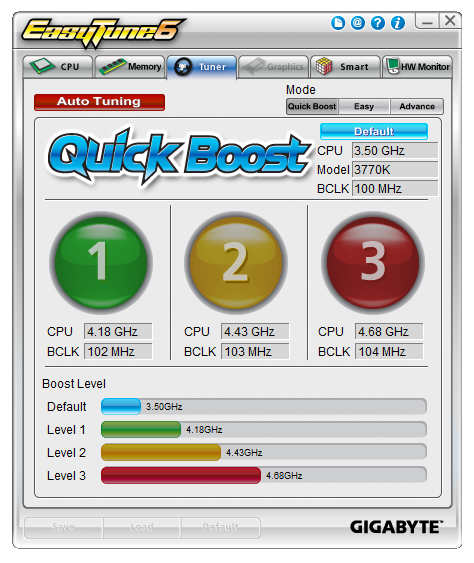
For the three EasyTune6 levels, the overclock is easy to understand – a new multiplier and BCLK is applied to achieve the relevant speed, and a voltage offset is used to keep it stable. The memory is also adjusted, to one strap below XMP. This is so the memory is not pushed above XMP due to the BCLK adjustment.
The issue we found with the ET6 overclock levels is the memory adjustment – the memory kit we use for our testing is very sensitive to adjustments, and would not work with any of the ET6 levels but did work at XMP. However a slower kit from Patriot did work with EasyTune on some of the levels.
Here are our results:
At Level 1, ET6 gave the CPU a 41x multiplier and 102.3 MHz BCLK, to give 4194.3 MHz total. A +0.110 volt offset on the CPU was also applied, as well as a memory adjustment to XMP minus one strap. However, this setting gave constant memory errors during PovRay.
At Level 2, ET6 gave the CPU a 43x multiplier and 103.3 MHz BCLK, to give 4441.9 MHz total. A +0.150 volt offset on the CPU was also applied, as well as a memory adjustment to XMP minus one strap. This was stable and gave peak temperatures of 85°C during PovRay and 89°C during OCCT.
At Level 3, ET6 gave the CPU a 45x multiplier and a 103.3 MHz BCLK, to give 4693.5 MHz total. A +0.150 volt offset on the CPU was also applied, as well as a memory adjustment to XMP minus one strap. This was stable and gave peak temperatures of 98°C during PovRay and 102°C during OCCT.
The Auto Tuning option resulted in giving the CPU a 47x multiplier and a 104.3 MHz BCLK, to give 4916 MHz total. The normal turbo bin procedure was also applied, giving 47x/47x/46x/45x for 1/2/3/4 threaded load, meaning 4707 MHz at full load. This setting showed 1.200 volts at load, and gave 90°C during OCCT but memory errors during PovRay.
Manual Overclock:
With our manual overclocking, we very early switched CPU Load Line Calibration to Extreme to improve stability and remove VDroop. On an LLC setting of automatic and a fixed CPU voltage of 1.100 volts, in the OS at load this dropped down to 1.068 volts. Changing LLC to extreme gave an OS reading of 1.104 volts, which usually results in a little extra temperature but improved stability all around. Here are our results:
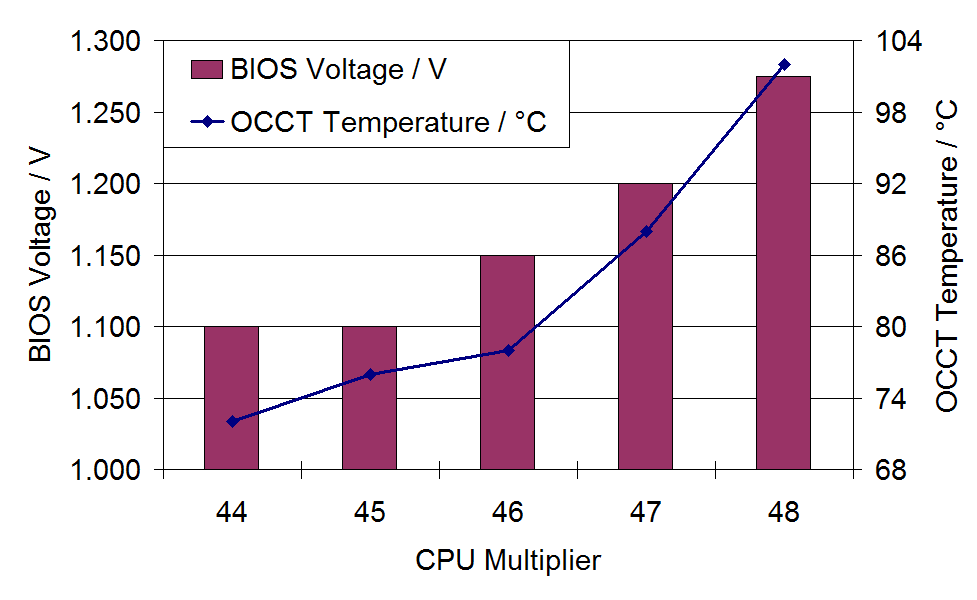
Starting at 44x multiplier and 1.100 volts, the system was stable with LLC on automatic and showed an OS load voltage of 1.068 volts. This gave peak temperatures of 69°C during PovRay and 72°C during OCCT.
The 45x multiplier was stable at 1.100 volts, but with the CPU LLC set to Extreme. This showed an OS load voltage of 1.104 volts. This also gave peak temperatures of 74°C during PovRay and 76°C during OCCT.
The 46x multiplier was stable at a minimum of 1.150 volts, with LLC set to Extreme and an OS load voltage of 1.152 volts. This gave peak temperatures of 79°C during PovRay and 78°C during OCCT.
The 47x multiplier was stable at a minimum of 1.200 volts, with LLC set to Extreme and an OS load voltage of 1.200 volts. This gave peak temperatures of 85°C during PovRay and 88°C during OCCT.
The 48x multiplier was stable at a minimum of 1.275 volts, with LLC set to Extreme and an OS load voltage of 1.272 volts. This gave peak temperatures of 97°C during PovRay and 102°C during OCCT.
Understandably we did not try higher speeds or voltages due to the load temperatures already being reached.


24 Comments
View All Comments
goinginstyle - Thursday, August 23, 2012 - link
I tried the G1 Sniper 3 and returned it a few days later. The audio was a significant downgrade from the Assassin series, EFI is clunky at best and the board had serious problems with a GSKill 16GB 2666 kit, not to mention the lousy fan controls.Purchased a Maximus Formula V and never looked back as the EFI, Fan Controls, Clocking and Audio are much better in every way compared to the Sniper board. There is no way Gigabyte has brought better value than ASUS with the Z77 chipset. You get what you pay for and the GB is overpriced once you actually use the board and compare it to ASUS or even ASRock.
JohnBS - Thursday, November 1, 2012 - link
I am looking for a rock solid MB, so of course I turned to ASUS. However, the reviews from verified buyers showed multiple issues with 3.0 USB ports losing power, system instability after months of use, and multiple instances of the board not working in one or more memory slots. Bent pins from the factory and complete DOA issues as well. A few reports of complete failure when the Wi-Fi card was inserted, yet gone with the card removed. This was mainly the Maximus IV series. Then I thought I'd look into the Maximus V series, because I really wanted ASUS, and was kinda sad to read reviews. Same issues from verified buyers of the Maximus V, more so with the USB 3.0 problems and the Wi-Fi/Bluetooth add-on card failures. In common were multiple complaints about customer service.So I emailed the ASUS rep who was replying to everyone's post, with specific attention on the recurring problems and how I was concerned about buying a MB. I got the email back, stating they were aware of the recurring problems listed on the user reviews, but that they are isolated occurrences.
I really need a rock solid x16 x 2 pci-e mb right now, and that's why I'm still searching. I'm planning on overclocking an i7-2700k with an gtx 690 and a 120z monitor for high res gaming. The sniper 3 looks good, but the front audio plug reaching the board's bottom audio header might be something I can't work around.
Just want something reliable. If there's a known issue, I'm always in that percentile that gets hit with the RMA process. I'm trying so hard to avoid that.
(Went with 690 instead of dual 680 for heat, noise, power draw considerations).
jonjonjonj - Friday, October 26, 2012 - link
you mean gigabyte in the evga conclusion?"the EVGA does not keep pace with ASUS and EVGA even at stock speeds."
couchassault9001 - Friday, November 2, 2012 - link
So for gaming benchmarks is it correct that the cpu multipliers were at 40 on the g1.sniper and 36 on the evga? if so it seems to be a rather unfair comparison. Being that the sniper cpu is running 11% fasterI'd be amazed if someone was looking at these boards with no intent to overclock like crazy, as i'm trying to decide between these 2 boards myself, and i'm sure i'll be pushing my 3770k as far as it will go.
The evga consumed ~8% less power than the sniper under load.
dirt 3 showed a 9% frame rate drop in the frame rate going from g1 to evga. metro 2033 showed a 3.6% drop in frame rate going from g1 to evga. Both of these are on the 4 7970 benchmarks. the 3 and below the gap is much tighter with it being under 1% with one card.
I know this may be nit picking to some, but i plan on running 5760x1080 3d so 4 7970 performance on a i7-3770k is exactly what i'm looking at.