Gigabyte GA-EP45-UD3P - P45 at its Finest
by Gary Key on February 3, 2009 12:15 AM EST- Posted in
- Motherboards
Board Layout

Taking a quick tour around this board, we find the overall layout is excellent. The 24-pin and 8-pin ATX power connectors, floppy/IDE connectors, and several of the SATA ports are all placed along the edge of the motherboard. We would have preferred that the SATA connectors were in a 90 degree angle configuration, but they work as is. One nice feature is that there is a double slot gap between the two physical PCI-E x16 slots so that aftermarket cooling will work. Installation of our peripherals was easy and the board fit well in several case designs. The back of the board is clean and all of our various air coolers that required a back plate worked fine. Let’s take a quick look at the rest of the board.
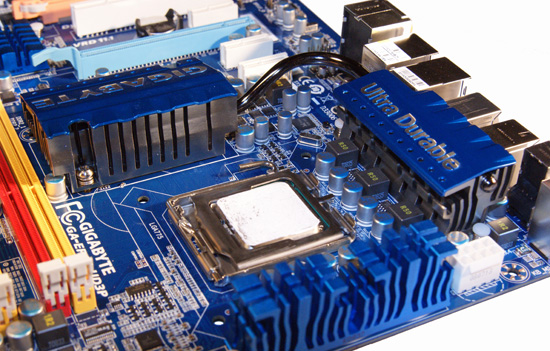
The CPU socket area is open and unobstructed for the most part. The socket area is surrounded by the Northbridge heatsink, MOSFET coolers, and several capacitors, but we had no issue installing large air coolers or a couple of water blocks. This board features a six-phase power design with three Low RDS(on) MOSFETs per channel along with the R50 ferrite core closed chokes.
Forget the marketing info about eight to sixteen phase power delivery systems; it is all about the quality of the components utilized. This board supports 30A per phase and delivers a total of 180A to the CPU. This is more than enough for any Core 2 processor in Intel’s lineup, even with heavy overclocking.
The chipset and MOSFET cooling system is well designed and works. Gigabyte connects the aluminum Northbridge heatsink to the primary MOSFET heatsink with a revised heatpipe design. The second MOSFET heatsink located on the edge of the board reminds us of Intel’s BadAxe designs. To answer the question of whether any of this works: yes, it works very well even with the system overclocked.
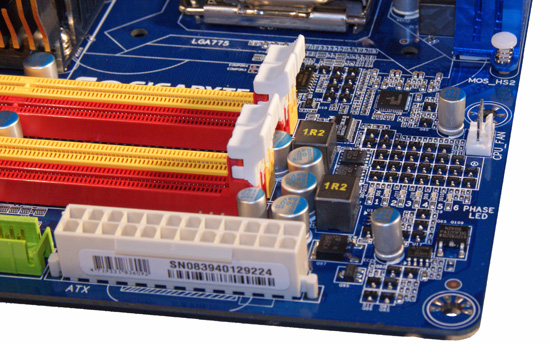
The top picture shows the phase LED setup that displays the number of power phases in use, but only when the Dynamic Energy Saver software is running. Located below the LED panel is the two-phase power system for the memory slot along with the CPU fan header that is slightly out of the way for us.
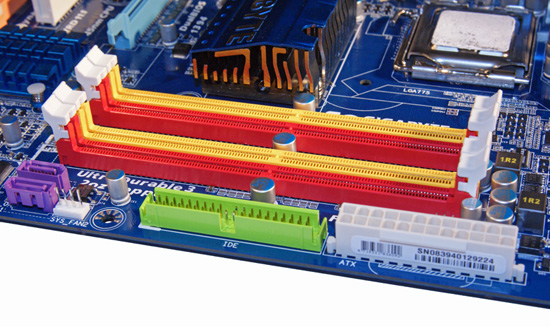
The second image shows the eye popping red and yellow memory slots. Fortunately for most of us, Gigabyte has changed to a muted color scheme on the X58 boards, but the Crayola color scheme lives on in this board. The floppy drive connector, 24-pin ATX power connector, and the two GSATA ports are located along the edge of the board.
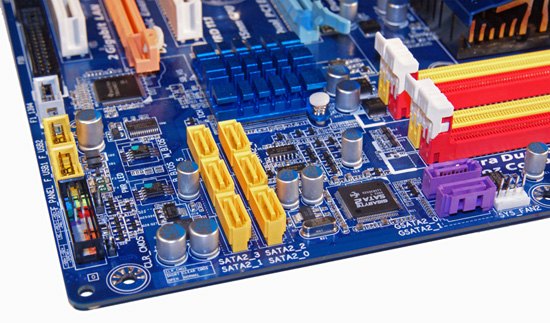
Hey, the two purple GSATA ports show up again. This rebranded JMicron controller is capable of RAID 0 and RAID 1 operation. Intel’s ICH10R provides support for the six yellow SATA ports and features RAID 0/1/5/10 capabilities with Intel’s excellent Matrix technology. The ICH10R is cooled by a low-rise aluminum heatsink . Along the left edge of the board is the black front panel connector, two yellow USB 2.0 headers, and the gray IEEE 1394a header.

The expansion slot layout is very good and indicates that Gigabyte has been listening to users. The third PCIe x1 slot and second PCI slot become physically unusable if dual-slot graphics cards are placed in the PCIe x16 slots. Even so, with a CrossFire setup you end up with two PCIe x1 and one PCI slot open. You cannot ask for much more than that.
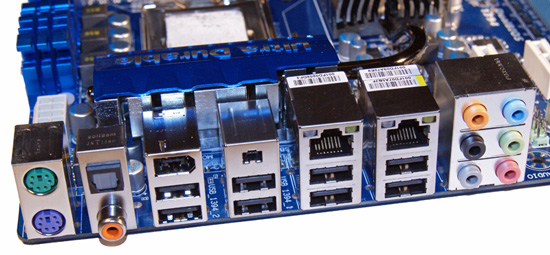
Last but certainly not least is the I/O panel. There are the standard issue PS/2 keyboard and mouse ports, two Gigabit LAN ports with LED activity lights, eight USB 2.0 ports, two IEEE 1394a ports, optical and coaxial S/PDIF ports, and an audio panel.


73 Comments
View All Comments
Glenn - Tuesday, February 3, 2009 - link
On second reading of your original post I wonder if you need to "initialize" that disk within Administrator Tools/computer management/Disk Management ? If it's showing up in device manager that is likely the problem. The cables provided by gigabyte work in any motherboard slot to any internal sata device (HD or Optical Drive) in either orientation.7Enigma - Tuesday, February 3, 2009 - link
You solved my problem! I am now in the process of formatting the drive after initializing. I have NEVER had this issue before as I guess this issue is Vista specific.I cannot thank you enough. I wish this article (and hence my question) had been up a couple days ago and saved me the several hours of wasted life. :(
Now anyone have a good (free?) ghosting program that will allow me to clone my current 80gig drive to the 250gig so I can get rid of the old PATA to use in my old computer build?
semo - Tuesday, February 3, 2009 - link
you've probably never had this problem because your drive already came with an os or the first thing you've done with a new hard drive is to install an os on it. either case, the initialization was done for you.to mirror a hard disk --> http://www.pcinspector.de/Sites/clone_maxx/info.ht...">http://www.pcinspector.de/Sites/clone_maxx/info.ht...
to take a snapshot --> http://ping.windowsdream.com/">http://ping.windowsdream.com/
http://clonezilla.org/">http://clonezilla.org/
get the source and destination right. you only get one chance!
7Enigma - Wednesday, February 4, 2009 - link
I've never directly swapped drives out like I'm trying to do here, but I have added additional drives before (all old IDE) and other than the Master/Slave issue the drives were always recognized upon reboot (with a drive letter already given). I'm sure this Vista method gives more flexibility (can have multiple drives installed but not actually recognized), but it was new and annoying to me.As for the ghost program I think I'm going to use HDclone. While the free version has slow copy times (~1gig/min), I only have an 80gig HD I'm cloning from so I don't mind a bit extra time. And according to their website they claim they now support the extra space when cloning (previously all the freeware ghost programs had the annoying habit of not adding in the rest of the space on the new HD and so you were left with creating another partition, or getting a program like partition magic to do the job the ghost program should have in the first place.
Once again than you very much for all the help and quick advice!
I'll be interested to compare boot times of Vista and games with the new drive. My current 80gig is a 7200rpm Maxtor from several years ago and while the new drive is the same spindle speed I'm assuming that the higher density will allow for quite a bit of an improvement. I'm sitting on the sideline for another year or so before jumping on the SSD bandwagon. Too rich for my blood at the moment, but I drool over them.
strikeback03 - Wednesday, February 4, 2009 - link
In XP when adding SATA drives IIRC it was normal to have to format the drive before it could be used. I don't remember initialization being a separate step though, just format the unformatted space and it would work.7Enigma - Wednesday, February 4, 2009 - link
Just wanted to say I am no running my system on my new Seagate Barracuda 7200.10 ST3250410AS 250GB 7200 RPM 16MB Cache SATA 3.0Gb/s Hard Drive, after a 2hour HDclone that worked flawlessly (and free). Not only that but the new/current version of HDclone also expanded the partition for the new larger drive so I literally just unplugged the old drive after the clone and Vista isn't even complaining to validate again (a fear I had since my copy is Vista Home Premium OEM). I didn't want to try to explain why after building my system 2 weeks ago I'm already swapping the HD....Thanks again!
7Enigma - Wednesday, February 4, 2009 - link
no = *now*7Enigma - Tuesday, February 3, 2009 - link
That sounds exactly like something that may be the culprit. As I mentioned I just made the big switch from XP to Vista, and am not used to some of the Vista policies.I thank you very much for the advice and I'll have to try this ASAP!
7Enigma - Tuesday, February 3, 2009 - link
The bios is pretty confusing when it comes to this (and the manual also doesn't help). I have made sure the SATA bios settings are NOT set to AHCI or Raid, I believe the "off" setting is for it to be seen as IDE.I kinda figured SATA didn't use the Master/Slave, but my concern is that since my primary OS drive IS a PATA drive, that there is an issue with trying to recognize a Master SATA (it shows up as master in the bios, whatever that means).
Another thing is since trying to install the SATA drive (I've since taken it out until I can find some answers) right before Vista loads the windows icon and the logon screen my HD now makes a 5-6 second grinding noise like it's searching the entire drive or something. This never happened before trying to get the SATA drive hooked up, and while it doesn't seem to have affected performance once in windows, it is a bit annoying during bootup (I keep my system off most of the time so on average boot up 2-3 times per day).
The0ne - Tuesday, February 10, 2009 - link
I'm not entirely sure of this myself not having gone through reliable tests but I've been having similar problems with HD's as of late.Make sure you only have one primary HD. If you have multiple HD set as primary, doesn't have to be active, you will run in problems. Vista chokes up as well. Make sure your HD's are labled properly when partition, Simple, Basic, Primary, etc. And then there's the odd external drive like my WorldBook 1TB that, if connected and power on, will 100% prevent XP or Vista to load up fully to the desktop (on my IP35E MB) or 100% crashes and resets the BIOS when XP/Vista tries to load (currently my EP45-DS3R MB). This WorldBook can only be connected once you're on the desktop.
I have a hate relationship with WD external drives, they just want to die in my arms for no apparent reasons.