Cooler Master Hyper 212: Looking for a Winner
by Wesley Fink on October 31, 2007 2:00 AM EST- Posted in
- Cases/Cooling/PSUs
Cooler Master Hyper 212
The Cooler Master brand hardly needs an introduction. It is one of the most widely recognized product names in cooling around the world. Headquartered in Taiwan, Cooler Master has established themselves as a leading name in cases, air cooling, and fans. They also market products such as power supplies, water cooling kits, notebook cooling pads, and specialized chassis for external storage. If it comes to cooling, Cooler Master probably makes a product that competes for your attention.
Cooler Master makes a wide selection of CPU air coolers, ranging from budget alternatives to the stock CPU coolers that come with retail units to exotic high-end solutions. The Hyper 212 looks like a high-end solution, but at about $40 it is priced as a midrange CPU air cooler.
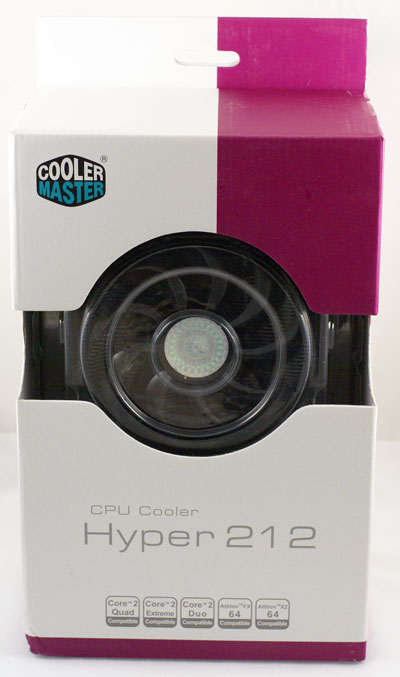
As a major player in the cooling business, Cooler Master pays more attention to things like packaging than you see from the smaller players. The Hyper 212 package is simple but it provides the info the buyer needs for a buying decision without being overly busy. Cooler Master uses a corporate color scheme that makes it easy to pick out their product.
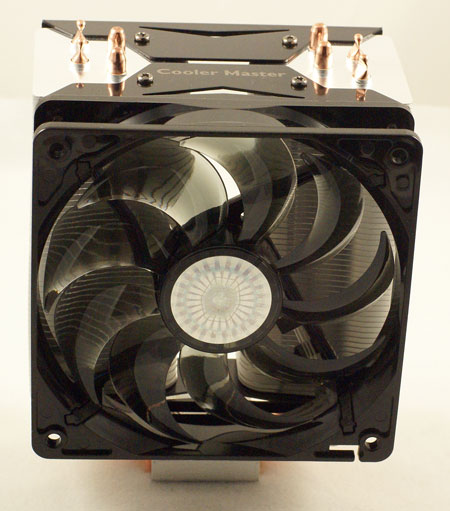
Inside the box you will find the Hyper 212 fully assembled, including a 120mm fan, except for the socket mounting plate. It should be clear from the picture than the 212 can easily mount two 120mm fans in a push-pull configuration. Everything needed for the second fan, including mount plates and fan mounting screws, is in the package. All you need is a bare fan to complete a dual-fan setup.
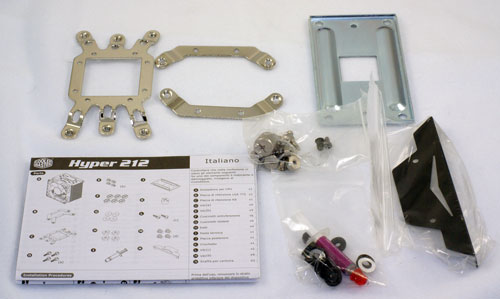
The items required for mounting the Hyper 212 on Intel Socket 775 or AMD 754/939/940/AM2 are included in the accessories kit. A nut driver socket for a Phillips screwdriver is included for installing the screw nuts. All you need is a Phillips screwdriver to remove your motherboard and secure the cooler.
Specifications
The Hyper 212 can be mounted on either AMD 754/939/940/AM2 or Intel Socket 775. The 120 fan is pre-mounted. Cooler Master also includes everything in the kit for mounting an optional second 120mm fan. Even the large thread, coarse-pitched fan screws for the second fan are included.
The included 120mm fan is specified at a high 70 CFM output and a very low 19 dB(A) noise level. These specifications appear pretty remarkable since the excellent and quiet Scythe S-FLEX fan manages just 28 dB(A) at an output of around 64 CFM. The S-FLEX also runs at a slower 1600 RPM. Noise measurements will provide a better idea of the true noise level of the included fan.
Installation
Since the Hyper 212 is fully assembled all that is required is to install the mounting plate for either Intel or AMD before attaching the cooler to your motherboard. Four small screws are used to attach the appropriate adapter to the base plate. With the adapter attached, it is then necessary to remove the motherboard (for both Intel as well as AMD) in order to attach the cooler.
On Intel 775 the mount screws pass through the four motherboard holes and are secured from the motherboard back with washers and nuts. Cooler Master thoughtfully includes a nut driver that works with a Phillips screwdriver to attach the nuts. The good news about this installation is the fairly heavy 710g cooler is very secure after mounting. The bad news is the motherboard has to be removed.
Overall the cooler installation is pretty easy - much easier than many competing products that also provide the security of a bolt-through installation. Those worried about a heavy heatsink popping out of holes with the Intel push clips should feel much better about this installation method.
The second fan option, on the other hand, is a nice addition whose installation just wasn't thought through. To mount the second fan you have to attach mounting plates with screws from the BACK of the plate. This means the plates must be removed from the cooler to install. The problem is the fan mounts are attached to the cooler at the top and bottom of the fin array, and - you guessed it - you have to remove the motherboard and cooler just to attach a second fan. While doing this before the initial installation isn't that big of a problem, there ought to be an easier way to add a second fan on an existing installation.
These strange cooler mount glitches, like having to remove the motherboard to mount the second Hyper 212 fan, could be avoided if manufacturers required design engineers to actually mount and use all accessories in a real case like consumers will be using. For a company like Cooler Master, which makes many excellent cases, this should be an easy task.
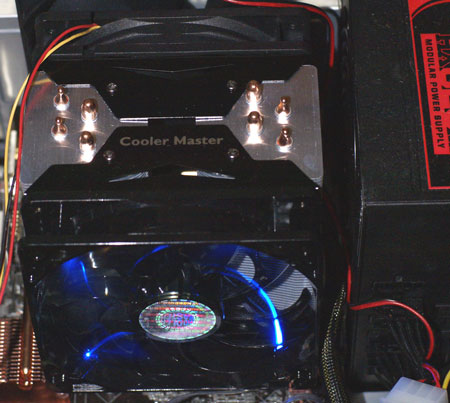
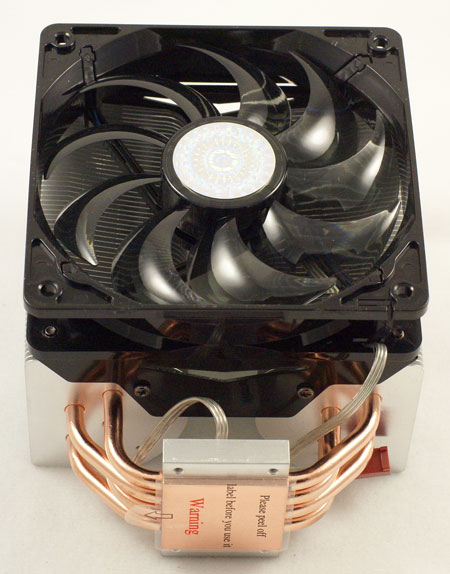
Once the second fan is installed it is very secure. The two fans in a push-pull configuration create a nice package as you can see in the photo above. Since the Hyper 212 is designed with support for two fans, we tested the cooler in both single and dual-fan configurations.
The Cooler Master brand hardly needs an introduction. It is one of the most widely recognized product names in cooling around the world. Headquartered in Taiwan, Cooler Master has established themselves as a leading name in cases, air cooling, and fans. They also market products such as power supplies, water cooling kits, notebook cooling pads, and specialized chassis for external storage. If it comes to cooling, Cooler Master probably makes a product that competes for your attention.
Cooler Master makes a wide selection of CPU air coolers, ranging from budget alternatives to the stock CPU coolers that come with retail units to exotic high-end solutions. The Hyper 212 looks like a high-end solution, but at about $40 it is priced as a midrange CPU air cooler.
As a major player in the cooling business, Cooler Master pays more attention to things like packaging than you see from the smaller players. The Hyper 212 package is simple but it provides the info the buyer needs for a buying decision without being overly busy. Cooler Master uses a corporate color scheme that makes it easy to pick out their product.
Inside the box you will find the Hyper 212 fully assembled, including a 120mm fan, except for the socket mounting plate. It should be clear from the picture than the 212 can easily mount two 120mm fans in a push-pull configuration. Everything needed for the second fan, including mount plates and fan mounting screws, is in the package. All you need is a bare fan to complete a dual-fan setup.
The items required for mounting the Hyper 212 on Intel Socket 775 or AMD 754/939/940/AM2 are included in the accessories kit. A nut driver socket for a Phillips screwdriver is included for installing the screw nuts. All you need is a Phillips screwdriver to remove your motherboard and secure the cooler.
Specifications
The Hyper 212 can be mounted on either AMD 754/939/940/AM2 or Intel Socket 775. The 120 fan is pre-mounted. Cooler Master also includes everything in the kit for mounting an optional second 120mm fan. Even the large thread, coarse-pitched fan screws for the second fan are included.
| Cooler Master Hyper 212 Specifications | |
| Heatsink | |
| Dimensions | 112(W) x 92(D) x 160mm(H) |
| Weight | 710g (18.7 ounces) |
| Material | Copper heatpipes and aluminum fins |
| Configuration | 4 copper heatpipes in U loops |
| Fan | |
| Fan Size | 120mm x 120mm x 25mm |
| Fan Type | Long-Life Sleeve Bearing with Blue LED |
| Connector | 3-pin |
| Maximum Fan Speed | 2000 RPM |
| Maximum Noise Level | 19.0 dB(A) |
| Maximum Airflow | 69.69 CFM |
| MTBF | 50.000 hours |
| Air pressure | 2.94mm H2O |
The included 120mm fan is specified at a high 70 CFM output and a very low 19 dB(A) noise level. These specifications appear pretty remarkable since the excellent and quiet Scythe S-FLEX fan manages just 28 dB(A) at an output of around 64 CFM. The S-FLEX also runs at a slower 1600 RPM. Noise measurements will provide a better idea of the true noise level of the included fan.
Installation
Since the Hyper 212 is fully assembled all that is required is to install the mounting plate for either Intel or AMD before attaching the cooler to your motherboard. Four small screws are used to attach the appropriate adapter to the base plate. With the adapter attached, it is then necessary to remove the motherboard (for both Intel as well as AMD) in order to attach the cooler.
On Intel 775 the mount screws pass through the four motherboard holes and are secured from the motherboard back with washers and nuts. Cooler Master thoughtfully includes a nut driver that works with a Phillips screwdriver to attach the nuts. The good news about this installation is the fairly heavy 710g cooler is very secure after mounting. The bad news is the motherboard has to be removed.
Overall the cooler installation is pretty easy - much easier than many competing products that also provide the security of a bolt-through installation. Those worried about a heavy heatsink popping out of holes with the Intel push clips should feel much better about this installation method.
The second fan option, on the other hand, is a nice addition whose installation just wasn't thought through. To mount the second fan you have to attach mounting plates with screws from the BACK of the plate. This means the plates must be removed from the cooler to install. The problem is the fan mounts are attached to the cooler at the top and bottom of the fin array, and - you guessed it - you have to remove the motherboard and cooler just to attach a second fan. While doing this before the initial installation isn't that big of a problem, there ought to be an easier way to add a second fan on an existing installation.
These strange cooler mount glitches, like having to remove the motherboard to mount the second Hyper 212 fan, could be avoided if manufacturers required design engineers to actually mount and use all accessories in a real case like consumers will be using. For a company like Cooler Master, which makes many excellent cases, this should be an easy task.
Once the second fan is installed it is very secure. The two fans in a push-pull configuration create a nice package as you can see in the photo above. Since the Hyper 212 is designed with support for two fans, we tested the cooler in both single and dual-fan configurations.


21 Comments
View All Comments
thoth@cheerful.com - Saturday, September 25, 2010 - link
choppergirl;There is one fatal flaw in your example above. In your suction building you are venting the heat outside the building. and in the blower building you are not. otherwise your examples are correct. In theory the amount of heat transfer is the same for blowing or sucking the air across a heat source with all variables being equal. As one of the previous posters stated to get the variables equal IE the exact amount of air flow.It cost more on the suction set up. Needing a shroud to focus the air flow. This added cost is why manufactures blow the air instead of sucking the air. After all if cost was not one of the driving factors in your system build we would all have decked out Intel hexacore overclocked beast with liquid nitrogen cooling.