Cooler Master Hyper 212: Looking for a Winner
by Wesley Fink on October 31, 2007 2:00 AM EST- Posted in
- Cases/Cooling/PSUs
Cooler Master Hyper 212
The Cooler Master brand hardly needs an introduction. It is one of the most widely recognized product names in cooling around the world. Headquartered in Taiwan, Cooler Master has established themselves as a leading name in cases, air cooling, and fans. They also market products such as power supplies, water cooling kits, notebook cooling pads, and specialized chassis for external storage. If it comes to cooling, Cooler Master probably makes a product that competes for your attention.
Cooler Master makes a wide selection of CPU air coolers, ranging from budget alternatives to the stock CPU coolers that come with retail units to exotic high-end solutions. The Hyper 212 looks like a high-end solution, but at about $40 it is priced as a midrange CPU air cooler.
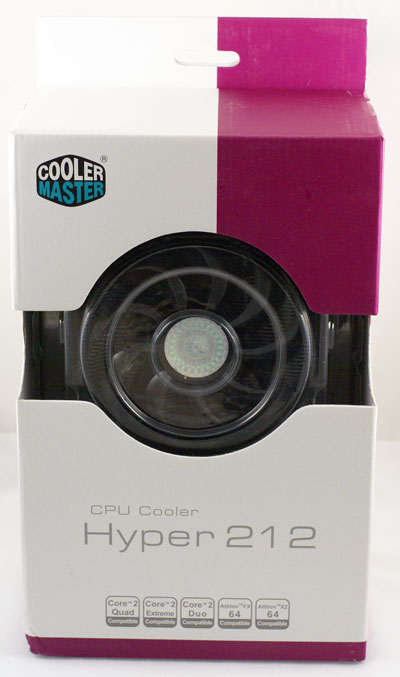
As a major player in the cooling business, Cooler Master pays more attention to things like packaging than you see from the smaller players. The Hyper 212 package is simple but it provides the info the buyer needs for a buying decision without being overly busy. Cooler Master uses a corporate color scheme that makes it easy to pick out their product.
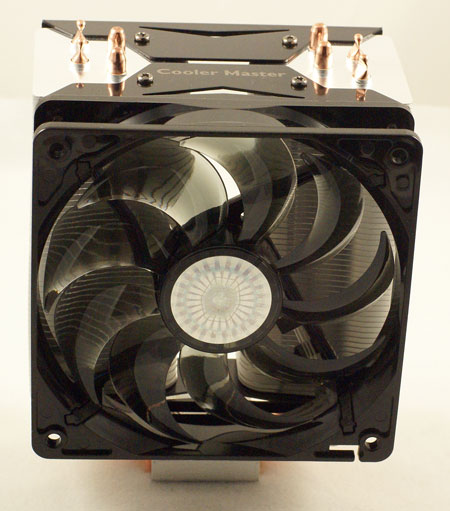
Inside the box you will find the Hyper 212 fully assembled, including a 120mm fan, except for the socket mounting plate. It should be clear from the picture than the 212 can easily mount two 120mm fans in a push-pull configuration. Everything needed for the second fan, including mount plates and fan mounting screws, is in the package. All you need is a bare fan to complete a dual-fan setup.
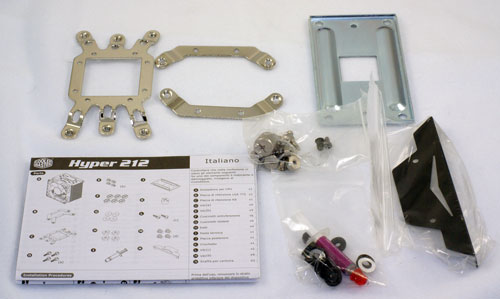
The items required for mounting the Hyper 212 on Intel Socket 775 or AMD 754/939/940/AM2 are included in the accessories kit. A nut driver socket for a Phillips screwdriver is included for installing the screw nuts. All you need is a Phillips screwdriver to remove your motherboard and secure the cooler.
Specifications
The Hyper 212 can be mounted on either AMD 754/939/940/AM2 or Intel Socket 775. The 120 fan is pre-mounted. Cooler Master also includes everything in the kit for mounting an optional second 120mm fan. Even the large thread, coarse-pitched fan screws for the second fan are included.
The included 120mm fan is specified at a high 70 CFM output and a very low 19 dB(A) noise level. These specifications appear pretty remarkable since the excellent and quiet Scythe S-FLEX fan manages just 28 dB(A) at an output of around 64 CFM. The S-FLEX also runs at a slower 1600 RPM. Noise measurements will provide a better idea of the true noise level of the included fan.
Installation
Since the Hyper 212 is fully assembled all that is required is to install the mounting plate for either Intel or AMD before attaching the cooler to your motherboard. Four small screws are used to attach the appropriate adapter to the base plate. With the adapter attached, it is then necessary to remove the motherboard (for both Intel as well as AMD) in order to attach the cooler.
On Intel 775 the mount screws pass through the four motherboard holes and are secured from the motherboard back with washers and nuts. Cooler Master thoughtfully includes a nut driver that works with a Phillips screwdriver to attach the nuts. The good news about this installation is the fairly heavy 710g cooler is very secure after mounting. The bad news is the motherboard has to be removed.
Overall the cooler installation is pretty easy - much easier than many competing products that also provide the security of a bolt-through installation. Those worried about a heavy heatsink popping out of holes with the Intel push clips should feel much better about this installation method.
The second fan option, on the other hand, is a nice addition whose installation just wasn't thought through. To mount the second fan you have to attach mounting plates with screws from the BACK of the plate. This means the plates must be removed from the cooler to install. The problem is the fan mounts are attached to the cooler at the top and bottom of the fin array, and - you guessed it - you have to remove the motherboard and cooler just to attach a second fan. While doing this before the initial installation isn't that big of a problem, there ought to be an easier way to add a second fan on an existing installation.
These strange cooler mount glitches, like having to remove the motherboard to mount the second Hyper 212 fan, could be avoided if manufacturers required design engineers to actually mount and use all accessories in a real case like consumers will be using. For a company like Cooler Master, which makes many excellent cases, this should be an easy task.
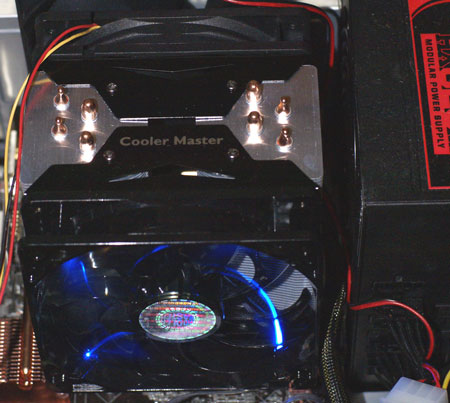
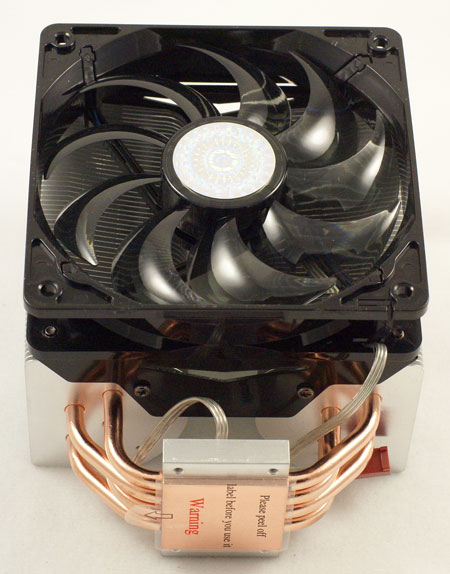
Once the second fan is installed it is very secure. The two fans in a push-pull configuration create a nice package as you can see in the photo above. Since the Hyper 212 is designed with support for two fans, we tested the cooler in both single and dual-fan configurations.
The Cooler Master brand hardly needs an introduction. It is one of the most widely recognized product names in cooling around the world. Headquartered in Taiwan, Cooler Master has established themselves as a leading name in cases, air cooling, and fans. They also market products such as power supplies, water cooling kits, notebook cooling pads, and specialized chassis for external storage. If it comes to cooling, Cooler Master probably makes a product that competes for your attention.
Cooler Master makes a wide selection of CPU air coolers, ranging from budget alternatives to the stock CPU coolers that come with retail units to exotic high-end solutions. The Hyper 212 looks like a high-end solution, but at about $40 it is priced as a midrange CPU air cooler.
As a major player in the cooling business, Cooler Master pays more attention to things like packaging than you see from the smaller players. The Hyper 212 package is simple but it provides the info the buyer needs for a buying decision without being overly busy. Cooler Master uses a corporate color scheme that makes it easy to pick out their product.
Inside the box you will find the Hyper 212 fully assembled, including a 120mm fan, except for the socket mounting plate. It should be clear from the picture than the 212 can easily mount two 120mm fans in a push-pull configuration. Everything needed for the second fan, including mount plates and fan mounting screws, is in the package. All you need is a bare fan to complete a dual-fan setup.
The items required for mounting the Hyper 212 on Intel Socket 775 or AMD 754/939/940/AM2 are included in the accessories kit. A nut driver socket for a Phillips screwdriver is included for installing the screw nuts. All you need is a Phillips screwdriver to remove your motherboard and secure the cooler.
Specifications
The Hyper 212 can be mounted on either AMD 754/939/940/AM2 or Intel Socket 775. The 120 fan is pre-mounted. Cooler Master also includes everything in the kit for mounting an optional second 120mm fan. Even the large thread, coarse-pitched fan screws for the second fan are included.
| Cooler Master Hyper 212 Specifications | |
| Heatsink | |
| Dimensions | 112(W) x 92(D) x 160mm(H) |
| Weight | 710g (18.7 ounces) |
| Material | Copper heatpipes and aluminum fins |
| Configuration | 4 copper heatpipes in U loops |
| Fan | |
| Fan Size | 120mm x 120mm x 25mm |
| Fan Type | Long-Life Sleeve Bearing with Blue LED |
| Connector | 3-pin |
| Maximum Fan Speed | 2000 RPM |
| Maximum Noise Level | 19.0 dB(A) |
| Maximum Airflow | 69.69 CFM |
| MTBF | 50.000 hours |
| Air pressure | 2.94mm H2O |
The included 120mm fan is specified at a high 70 CFM output and a very low 19 dB(A) noise level. These specifications appear pretty remarkable since the excellent and quiet Scythe S-FLEX fan manages just 28 dB(A) at an output of around 64 CFM. The S-FLEX also runs at a slower 1600 RPM. Noise measurements will provide a better idea of the true noise level of the included fan.
Installation
Since the Hyper 212 is fully assembled all that is required is to install the mounting plate for either Intel or AMD before attaching the cooler to your motherboard. Four small screws are used to attach the appropriate adapter to the base plate. With the adapter attached, it is then necessary to remove the motherboard (for both Intel as well as AMD) in order to attach the cooler.
On Intel 775 the mount screws pass through the four motherboard holes and are secured from the motherboard back with washers and nuts. Cooler Master thoughtfully includes a nut driver that works with a Phillips screwdriver to attach the nuts. The good news about this installation is the fairly heavy 710g cooler is very secure after mounting. The bad news is the motherboard has to be removed.
Overall the cooler installation is pretty easy - much easier than many competing products that also provide the security of a bolt-through installation. Those worried about a heavy heatsink popping out of holes with the Intel push clips should feel much better about this installation method.
The second fan option, on the other hand, is a nice addition whose installation just wasn't thought through. To mount the second fan you have to attach mounting plates with screws from the BACK of the plate. This means the plates must be removed from the cooler to install. The problem is the fan mounts are attached to the cooler at the top and bottom of the fin array, and - you guessed it - you have to remove the motherboard and cooler just to attach a second fan. While doing this before the initial installation isn't that big of a problem, there ought to be an easier way to add a second fan on an existing installation.
These strange cooler mount glitches, like having to remove the motherboard to mount the second Hyper 212 fan, could be avoided if manufacturers required design engineers to actually mount and use all accessories in a real case like consumers will be using. For a company like Cooler Master, which makes many excellent cases, this should be an easy task.
Once the second fan is installed it is very secure. The two fans in a push-pull configuration create a nice package as you can see in the photo above. Since the Hyper 212 is designed with support for two fans, we tested the cooler in both single and dual-fan configurations.


21 Comments
View All Comments
pc007 - Wednesday, October 31, 2007 - link
True, but assuming the fan is ducted correctly, i.e the heat sink has some 'walls' forcing the air to be sucked in from the opposite side? Cooling the edges of a heatsink well should still produce the desired result, similar to the way a heat pipe configuration works.I am aware that it is much more efficient to push a fluid/gas than 'pull' it for any reasonable distance, But on something as small as a heatsink would this still be the case?... and besides the movement of the cooling medium (air) is not the goal, rather the cooling effect on the heat sink.
Could anyone point me at some research with regard to PC cooling that would explain this?
Chuckles - Friday, November 2, 2007 - link
If the fan is ducted well, you will get a similar heat transfer. However, ducting adds material and thus cost. A buck of material for ducting may not seem like much, but the multiplier to get to retail price is on the order of 3-5. So for 2 similar performing heatsinks, one an open push, the other a ducted pull, the ducted pull configuration will cost about $4 more, for no gain. On a $40 heatsink...As for your second question, a 3" long heatsink is still "macroscale". The fluid properties aren't changing drastically, so the scaling relationships and equations would still be valid.
Also, "movement of the cooling medium" is a crucial aspect of a heatsink. Coeffiecients of heat transfer (h) are strongly dependent on the Reynolds number of the fluid flow. In a given fluid, the easiest way to up the Reynolds number is to raise the velocity term.
assafb - Wednesday, October 31, 2007 - link
Thanks!EODetroit - Wednesday, October 31, 2007 - link
See title.Also you said you would review the new Razor mouse. Haven't seen that yet either.
Wesley Fink - Wednesday, October 31, 2007 - link
We are working on several NDAs right now, but we do plan a dual-radiator water cooling review in the near future.Margalus - Wednesday, October 31, 2007 - link
One thing I always wonder about these heatsink tests. How are they tested? On a test platform with the motherboard laying flat? Or, like most users have it? In an upright motherboard with the heatsink parallel to the ground?With the advent of all these heatpipes that makes a big difference. If they are being tested on a testbed laying flat on a table the cooling results may be markedly better a real life setup in a tower case with a vertical motherboard. With the heatpipes lying sideways in a tower setup they would not seem to work like they were designed to since the fluid that is supposed to cool off and flow down to the top of the heatsink would lay trapped in the tubes that are laying on their sides..
strikeback03 - Wednesday, October 31, 2007 - link
from page 3:IIRC the heatpipes supposedly contain a mesh inside designed to help the fluid return to the base through capillary action.
CrystalBay - Wednesday, October 31, 2007 - link
They stil rule in casesThankx for the review Wes,
Eight years ago I paid 300 for the first ACTS aluminum removable MB Tray.IT came with 4x80 CM Fans . It was good but too loud for my P3 700 @ 966...
IT is for sale ...inquire within...
choppergirl - Sunday, April 4, 2010 - link
I respectfully TOTALLY disagree. :-)Compare these two examples.
Start with two enclosed metal buildings consisting of a single room.
In both, you put a a space heater operating on HIGH to represent the heat coming off the CPU. That's all a CPU is really, generating waste heat the equivalent of a light bulb, a space heater in effect.
You are in one building, and you put a fan blowing directly blowing on the space heater. No air is being sucked in from the outside, it is simply a fan blowing straight on the heater. There are various little holes around the building, but no appreciable net amount of air is traveling into or out of them.
I am in the second building. The same fan is turned around backwards, sucking the heat into the fan at the base of the heater, instead of blowing at it, and through a venturi duct this hot air is being shot out and shunted to the outside of the building. Other small holes around the building are allowing air pressure to come in because of the negative pressure caused by the fan sucking and venting air to the outside of the building at its heat source.
Further, if I were to break down one of the walls of my building (take off the side of the PC case and leave it off) I would stay even more cool, darn near close to the temperature outside the building even.
In the first building, the space heater will be cooler, because the violent air at the exit of the fan is more turbulent that air being sucked into the fan. But very quickly over time the heat in the building is going to rise and rise and rise, because all your fan is doing is blowing it right off the space heater and churning it up. The air being sucked into the fan is getting hotter and hotter and will lose its effect to cool the space heater down. You will end up dying of heat exhaustion, because the heat will continue to rise and stay at a high equiliberium level, only limited by the metal buildings ability to shed heat.
In the second building, the air around me won't be violently turbulent, but most of the heat off the space heater is being sucked into the fan and shunted out the building. I can sit there all day and watch the space heater and stay nice and cool.
If you don't believe me, set up two PCs and try it. One has enclosed case blowing the fan on CPU, stirring up the heat. The other has fan reversed, with venturi on it sucking like a vacuum the heat at the source of the heater, and directing it out of the case. Leave off the side panel.
Put two thermometers in both.
After a few hours running on a hot summer day, open up both cases and look at the thermometers, and feel with your hand. The enclosed case with the fan blowing on the CPU is going to be hot as hell, the open case will be near room temperature.
And when you're using nothing but air cooling, being as close to air temperature as possible is as good as you are going to get. You can't go below that just by blowing a fan at soemthing.
You see super expensive cases with tons of fans blowing out, etc. And a fan inside blowing on the CPU pushing the heat around. You're using lots of electricity, making more noise, etc. Much better to do away with them all, and just leave the side panel off, period.
I repeat, I repeat, the only thing the side panel is there for is to keep RATS (and cats and children and idiots) out of the PC, that is it, period. It contributes nothing to proper air suction or flow for fans designed to suck air out. RATS love to chew on IDE ribbon cables, it keeps their teeth from growing to long, they have to do it like hamsters, cockateils, and other critters.
I see a lot of PCs built with this idiot idea, esp. the minitower cases. One fan inside blowing on CPU, everything locked up as tight as a ship for air flow, And only the power supply fan to suck any air out. And the hot air its sucking into the PC power supply is from inside the case.
If these manufacturers would reverse the cpu fanon the CPU heatsink, and put a duct straight out of a hole in the middle of the side panel, you'd have two fans working to suck heat out right at the source like vacuum cleaners. Air will come in via ll the little openings all around the case.
CHOPPERGIRL
http://choppergirl.air-war.org
choppergirl - Sunday, April 4, 2010 - link
In short, take the side panel off your case, and leave it off, if you have no kid, rat, or idiot problems.Reverse the fan on your CPU heatsink (assuming its a traditional one).
Make a duct out of paper and tape to put around the exit of the fan like a tube, so that the CPU fan is sucking air in at the CPU heatsink like a vacuum cleaner, and shooting it outward past the boundaries of the case. If you don't fully understand what I'm talking about for making a venturi duct outward (even though its simple), just skip this step. Your cpu fan will still be shooting the heat outwards towards the missing side panel and out of your PC case.