The GIGABYTE Z390 Aorus Master Motherboard Review: Solid, But Not Special
by Gavin Bonshor on March 21, 2019 12:30 PM EST- Posted in
- Motherboards
- Intel
- Gigabyte
- ATX
- LGA1151
- i7-8700K
- Z390
- Aorus Master
Overclocking
Experience with the GIGABYTE Z390 Aorus Master
GIGABYTE's UEFI firmware uses a basic, yet simple and intuitive layout. All of the relevant overclocking settings such as those for frequency, memory, and voltage all have their own individual sections. All of the power-related settings can be found under the advanced power settings subsection. This can make the adjustment of different settings a little bit challenging as once you’ve been through four or five different menus and changed settings, it could be quite easy to forget a couple of settings that’s been applied; for what it’s worth, I write mine down as I go.
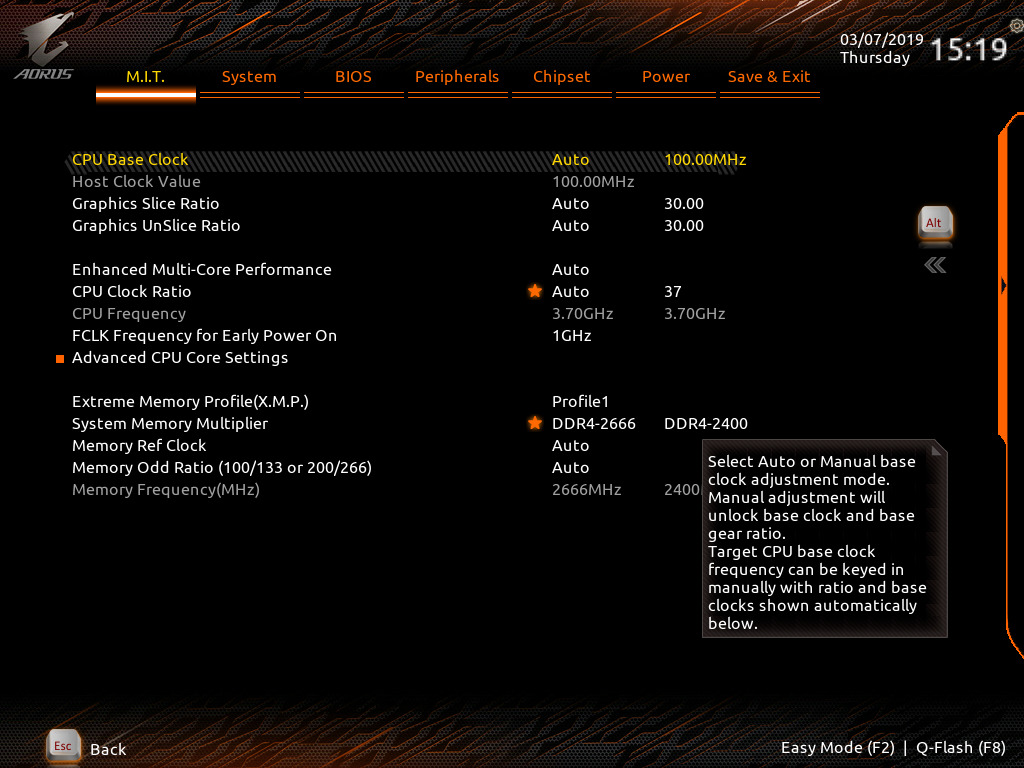
We know that the limitations when using ambient cooling with our testbed Intel Core i7-8700K. This is around 5.1 GHz at 1.45 V; thermal throttling kicks in around 1.4 V and does have a negative impact on performance. Changing the CPU Core Frequency can be done through the multiplier in increments of 100 MHz e.g. x45, x46. The GIGABYTE Z390 Aorus Master has a hardwired OC button in the top right corner of the PCB which allows users to instantly enable a pre-defined CPU overclocking profile with just one click. Users looking to overclock their memory can adjust their settings manually, or simply enable the X.M.P profile within the memory settings subsection of the firmware.
Before we dive into the overclock testing, we did experience the following issues when overclocking using this board:
- The CPU-Z monitoring utility and the GIGABYTE EasyTune software is reporting incorrect voltage values
- We experienced abnormal overclocking stability at usually reliable CPU Core Ratio and CPU VCore settings; the first board I have tested at AnandTech that has required extensive changes in the firmware in regards to power settings.
- Unreliable CPU VCore monitoring on the only accurate sensor without load-line calibration adjustment and VRM setting changes in the firmware.
How to Find the Correct CPU VCore Voltage on the GIGABYTE Z390 Aorus Master
To find the sensor with the most accurate CPU Vcore voltage readouts, first users will need to download HWINFO. The HWINFO utility provides very extensive information on various readouts including the temperature from various sensors including thermal monitoring points, chipsets and controllers, and voltages. To find the correct voltages for the GIGABYTE Z390 Aorus Master, the CPU VCore can be located under the VR VOUT value under the IR35201 section.

The IR35201 is the 8-channel PWM controller of choice on the power delivery of the Z390 Aorus Master and aside from being the most accurate for monitoring the CPU VCore voltage, is also the most obvious one as the IR35201 handles the current going directly from the power inputs into the CPU itself. Users can download HWINFO at this link.
Overclocking Methodology
Our standard overclocking methodology is as follows. We select the automatic overclock options and test for stability with POV-Ray and OCCT to simulate high-end workloads. These stability tests aim to catch any immediate causes for memory or CPU errors.
For manual overclocks, based on the information gathered from the previous testing, starts off at a nominal voltage and CPU multiplier, and the multiplier is increased until the stability tests are failed. The CPU voltage is increased gradually until the stability tests are passed, and the process repeated until the motherboard reduces the multiplier automatically (due to safety protocol) or the CPU temperature reaches a stupidly high level (90ºC+). Our test bed is not in a case, which should push overclocks higher with fresher (cooler) air.
Overclocking Results
For the purpose of overclocking our i7-8700K on the Z390 Aorus Master, we changed the following settings which generally on other boards we've tested, have been left completely untouched. It's not unusual to disable the C-states and alter power settings when overclocking.
- CPU VCore Loadline Calibration - High
- VAXG Loadline Calibration - High
- PWM Phase Control - Perf
- VAXG Phase Control - High Perf
- All C-States - Disabled
- EIST (Intel SpeedStep Technology) - Disabled
- Race to Halt - Disabled
- Voltage Optimization - Disabled
- Intel Speed Shift - Disabled
- Enhanced Multi-Core Performance - Disabled
The GIGABYTE Z390 Aorus Master has three different predefined overclocks and modes to choose from; Eco, OC mode and AutoTuning. The Eco mode ran our i7-8700K with 4.7 GHz on one core and achieved a max VCore of 1.115 V with an average of 1.137 V, with a slightly lower power draw overall than stock settings, and a with a little less performance in POV-Ray. The OC mode was slightly different with all cores set to 4.7 GHz which meant a higher overall power draw with a maximum figure of 218 W at the wall. This was due to the maximum CPU VCore at a load of 1.361 V, with an average of 1.351 V. With the AutoTuning mode, the firmware of the Z390 Aorus Master automatically determines which the best settings are suitable for the components and cooling selected. Once activated through the EasyTune software, it cycled through system resets and ran automatic stress tests are different frequencies to find the most stable. Our system managed to achieve 5.0 GHz with AutoTuning, but upon running POV-Ray, it crashed immediately. This means that the overclock the firmware spent 5-10 minutes preparing for us, wasn't actually stable and shows that the Z390 Aorus Master could do with a little work on that front.
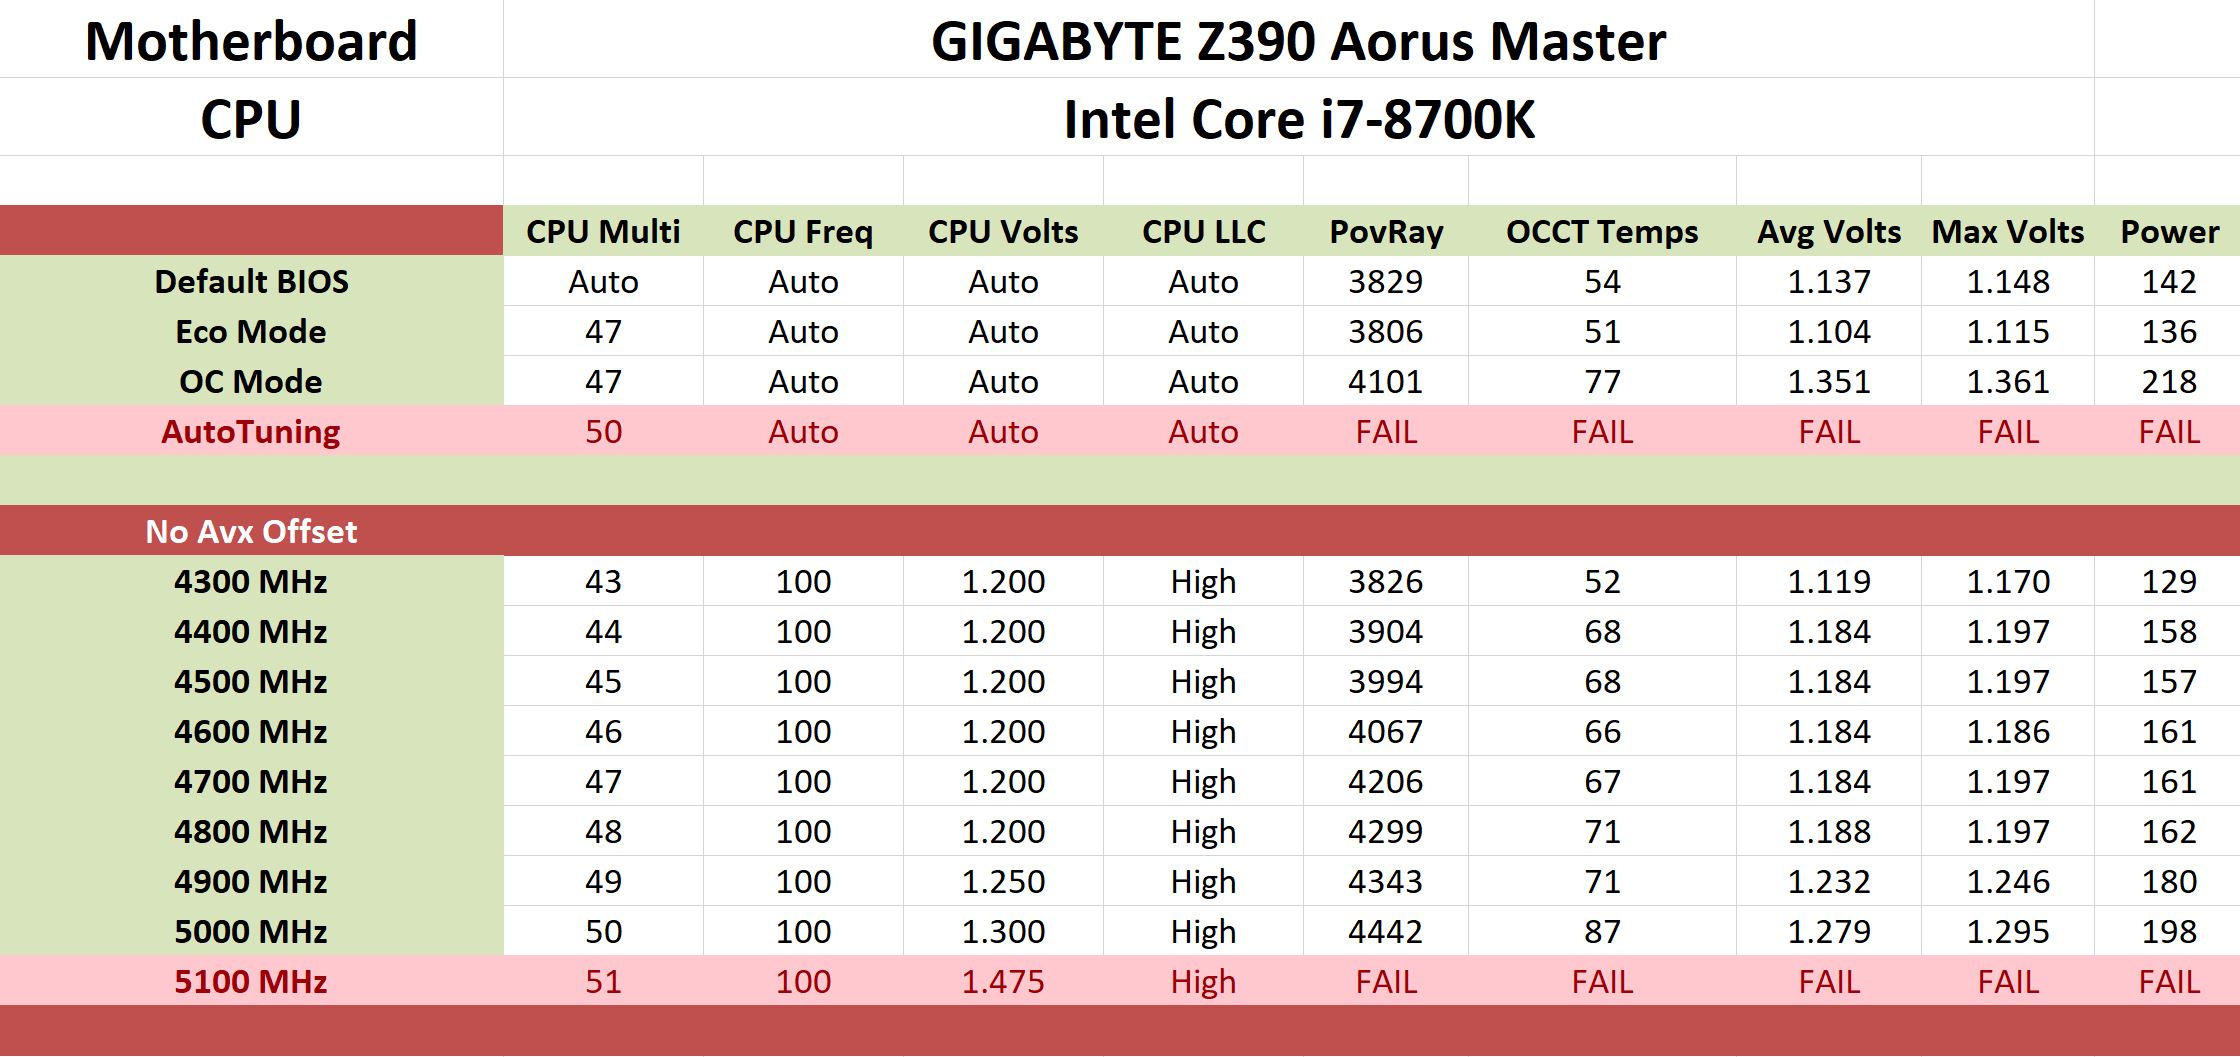
Performing manual overclocks on the GIGABYTE Z390 Aorus Master with our i7-8700K once we changed a plethora of settings was actually quite pleasing. We managed to achieve a maximum stable overclock of 5.0 GHz at 1.30 V on the VCore with the CPU LLC set to the high setting. Even with up to 1.475 V on the CPU VCore, 5.1 GHz was unstable, but one thing we did note was a consistent increase in POV-Ray performance from 4.3 GHz up to 5.0 GHz. Total power draw was consistent with what is expected compared to previous models tested and 1.30 V on the VCore for our test-bed i7-8700K is pretty impressive.
It's clear that the GIGABYTE Z390 Aorus Master has plenty of potential with the 6+2 power delivery and after the curfuffle and rigmarole with the default power settings, overclocking performance is good. As long as users remember that the VR VOUT sensor under the IR35201 section in the HWINFO monitoring utility is the most accurate sensor, overclocking can be made a lot easier and it would be nice to see GIGABYTE take note and rectify this for the future, especially on a model with a price tag of $290.


36 Comments
View All Comments
spaceweasel - Monday, May 27, 2019 - link
Solid 5.0Ghz at 38C, at idle, on my Aorus Master, with F8 BIOS. One of the best motherboards I have ever used.3dfx_Rampage - Friday, March 22, 2019 - link
And yet a bottom of the barrel Asus board performed better. More phases does not automatically make a VRM better.shaolin95 - Thursday, April 4, 2019 - link
hahahahaha BS...Asus you can cook on it but that is how butthurt Asus fanboys are. CAnt accept that on z390, Asus dropped the ball big timeOpencg - Wednesday, March 27, 2019 - link
for all those phases it sure comes out alot slower than the asus boardsCyruskain - Thursday, March 21, 2019 - link
"During the overclock testing on the Z390 Aorus Master, we had to take a slightly different approach due to some instability as we went through the multipliers with default power settings."Yes, yes, and yes. I bought this board back in November on Black Friday due to a great sale New Egg had on it (which surprises me that this review is as late as it is. This board is about 5 months old now). But I simply couldn't figure out how to overclock the CPU manually via BIOS on this board due to crashing loops. I ultimately settled on using the Appcenter EZTune software which placed my 9700k @ 5.1 and ~1.3v, although it fluctuates depending on load (of course). I'm happy enough with a software generated 5.1. But OCing this board shouldn't have been as annoying as it was.
I'm actually surprised it was near bottom of the barrel for gaming fps though. Bummer. But I like the Mobo all things considered, especially the amount of USB ports it has.
Oh, and it does have a solid VRM as El Sama stated.
gavbon - Thursday, March 21, 2019 - link
I'm currently testing the GIGABYTE Z390 Aorus Pro WIFI (on the test bench) and the overclocking is pretty similar in experience. As I highlighted in the review, this board (and the Pro WIFI) are the only boards where I've had to adjust LLC and power settings to achieve 5-5.1 GHz.Cyruskain - Thursday, March 21, 2019 - link
@gavbon I'm going to attempt to mirror the BIOS changes you did and see where that nets me. I also attempted to adjust the LLC alongside the freq. multiplier, but I continued to get crashing loops. However, there were things from the article you did that I didn't, so I'm curious to try it out. But, at the end of the day, the software netting me 5.1 isn't anything to scoff at. It's pretty impressive for software.gavbon - Thursday, March 21, 2019 - link
At least the software gave you a stable overclock, to begin with! 5.1 GHz is certainly good, pretty awesome if you ask me!sonny73n - Friday, March 22, 2019 - link
You can OC GPU with software but I would recommend against OCing CPU with software, especially Gigabyte software. Google it!ZedVile - Thursday, March 21, 2019 - link
I have done a bit of testing on this Motherboard both on the test bench and fully integrated into a build. Ring ratio seems to play a role with performance and defaults have changed through-out the bios revisions. Huge variations in performance, CPU voltage requirements and ring ratio defaults.Bios F6 defaulted the Ring ratio to 4.8 while later revisions have lowered the ratio to 4.7 and 4.6.
I have experienced the best bench performance with the 9900k on F6 BIOS ring ratio 4.8 and at 5.0GHZ all core at 1.285 Volts. B-die at 4266 1.5v
Passes Intel Burn Test very high and maximum. 5.2GHZ @ 1.375 also passes IBT very high on F6 bios.
On the contrary bios F8e requires 1.325v @5.0GHZ and does not pass IBT @ maximum. Performance is also down if the ring ratio is not manually adjusted back up to 48.
Buildzoid has a great vid on samsung B-die overclocking on the Z390 Master
Over on the Gigabyte forum users have complained about XMP profiles and RAM compatibility throughout the bios revisions...
@Gavin Which bios revision were you using, and did you test DPC latency & gaming perf with different bios revisions?