Overclocking The AMD Ryzen APUs: Guide and Results
by Ian Cutress & Gavin Bonshor on April 16, 2018 2:30 PM ESTOverclocking Methodology
To achieve the overclocks on our test setup, only a small selection of the settings were changed.
Overclocking the CPU
Firstly, we adjust the CPU ratio. The APUs have a 'base frequency' of 100 MHz, and to get the final frequency, the CPU ratio acts like a multiplier (it is often called the CPU multiplier as well). For our testing, to show some underclocking as well as overclocking, we start with a CPU ratio of 30x on all cores. This gives us a floor frequency of 3.0 GHz to start with, and we get a stable voltage and work up from there. At 3.0 GHz, we adjust the CPU voltage to find the lowest setting that remains stable for our testing.

Now the CPU testing rises up like a staircase. If the CPU is stable, raise the ratio by one, and retest stability. If the system is not stable, then add +0.025 volts to the CPU, and retest. Repeat until stable. When stable, raise the ratio again. Repeat until the stress tests hit a thermal limit.
As a result, we get this nice graph when it comes to testing:
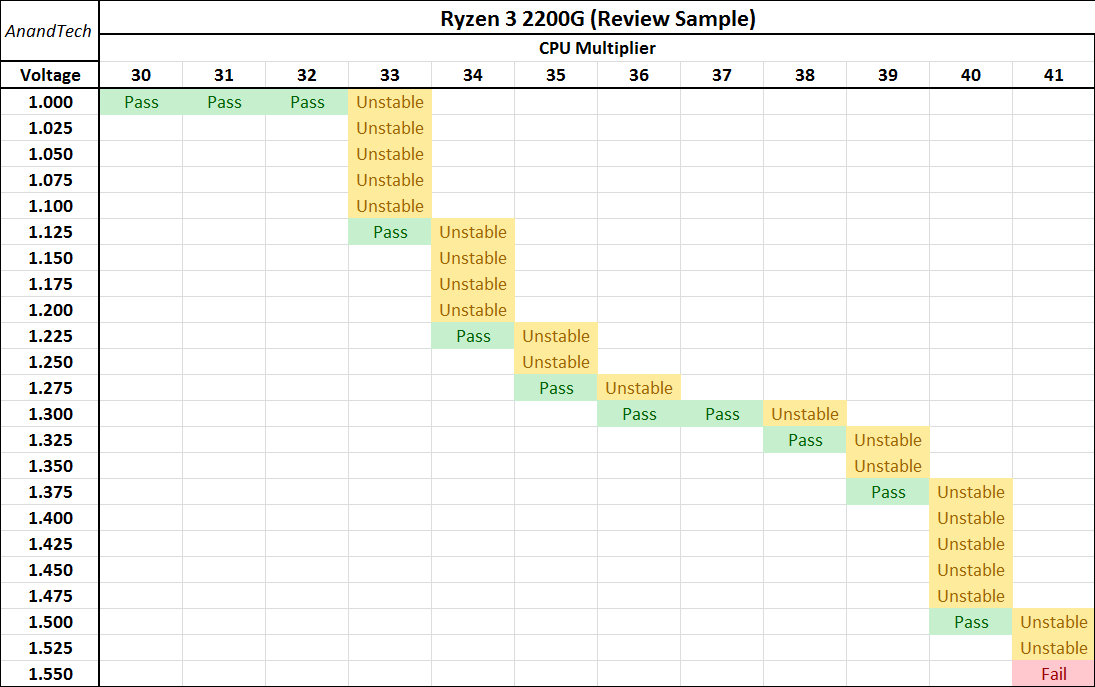
The last fail at the end was due to temperature - the Ryzen family of processors, due to the manufacturing process, seem to have a distinct hard limit on CPU frequency. This hard limit means that a lot of voltage is required just to move up one on the frequency ratio - we can see here that the jump from 39x to 40x required six more stops on the voltage curve. At this point, it would be prudent to select the 39x multiplier for more of a 24/7 daily system, which for the Ryzen 3 2200G is a reasonable core overclock, especially as we test will all CPU cores at this frequency.
Overclocking the Memory
The performance of the memory overclock is dependent on two things: the capability of the memory controller in the processor, and the capability of the memory itself. Either one can present a limit to overclocking, and it can be difficult to diagnose which on is a limit without testing with either a different memory kit or a different CPU.
The memory controllers of the Ryzen APUs are rated to DDR4-2933 out of the box, meaning that with verified memory, the system should happily run at this speed under 'JEDEC' sub-timings (JEDEC being the standard). Memory manufacturers sell memory faster than this, and the easiest way to 'overclock' the APU is by buying a memory kit that has a high speed. Users can then install the kit, and use the BIOS to apply the memory profile (because high speed kits are not enabled automatically). As long as the memory controller in the processor can handle the memory, all is well. However these high-speed memory kits are often very expensive.
Memory comes with two main parameters: frequency and sub-timings. For daily overclocking, DDR4 is quite reasonable in that most memory kits have roughly the same sub-timings, but differ more in frequency, and it is easier to adjust the frequency. Sub-timings are complicated, but AnandTech posted a big analysis on this in 2010. It is worth a read to get a more detailed look:
Everything You Always Wanted to Know About SDRAM (Memory): But Were Afraid to Ask
For our memory overclocking, we are using G.Skill's DDR4-3600 memory kit, with 17-18-18 sub-timings. For each of our processors in our stack that would do this out of the box, it would instantly giving a sizeable boost from the rated DDR4-2933 or from any cheap DDR4-2400 memory kit. Our G.Skill kit actually offers two different XMP profiles on-board, one with DDR4-3333 and the other at DDR4-3600, with the same latency timings.
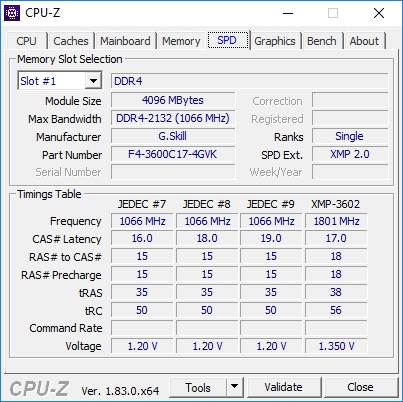
For the DDR4 standard, three different memory voltages are defined. The regular voltage for most memory kits is 1.20 volts, while high-speed memory kits are given 1.35 volts. There are also low powered kits at 1.05 volts. Overclocking the memory is similar to that on the CPU - the memory ratio/multiplier can be adjusted in conjuction with the voltage. However unlike a CPU, thermal limits of the memory are not often the limiting factor, but the ability of the memory itself or the memory controller on the processor. This can be hard to determine - for most daily overclocks we recommend a safer voltage around 1.35-1.40 volts and to work within those means. Pushing too much voltage through the memory controller is not something that the processor can recover from as easily, like an unstable CPU overclock.
In our testing, due to a limitation on the integrated memory controller on our Ryzen 3 2200G ($99) samples, we would need to push voltages beyond levels considered safe at DDR4-3600, so we opted to go with the first profile with speeds of DDR4-3333. While all of the other settings in regards to memory were left untouched, the only one that was changed was the DRAM voltage, (called VDDIO voltage on the board we used). It was changed to match the specifications of the applied XMP profile, just to ensure the voltage remains stable during operation.
Overclocking the Graphics
When it comes to gaming, the GPU frequency is likely to matter the most, As with the other two parts of the processor, the main goal here is frequency and voltage. Overclocking the GPU is a little different for frequency, as the options allow for a 1 MHz granularity, rather than dealing with ratios or multipliers. It comes down to pushing the frequency, adjusting the voltage, finding the stability point, and repeating. In this case we usually raise the GPU voltage by 50 MHz each time, then dialling the overclock back when we hit a hard limit.
I managed to push the integrated Vega cores on our Ryzen 3 2200G sample to 1360 MHz, with a maximum recommended SoC/GPU voltage of 1.25V. Coming from a 1100 MHz turbo frequency, this is almost a 25% overclock. Other overclocks have been reported to hit higher, some even reaching 1450MHz in some cases. The limiting factors in integrated graphics usually come down to the capabilities of the chip and the power delivery mechanism: some motherboards are not geared towards integrated graphics, due to the regular Ryzen processors not having any, and as such built more towards discrete graphics solutions.
Note - As with all overclocking on the Ryzen 2000 series APUs, we would recommend the processes to be done individually with stress and stability testing done at each stage, etc. CPU overclock, stability test, RAM overclock, stability test, graphics overclock, stability test and so forth. This way allows for a process of elimination to be carried out if one of the overclocks fails during stability testing, although this isn’t an exact science, it is more than likely that the last changed setting is the one that needs adjusting in relation to the component you’re currently overclocking.
Some Results from CPU Overclocking
For each of our CPUs, we used the method listed up top to see the limits in CPU frequency. One of the concerns with readers that follow the tech press quite closely is that for launch day reviews the CPU manufacturer might send out 'golden samples' - processors that overclock very well. The danger here is that they might not be representative of what a user will get, and the journalist might give the product a favorable review when the retail situation is actually quite different.
Most manufacturers that sample the press, either CPU, motherboard, DRAM, power supplies, do some level of internal testing on samples before sending them out. There is no point shipping a 1200W power supply around the world that is dead on arrival, for instance. Every time we get an MSI motherboard, it comes with a certificate of pre-testing: someone in the PR team has put in a chip, run a few basic 3DMark tests, and given it a tick. That makes common sense - it saves time and money for all concerned.
The issue comes with pre-launch hardware. Normally a section of the tech press (not all, and how many depends on the company involved) get access to the hardware in advance. Sometimes, in order to be timely with articles, these are engineering samples and not full retail products. Big companies are likely to test these samples before leaving in more ways than one: if they know that 80% of the products can overclock to a certain frequency, they are going to make sure that none of the other 20% are sent out: the goal of the PR is to put the product in the best possible light. It is up to the tech press and the journalist to determine how much weighting they should give to a single, solitary overclock score (in our view, not much if any). If a journalist is raving about overclock performance from testing one processor, something should fire up a red flag. But is that the fault of the manufacturer that sampled, or the journalist?
Obviously the best way to solve this is to get a retail sample. Some tech press who don't get samples will buy it and then test, although that misses the boat on 'day one' reviews (some media don't care much about day one reviews). As stated above, sending out untested retail samples, even if they were available to the PR team early, might not be the best way for the PR team to 'showcase' the product, especially if it ends up DoA. There will be some testing, and we cannot get away from it.
So for this article, we decided to have our small run of processors. We have two that came from AMD before the launch, and obtained two after the launch in sealed retail boxes. There was a small difference, but not a big one by any means.
Launch Samples
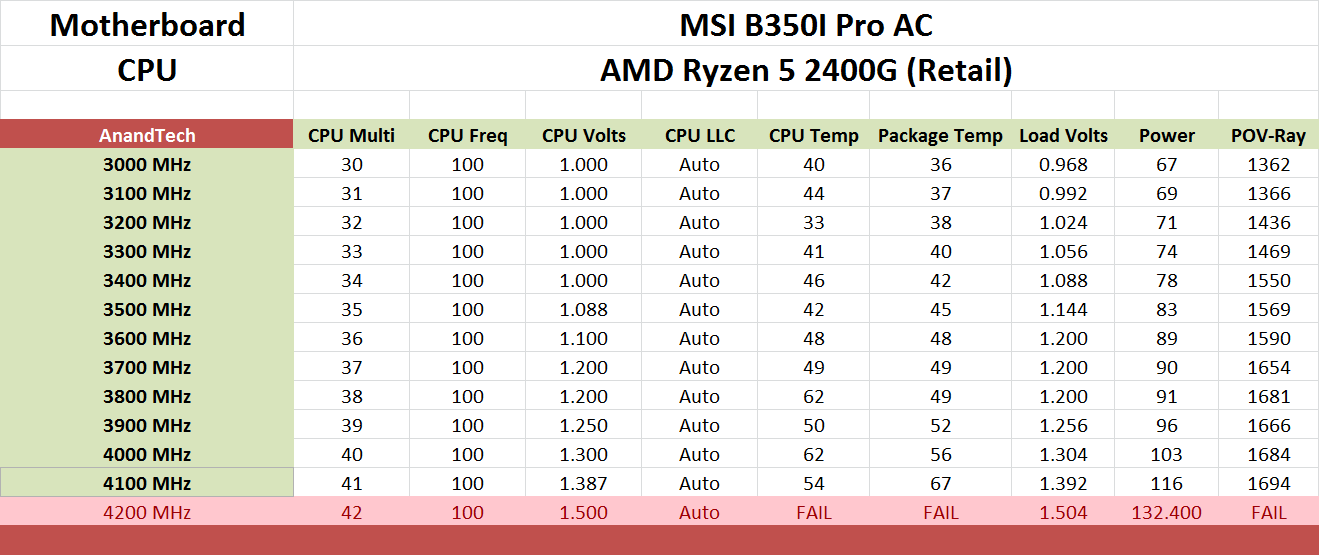
Both CPUs were tested in the MSI B350I Pro AC.
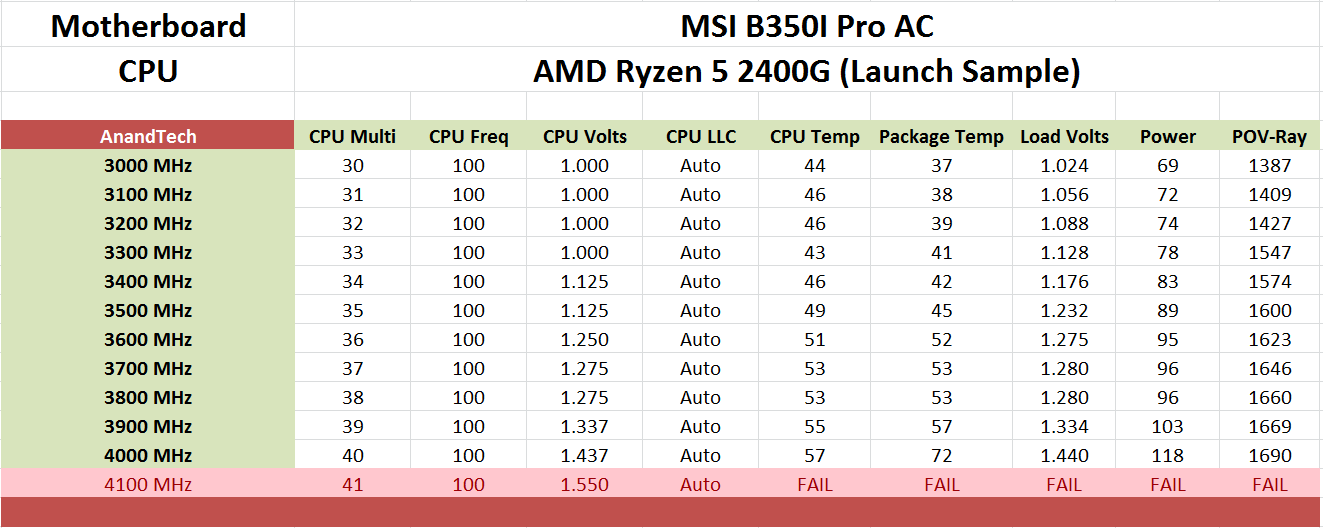
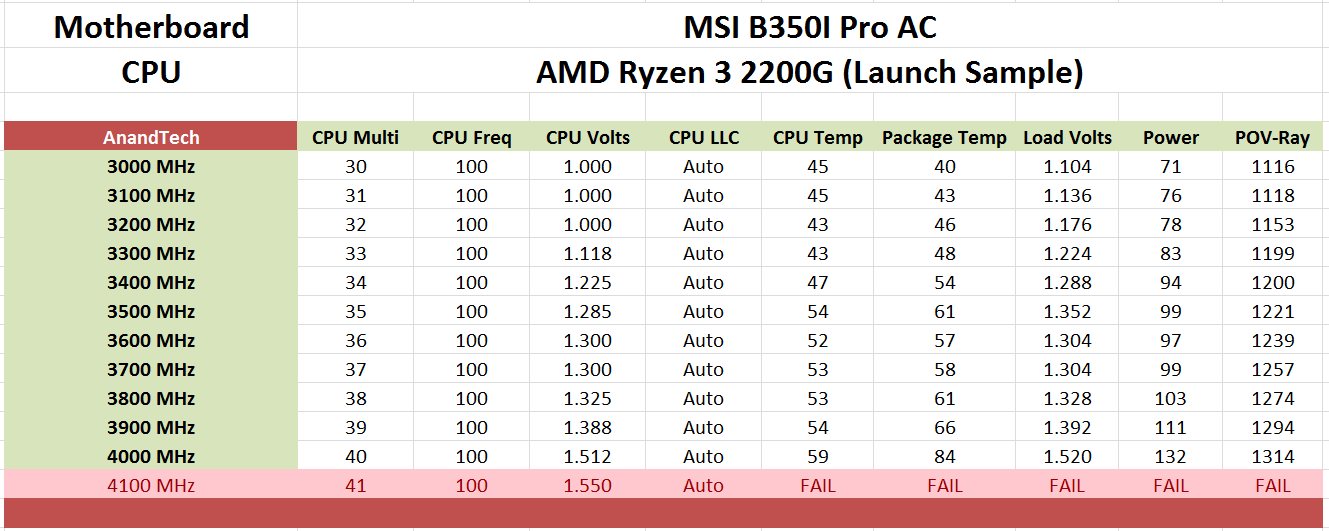
Both of our luanch samples hit 4.0 GHz, although the Ryzen 3 2200G required a lot more voltage to get there. The Ryzen 5 2400G also had lower power consumption across the board, and lower temperatures, despite having two threads per core. This shows that it was the better binned chip from AMD.
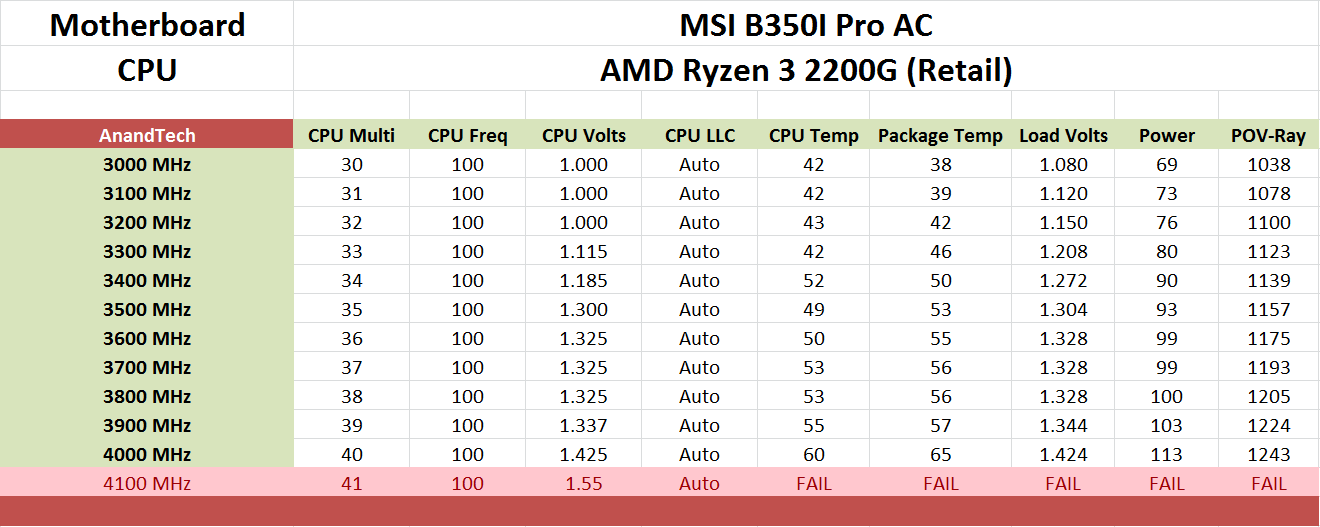
Retail Samples
Both CPUs were tested in the MSI B350I Pro AC.


63 Comments
View All Comments
Alexvrb - Monday, April 16, 2018 - link
One thing that was odd about an older stock Asrock board I was using was that you had to update to the "Bridge BIOS" (3.4? I think) before you could flash the latest 4.50. But it wasn't a big deal because Instant Flash did not even acknowledge the 4.x BIOS until I flashed the bridge BIOS. Shrug.Lolimaster - Tuesday, April 17, 2018 - link
Your OC's are a joke, you don't OC the cpu a part at all, it's worthless with a chip that runs at 3600Mhz base, you focus solely on the igpu.1.3v for soc voltage 1600-1700Mhz pretty much guranteed on any chip properly OCed
Lolimaster - Tuesday, April 17, 2018 - link
OCing the cpu part only takes aways precious heat that gpu could benefit from.gavbon - Tuesday, April 17, 2018 - link
This particular piece isn't the end of the testing, it's only the first part. Each stage including CPU frequency, memory frequency and iGPU frequency is being analyzed/tested. Where someone looking to opt for a Ryzen 2000 series APU over say an Intel i3/i5, not everyone automatically buys an APU marketed at gaming just solely for gaming.Rest assured, each element is being deep dived to determine sweet spots for specific tasks and uses. Of course, gaming will benefit more from increased iGPU clock speed, but not everything will and every motherboard I've tested on AM4 has multiple overclocking profiles available so setting an overclock for each individual need is easier than ever.
id4andrei - Tuesday, April 17, 2018 - link
In sentiment with the OP, I will add that Techspot has reached 1600 Mhz on the GPU side of the 2200G by abandoning the CPU side altogether and that with the stock cooler. For the budget conscious gamers a GPU only approach would make more sense.gavbon - Tuesday, April 17, 2018 - link
Yeah achieving higher clocks on the iGPU is possible if you completely ignore overclocking the CPU, that much is true! Of course we have to explore all the avenues as not everyone games, and you'll see the script as more of the series (around 4-5 pieces in total including this one) get published.eastcoast_pete - Wednesday, April 18, 2018 - link
Hi Gavin,If you can, please go one step further: undervolt the CPU, and then see how far you can push the iGPU, even (or especially) on the stock cooler. Also, while you're at it, do the reverse - undervolt the iGPU, and overclock the CPU, and see how far it can be pushed on the stock cooler. For example, if I run handbrake to compress the 4K videos from my camera, I don't care much about iGPU speed, but take all the sped the CPU can give me. With gaming, it's usually the opposite.
SanX - Tuesday, April 17, 2018 - link
Hi overclockers. Looking back i feel like probably one of the world oldest overclockers. Such happened that i overclocked my 4.77MHz IBM PC XT -like comp soldered on the knees from low integration chips on the home-made motherboard to ~10MHz continuously. That was in the middle of 1980th. Overlock happened just by lucky chance that i had no crystal oscillators so just the LC-based variable freq generator was made for it and it was easy to change its frequency. The overclocking was on air up to approx 10 MHz, after which dirt started to appear on the TV which was used as a monitor. Sometimes the dry ice was used too (but mostly to find bad overheating chips). Then when i added missing FP-coprocessors this computer gave me orders of magnitude larger computer power then i was getting on my job where of course the entire institute of 1000s of people time-shared couple mainframes getting very little each. There was also one very funny moment with this overclocked PC. That was the behavior of floppy drives "on steroids" when computer was more then 2x overclocked. Drives were spinning, opening, closing and reading data so fast and also producing noise of lifting rocket, that my friends who also were making their own computers, laughed hysterically. I overclock each and every computer since then.Death666Angel - Tuesday, April 17, 2018 - link
Great article. One thing though: the position of the two processors in the charts is not always the same. At first the R5 is always #1 and the R3 is #2, but then it changes in the discrete section and even changes within the F1 section again.bcronce - Tuesday, April 17, 2018 - link
" I find it amusing to note that DRAM bit-errors, unaffected by overclocking, can happen on the scale of one per GB per four years (or less). That's about a worse case scenario, but it translates to about one bit-error per three months in a system with 16GB."Googling the topic, I'm seeing most sources say in the area of 1 bit error per 1GiB per hour.