EPoX EP-3SPA3 i815EP Socket-370 ATX
by Mike Andrawes on March 15, 2001 1:36 AM EST- Posted in
- Motherboards
Overclocking Package
Despite the newer i815EP chipset and the fact that EPoX is trying to produce a more cost effective motherboard, the EP-3SPA3 still comes with a full suite of overclocking features.
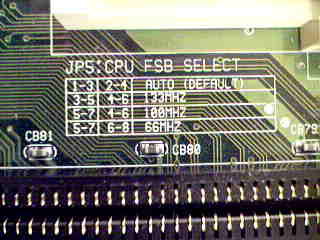
Since multiplier overclocking is not available for commercial Intel processors (engineering samples are unlocked), FSB overclocking is the only option. As such, it is that much more important for Socket-370 motherboards to include 1MHz FSB increments for maximum overclocking potential, and that's exactly what EPoX has implemented on the EP-3SPA3.
The EP-3SPA3 allows you to select FSB speeds between 66MHz and 250MHz in 1MHz increments. This can easily done right within the BIOS. Depending on the processor you install on the EP-3SPA3, the board will auto detect the original FSB and use this information to set the AGP:FSB and PCI:FSB ratios appropriately, although you can override these values with a set of jumpers on the motherboard. This will allow you to overclock your 100MHz FSB CPU to 133MHz (or higher), without having to worry about AGP or PCI speeds running out of spec.
 |
 |
|
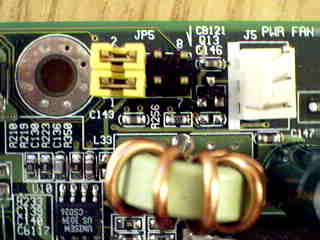
Jumpers
for overriding the autodetect pins on the CPU for FSB settings
|
|
FSB speeds up to 250MHz are great in theory, but a variety of factors keep us from reaching such high speeds when overclocking, including the design of the board, limited memory speeds, and the fact that we're using multiplier locked CPU's. The most we can reasonably expect to achieve is in the 160MHz range, so FSB speeds from 160MHz to 250MHz don't really help much with real overclocking. However, the 1MHz increments between 100MHz to 160MHz will in most cases fit your needs when it comes to squeezing out the last bit of performance from your CPU.
EPoX also did an exceptional job with their variety of voltage tweaking options, all of which are found in the BIOS as well, which in turn makes overclocking that much easier for you. For CPU core voltage, you can select increases of 0.05 / 0.10 / 0.15 / 0.20 / 0.25 / 0.30 V above the auto detected value. I/O voltage defaults to 3.45V, but can be raised by 0.05 / 0.10 / 0.15 / 0.20 V. Last of all, EPoX once again brings us voltage tweaks for the AGP interface. The default voltage is 1.5V, which can be raised by 0.1 / 0.2 / 0.3 / 0.4 V. In theory, raising the voltage helps to maintain stability in overclocking systems at the expense of additional heat production. However, keep in mind that putting too much voltage through a device might damage it, especially when run for extended periods of time. In general, 10-15% increases in voltage seem to be acceptable.
Like most other i815E boards, the EP-3SPA3 uses the Winbond W8362HF-AW as the I/O controller and for hardware monitoring. There are a total of three fan headers on the EP-3SPA3, all of which can be monitored in the BIOS. You can also keep track of two temperatures - the CPU (through the on-die thermal diode) and the system temperature.
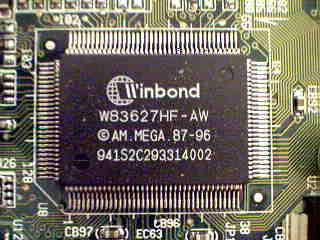
Winbond W83627HF-AW I/O controller & hardware monitor
EPoX not only put in more overclocking options on the EP-3SPA3, they also put in a lot of effort towards making the board more stable. To ensure sufficient power to the CPU, they put in six 2200uF capacitors. Throw in a clean layout of the board and you get a relatively stable board, crashing only three times in 24 hours. Although it is not the best i815 board we have tested, the EP-3SPA3 is considered very stable compared to the average crash rate of 5 to 6 in 24 hours.
On the EPoX web page you will notice they also carry another model using the i815EP chipset, the EP-3SPA3L. The only difference between that board and the EP-3SPA3 we have here is that the EP-our board also features the POSTMAN diagnostic tool. If you recall from our EP-8KTA3 KT133A review, EPoX started to include a new diagnostic system on their motherboards called the P80P LED Debugger. However, putting that decoder on the EP-3SPA3 would not only take up a lot of space but also raise the cost considerably. Instead EPoX has put in a custom ASIC called POSTMAN, providing a human voice based diagnostics.
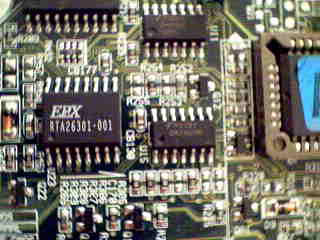
The EPoX ASIC for POSTMAN diagnostic tool
You may have noticed that there is a blank silk screen above the fourth and fifth PCI slots. That's designed for an optional C-Media sound chip, but inline with attempts to reduce the cost of the board, EPoX decided not to include this chip on our sample, although it will probably still be available as an option.
Silk screen for optional C-Media sound chip
The manual for the board is a little bit above average. You should be able to find most information about the jumpers and connectors on the motherboard along with installation instructions. BIOS settings are also discussed but not in great detail. Last of all, it also contains instructions on driver and utility installation.


0 Comments
View All Comments