The Neophyte's Custom Liquid Cooling Guide: How To, Why To, What To Expect
by Dustin Sklavos on September 30, 2013 12:01 AM ESTIf our whole hypothesis is that watercooling is (in most cases) superior to air cooling, then we need some measure of data to prove it. That means building our system and cooling it under air first, and seeing just how much overclocking performance we can get out of it before heat becomes too serious an issue. This is difficult to fully quantify; luck of the draw means we could wind up with stellar, efficient overclockers on both the CPU and GPU sides, or absolutely lousy ones. Haswell, in particular, seems to be afflicted with unusually high variation between individual chips.
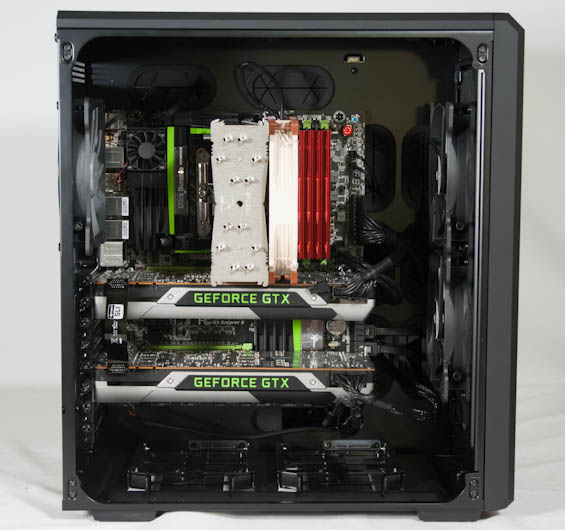
To get some idea of how assembly goes in the Corsair Carbide Air 540, you can refer to my review. Suffice to say the system came together pretty easily. The modular nature of the SSD cages allowed me to remove all but one, and the 3.5" drive sleds went unpopulated but connected for the future. My biggest concern was the lack of clearance between the Noctua NH-U14S and the top GeForce GTX 780.

It looks like they're touching, but fear not, they're just playing the scariest game of "I'm not touching you" I've ever seen. This board is designed for quad-GPU graphics systems, which puts the primary PCIe x16 slot at the top. The upshot of that is the excellent spacing between the two cards: they're two slots apart, allowing for plenty of airflow between them.

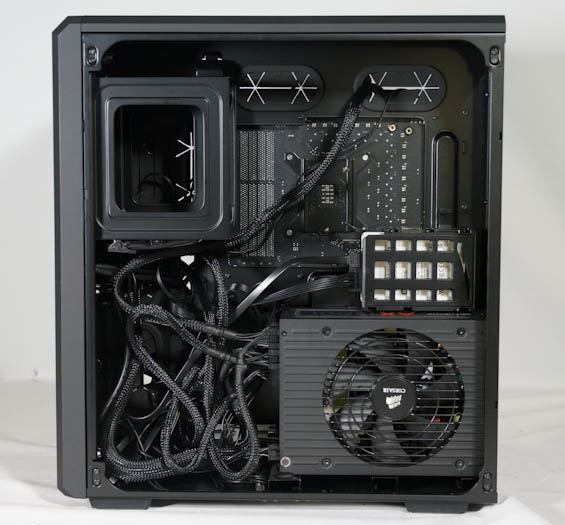
Ignoring for a moment the fact that I've always been lousy at cabling, we're presented with something of an issue. The Carbide Air 540 doesn't really necessitate neat cabling since that cubby in the bottom left of the photo is typically where the mass of cables always goes. However, the AX1200i is a very deep power supply, and that cubby is where I intend to put the pump and reservoir. This is, in my opinion, a failing of the Carbide Air 540's design: there's a tremendous amount of open space at the top right, and no real way to occupy it.
Overclocking on air wasn't actually tremendously difficult, but it's where I ran into some real issues with the i7-4770K. This is...not a spectacular sample. VRIN starts at 1.812V, and the VCore's default voltage is already at 1.2V. With load line calibration set to Turbo, I was able to get the chip stable at 4.3GHz, but VCore was reading ~1.3V in Windows. Thermals were reaching the low 90s under OCCT. 4.4GHz and 4.5GHz were both bootable, but thermally too dangerous. For stability testing, I did a five minute run of OCCT followed by a run of POVray 3.7 RC, per Ian's suggestion.
The two GeForce GTX 780s fared a bit better. I maxed out the power and temperature targets, and while the fans got pretty loud, I was able to get a +125 offset on the core and stunning +550 offset on the GDDR5, leading to a peak boost clock of ~1150MHz and a GDDR5 clock of 7.1GHz. Any higher than that on the GDDR5 would work, but produce artifacts. Peak boost was pretty tough to maintain, though, with the cards regularly dipping back at least a couple of boost bins under EVGA OC Scanner X. Stability testing was initially done with OC Scanner X, but I found it to be remarkably unreliable. Per Ryan Smith's suggestion, I switched to using a Crysis Warhead benchmark and then running Fire Strike Extreme in 3DMark. Crysis Warhead was pretty good at ferreting out unstable overclocks, but 3DMark was fantastic at it.
All in all, the overclocks were decent, although the i7-4770K apparently lived to underwhelm. I'm also a little disappointed the 780s couldn't hit 1.2GHz under boost on the core, but the excellent GDDR5 overclock takes some of the sting off of that.


_thumb.jpg)
_thumb.jpg)
_thumb.jpg)
_thumb.jpg)
_thumb.jpg)
_thumb.jpg)


106 Comments
View All Comments
hot120 - Monday, September 30, 2013 - link
Awesome article!blanarahul - Monday, September 30, 2013 - link
Hmm.. Can you try cooling those 780s alone? Overclocking the CPU seems pointless on Haswell.valkyrie743 - Monday, September 30, 2013 - link
overclocking haswell is not pointless. just is a pain (same with ivy bridge) cause intel decided to be cheap and not solder the IHS to the cpu. if you do a mild overclock its fine give or take how bad the tim on the cpu/ihs is. but if you plan on doing high overclocks and water cooling like this. you might as well de-lid the cpu and apply your own tim. temps on air (if done right) drop a good 15 to 20C under load. I've seen people hitting 90 C and go down to 70 or less underload. and thats on air.the reason why i have no upgraded from my sandy bridge 2600K. @4.5ghz right now at 1.28 volts and my max temp running intel burn test was 70C (air)
The Von Matrices - Monday, September 30, 2013 - link
Please read my post in response to NeatOman. The result is correct but the reasoning is incorrect.gandergray - Tuesday, October 1, 2013 - link
For information about removing the cpu lid or integrated heat spreader, see the work performed by Idontcare: http://forums.anandtech.com/showthread.php?t=22618... .iTzSnypah - Monday, September 30, 2013 - link
You are cooling way too much with only 600mm worth of radiators and your deltaT is obscene. Take out 1x GTX780 and retest if possible.NeatOman - Monday, September 30, 2013 - link
I think the thermal paste between the cpu and the lid are the limiting factor here, i believe that not only will 4770K do better with better thermal paste in between the lid and cpu on just air cooling alone but also might have a larger difference between the air and water cooling.And of course there is also a full delid which i think wont be much of a threat because with water cooling you don't need the motherboard to support a large heavy cooler.
NeatOman - Monday, September 30, 2013 - link
Sorry, i meant that you wont need to put a lot of pressure like if you where supporting a large air cooler with the motherboard.The Von Matrices - Monday, September 30, 2013 - link
The issue is not the composition of the thermal paste between the die and the lid; it is the thickness of the thermal paste between the die and the lid. It's widely reported that in Ivy Bridge and Haswell there is way too much of a gap between the die and the lid due to the thickness of the glue used to secure the lid to the package. You can solve this by removing the lid, using a razor blade to remove all the glue, then put on new TIM and place the lid back on the package. No matter what new TIM you use you will get drastically reduced temperatures.Either way, Haswell runs hot due to its FIVR, and there's nothing that can be done through beefier heatsinks, delidding, or changing thermal paste that will make it cooler than an equivalently modified Ivy Bridge.
dragosmp - Monday, September 30, 2013 - link
Still, it is incomplete. The thermal transfer formula is simply Rth=rho*L/S, more thermal resistance (Rth) more the temperature delta is high between the source and ambient: deltaT=Power*RthAsuming the power is constant, to decrease deltaT you need to decrease the thermal resistance, so:
*S is the die surface, can't change that
*L is the thickness of paste - you're right, it needs to be as thin as possible; put 2x too much and you have twice the deltaT
*rho - thermal resistivity (1/lambda) - it depends on the material; Intel does use cheap paste with a conductivity around 3; were they to use fluxless solder or at least some AS5 they'd decrease the thermal resitance by a factor of 2 easily, thus offsetting a thicker than needed layer of paste.
My 2 cents: for performance the paste must be removed and replaced with something better plus as you say remove the glue to reduce the thickness. Of course one should be careful not to chip the die, but these two things really help.