DFI X48 LT T2R: Floats like a Butterfly…
by Rajinder Gill on April 28, 2008 4:00 AM EST- Posted in
- Motherboards
Important Performance Related BIOS Options
DFI supplied us with their latest BIOS for testing, which is set to go live sometime this week in a public beta. There are six new options for MCH termination and reference voltage adjustments. Three of the new settings over-complicate the BIOS to the point of being unnecessary so will probably be dropped for the public beta. The remaining three BIOS functions will be documented in this guide with the little information we have - even DFI is unsure as to their true nature and Intel has not been forthcoming with the information, shrouding these settings in further mystery.
For the most part, please note that we have decided to work on explanations of BIOS settings we deem worthy of user adjustment when overclocking. Settings we have left out were found to function adequately at the default/AUTO settings.
Genie BIOS Setting
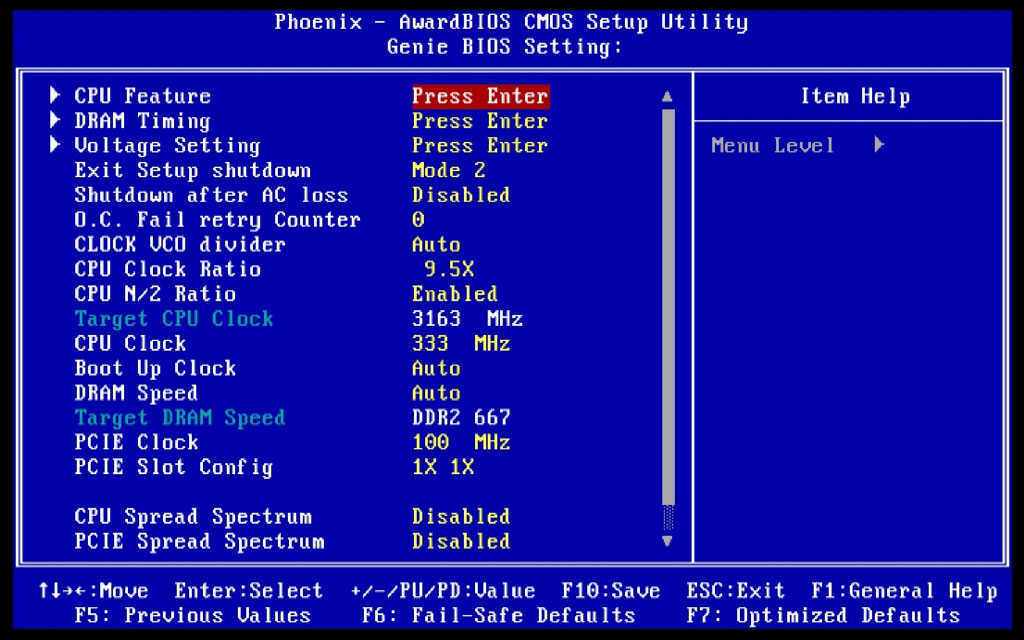 |
Boot Up Clock: Sets a safe user selected FSB speed for the system to revert to when an overzealous overclock fails.
PCIE Clock: Overclocking the PCIE bus can be useful for benchmarking, bringing small gains to overall scores. Unfortunately the X48/ICH9R combo does not have the potential for overall MHz we find with NVIDIA's 680i chipset which could run PCIE frequencies in excess of 150MHz for benchmarking. Generally, speeds below 110 MHz are safe enough to use, while SATA detection begins to fail when frequency is increased above 115MHz.
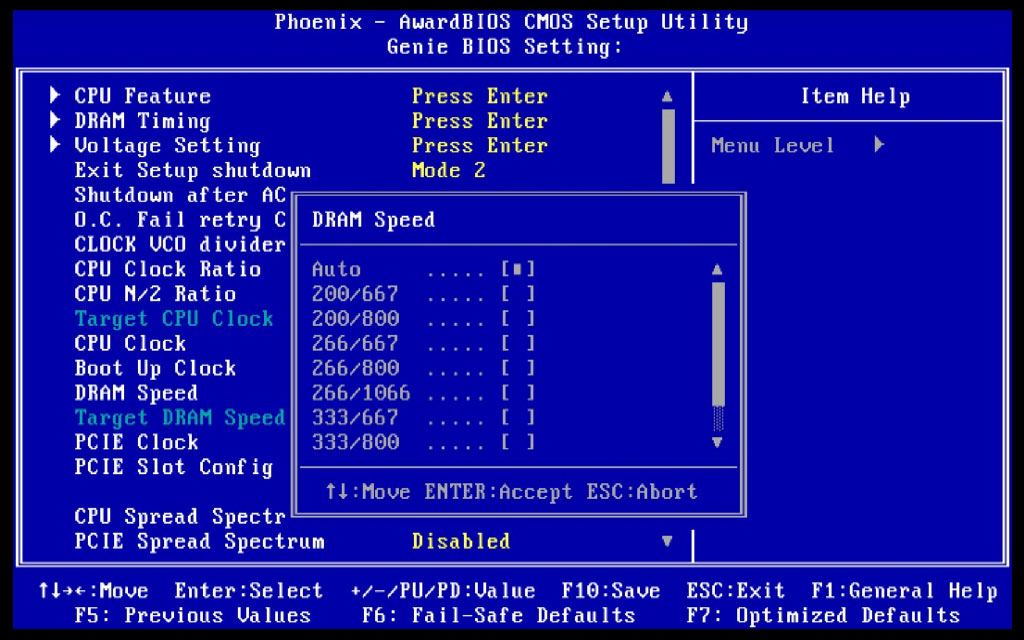
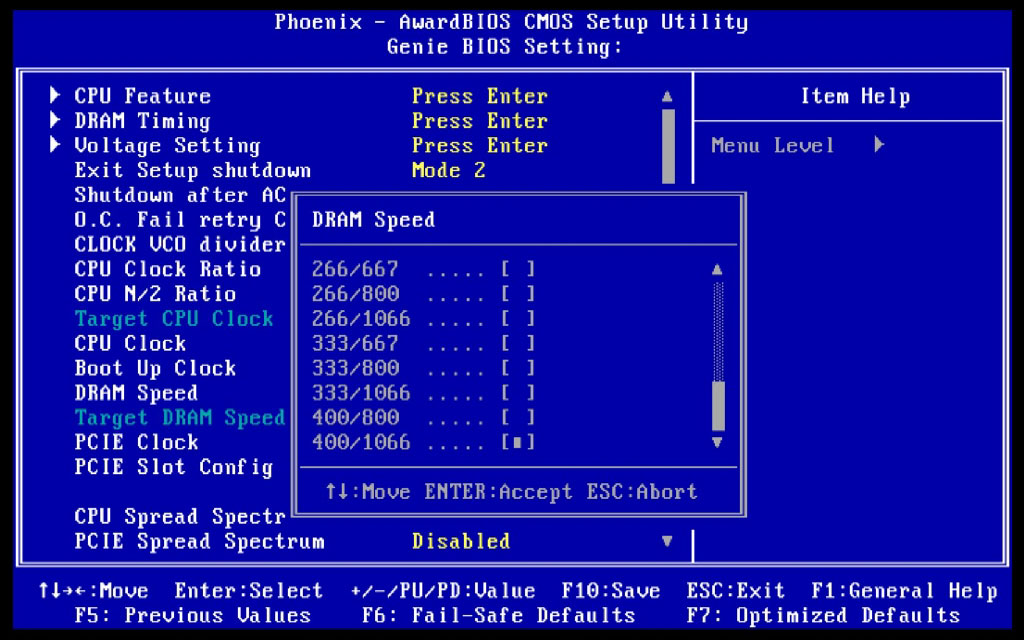
DRAM Speed
Available options are for this function can be seen in the following images:
 |
 |
We recommend that users with quad-core processors stay around 400FSB if they have the luxury of an unlocked multiplier. A 10x multiplier used at 400FSB will not require any GTL reference voltage adjustments to work and choosing the 266 strap will select a default tRD of 6 with some of the phases pulled down to 5 automatically in the BIOS. It really cannot get any simpler to set up one of these processors.
In fact, there are not any boards we know of that can quite eclipse this feat with 8GB of memory in place. We managed to run our board at default VMCH (1.25V) with a QX9650 and no less than 8GB of memory running DDR2-1000 and it was completely stable. Trying to beat this level of performance in any other way with 12MB cache quad-core CPUs is virtually impossible on this board. A default VTT voltage will get you close to 420 FSB, at which point a tRD adjustment as well as non-linear VTT increases for every 10FSB will follow.
We managed to get to 440FSB fully stable, but the VTT required was hardly safe for 24/7 use. As rule of thumb, do not exceed 1.34V (real), unless you have sub-zero cooling and are only running the board to perform a few benchmarks.
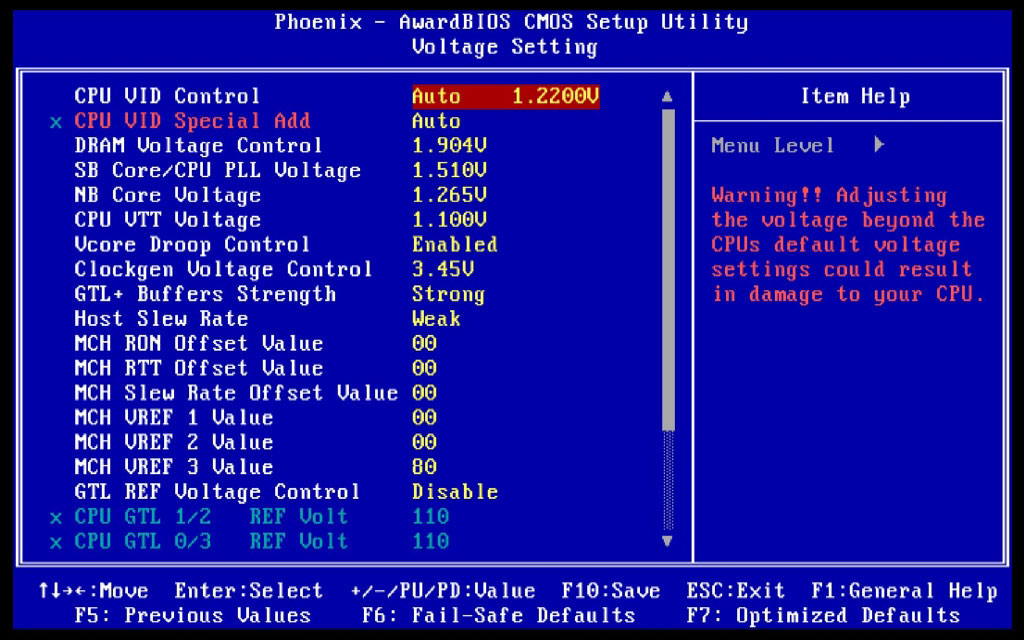 |
CPU VID Control: This function sets the current CPU Vcore (range from 0.8V to 1.6V); this function can be used in conjunction with "CPU VID Special Add", for overvolting past 1.6V if required.
CPU VID Special Add: Used in conjunction with "CPU VID Control", sets a percentage of VCore over the applied voltage using the "CPU VID Control" function; maximum is 125% over 1.6V.
VCore Droop Control: We generally leave this function to its default setting of Enabled. Using Enabled here ensures that the applied VCore is never compromised by overshoot while the PWM circuit is recovering for a heavy transient load. Disabling this function will remove the droop but will also strain the MOSFETs as they struggle to maintain the applied Vcore level, which fluctuates thousands of times a second from the applied value even in light load conditions. The recovery process with no Voffset usually results in longer settling times, which actually gives rise to instability in certain cases - a BSOD during the windows load process is a classic example of this at work.
NBCore Voltage: Sets the core voltage for the MCH. For quad-core CPUs, operating under 420FSB may require nothing more than 1.32V. Over 430FSB, the VMCH requirement rises quite drastically, making the whole process futile - especially when we consider that a rather loose tRD value is required just to hold the board stable. For dual-core processors, if properly tuned the VMCH requirement can be as low as 1.4V for benchmarking while full stability will need circa 1.55V. A properly tuned NBGTL reference voltage value, VTT, and MCH reference values all serve to reduce the requirement of higher levels of VMCH. Anything over 510FSB using a 45nm processor will require in excess of 1.6V though.
CPU VTT Voltage: VTT is the termination voltage used to string data lines between the CPU FSB and the MCH. Increasing this voltage usually enables FSB frequency to be increased. Both 65nm and 45nm processors can benefit from a slight overvolt, bearing in mind that GTL voltage values must be tuned effectively any time an adjustment is made to VTT. For 65nm dual- and quad-core processors we recommend that users attempt to overclock their systems without any adjustment to VTT and GTL and see how far the board will clock.
We have heard of instances where pushing 65nm quad-core processors to their internal FSB limits before any adjustment of VTT/GTL is necessary when using this board. For 45nm quad-cores, we have already outlined our thoughts on the sensible operating point at the beginning of this guide, which just so happens to not require any adjustment to VTT or GTL values.
Pushing dual-core 45nm processors requires no real adjustment to VTT or GTL right up to 485FSB on our board. After this point, we find that although we can run VTT levels in the region of 1.18-1.28V to benchmark the board, heavy CPU loads result in a system freeze irrespective of GTL tuning until we raise VTT to around 1.34V (real) and set GTL reference values in the region of 61% of VTT. The bottom line here is that many users should never need to alter VTT/GTL levels unless they happen to have Satan's donkey for a processor or are shooting for high FSB levels for their particular processor class.
MCH Vref 1/2/3 Value
The defaults for these three settings are 00/00/80. DFI informed us that all three settings must be moved in unison, i.e. the ratio between all three settings should be maintained if making any adjustments. Up to 500 FSB, adjustment of these three settings is not usually necessary (though the FSB threshold for required adjustment may be lower for quad-cores). Unfortunately, there is little information available to us as to exactly which part of the MCH is driven by these reference voltages.
However, through some fiddling, we have found that a value of 30/30/B0 works quite well on our board once beyond 500FSB with a 45nm dual-core CPU. Effects can be marginal at times and at others provide the MCH with enough offset to boot into the OS and allow a benchmark to run. With a hexadecimal scale ranging from 00 to FF, the permutations for adjustment are almost limitless.
We found values over 40/40/C0 did not provide us with any additional gain. Properly set, the ability of the board to run low levels of VMCH may become apparent for those who run just benchmarks. We managed to 3D benchmark our board right down at 1.4VMCH at 500FSB and 4GHz with an E8500 CPU with 4GB of memory when this setting was tuned for our board and parts combination, something we have not be able to do on any other X48 board in DDR2 form.


24 Comments
View All Comments
orangeblue - Friday, June 13, 2008 - link
hi,can anybody tell me if the ocz flex 9200 4gb-kit(2x2048) workz too instead the four 1024 plz.
Zoomer - Saturday, May 3, 2008 - link
I miss the analysis of other features than just plain memory latency.Max fsb overclock, max mem overclock, etc?
Running the board at 400fsb seems boring - lots of P965 boards can best that. Tons of people don't buy these multiplier unlocked chips.
Rajinder Gill - Sunday, May 4, 2008 - link
Hi,Dual core 45nm's top out at around 510-515FSB using air cooling. Most of the quad CPU info is in the review.
We are looking at perhaps adding some more content tomorrow. Mainly 2x2GB and 4X1GB maxmimum stable overclocks and best operating points - using air cooling.
When Using 45nm dual core CPU's X48/X38 chipsets are really only 'good' to around 500FSB tops for 24/7, after this VMCH requirements and total stability with low tRD becomes futile rather quickly. SOme of the DDR3 boards are a little better in this regard, though this overhaed always comes at a high voltage price when used with a suitably high CPU multiplier.
65nm CPU's in dual core form may cruise upto 550fsb with some work, perhaps a 67% GTL table will help for that. Many of the benches in the review were run at 8x500FSB just to reflect the maximum 24/7 somebody is likely to be able to achieve and/or use consistently. FSB values over this are prone to failure in applications like PC Mark Vantage or 3D in some instance (even with lots of GTL work). Our E8500 processor managed 510FSB with 4X1GB maximum stable on this board, while using 2x1GB memory allowed me to boot at a around 520FSB - though this was far from being called stable.
regards
Raja
Zoomer - Wednesday, May 7, 2008 - link
Thanks for taking the time to respond.Unfortunately, I have not been keeping up with the latest tweaks on the best boards. Thanks for the detail, though. :)
amalinov - Friday, May 2, 2008 - link
Am I imaging things or something fishy is going on here?The board has 2 PCIe 2.0 x16 slots - from the X48 MCH. OK.
The board has the following PCIe devices connected to the ICH9R:
1. PCIe x1 slot
2. PCIe x1 JMB363 SATA/PATA controller
3. PCIe x1 Marvell 88E8052 Gigabit Ethernet controller
4. PCIe x1 Marvell 88E8053 Gigabit Ethernet controller
5. PCIe x4 slot (physical x16)
IMHO in this situation the x4 slot can be utilized as x4 only if at least 2 of the PCIe x1 devices are disabled? (if so, then wich exactly?) But this is not mentioned anywhere - neighter in the review, nor in the official DFI specifications or manual. Also, in the manual there is no BIOS settings description section - so I can't find what does the "PCIE Slot Config - 1X 1X" option stand for? (I assume for putting the x4/x16 slot in x1/x16 mode when the other devices are not disabled?)
n7 - Tuesday, April 29, 2008 - link
Great stuff.I have one concern though.
What are you using to test stability for 8 GB?
I have found that what people like to consider "stable" is only stable because of the use of applications like P95, Everest, OCCT, & Memtest86+, which don't tend to really stress 4+ GB RAM & the Northbridge to the same extent as multiple instances of HCI Memtest or as LinPack.
Just curious is all.
Rajinder Gill - Monday, May 5, 2008 - link
HCI memtest seems the way to go for me for memory NBGTL related stuff.For CPU core testing Prime/PC Mark Vantage (Blu-Ray test).regards
Raja
aldy402 - Tuesday, April 29, 2008 - link
great review RajinderIt was very in-depth and well written. A big chunk of the memory portion seemed to focus on micron D9 chips. I have the 4gb Gskill(powerchip ICs) and would really like to see a write up on this board involving "other ICs" and maby a guide with 65nm quads.
also have you tested the performance differential between the intel and jmicron sata ports?
well done
-Aldy
Rajinder Gill - Tuesday, April 29, 2008 - link
HI Andy,Although the guide says Micron I did add a comment on TRFC and double density modules. tRAS adn tRFC are the 2 tiimings that need to be changed for the most part. The boards will hold upto 450FSB and a dual core 45nm 'stable' with most of the chipset registers set to fast/more aggressive. Comments are already in the guide for 65nm CPU's pertaining to leaving the GTL controls at defaults - nothing more is really needed tbh..
regards
Raja
coolbluewater - Tuesday, April 29, 2008 - link
Replacing two of the six USB ports ith two eSata ports would seem to make sense. Not sure why they didn't do this on a board in this price range.