Nikon Coolpix 8400: A Wide Angle Solution
by Stephen Caston on January 12, 2005 12:05 AM EST- Posted in
- Digital Camera
Recording Features
In all recording modes, the Coolpix 8400 can record images as either JPEG, TIFF, or NEF (RAW) files. In JPEG mode, the camera offers 4 quality options: Extra, Fine, Normal, and Basic. The resolution options are below:| Setting | Resolution (pixels) |
| 8M | 3264x2448 |
| 3:2 | 3264x2176 |
| 5M | 2592x1944 |
| 3M | 2048x1536 |
| 2M | 1600x1200 |
| 1M | 1280x960 |
| PC | 1024x768 |
| TV | 640x480 |
The Nikon Coolpix 8400 offers all the shooting modes that you would expect from an advanced digicam: Auto, Programmed Auto, Shutter-priority, Aperture-priority, and Manual. In addition, the camera offers 15 Scene presets and a Movie mode. Also on the Mode dial is a dedicated play mode and separate positions for quickly setting the White Balance, ISO, and Image Quality/Resolution. Finally, there is a Set Up mode.
In Auto mode, the camera determines most of the major shooting settings for you. In fact, the Menu button is completely disabled. However, there are still some options available to adjust. For example, the flash mode can be selected from the following options: Auto, Flash off, Auto w/Red-eye reduction, Fill-in, Slow sync, and Rear curtain sync. The Fill-in flash option forces the camera to use the flash, even if the camera does not deem it necessary. This can be useful in outdoor pictures when there is a significant backlight behind your subject. The Fill-in flash can be used to counter the shadows and illuminate the subject's face. The Slow sync options use a longer shutter speed. Selecting the first Slow sync option, the camera will first fire a flash. Then, the shutter will stay open longer to gather ambient light, resulting in a natural-looking flash picture. In Rear curtain sync, the camera will gather ambient light first and then fire the flash just before the shutter closes. The difference between the two is that if the subject is moving, the Rear curtain sync option will create an image where there is motion blur behind your subject. The opposite will be true for the first Slow sync option.
In Auto mode, the user can also apply E.C. (exposure compensation) up to +/- 2 stops in 1/3 stop increments. The AE/AF lock button can be used to lock the exposure and focus. In the advanced modes, you can choose the behavior of the AE/AF lock button. For example, you can set it to lock the exposure, focus, or both. In Auto mode, it locks both the exposure and focus (just as if you had half-pressed the shutter button). In Auto mode, you can enable Infinity or Macro focus. With the Infinity focus mode, the camera will simply focus the lens to infinity. In Macro mode, the camera can focus as close as 1.2" from the subject. A self-timer of 3 or 10 seconds can be enabled as well.
In Programmed-Auto mode, the camera sets the appropriate exposure automatically. However, by rotating the Command dial, you can alter the shutter speed/aperture equation. For example, by rotating the dial to the right, the aperture will open up and the shutter speed will quicken. Conversely, by rotating the dial to the left, the aperture will contract and the shutter speed will slow down. In Shutter speed priority mode, the user can select the desired shutter speed, while the camera selects the appropriate aperture. In Aperture priority mode, the user can select the desired aperture while the camera picks the shutter speed. Finally, in Manual mode, the user has total control over the exposure. The values are adjusted by rotating the Command dial. To switch between the shutter speed and aperture, you must press the Function button.
 Underexposed |
 Overexposed |
While adjusting the aperture and shutter speed values, a display will appear just above the values to indicate the exposure condition.
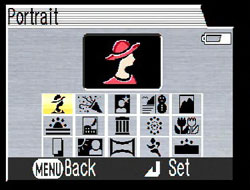
Scene selection screen
The final still recording option is Scene mode. After switching to Scene mode, pressing the Menu button will result in the appearance of the above screen, which displays the 15 available scene types. The scene types are described below:
| Scene | Effect |
| Portrait | Large aperture to create small depth-of-field with sharp subject and blurred background |
| Party/Indoor | Slow-sync flash to capture background lighting |
| Night portrait | Slow-sync flash; noise-reduction |
| Beach/Snow | Compensates automatically for bright scenes to create a bright exposure |
| Landscape | Focus is set to Infinity |
| Sunset | Saturates colors in sunsets/sunrises |
| Night landscape | Focus is set to Infinity; noise-reduction is applied |
| Museum | Flash is disabled; Best Shot Selector is enabled |
| Fireworks | Slow shutter speed; focus is set to Infinity |
| Close up | Camera focuses continuously until shutter button is pressed |
| Copy | Black & white image; used for photographing drawings, text, etc. |
| Backlight | Fill flash is used automatically to fill in shadows created by backlighting |
| Panorama assist | Used to take pictures that can be joined later with included software |
| Sports | Camera focuses continuously until shutter button is pressed; camera will shoot continuously at approximately 2.3 fps while shutter button is held down |
| Dusk/Dawn | Focus is set to Infinity; noise-reduction is applied; dusk/dawn hues are saturated |
 Typical |
 Live histogram |
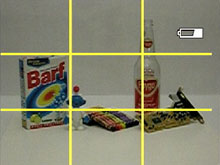 Grid |
 No information |
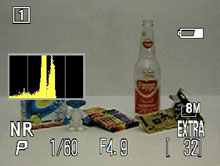
By pressing the Disp button, the camera will cycle through four possible displays. The first display contains information such as the current user memory bank, recording mode, shutter speed, aperture, resolution/quality, and remaining pictures. By pressing the Disp button, the camera will overlay a live histogram on the left side of the screen. Another press of the Disp button will clear the screen of all information other than a 3x3 grid for assistance in composition. A final press of the Disp button will clear the screen of all information other than the live image. At any time, a press of the Monitor button (below the Disp button) will toggle the display between the LCD monitor and the viewfinder.
In Programmed-Auto, Aperture-priority, Shutter-priority, and Manual modes, pressing the Menu button brings up several adjustable options. The first screen that will appear is called "My Menu", which is a screen with six customizable menu options. By selecting "Show all menus", however, we can see the full list of available options. Below, we have broken up these menu options into three separate tables:
| Menu (1/3) | |
| White balance | Auto, White bal. preset, Daylight, Incandescent, Fluorescent, Cloudy, Speedlight, Shade |
| Metering | Matrix, Spot, Center-weighted, Spot AF area |
| Continuous | Single, Continuous H, Continuous L, Multi-Shot 16, Ultra HS, 5 shot buffer, Interval timer shooting |
| BSS | BSS Off, BSS On, AE Exposure BSS |
| Image Adjustment | Auto, Normal, More contrast, Less contrast |
| Saturation Control | Auto, +2 Maximum, +1 Enhanced, +/- Normal, -1 Moderate, -2 Minimum, Black & White |
| User setting | 1, 2 |
For metering, the 8400 offers 4 different options: Matrix, Spot, Center-weighted, and Spot AF area. With Matrix metering, the camera measures light automatically from 256 areas of the frame in order to determine the appropriate exposure. When Spot is selected, the camera will measure light from an area that is 1/32 the size of the entire frame. This area is displayed as a small rectangle at the center of the screen. When Center-weighted metering is used, the camera places emphasis on the center of the frame in its exposure calculation. With Spot AF area metering, the camera will use spot metering on whichever focal point is used.
For drive options, the 8400 offers several possibilities. The default option "Single" means that the camera will only take one picture when you press the shutter button. With Continuous H, the camera can record up to 5 images in any JPEG quality/resolution and in RAW mode at 2.3 fps while the shutter button is held down. With the Continuous L setting, the camera can record up to 11 8M/Fine JPEG images at 1.2 fps while the shutter button is held down. When Multi-Shot 16 is selected, the camera will take 16 816x612 images in a row at 1.6 fps. These images are assembled automatically into a 3264x2448 image with 4 rows. With the Ultra HS mode, the camera will record up to 100 TV/Normal images at 30 fps while the shutter button is held down. The images are recorded to a new folder on the flash card. The option "5 shot buffer" allows you to shoot at 0.7 fps for as long as the shutter button is held down. However, the camera will only save the last 5 images that were taken. With the "Interval timer shooting", you can select from the following intervals: 0.5, 1, 5, 10, 30, or 60 minutes. After pressing the shutter button, the camera will take pictures at the specified interval until the shutter button is pressed again, the memory card fills up, the power source is interrupted, or when 1,800 pictures have been taken.
The Coolpix 8400 offers something called Best Shot Selector (BSS), which is available in Programmed-Auto, Aperture-priority, Shutter-priority, and Manual modes. When BSS is enabled, the camera will take up to ten pictures while the shutter button is held down. The camera then compares the pictures and saves only the one with the highest level of sharpness and detail. This feature can be very useful when taking pictures in low light where camera shake can cause blurry pictures. It is also recommended in Macro mode and when taking telephoto shots. Under the BSS menu option, there is another setting called "Exposure BSS". With Exposure BSS, the camera will take five pictures each time that the shutter button is pressed. There are three sub-options under Exposure BSS: Highlight, Shadow, or Histogram BSS. Each of these options allows you to use BSS in a different way. For example, Highlight BSS will select the image with the least amount of overexposed areas. Shadow BSS will select the image with the least amount of underexposed areas. Finally, Histogram BSS will select the image with the least amount of overexposed and underexposed areas.
The "User setting" option allows you to save changes to camera settings to one of 2 memory banks. By default, all camera settings are saved to the first user bank. This feature is useful if there are two people sharing the same camera or if you are frequently changing between two types of shooting situations.
| Menu (2/3) | |
| Image mode | Image quality, Image size |
| Sensitivity | Auto, 50, 100, 200, 400 |
| Image sharpening | Auto, High, Normal, Low, Off |
| Lens | Normal, Wide adapter, Telephoto, Fisheye |
| Exposure options | AE lock (Off, On, Reset), Bulb/Time (Bulb release, Timed release) |
| Focus options | AF area mode (Auto, Manual, Off), Auto-focus mode (Single AF, Continuous AF), Focus confirmation (Manual focus, On, Off) |
| Zoom options | Digital tele (On, Off), Fixed aperture (On, Off) |
The Sensitivity option lets you control the camera's sensitivity to light. The options are ISO 50, 100, 200, and 400. The Lens options are to be used when an adapter lens is being used on the camera. When the exposure option AE lock is enabled, the camera will lock the exposure and white balance setting so that each subsequent picture will use the current settings. This can be helpful when taking pictures for a panorama for example. The Bulb/Time options allow you to specify what happens when Bulb/Time is selected in Manual mode. If Bulb release is selected, the shutter will remain open for as long as the shutter button is held down. If Time release is selected, the shutter will stay open for a preset time of 0.5, 1, 3, 5, or 10 minutes.
 Auto AF area, locked |
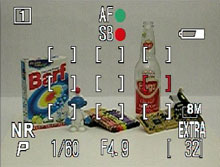 Manual AF area, locked |
The Coolpix 8400 offers several auto-focus options. If the AF area mode is set to Auto, the camera will select one of 5 focus points automatically when the shutter button is half-pressed. If Manual is selected, one of 9 AF points can be selected with the arrow pad. When the AF area mode is set to "Off", the camera will always use the center focus point. However, there is a benefit to turning AF area mode off. After selecting the "Off" option, you can choose between "Hybrid AF" and "Standard AF". The advantage of Hybrid AF is that the camera uses its ranging sensor to estimate the distance to the subject even before the shutter button is pressed. The ranging sensor works in combination with the contrast detection method to provide faster focusing. The Coolpix 8400 also has an AF-assist lamp that illuminates the subject automatically to aid in focusing if there is not enough ambient light available.
In Programmed-Auto, Shutter-priority, Aperture-priority, Manual, and Movie recording modes, the 8400 can be set to manual focus. To do this, the Focus button must be pressed while rotating the Command dial. At this point, the Focus button can be released and the Command dial can be rotated left and right until the subject appears in focus.
For the Auto-focus mode, you can choose between Single AF or Continuous AF. With Single AF, the camera locks focus when the shutter button is half-pressed. When Continuous AF is selected, the camera will focus on its own. When the shutter button is half-pressed, the camera will lock focus. Focus Confirmation is an interesting option. When it is enabled, the objects that are in focus will appear with sharp edges to let you know that they are in focus. If "Manual focus" is selected, the camera will only show these edges when focusing manually. Under Zoom options, the "Digital tele" setting refers to the digital zoom. If On is selected, the digital zoom can be enabled by continuing to hold the telephoto side of the zoom controller after the optical zoom has reached is limit. If "Fixed aperture" is enabled, the camera will keep the aperture as close as possible to the selected value in both Aperture-priority and Manual shooting modes.
| Menu (3/3) | |
| Speedlight options | Pop Up (Auto, Manual), Flash exposure compensation (+/- 2 stops in 1/3 stop increments), Speedlight control (Auto, Internal off) |
| Auto bracketing | Off, Auto bracketing (3 or 5 shots, +/- 0.3, 0.7, 1.0), WB bracketing |
| Noise reduction | On, Off |
| Reset | No, Reset |
| My menu | Setup |
| CF card format | No, Format |
The Speedlight options allow you to control the behavior of both the built-in and optional flashes. If Pop Up is set to Auto, the camera will release the pop-up flash automatically when it is needed. If this option is set to Manual, the flash must be released manually by pressing the Flash Mode button on the top of the camera. With the Flash exposure compensation setting, a compensation of +/- 2 stops in 1/3 stop increments can be applied to the flash. If the Speedlight control setting is set to Auto, the camera will use the optional Speedlight if it is attached. Otherwise, the camera will use the built-in flash. The setting "Internal off" will disable the built-in flash. The Auto bracketing option allows you to take either 3 or 5 pictures with the following variations: +/- 0.3, 0.7, 1.0. For example, if "3 +/-1.0" is selected, the first shutter release will take a picture with no compensation applied. The next shutter release would take a picture with +1.0 EV applied. Finally, the third picture would have -1.0 EV applied. If Continuous is selected as the current drive mode, the camera will take all three pictures in a row while the shutter button is held down. The WB bracketing option is similar except instead of varying the exposure, it varies the white balance. With WB bracketing, the camera records three pictures each time that the shutter button is pressed. The first picture is normal followed by a picture with a reddish cast and a picture with a bluish cast.
With Noise reduction on, the camera attempts to remove noise from images taken at shutter speeds 1/4th sec. or slower. The Reset option will restore the current user memory bank to the factory default settings. The settings in the other user bank will remain unchanged. With the "My menu" option, you can specify which 6 of the 20 menu items to display when the Menu button is pressed. You can also specify in what order you want them to appear. In order to see all 20 menu items, you must select "Show all menus" from the bottom of the "My Menu" display. Finally, the "CF card format" option allows you to format the flash card.
In Movie mode, the Coolpix 8400 records video with audio at 640x480 (30 fps) or 320x240 (15 fps) as QuickTime MOV files. When recording at 640x480, the length of a video clip is limited to 60 seconds. However, at 320x240, the video length is only limited by the remaining flash card space. At the 320x240 size, the video can be in full color, sepia, or black and white. There is also an option to record a time-lapse movie with interval options of 0.5, 1, 5, 10, 30, and 60 minutes. Under the time-lapse menu, you can choose to enable AE lock as well. The Auto-focus mode can be set to either Single AF or Continuous AF via the Menu button. Finally, the 8400 offers an option called Electronic VR (Vibration Reduction), which can be enabled or disabled. While recording, the optical zoom is disabled. However, the digital zoom is available.
The final position on the mode dial that we must discuss is Setup mode. Setup mode consists of three "pages" of options that pertain to camera operation. Below, we have outlined these options in three separate tables:
| Set-up (1/3) | |
| Language | Select |
| Date | Date/Time, Time Zone |
| Folders | Folder options (New, Rename, Delete), Select |
| Monitor options | Release speed (Normal, Quick response) Review options (On, Off) Brightness (5 levels) Hue (11 levels) Start-up display (Monitor On, Viewfinder On) Welcome screen (Disable, Nikon, Select) |
| Seq. numbers | On, Off, Reset |
| Shutter sound | On, Off |
| Auto off | 0.5, 1, 5, 30 min. |
The Folder option allows you to create and name new folders or rename and delete existing folders. In addition, you can select which folder the camera should use to record and display images. The Monitor option category contains several settings for adjusting the appearance of images on the LCD/viewfinder display. According to the user's guide, a slight decrease in shutter lag can be gained by enabling "Quick response". The Quick response option places priority on speed instead of the preview image quality (the recorded image quality is unaffected). The Review setting refers to whether or not the camera displays a brief review of the image immediately after it is taken in Programmed-Auto, Shutter-priority, Aperture-priority, and Manual modes. In all other still recording modes, a review is displayed automatically. The Start-up display option allows you to specify whether the LCD monitor or the viewfinder should turn with the camera. With the Welcome screen option, you can enable/disable the default Nikon display or select a custom image for display at startup. The "Seq. numbers" option allows you to adjust the way in which the 8400 numbers its files and folders. If On is selected, the camera will use sequential file numbers for all new folders and images, even if a new card is inserted or the current card is formatted. If Off is selected, the camera will start with "0001" if a card is formatted, a new folder is created, or a new card is inserted. If Reset is selected, the camera will restart its numbering scheme at "0001". "Auto off" refers to the amount of the time the camera will wait before entering standby mode if no buttons are pressed.
| Set-up (2/3) | |
| CF card format | No, Format |
| Controls | Func (User setting, White balance, Image quality, Image size, Sensitivity, Continuous) , "AE, AF-L" (AE-L&AF-L, AE-L, AF-L) |
| Shot confirmation | On, Off |
| Info.txt | On, Off |
| USB | PTP, Mass storage |
| Video mode | NTSC, PAL |
| Reset all | No, Reset |
With the Controls option, you can specify a frequently used menu to appear when the Func button is pressed. The "AE, AF-L" option lets you specify the behavior of the AE/AF-L button. With Shot confirmation enabled, the self-timer lamp will illuminate to indicate the shutter has been released. If the Info.txt option is enabled, the camera will create a text file with details of each image such as shutter speed, aperture, metering, etc.
| Set-up (3/3) | |
| Date imprint | Off, Date, Date and time |
| Firmware version | Ok |
With the date imprint option, the camera will imprint the date or date/time on each picture in the lower right corner. The Firmware version option simply displays the current firmware. We are using version 1.2.


3 Comments
View All Comments
pigdog - Wednesday, January 12, 2005 - link
The return of the hairy hand!ShinGouki - Wednesday, January 12, 2005 - link
Oops I've noticed its Mr Caston that is the author of the review sorry for the mistaken identity.ShinGouki - Wednesday, January 12, 2005 - link
That you playing the guitar in those clips Anand?Don't suppose there's any hope you feel like starting a section on consumer to semi pro level audio recording hardware / software eg M-audio Audiophile or Terratecs DMX fire type cards not that Creative rubbish. Be nice to have anandtech quality reviews on that type of product and who knows might even cause them to release less buggy drivers if they are under more scrutiny.
*sorry for being totally off topic :), in other news its nice to see you continue with the camera reviews*