Canon 20D: Raising the Bar for Prosumer Digital SLRs
by Stephen Caston on November 11, 2004 12:05 AM EST- Posted in
- Digital Camera
Recording Features
The 20D can record images as JPEG files, RAW files, or RAW files and JPEG files (simultaneously). The JPEG settings Fine and Normal refer to the compression used. Below are the different settings:| Setting | Resolution (pixels) |
| Large Fine/Normal | 3504 x 2336 |
| Medium Fine/Normal | 2544 x 1696 |
| Small Fine/Normal | 1728 x 1152 |
| RAW | 3504 x 2336 |
| RAW w/JPEG* (Large, Medium, Small) (Fine/Normal) | 3504 x 2336 w/JPEG* |
In addition to the extra 1.9 megapixel advantage over the 10D, the 20D also differs in its RAW mode approach. Despite having a different extension (.CR2 compared to the 10D's .CRW), the 20D allows recording of RAW files along with a separate JPEG file. On the 10D, the JPEG file is embedded in the RAW file.
The 20D features the same exposure modes as the 10D and the Digital Rebel. These are split into two different "zones" on the Mode Dial: the Creative Zone and the Basic Zone. The Creative Zone offers 5 modes: Program AE, Shutter priority, Aperture priority, Manual, and Automatic Depth-of-Field. Program AE is an "automatic exposure" mode like Auto mode with several exceptions. For example, the aperture/shutter speed relationship can be adjusted by rotating the Main Dial. Additionally, advanced exposure settings such as white balance, ISO, exposure compensation, RAW mode, and several others can be accessed. In Shutter priority mode, the user can set the desired shutter speed while the camera sets the appropriate aperture automatically. Aperture priority mode is the exact opposite - the user sets the aperture desired while the camera picks the shutter speed. In both Shutter priority and Aperture priority modes, the Main Dial is used to adjust the shutter speed/aperture setting. In Manual mode, the 20D gives you total control over the camera's exposure allowing you to select the shutter speed and aperture. The Main Dial adjusts the shutter speed while the Quick Control Dial adjusts the aperture setting. The final mode in the Creative Zone is called Automatic Depth-of-Field. With this mode, the camera will set the aperture and shutter speed so that the subjects under the selected focus points are in focus. This is especially useful for pictures with groups of subjects at varying distances from the lens.
The Basic Zone offers the following 7 shooting modes: Full Auto, Portrait, Landscape, Close-up, Sports, Night Portrait, and Flash Off. In all Basic Zone modes, the camera sets automatically the AF mode, white balance, ISO, metering, flash behavior, etc. Additionally, RAW shooting is unavailable in these modes. In Full Auto mode, the camera selects the appropriate aperture and shutter speed automatically to provide an accurate exposure. The built-in flash will pop up from its closed position if the camera decides it is necessary. This is also true in Portrait, Close-up, and Night Portrait modes. In Portrait mode, the camera uses a large aperture to produce an image with a focused subject and an out-of-focus background. In Landscape mode, the camera uses a small aperture to produce an image where the foreground and background are in focus. Close-up mode is designed for macro shots and will produce a sharply-focused subject with a blurred background. In Sports mode, a fast shutter speed is the priority. The drive mode is set automatically to Continuous, AF is set to AI Servo, and the flash is unavailable. With Night Portrait mode, the camera will engage the flash if there is not enough light. Then it will use a slow sync flash to illuminate both the subject and the background properly. The camera uses a slow shutter speed during which the flash will fire to illuminate the subject and the camera will allow ambient light to illuminate the background. This method produces a natural-looking night picture. The final shooting mode in the Basic Zone is Flash Off where the camera disables the use of the flash and sets the AF mode to AI Focus.
Because the Creative Zone is where the camera gives the user access to all the settings, this is where we will focus our discussion. We begin with the three available drive modes: Single, Continuous, and Self-timer. With the Single drive mode, the camera will only take one picture when the shutter button is pressed. With Continuous drive selected, the camera will continue to take pictures while the shutter button is held down at a rate of 5.0 fps. Below is a table provided by the Instruction Manual that shows the total number of images that can be shot in a single burst depending on the image quality setting:
| Image-recording quality | Large/ Fine | Large/ Normal | Medium/ Fine | Medium/ Normal | Small/ Fine | Small/ Normal | RAW | RAW +JPEG |
| Max. Burst | 20 | 32 | 28 | 61 | 64 | 123 | 6 | 6 |
We should note that these numbers will vary depending on the speed of the CompactFlash card and the shooting conditions. With the 10D, the continuous drive mode is only able to shoot either 9 Large/Fine JPEG files or 9 RAW files at 3 fps. The most significant advantage that the 20D has over the 10D is that it is able to write files to the flash card even while the shutter button is half-pressed. The 10D will not write any files (unless the buffer is full) until you stop pressing the shutter button entirely. The difference is enormous and results in the 20D's increased readiness to shoot more frames. The final drive mode is Self-timer. Using the self-timer creates a 10-second delay after the shutter button is pressed. However, if Custom Function 12 (Mirror Lockup) is enabled, the delay changes to 2 seconds.
The 20D uses a new auto-focus system with 9 focus points in a diamond arrangement. This is up from 7 focus points on the 10D in a cross arrangement. The new auto-focus system is designed to be faster and more effective in low light. There are 3 auto-focus options: One Shot, AI Focus, and AI Servo. With One Shot focus, the camera will lock focus when the shutter button is half-pressed. This mode is best fitted for still subjects because the lens will only focus one time. Additionally, when evaluative metering is used, the camera will lock the exposure settings at the same time that the focus is locked. With AI Servo, the camera focuses continuously while the shutter button is half-pressed, making it very effective for moving subjects. The exposure settings also change continuously according to variations in lighting. AI Focus mode switches automatically from One Shot and AI Servo when it detects subject motion. Of course, manual focus is always an option as well. In addition to the different focusing modes, the user also has control over which focusing points the camera uses in the Creative Zone modes. The camera can be set to select focus points automatically or the user can select one of the nine points. To do this, you must first press the AF-point selector button. Then the Multi-controller is used to specify which point to use or to use all points (auto). The 20D, like the 10D and Digital Rebel, does not have a dedicated AF-assist lamp. Instead, the built-in flash is used as the AF-assist by firing several short flashes of light to aid the camera in focusing. However, we should point out that if Custom Function 7 (Flash firing) is changed from "Fires" to "Does not fire", the pop-up flash can be left up. By doing this, the camera will use the flash for focus assistance, but will not fire the flash when the shutter button is pressed.
The 20D offers 6 different ISO settings from which to choose: 100, 200, 400, 800, 1600, and 3200 (H). ISO 3200 must be enabled in the Custom Functions menu before it is displayed as an option. For white balance, the 20D has 9 options: Auto, Daylight, Shade, Cloudy, Tungsten, Fluorescent, Flash, Custom, and color temperature (Kelvin). For the color temperature setting, you must set the desired color temperature in the Menu from 2,800K to 10,000K. To set a custom white balance, you first take a picture of the white object that you wish to use as a reference. Then, in the main menu, you select "Custom WB" and select the image from the images on the flash card. The 20D even has a reminder that tells you to "Set WB to 'Custom WB'" if it is not already set on the information panel.
There are three basic metering modes available: Evaluative, Partial metering, and Center-weighted average. With Evaluative metering, the 20D uses several factors to determine the proper exposure by measuring light from various portions of the frame. With Partial metering, the camera uses a small portion of the frame to determine the exposure. This area is seen in the viewfinder as a circle covering approximately 9% of the frame. Center-weighted average metering determines the exposure by measuring light across the entire frame, but by placing special emphasis at the center.
The Canon 20D offers both exposure compensation and flash exposure compensation of +/- 2 stops in either 1/2 or 1/3 stop increments. The increment can be selected via Custom Function 6. To adjust the exposure compensation before a shot, you simply rotate the Quick Control Dial clockwise or counterclockwise to select the desired compensation. For flash compensation, the flash must first be raised. Then, press the Metering/Flash exposure compensation button and rotate the Quick Control Dial to the desired amount.
AE and FE lock are also available on the 20D. AE (auto exposure) lock allows you to use the exposure settings from a different part of the subject than the focus point. To do this, you simply point the lens to the area where you would like to lock the exposure and then press the AE lock button. Then, recompose the image and shoot. The same method is applied for a flash exposure lock. With FE lock, the flash will fire a short pre-flash in order to determine the exposure with the flash added to the equation. The 20D also offers AE and WB (white balance) bracketing. AE bracketing is available as +/- 2 stops in 1/2 or 1/3 increments. Essentially, AE bracketing is a way to ensure a usable exposure. It takes 3 separate pictures with the varied exposures that you indicate. For example, if you set an AE bracket of 0.5 EV (exposure value) and the exposure compensation is set to 0, the resulting three pictures would be: -0.5 EV, 0 EV, and +0.5 EV. This would give you three pictures with different exposures. The order of the exposures can be set via the Custom Functions menu. Although white balance bracketing is offered on the 10D, the 20D takes it to a whole new level with its "WB Shift/BKT" option in the menu.
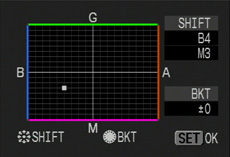 White Balance Shift |
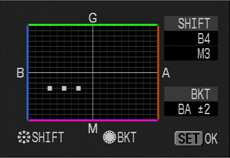 White Balance Shift/BKT |
At first, this screen can be very intimidating, but it is actually fairly intuitive. There are two axes: Blue-Amber on the horizontal axis and Magenta-Green on the vertical axis. By using the Multi-controller, you can choose to create a WB shift by simply moving the small indicator block on the screen to one of 361 points horizontally, vertically, or diagonally. After selecting a shift point, you can add bracketing to the equation by rotating the Quick Control Dial clockwise for a Blue-Amber bracket or counterclockwise for a Magenta-Green bracket. Even if it is difficult to describe, it is really simple to use. With WB bracketing, the camera takes just one picture and saves it as 3 separate files with each color variation.
The main menu is broken up into 3 different sections: Shooting, Playback, and Set-up. Below, we have outlined the Shooting and Set-up menu options available:
| Shooting menu | ||
| Quality | Large/Fine Large/Normal Medium/Fine Medium/Normal Small/Fine Small/Normal |
RAW +Large/Fine RAW +Large/Normal RAW +Medium/Fine RAW +Medium/Normal RAW +Small/Fine RAW +Small/Normal RAW |
| Red-eye | Off, On | |
| Beep | Off, On | |
| Shoot w/o card | On, Off | |
| AEB | +/- 2 stops in 1/2 or 1/3 increments | |
| WB Shift/BKT | Shift amount/BKT amount | |
| Custom WB | Set | |
| Color temp. | 2,800K - 10,000K | |
| Color space | sRGB, Adobe RGB | |
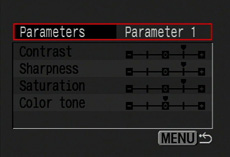
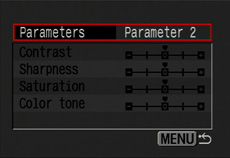
| Parameters | Parameter 1, Parameter 2, Set 1, Set 2, Set 3, B/W | |
 Parameter 1 |
 Parameter 2 |
The 20D differs from the 10D in that it separates the Color space options from the Parameters. By default, the 20D uses Parameter 1, which has added saturation, sharpness, and contrast. Parameter 2 is neutral shooting option. Sets 1 through 3 are user-programmable, which allow you to switch between different customized parameters quickly. The B/W option is an interesting one for Canon to implement into their prosumer SLRs. You can specify the contrast and sharpness of the black and white images. In addition, to mimic film cameras, there are 4 different filter effects from which to choose: Yellow, Orange, Red, and Green. Also, there are 4 toning options that can be applied: Sepia, Blue, Purple, and Green.
| Setup Menu | |
| Auto power off | 1, 2, 4, 8, 15, 30 min., Off |
| Auto rotateOn, Off | Select images |
| LCD Brightness | 5 levels |
| Date/Time | Set |
| File numbering | Continuous, Auto reset |
| Language | Select |
| Video system | NTSC, PAL |
| Communication | Normal, PTP |
| Format | Set |
| Custom Functions | *See table below |
| Clear settings | Clear all camera settings, Clear all Custom Functions |
| Sensor clean | Set |
| Firmware Ver. x.x.x | Update |
The Auto power off option determines how long the camera will wait before turning itself off. A half-press of the shutter button will turn back on the camera. With Auto rotate enabled, the camera will tag pictures taken with a portrait orientation so that they can be viewed as they were taken on the LCD monitor as well as with the included software. LCD brightness can be set to one of 5 positions like the 10D. Although the brightest setting works very well indoors and in low light, just like the 10D, we found the monitor difficult to view in bright sunlight due to reflections. With Continuous File numbering, the camera will assign each new image a sequential number from "0001" to "9999". If Auto reset is selected, the numbering scheme will reset to "0001" each time the flash card is replaced. Communication mode Normal is used for interfacing with a computer while PTP is used when the camera is connected to a printer. The Custom Functions option brings up 18 advanced settings that change the way the camera operates:
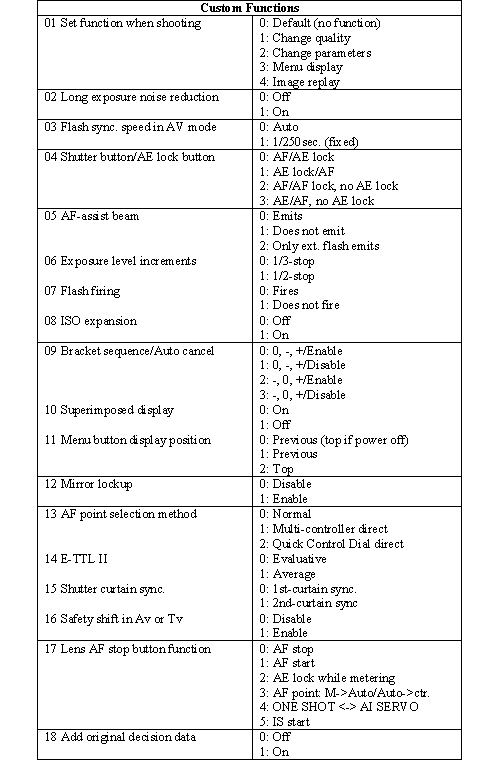
As you can see, the Custom Functions offer quite a bit of control over the camera's functionality. The 20D's Custom Functions are similar to those of the 10D with a few exceptions. The 20D has added an option for Long exposure noise reduction. With this selected, the camera will take a second frame for exposures longer than 1 second. Then, using a dark frame subtraction method, the 20D will attempt to lower the noise of the original image. The 20D has separated the options for AF-assist beam and Flash firing, which were combined into one Custom Function on the 10D. The E-TTL II option supports the new 580EX Speedlite flash. Also, Custom Function 18 is designed for use with the optional Data Verification Kit (DVK-E2).
The Clear Settings option allows you to either reset the camera's settings or to reset all the Custom Functions to their defaults. The "Sensor clean" option causes the camera to open the shutter and to flip the mirror up, giving you access to the sensor for cleaning. You must have sufficient battery power or the AC adaptor; otherwise, the camera will refuse the request. Lastly, the Firmware option in the menu will display the current firmware version that is being used. Pushing the "Set" button will initiate a firmware upgrade process.
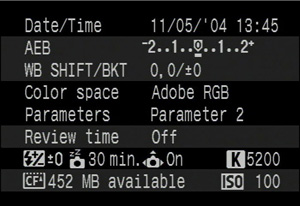
Info screen
Like the 10D, pressing the Info button on the 20D will bring up a display containing all the major camera settings on one screen. This allows you to see numerous settings at a glance.
Overall, if you are familiar with the 10D or Digital Rebel, the 20D will be a cinch to shoot with. However, there are some minor differences in the layout of things. For example, when selecting a white balance mode, rotating the Quick Control Dial clockwise on the 20D will rotate through the options clockwise. The same clockwise motion on the 10D wheel would result in counterclockwise white balance selection. However, the white balance options are a mirror image of each other. So, rotating the dial clockwise on both cameras will select the same options in the same order (in opposite directions). This difference, although confusing to explain, is more logical on the 20D. Just by shooting casually with the 20D, you will notice a large speed improvement over the 10D and Digital Rebel in terms of auto-focus as well as startup and write speed.
Below is a list of some of the major recording differences between the 20D and the 10D:
| 20D | 10D |
| 8.2 megapixels | 6.3 megapixels |
| DIGIC II processor | DIGIC processor |
| 1/8000 max. shutter speed | 1/4000 max. shutter speed |
| 1/250 flash sync | 1/200 flash sync |
| Fast startup | Average startup |
| New auto-focus system with 9 focus points | 7 focus points |
| 5 fps for 20 frames (Large/Fine) 5 fps for 6 frames (RAW) |
3 fps for 9 frames (Large/Fine) 3 fps for 9 frames (RAW) |
| Dual function power switch for camera and Quick Control Dial | Separate switch for camera and Quick Control Dial |
| Improved parameters now allow B&W shooting with Filter and Toning effects | No color filter options |
| Extensive WB Shift/BKT | No Shift, just bracketing |
| Added Custom Functions for Noise Reduction and for Data Verification Kit | No option for noise reduction or DVK |
| Selection of WB Shift/BKT and focus points with new Multi-controller | No Multi-controller |
| RAW mode can record separate JPEG files | RAW files embed JPEG files |
| Shutter sound is chunkier | Shutter sound is thinner |


14 Comments
View All Comments
shuttleboi - Monday, November 15, 2004 - link
What exactly is the point of these camera reviews? As I wrote several months ago, Anandtech is a gadget/hardware site, not a photography site. If you want to reach the photography community (like the rich folk who hang around DPReview.com, spending $1000 a month on lenses, and are ready to click on lots of advertisers' banners), you should do something novel. I suggested reviewing portable photo storage devices (e.g. the Epson P-2000, Archos AV-480, and Nikon ), but nobody listened to me. Suit yourself. As soon as you review any of these gadgets, you will find yourself on DPReview.com, gizmodo.com, and other popular sites. But don't listen to me, I'm just a yuppie male, age 28-40, making a good salary; it's not like your advertisers care about my demographic or anything.Joony - Friday, November 12, 2004 - link
I love my 20D, check out my photogallery,http://www.pbase.com/joony
Gatak - Thursday, November 11, 2004 - link
You may also want to look at the DCRAW - Digital Camera RAW. It is a open source program for reading RAW files from most camera RAW files.DCRAW vs. Canon D60: http://www.aim-dtp.net/aim/digicam/dcraw/
DCRAW vs. Canon 10D: http://www.insflug.org/raw/analysis/dcrawvsfvu/
DCRAW source: http://www.cybercom.net/~dcoffin/dcraw/
Windows binary: http://home.arcor.de/benjamin_lebsanft/
stephencaston - Thursday, November 11, 2004 - link
Woodaddy, thanks for your comments. A Canon 50mm f/2.5 Macro lens was used for all the tests except on page 11 (where each picture lists the lens used beneath the thumbnail). I've also amended the other image quality pages to indicate the use of the 50mm. Sorry for this oversight.WooDaddy - Thursday, November 11, 2004 - link
I missed something critical here. Let me know if it was posted. What lens are you using? Since DSLRs have interchangable lenses, the image quality is directly related to the lens used. If not listed, you really want to say that for reference in you image quality tests.#8, #3 I've picked on Stephen when he first got started on his reviews. He's getting better and IMO he's doing a great job. Now mind you, dpreview is for photogs/techies with an emphasis on photogs. AT is the converse; techies/photogs. I would consider ease of use and image quality and control to be a focus in a review at dpreview. Technical features would be the focus at AT....
Personally, I'm a photog more so than a techie camera guy. I'm doing quite well with my Nikon FE2 manual camera (with Acer 2740s film scanner) and Minolta G400 backup.
AtaStrumf - Thursday, November 11, 2004 - link
Wau, this thing makes some great pics! Way too expensive though.Gatak - Thursday, November 11, 2004 - link
#3 Yes dpreview has many good articles. But I think this is a good start anyway. Dpreview is very technical and doesn't really provide much explanation of technical stuff. This is something I think Anandtech could advance in =) It is possible to have technical depth and yet have good, easy to understand explanations.ProviaFan - Thursday, November 11, 2004 - link
#4 - that's why we have the term "prosumer". It's (the 20D) better than consumer, which would be the digital rebel, but it's not in the league of 1D Mark II (even though it has the same resolution, the speed and build quality don't compare) or 1Ds - which are professional.stephencaston - Thursday, November 11, 2004 - link
#4, The 20D is often referred to as a Prosumer camera. Among the reasons are price, 1.6x cropping factor, sealing, built-in flash, and _optional_ battery grip.The 20D is aimed at amateur photographers looking to replace/supplement their existing film SLR or for those looking to upgrade from a non-SLR camera. I've also heard of pros buying 10D and 20D bodies as backup cameras. I don't think it would be fair to the 1D line to call the 20D a professional camera. It is very nice, but not quite pro ;-)
sjprg - Thursday, November 11, 2004 - link
Nice article, I use both a 10D and a 20D and would like to see some ACR tests added to the CPU processing tests besides the emphasis on games to assist us in selecting the best hardware for processing digital images. One of the test that could be used is the Tom Fors ACR calibrator beta 3.http://fors.net/scripts/ACR-Calibrator/