Fujifilm FinePix E550: Fuji's Newest Packs a Punch
by Stephen Caston on October 15, 2004 12:05 AM EST- Posted in
- Digital Camera
Recording Features
In all recording modes, the FinePix E550 records images as either JPEG or RAF (RAW) files. The resolution options are below:| Setting | Resolution (pixels) |
| CCD RAW | 2848x2139 |
| 12M F | 4048x3040 (interpolated) |
| 12M N | 4048x3040 (interpolated) |
| 6M | 2848x2136 |
| 3M | 2048x1536 |
| 2M | 1600X1200 |
| 03M | 640x480 |
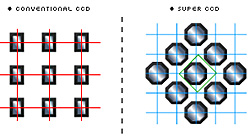
Super CCD
Image courtesy of Fujifilm
The FinePix E550 implements the Super CCD HR sensor. In briefly describing the sensor, we will give you a little background information on the technology that Fujifilm is developing. In 2002, Fujifilm created the Super CCD. The Super CCD consists of octagonally-shaped photodiodes. This is designed to help capture more information horizontally and vertically. Fujifilm claims that the benefits are improved sensitivity, dynamic range, and signal-to-noise ratio. Then, in 2003, the Super CCD HR was created with the idea that it can create images with great detail using a sensor that is less than 2/3 the size of the Super CCD. Later in 2003, the Super CCD SR was designed and is seen in cameras like the FinePix F700, S20 Pro, F710, and S3 Pro. The concept behind the Super CCD SR is to have two photodiodes at each photosite: one that is more sensitive to light and one that is less sensitive. By using two photodiodes, Fujifilm claims that the dynamic range is improved, producing an image "that is more richly detailed, particularly in the highlight area". Go to http://www.fujifilm.co.uk/digital/ to learn more about the technology developing at Fujifilm. (Click on the button "Find out about our new technology" for a cool flash presentation about the sensors.)
The E550 has 10 exposure modes ranging from Auto to Manual. They are Auto, Program, Shutter Priority, Aperture Priority, Manual, Portrait, Landscape, Sports, Night Scene, and Movie. In Auto mode, the camera determines most of the settings for you, giving you access to just a few options. Pressing the Photo mode button brings up the following options:
| Photo mode Menu (Auto) | |
| Quality | 12M F, 12M N, 6M, 3M, 2M, 03M |
| ISO | Auto, 80, 100, 200, 400, *800 |
| FinePix Color | B&W, Chrome, Standard |
We should point out that the ISO setting, "Auto", is only available in Auto mode. In all other modes, you must select the desired ISO level. RAW mode is also available through the Menu and offers 2848x2139 pixels. The difference between "12M F" and "12M N" is the amount of compression used. The owner's manual explains that the different quality modes are printable up to the following sizes:
| Setting | Printable size (inches) |
| 12M F | 14 x 17 (better quality) |
| 12M N | 14 x 17 |
| 6M | 10 x 12 |
| 3M | 6 x 8 |
| 2M | 4 x 6 |
| 03M | E-mail or website |
The ISO level corresponds to the camera's sensitivity to light. The ISO level can be set from Auto to 400 when any quality setting is selected. However, to enable ISO 800, you must use the quality setting 3M or smaller. If you have a higher quality setting selected before selecting ISO 800, the camera will shift the quality setting down automatically to 3M. The FinePix Color settings are effects that can be selected to shoot in black and white or chrome. In Auto mode, the Macro setting can also be enabled by pressing the left arrow pad, which allows focusing as close as 3 inches. By popping up the built-in flash, you can change the flash mode from Auto, Red-eye reduction, and Forced. The self-timer can also be enabled by pressing the Menu button and selecting between 10 seconds or 2 seconds.
There are 3 continuous drive options available in Auto mode: Top 4, Final 4, and 40 frames. These continuous drive options are not available if RAW is selected as the recording quality. "Top 4" allows you to shoot up to 4 continuous frames when the shutter button is held down. The next continuous drive option is called "Final 4". With Final 4, the camera will shoot up to 40 pictures in any quality setting for as long as the shutter button is held down. However, it will only save the last 4 images taken after the shutter button is released. The "40 frames" setting is referred to as "Long-period continuous shooting" in the manual and is only available in Auto mode. This setting automatically fixes the resolution to 1600x1200 and allows you to record images at rates as fast as 1.6 fps. The camera will continue to record images for as long as the shutter button is held down (up to 40 images). We should point out that in all continuous drive modes, except "40 frames", the camera displays images as you take them so that you can monitor action on the LCD screen. In "40 frames" mode, the LCD blacks out between shots.
In Program, Shutter Priority, Aperture Priority, and Manual modes, there are numerous additional options available to the user. By pressing the Menu button in any of these advanced recording modes, the following options are presented.
| Menu | |
| Self-timer | Off, 10, 2 sec. |
| White Balance | Auto, Custom, Daylight, Shade, Fluorescent ("daylight"), Fluorescent ("warm white"), Fluorescent ("cool white"), Incandescent |
| Focusing | AF (Center), AF (Multi), AF Area, Continuous AF, Manual |
| Photometry | Multi, Spot, Average |
| Continuous drive | Off, Top 4, Bracketing, Final 4 |
| Option | LCD, Set-up |
| Bracketing | +/- 1/3, 2/3, 1 EV |
| Sharpness | Hard, Normal, Soft |
| Flash | -2/3, -1/3, +/-0, +1/3, +2/3 |
| Focusing Modes | ||
 AF (Center) |
 AF (Multi) |
 AF Area |
 Continuous AF |
 Manual |
The E550 offers several white balance options from Auto to Manual. It even has 3 settings for different fluorescent light sources including "daylight", "warm white", and "cool white". The camera offers 5 different focusing modes from which to choose. With AF (Center), a crosshair appears in the center of the screen. You can half-press the shutter button to lock focus on your subject. Then, recompose the frame before pressing the shutter button fully. With AF (Multi), the camera attempts to detect the subject automatically when the shutter button is half-pressed. It then displays brackets to indicate the focus point. With AF Area, a box is presented with the phrase "Select AF Area" at the top of the screen. At this point, you are able to use the arrow pad to move the box to one of 49 areas in the frame. To finalize your decision, you press the Menu/OK button. With Continuous AF, the camera will focus constantly on its own until the shutter button is half-pressed. When the shutter button is half-pressed, focus is locked and the picture can be taken. To focus the E550 manually, you must select "MF" from the Focusing menu. To focus, you must hold down the E.C. (exposure compensation) button and use the zoom controller to focus near and far. When the desired focus is achieved, you can press the shutter button fully to take the picture.
There are 3 metering options available: Multi, Spot, and Average. When Multi metering is selected, the camera analyzes the scene to determine the proper exposure. With Spot metering, the camera uses information from the very center of the frame to determine the right exposure. With Average metering, the camera averages the values of the entire scene for the best exposure. In addition to the "Top 4" and "Final 4" continuous drive modes available in Auto, the advanced recording modes offer Bracketing. With Bracketing selected as the Continuous Drive setting, the E550 will take 3 pictures in a row with varying exposures. The exposure variance is set through the sub-menu, "Bracketing". When the shutter button is pressed, the camera will take 3 pictures in the following order: normal exposure, overexposure, and underexposure. The idea is that you can sort through the pictures later and pick the one with the best exposure.
Under the Option sub-menu, you can select the LCD brightness from 10 levels. The Set-up option displays the camera's Setup screen with settings related to camera operation. We will discuss these options further down on this page. With the Sharpness settings, you can select the desired level of sharpening that the camera will apply to JPEG images. The Flash options allow you to adjust the output of the flash. This is helpful if you find the flash is emitting too little/much light than you desire. Speaking of the flash, in the advanced recording modes, there are two additional flash modes available: Slow synchro and Red-eye reduction w/Slow synchro. Slow synchro refers to a special flash mode that helps to obtain a natural-looking flash picture in low light. The camera achieves this by first firing a flash to illuminate the subject. Then, the shutter stays open longer to allow ambient light in, creating a natural and well-lit flash image. Because of the slower shutter speed, a tripod is always recommended with Slow-synchro shots. In Program, Shutter Priority, and Aperture Priority modes, exposure compensation is available as +/- 2 stops in 1/3 increments. To apply compensation, hold down the E.C. button on the back left side of the camera and adjust the exposure up and down using the left/right arrow keys.
The other 4 still recording modes are Portrait, Landscape, Sports, and Night Scene. They operate like Auto mode in the sense that the camera offers very few options via the Menu button. There are only options for the self-timer and continuous drive modes, "Top 4" and "Final 4". The flash behavior can be changed in all modes except Landscape (where the flash is disabled). In Portrait mode, the camera uses a large aperture to create a small depth-of-field, causing the subject to stand out against a soft background. In Landscape mode, the camera uses a small aperture to achieve a larger depth-of-field. This creates an image where both the foreground and background are in sharp focus. With Sports mode, the camera sets a fast shutter speed in order to capture fast-moving subjects. In Night Scene mode, the camera uses a shutter speed as slow as 3 seconds to capture images in low light. The flash can be enabled to perform a slow-sync with or without red-eye reduction.
| Display | ||
 Standard |
 Standard w/Grid |
 No Information |
The LCD display can be changed by pressing the Display/Back button. The cycle is as follows: standard, standard w/grid, no information, LCD off.
Movie Mode
The E550 is capable of recording video with audio at 30 fps in AVI format. The duration of video clips is only limited by amount of available storage. The resolution options are 640x480 or 320x240. We were disappointed that there were no additional options available via the Menu/OK button. It would be nice to have the option to change the white balance or to apply exposure compensation. In addition, neither the optical nor digital zoom can be utilized during recording. In the General Image Quality section of this article, we will take a look at a sample video clip.In all recording modes, the Set-Up menu can be accessed via the Menu/OK button. The following options are available:
| Set-Up Menu 1 | |
| Image Display | Off, On, Preview |
| Power Save | Off, 2, 5 min. |
| Format | OK, Cancel |
| LCD | On, Off |
The Image Display option determines what the camera will do directly after taking a picture. If "Off" is selected, the camera will not display the image just taken. It will simply prepare for the next picture by displaying the live image on the LCD. If "On" is selected, the camera will display the image for 2 seconds immediately after it is taken. If the "Preview" option is selected, the camera will allow you to choose whether to record the image to the flash card or to discard it.
| Set-Up Menu 2 | |
| Beep | Off, Volume 1 - 3 |
| Shutter | Off, Volume 1 - 3 |
| Date/Time | Set |
| Time Difference | Set |
The first two options in the second menu allow you to either turn off the operation sounds or to adjust them in 3 increments. The Time Difference option allows you to switch easily from Home and Local times. This is useful if you find yourself frequenting two different time zones.
| Set-Up Menu 3 | |
| Frame No. | Continuous, Renew |
| USB Mode | Mass Storage Device, WEB, PictBridge |
| CCD-RAW | Off, On |
| Language | English, French, Dutch, Spanish, Japanese, Chinese |
The Frame No. option allows you to specify whether to continue with the present file numbering sequence or to reset it. The USB Mode option allows you to switch to one of the three options. With Mass Storage Device selected, you are able to transfer files to and from a computer. With WEB, the E550 can be used as a Web Cam. However, the manual indicates that this is only possible with Windows XP. The PictBridge option allows you to connect the camera to a PictBridge-compatible printer to print directly from the camera. With the CCD-RAW function enabled, the camera will record images directly from the sensor without any post-processing. The images are recorded as RAF files on the flash card.
| Set-Up Menu 4 | |
| Video System | NTSC, PAL |
| Discharge | OK, Cancel |
| Reset | OK, Cancel |
"Video System" refers to the TV-out capability of the camera. It can be toggled between NTSC and PAL, depending on the television that you will be using. The Discharge option is an interesting one. In order to help maintain the maximum charge capacity, the manual recommends using the Discharge option when using new Ni-MH batteries or when your batteries do not seem to be holding the same charge that they once did. Something known as the "Memory Effect" can occur with rechargeable batteries. This causes the batteries to hold a lesser charge than they are capable of. The Reset option resets the camera back to its factory default settings.
Overall, we found the recording options of the E550 to be very straightforward. We also like the layout of the menu system. Unlike some cameras that list all the menu options in a long list, the E550 uses a tab system that makes the process of finding and changing a setting much faster.


3 Comments
View All Comments
dugweb - Wednesday, May 11, 2005 - link
This was my first digital cam. I really like it. Ive hesitated buying a digital camera because i hate the lag times in between shots, and before shots, and startup... This camera hardly has lag (except flash to flash pics)im very happy with it.
inbeechwood - Saturday, March 26, 2005 - link
I owned the Fuji FinePix 550 and I agree that it offered a lot of bang for the buck. The picture quality was excellent and the movie mode was very impressive also.However, I think everyone considering buying this camera should know that it does not offer a focus assist lamp and as a result, it has a very hard time (read impossible) of focusing in low light conditions. Also, the LCD screen is nearly impossible to see in dimly lit rooms. Forget about using this camera in a church or at a wedding reception. I returned the camera for this reason.
Souka - Saturday, October 16, 2004 - link
Ok... I've read the first sentence...I'm already annoyed/ticked to post....but hey, It's just me.Why?
"Fujifilm stands out amongst other digital camera companies because of its research in sensor technology."
Like their earlier cameras that say 4mp, but are really 3mp? (I remeber it having to do with some sort of pixel shifting....can't remember exactly, but that always made me distrust fuji digi-cams).
Anyhow....I'm sure this is nice enuf of a camera...as I"ll soon find out from reading.
:)