Nikon Coolpix 5200: Does It Deliver?
by Stephen Caston on July 23, 2004 12:05 AM EST- Posted in
- Digital Camera
Recording Features
The CP5200 records images as JPG files with quality settings Fine, Normal, or Basic and the following resolution options:| Setting | Resolution (pixels) |
| 5M | 2592x1944 |
| 3M | 2048x1536 |
| 2M | 1600x1200 |
| PC | 1024x768 |
| TV | 640x480 |
On the CP5200, Auto is the main shooting mode and there are several preset modes including Scene modes and Assist modes. Although Auto mode is designed for general-purpose shooting, it contains the largest number of options available to the user than any of the other modes. While in Auto mode, each direction on the arrow pad brings up a mini menu.
Pressing the left arrow pad brings up an option to turn the self-timer on or off. When the self-timer is activated, pressing the shutter button once will lock focus and begin counting down from 10. If you press the shutter button twice in a row, the time changes from 10 seconds to 3 seconds. Another press of the shutter button will cancel the shot. Pressing the up arrow pad displays a menu with the following flash options: Auto, Flash w/Red-eye, Flash Off, Always Fire, and Flash w/Slow Sync.
A press of the right arrow pad will display a menu that allows Exposure Compensation of +/- 2 stops in 1/3 increments. The down arrow pad gives the user the option to enable or disable Macro mode. When Macro mode is enabled, the camera is able to focus on subjects up to 1.6 inches away from the lens. Pressing the Menu button gains access to 13 additional camera options, which are only available in Auto mode. These options are: Image mode, White balance, Metering, Continuous (drive), BSS (Best Shot Selector), Image adjustment, Image sharpening, Sensitivity, Auto bracketing, Saturation control, AF area mode, Auto-focus mode, and Noise reduction. While in any of the menus, pressing the shutter button down half-way will exit the current menu and return the camera to record mode.
The Image mode menu has options to set the resolution and quality settings mentioned earlier. In the White balance menu, the options are: Auto, Manual, Daylight, Incandescent, Fluorescent (FL1 or FL2), Cloudy, Shade, or Speedlight. As you scroll through the options, the live image behind the menu is updated with the highlighted white balance setting.
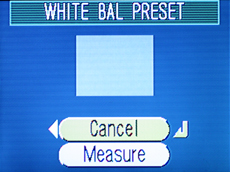
It's good to see that Nikon included manual white balance on this camera. Setting manual WB is pretty fast and straightforward. After selecting White balance from the main menu, you simply select the "PRE White bal. preset" option and press "Enter". The camera's lens zooms in and the LCD shows a preview of the image that it will measure. After framing your white balance subject, you select "Measure" and press Enter. Then, you are ready to shoot with your manual WB setting.
 Matrix metering |
 Center-weighted metering |
 Spot metering |
The CP5200 offers a few different options for metering in Auto mode: Auto, 256-segment Matrix, Center-weighted, or Spot metering. The 256-segment Matrix setting is suggested for general shooting conditions. It measures 256 areas of the frame to determine the best exposure. With Center-weighted metering, the camera will measure mostly the center of the frame to determine a proper exposure. If Spot metering is selected, the camera will measure light in a very small area at the center of the frame.
In the "Continuous" menu, there are 4 options: Single, Continuous, 5 shot buffer, and Multi-shot 16. With Single selected, the camera is set to record only one picture at a time. With the camera set to Continuous and image quality set to 5M/Normal, the camera will take up to 7 frames at 2.5 fps with the shutter button held down. 5 shot buffer will take pictures for as long as the shutter button is held down, but the camera will only record the last 5 shots taken. Multi-shot 16 is an interesting feature that takes 16 small pictures (648x486) at 3.5 fps and then combines the pictures into 4 rows creating the final 2592x1944 pixel image.
The next option on the menu is Best Shot Selector (BSS). The idea is that when you hold the shutter button down, the camera will take up to 10 pictures in a row. Automatically, the camera compares the pictures taken, saves the sharpest of the images, and discards the rest. This setting is really designed to filter out images that may be blurry due to hand movement during exposure. Although this feature sounds a bit superfluous, we feel that some people will find it useful in weeding out those blurry pictures when a tripod is not convenient (i.e. at a concert). By design, this feature disables the flash (to increase continuous shooting speed).
By going to the menu option Image adjustment, you are given the choice between Auto, Normal, More contrast, and Less contrast. In the Image sharpening menu, you can select from Auto, High, Normal, and Low sharpness. With the Sensitivity menu, you are able to select between 5 different ISO settings: Auto, 64, 100, 200, and 400. In the Auto bracketing menu, you are given the option to bracket exposure or WB. With Auto bracketing (exposure) selected, when the shutter button is pressed, the camera takes 3 pictures: one with normal exposure, one with +.5 E.C. (Exposure Compensation), and one with -.5 E.C. With WB bracketing, every time the shutter button is pressed, the camera takes 3 pictures: one with the normal WB setting, one with a bluish cast, and one with a reddish cast. WB bracketing is especially useful if you want to make sure that you get the right color. With 3 pictures of varying WB, your chances of getting a satisfactory shot are much higher than if you just take 1 picture. For Saturation control, you can choose from Enhanced, Normal, or Moderate.
 AF area: Auto |
 AF area: Manual |
When it comes to focusing, the CP5200 offers users a little bit more control than a straight forward point-and-shoot camera. Although there is no option for manual focus, you can select the AF area mode: Auto, Manual, or Off. When the AF area mode is set to Auto, the camera will automatically select one of five focus points (in a "plus sign" formation). In Manual mode, you can use the arrow pad to select from 99 focus points on the screen. When the auto focus mode is set to "Off", the camera will automatically focus on the center of the frame, allowing you to half-press the shutter to lock focus and then recompose the framing before taking the picture. In addition to the AF area modes, you can choose between two types of Auto-focus modes: Continuous AF and Single AF. Continuous AF causes the lens to focus continuously until the shutter button is pressed halfway. This would be useful if you are shooting subjects that are moving quickly. In Single AF mode, the camera will only focus when the shutter button has been pressed halfway. One of the really nice features of the CP5200 is the inclusion of an AF assist lamp. In low light situations, the AF assist lamp turns on automatically to help illuminate the scene in order to focus properly. Finally, there is an option to turn Noise reduction on or off to reduce noise in long exposures.
The next option on the Mode Dial is Scene Mode. In Scene mode, pressing the Menu button brings up a screen that shows 11 preset shooting options along with image quality and resolution settings. The shooting options are:
| Party/Indoor Beach/Snow Sunset Dusk/Dawn Night landscape Close up Museum Fireworks show Copy Back light Panorama Assist |
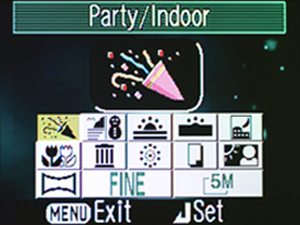 (In this screenshot, the Party/Indoor setting is selected) |
These preset options are designed to be used for popular shooting conditions. It is questionable as to how useful the "Fireworks show" option is, but some of the others are pretty handy. For example, the Party/Indoor setting presets the flash for red-eye reduction and uses a slow sync. Slow sync helps to create a natural-looking background by leaving the shutter open after the flash has fired, allowing ambient light to fill in the scene.
Another example is the Sunset setting, which automatically intensifies the colors found in sunset pictures. In Scene mode, the functionality of the 4-way arrow pad changes for each Scene. For example, with the Museum Scene selected, pressing the up arrow pad will not give you the option to turn on the flash. Each Scene has its own preset camera settings from the Menu options that we mentioned in Auto mode.

(Portrait Assist)
The next 4 options on the Mode Dial are Portrait, Landscape, Sports, and Night Portrait assist. After selecting any of these "Assist" modes, pressing the Menu button will take you to more specific options for each. For example, in Portrait Assist mode, the options are Portrait, Portrait Left, Portrait Right, Portrait Close-up, Portrait Couple, and Portrait Figure. With each of these options (except the first one), a yellow line drawing appears on the LCD over the live preview image. The line drawing serves as a framing guide to help compose portrait shots. The Portrait Assist mode is similar to the "Portrait" feature seen in many other cameras in that it attempts to make the background blurry by producing a small depth of field to make your subject stand out in the image.
The options in Landscape assist mode are similar to Portrait assist. You can choose from Landscape, Scenic View, Architecture, Group Right, and Group Left options. In Landscape mode, the camera ensures that both the foreground and background will be in focus. In the Scenic view option, the screen is split into 3 horizontal sections to assist the user in composing the shot. In the Architecture and Group settings, the on-screen framing guide helps to align buildings properly.
In Sports assist, the camera is automatically set to continuous drive. The other two options that you can select in the menu are Sport Spectator and Sport Composite. In Sport Spectator mode, the camera can take 7 pictures at 2.5 fps with image quality set to 5M/Normal. Sport Composite mode is similar to the Multi-shot 16 mode discussed earlier. The camera takes 16 small pictures and combines them into the final 2592x1944 pixel image.
The Night Portrait assist function is the same as the regular Portrait assist except it is designed for low light situations. Therefore, when taking a Night Portrait shot, the camera will use a slow sync to capture the ambient lighting in addition to using the flash.
The next position on the Mode Dial is "Set up". In Set up mode, you can set the date, monitor info, screen brightness, sound settings, auto-off time, language, USB mode, and video out (NTSC or PAL). You can also change the camera's welcome screen, reset all of the camera's settings, and check the Firmware version. We felt that having a "Set up" button would have made a little more sense than a Set up mode on the dial. In order to take a picture when you are in Set up mode, you must rotate the Mode Dial to the shooting mode that you want. On the other hand, if there was a Set up button, a half-press of the shutter button could be programmed to exit the Set up dialog and return to shooting. This is a standard practice with many other digital cameras. Another feature that would be nice to see is an image orientation sensor to rotate portrait shots automatically. This is something that is becoming more and more common in today's digicams.
Movie mode is the last position on the Mode Dial. The CP5200 offers 3 resolution options for Movie mode. Each option records in QuickTime (MOV) format at 30 fps with audio. The resolution options are 640x480, 320x240, and 160x120. It is important to note that the duration of a movie is only limited by the amount of free space available. On our PNY 512MB SD card, we were able to hold 5 minutes and 51 seconds of 640x480 video. You must set the optical zoom to where you want it before you start recording. Once you have started, you are only able to use the digital zoom up to 2.5x.


5 Comments
View All Comments
FFS - Thursday, July 29, 2004 - link
ANANDECH Please stick to HARDWARE REVIEWSThere much better sites over Internet for DigiCams reviews... You just could not compete with there competence.
Do not make the same mistake as TomsHardware guide did.
What would be next - Games... :(((
That is my POINT OF VIEW
And I'm also very disappointed (to say at least)
Thou not about english, my is not perfect as well.
WooDaddy - Friday, July 23, 2004 - link
Ok.. I guess..You might not what to make up a phrase like that and instead just call it what it is; play to record transition. That's the term that is widely accepted and would prevent confusion.
From other reviews I've seen on the 5200, this 'feature' exists and there are timings for this as well. Maybe try a full press .. or read the manual. Nikon probably uses a different method for switching between play and record modes. Each manufacturer is different... and their customers know this.
It's upsetting that I have to look to other reviews to validate or invalidate what you're written.
(Also, it's "Timing", not "The Times". Simple 8th grade grammar. And yes, I'm pissed again..)
stephencaston - Friday, July 23, 2004 - link
WooDaddy: When I say shooting priority, I am not referring to Shutter Priority. I am referring to when a half-press of the shutter button will switch the camera back to shooting mode from playback mode, menus, etc. Shooting priority means the camera's priority is to take pictures as opposed to reviewing pictures or changing menu options.Sorry for the confusion
WooDaddy - Friday, July 23, 2004 - link
You know I had to say something...Better, has potential. A few comments though:
The garbage dumpster in the parking lot... Come on man. That's a horrible subject. You can do better. Would you show that to your friends and say "Hey look at this cool picture!". I think not.
Shooting-priority - There is no such thing. You probably saw it somewhere but it is a poorly chosen marketing term. There are only four types of exposure based shooting: aperture, SHUTTER, manual and full auto. Think about it.. Shooting-priority. Shooting priority over what? Not shooting? It's a marketing term gone awry.
Even though you are showcasing the Nikon, you should still have a reference point from another similarly marketed camera from another company. I mentioned this in my last post. Even though this is not a camera roundup, it still applies here as well.
I can tell from your subjects (the subjects in your photos) and your commentary that you are still new to photography as a whole. A REALLY OUTSTANDING book is Photography by Barbara London and John Upton. It's about $86 but it is a great book for beginners and pros alike. It's the standard textbook that all photographers use. If you want some suggestions for subjects, I can be of help. PM me and I promise not to bite.
The final word didn't really convince me. The features you mentioned as being good are features that most 5mp have or should have and nothing that stands out. Try out the Minolta G500 as it is a similar camera. Compare them and I bet you'll see what I mean. Also, use dpreview.com. Compare their reviews to steves-digicams and imaging-resource.com. You'll see the WIDE difference between them from dpreview.com. The level of professionalism and inherent photography skill vs gadget love is obvious. I want you to decide which side you want to be on. It seems like you'd like to be a dpreview editor but I think based on AT's focus, you might just want to focus on prices, features and that's it. Most of us know about dpreview and will go there.
It'll take some time, but you'll get there...
And I promise, I'll be less harsh as time goes on. Us photogs can be ruthless ;)
LoneWolf15 - Friday, July 23, 2004 - link
For about $100 less, one can get the Fuji Finepix S5000, which has lower resolution (3.1MP) but compensates by having a 10x optical zoom, aperture priority, shutter priority, and full manual, as well as a digital TTL viewfinder. It has 6MP resolution with interpolation, which I wouldn't use, but I think you get more for the money overall.