ThermalTake A6000B Aluminum Case: Quiet Cooling
by Kristopher Kubicki on October 11, 2002 2:49 AM EST- Posted in
- Cases/Cooling/PSUs
Front Panel
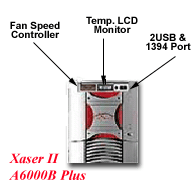
The front panel of the A6000B shows off a little bit of ThermalTake’s dedication to cool computing. The unit’s LCD panel actually takes up one of the case’s 4 5.25” expansion bays. The 2 USB connections go directly into the motherboard. The 1394 Port trails out into a cable that extends out the back of the case (if you have a 1394 expansion card, you would then plug the cable into the back of it).

The temperature LCD monitor attracted the bulk of our attention. The front panel of the case is tailored around the LCD display and fan control. Recently, we have seen several 5.25” bay kits like this for sale, however, this is one of the few cases we have seen that is designed with a kit like this in mind.
For our tests, the LCD remained accurate and true. The fan control also performed well, although automatic settings would not hurt our feelings. For the purpose of testing, we used the on-case RPM control rather than the motherboard control. The factory model we received only had three options (High, Low and Medium). Since there was only a slight difference in sound when we switched the fans to the ‘High’ setting, we left the fans at that setting. A small pitfall of the fan control was the length of the control wire. At a mere 20”, the wire was not long enough to reach all the way to the motherboard. Because of this fact, we were unable to record the controlled fan’s RPM. In all honestly, this seemed like a fairly large oversight on ThermalTake’s part.
Unusual to see on a front display was an IEEE 1394 Port. Since very few motherboards support onboard 1394 capabilities, the 1394 cable extends through the case out the back and terminates at a male 1394 coupler. This way, a PCI card could be plugged into the system and the cable then plugged into the rear of the adaptor. The 2 USB ports provided simply terminate at the motherboard.


1 Comments
View All Comments
jamski - Tuesday, November 28, 2017 - link
http://brawlstarsapkdownloads.com/http://brawlstarsapkdownloads.com/brawl-stars-apk/
http://brawlstarsapkdownloads.com/brawl-stars-ios/