GIGABYTE G1.Sniper Z87 Review
by Ian Cutress on February 24, 2014 2:00 PM EST- Posted in
- Motherboards
- Intel
- Gigabyte
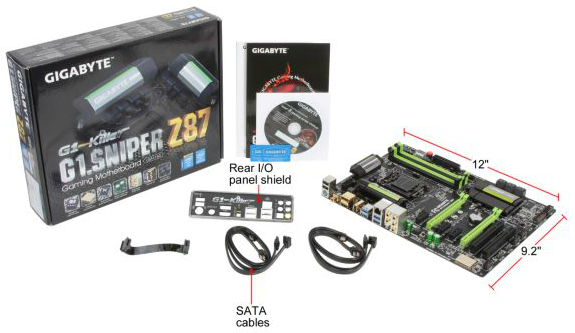
GIGABYTE G1.Sniper Z87 In The Box
For Z87 so far we have looked at the Z87X-UD3H ($160) and the Z87X-OC ($200) from GIGABYTE, both within the ballpark in terms of pricing with the G1.Sniper Z87 ($170). In the cheaper products, there was nothing to write home about in terms of in-box goodies, whereas the Z87X-OC came with an added CrossFire bridge and the OC brace. In terms of the G1.Sniper Z87, the result is more of the former than the latter in this comparison.
In the box we get:
Driver DVD
Rear IO Shield
Manuals
Four SATA Cables
Flexi SLI Cable
With the G1.Sniper branding or focus on audio, GIGABYTE had scope to add something to bolster that position that would set it apart from other products. Note that GIGABYTE has several other Z87 Sniper models, all the way up to $400 – thus the added bonus might require some additional outlay from the user.
GIGABYTE G1.Sniper Z87 Overclocking
Experience with GIGABYTE G1.Sniper Z87
A common feature in the majority of the Z87 motherboards we have tested thus far is a lack of automatic overclocking options. A couple of the manufacturers have either a single or a couple of options, whereas GIGABYTE falls in the category of providing a range. The characteristics of a CPU for overclocking (mostly MHz vs. voltage) can range in both extremes, from good 4.8 GHz+ i7-4770K CPUs to ones that struggle to get to 4.2 GHz. Automatic overclock options must cater for both sides, and the G1.Sniper Z87 offers a range in EasyTune and in the BIOS allowing the user to tweak as they require.
While the automatic options for the most part worked, they had a tendency to drive the temperature up higher than is advised (90C+). The BIOS based overclock options were more guilty than the rest, giving a +0.2 volt offset causing out CPU to almost throttle if it were inside a case.
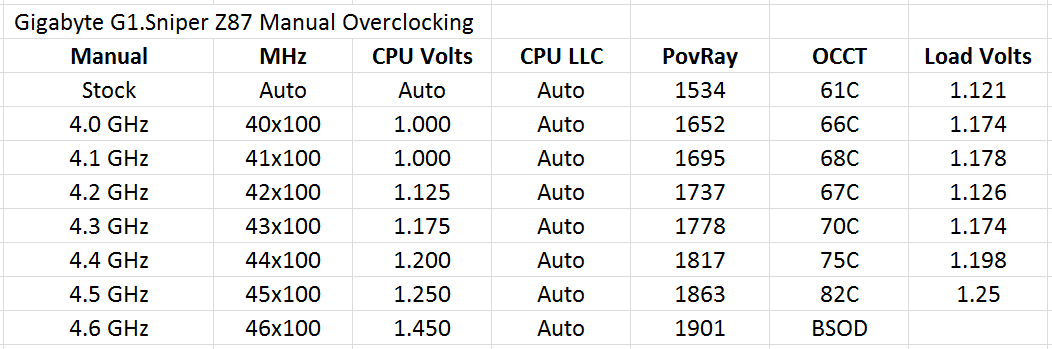
Manual overclocking was a little weird. At any setting below 42x multiplier, the voltage we placed into the BIOS was ignored and the system continued at ‘Auto’ voltage. After 4.2 GHz we were able to apply our own voltage – this would suggest that the G1.Sniper Z87 is not amenable to underclocking without going through the OS.
Methodology:
Our standard overclocking methodology is as follows. We select the automatic overclock options and test for stability with PovRay and OCCT to simulate high-end workloads. These stability tests aim to catch any immediate causes for memory or CPU errors.
For manual overclocks, based on the information gathered from previous testing, starts off at a nominal voltage and CPU multiplier, and the multiplier is increased until the stability tests are failed. The CPU voltage is increased gradually until the stability tests are passed, and the process repeated until the motherboard reduces the multiplier automatically (due to safety protocol) or the CPU temperature reaches a stupidly high level (100ºC+). Our test bed is not in a case, which should push overclocks higher with fresher (cooler) air.
Automatic Overclock:
For automatic overclocking, the following options in the OS were available:

- Light (4.1 GHz): Successful, gives 1.178 volts at load, PovRay 1693pts, peak 70ºC
- Medium (4.3 GHz): Successful, gives 1.383 volts at load, PovRay 1778pts, peak 91ºC
- Extreme (4.5 GHz): Successful, gives 1.383 volts at load, PovRay 1848pts, peak 96ºC
- Energy Saving (800 MHz): Successful, gives 0.698 volts at load, PovRay 327pts, peak 38ºC
- Auto Tuning: Gives 50x-48x overclock, CPU Voltage set to 1.350 volts + 0.200 volts offset. System overheats, slowing CPU down – 1.545 volts shown at load.
In the BIOS, we have options from 4.3 GHz to 4.7 GHz in 100 MHz increments:

- BIOS @ 4.3 GHz: Successful, gives 1.383 volts at load, PovRay 1776pts, peak 90ºC
- BIOS @ 4.4 GHz: Successful, gives 1.383 volts at load, PovRay 1822pts, peak 89ºC
- BIOS @ 4.5 GHz: Successful, gives 1.388 volts at load, PovRay 1860pts, peak 87ºC
- BIOS @ 4.6 GHz: Unsuccessful, gives 1.359 volts at load, PovRay 1907pts, OCCT BSOD
- BIOS @ 4.7 GHz: Unsuccessful, gives 1.421 volts at load, PovRay 1945pts, OCCT BSOD
Manual Overclock:
Using the automatic overclocking settings as a guide, we start our CPU at 40x multiplier (100 MHz BCLK) for 4.0 GHz, with a voltage setting in the BIOS of 1.000. Unfortunately the G1.Sniper Z87 has an issue when setting the BIOS as an absolute value when the CPU is below 4.2 GHz – our setting was ignored. After this value, we were able to reach 4.5 GHz within reasonable temperature parameters, but the jump to 4.6 GHz required to much voltage.


36 Comments
View All Comments
nos024 - Wednesday, February 26, 2014 - link
Wow, PCI slots on a high-end Z87? Where was this when I wanted PCI slots?Jay77 - Wednesday, February 26, 2014 - link
Have I mentioned how much I hate PCI slots? They were a waste of space and resources 5 years ago and they are an insult now. A PCIe 2.0 x2 or x4 slot is going to be real handy in the next couple of years (3-way crossfire, not so much). Pissing away lanes on PCI is just stupid at this point.Frolictoo - Sunday, March 2, 2014 - link
Overall, this is a good motherboard. However, I wish they would include a second LAN port, one based the various Intel options. I have always built multi-boot systems and the ports do not behave the same under different OSs while the gaming must go on.RAYBOYD44 - Monday, March 3, 2014 - link
my Aunty Violet got a new Volvo XC60 SUV by work part-time using a laptop.Antronman - Saturday, March 29, 2014 - link
I thought PCI slots were extinct?trebor darnoc - Monday, April 28, 2014 - link
I have such a stupid question. . . I love this review and ended up buying the board. But now I have a question about the F_PANEL (Front Panel Header) connections. On page 27 in the manual, there is a diagram for the F_PANEL. But it shows 2 different 'Power LED' locations! There is a 2 pin Power LED possibility at one corner and a 3 pin option at the opposite corner (of the F Panel) . The Power LED wires from my case (Corsair 450D) are 2 individual little connectors marked Power LED (one + and one -). All the other wires from the case are little 'doubles' with 2 wires each, clearly marked. If you look at that page in the G1.Sniper Z87 manual you will see one is labeled 'PWR_LED' and the other 'PLED', but each one of those has a little box describing that connection as 'Power LED' just like the cables say. Can I use either one? I thought the case wires might be split for a reason, which led me to considering the 3 pin grouping (connecting the outer pins and leaving the middle one bare)? ? ? ? ?