ASUS P9X79-E WS Review: Xeon meets PLX for 7x
by Ian Cutress on January 10, 2014 10:00 AM EST- Posted in
- Motherboards
- Asus
- Workstation
- X79
- Prosumer
Any highly priced motherboard should come with almost everything supplied in the box, and ones labeled ‘Workstation’ I should imagine have everything that a prosumer might need. This includes GPU bridges, SATA cables and anything else a user might need (Molex to SATA, 12V extension cables?). In the P9X79-E WS box we get the following:
Driver CD
User Guide
Rear IO Panel
10 SATA Cables
Flexi SLI Bridge
Rigid 3-way SLI Bridge
Rigid 4-way SLI Bridge
COM Rear Bracket
USB and IEEE1394 Rear Bracket
Molex to 2x SATA power cable
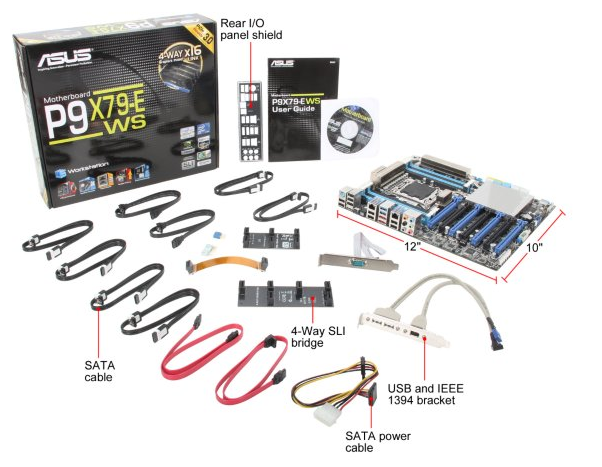
Well, I was right about the full complement of SATA cables, even additional power cables, SLI bridges and it is good to see the rear brackets for the less commonly used ports on board, which may be an important facet of a prosumer build.
ASUS P9X79-E WS Overclocking
Experience with ASUS P9X79-E WS
The P9X79-E WS is a workstation board, and often any overclocking features are a secondary thought – given that the purpose of such a product is the prosumer Xeon market, the fact that it supports the regular consumer level CPUs is more a bonus than anything else. But rather than use a server chipset and work down, ASUS have used the consumer chipset and worked up to include Xeons over the consumer level. As we are using a consumer CPU for this test, all the overclocking options were available, albeit limited.
For automatic overclocks, the AI Suite software offers Fast and Extreme modes, whereby the Fast mode is mirrored in the OC Tuner option in the BIOS and by the switch on the motherboard. The fast mode implements a set overclock whereas the extreme mode uses the preset as a starting point to probe the system for faster speeds. Unfortunately due to our lackluster CPU sample, both these settings returned almost the same result.
For manual overclocking, all the options that most regular overclockers are familiar with are here, and compared to the Rampage IV Extreme we actually had some success in beating BIOS set voltages to hit certain frequencies. Nonetheless, the big extended heatsink on the motherboard does play a part and we saw 90C at the limit of our CPU.
Methodology:
Our standard overclocking methodology is as follows. We select the automatic overclock options and test for stability with PovRay and OCCT to simulate high-end workloads. These stability tests aim to catch any immediate causes for memory or CPU errors.
For manual overclocks, based on the information gathered from previous testing, starts off at a nominal voltage and CPU multiplier, and the multiplier is increased until the stability tests are failed. The CPU voltage is increased gradually until the stability tests are passed, and the process repeated until the motherboard reduces the multiplier automatically (due to safety protocol) or the CPU temperature reaches a stupidly high level (100ºC+). Our test bed is not in a case, which should push overclocks higher with fresher (cooler) air.
Automatic Overclock:
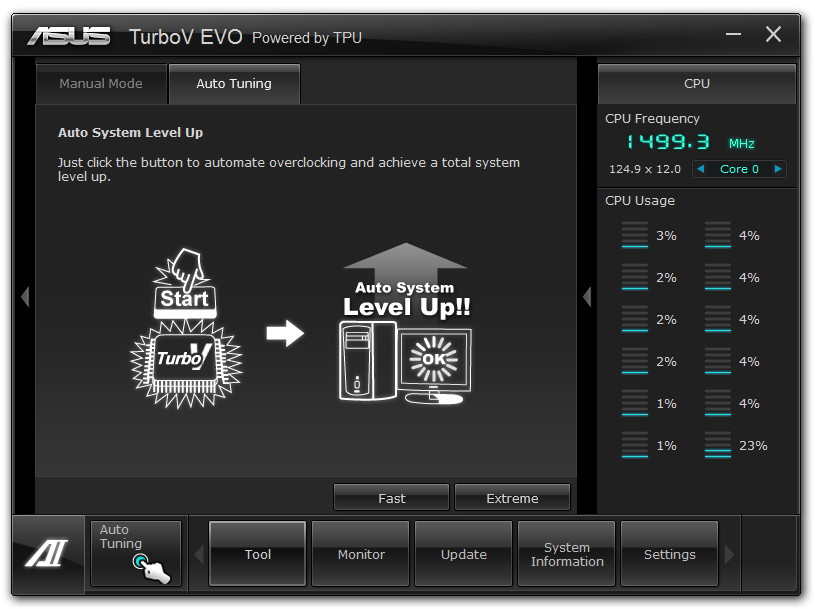
The automatic overclock options are fond in the TurboV EVO section of AI Suite, and offer one button selections. Our results are as follows:
On the ‘Fast’ setting, the system changed the CPU strap from 100 MHz to 125 MHz, as well as adjusting the CPU to 33x base turbo with 36x full turbo. This gave a MHz range of 4125 MHz to 4500 MHz, with the CPU set at 1.300 volts and Load Line Calibration on Auto. At this setting the CPU scored 2210.71 in PovRay, a peak temperature of 74C in OCCT and a load voltage of 1.288 volts on the CPU.
On the ‘Extreme’ setting, the system rebooted to the ‘Fast’ mode speed and then attempted to stress test the CPU, first by incrementing the multiplier and then the BCLK. Unfortuantely there was an issue with the software when upping the multiplier, causing the system to loop the same screen animation. If the system is reset at that point, the software tries again but with BCLK. On this setting, the system ended up with the same multiplier range as the ‘Fast’ setting, but at 125.50 MHz, a small 0.50 MHz difference – the CPU voltage and LLC were set the same as the Fast mode. With this setting, PovRay scored 2235.18, OCCT peak temperature was 74C and the system reported a load voltage of 1.288 volts.
Manual Overclock:
For our manual overclock, we start at the 40x multiplier, set load line calibration to Ultra High, the CPU voltage to 1.100 volts and start testing. If the system is stable (PovRay and OCCT test), the multiplier is increased; if unstable, the voltage is increased. Here are our results:

At 4.5 GHz the OCCT test was moving above 90C, so we decided to stop there in our testing. It was interesting to see such a level voltage up to 4.2 GHz.


53 Comments
View All Comments
Hammerfist - Friday, January 10, 2014 - link
What are the effects of PLX chip when using two or more R9 290 in crossfire ?We know that when doing AFR , R9 290 and R9 290X uses the PCIe lanes to move the frame around from on GPU to another .
A frame time testing with two GPUs in different lanes will be very interesting .
PCIe 1 - PCIe 2 -> Goes through the PLX chip and QS
PCIe 2 - PCIe 3 -> Goes through QS only
PCIe 1 - PCIe 5 -> Goes through both PLX chips
PCIe 2 - PCIe 6 -> Goes through both PLX and QS chips
and possibly more combinations.
I am not saying that all possible combinations need to be tested , just two combinations to give us and idea of the latency involved is good enough like
1) PCIe1 - PCIe3 (only PLX)
2) PCIe2 - PCIe6 (both PLX and QS)
Ian Cutress - Saturday, January 11, 2014 - link
I did some PLX testing on various Z87 motherboards that use one of the chips, and the overall defecit over ideal routing was a 1-2% loss per PLX chip in the worst case scenario. This is better than the old NF200s, which had up to a 5-10% loss iirc? Of course with X79 it's a little different in that the CPU could go for an x16/x8/x8/x8 layout and whether going for an x16/x16/x16/x16 would make a difference. While I don't have 290 cards to hand, I do have 7970s and now GTX 770s to do a small comparison in the future.watersb - Saturday, January 11, 2014 - link
Ian, thanks very much for this review.I am not a gamer, but my science and storage workloads are well met by Xeon workstations. The build-your-own route can make financial sense sometimes, depends on the job.
Glad you are there checking it all out.
mapesdhs - Saturday, January 11, 2014 - link
The main benefit of a DIY oc build is gaining access to the performance equivalent to anexpensive high-core XEON on a lower budget. XEONs with lots of cores have much lower
clocks, so a 6-core SB-E or IB-E at 4.7+ runs very well. There are tradeoffs of course,
such as non-ECC RAM being used; this might rule out the idea for some tasks. Still, there's
a lot of scope for building something fast without breaking the bank. If one needs a degree
of reliability though then I guess just step back a step or two on the oc, say 4.5GHz, and/or
go for top-end cooling by default such as an H110 + suitable case.
Ian.
Pooyan - Saturday, January 11, 2014 - link
Great article, Ian. Although I wish you focused more on workstation aspects of the motherboard, not gamin and stuff :D1. Do you know any motherboards from other manufacturers with similar specs?
2. ASUS says it's a CEB motherboard. So the case has to be CEB as well? Or can it be E-ATX? Isn't that kinda small for it?
Thanks again for the review.
mapesdhs - Saturday, January 11, 2014 - link
The only other board I could find that came close in overall concept to ASUS' X79 WSseries is Asrock's X79 Extreme 11. However, apart from being quite a bit more expensive,
in the end I felt Asrock messed up a bit by not using a SAS controller with any onboard
cache, which can spoil 4K performance. Given the board cost, I can't imagine why the
didn't choose an equivalent LSI chip that had a 1GB cache or something, would have
been much better. Maybe the added cost was just too much.
Can't remember offhand about CEB vs. EATX; I think CEB means the board can be
deeper aswell as longer. Either way, fits fine in a HAF 932, though the case I'd
recommend atm is an Aercool X-Predator. Caveat: if one has to move a system
around a lot, eg. transport to company sites, then choose a different case that has
handles. Either way, for max expandability, use a 10-slot case.
Ian.
Pooyan - Tuesday, January 14, 2014 - link
I thought it only fits in a CEB case. That's why I was gonna get a Silverstone RV03, because that's the only CEB I could find. This is a great help for me. It means I have other options for the case. Thanks a lot!mapesdhs - Tuesday, June 7, 2016 - link
An old thread I know, but a minor update for anyone who finds this for some reason as I recently built an editing setup with a P9X79-E WS I managed to get for only 200 quid (fitted with an i7 3970X, Quadro 6000, GTX 580 3GB, etc.): now I'm using a Corsair C70 Military Green case, definitely better. More rear slots than the HAF 932, though I'm only using two NDS fans with the H110 (decided after several builds that four is unnecessary). The C70 has fewer front 5.25" bays than the 932, but using more SSDs, etc. has meant that's not an issue.Hoping to see if it's possible to boot from a 950 Pro soon...
Ian.
Umbongo - Saturday, January 11, 2014 - link
"Being a Workstation board, the P9X79-E WS is designed to accept any socket 2011 Xeon, as well as ECC memory – up to 64GB is listed on the specification sheet, although 16GB ECC DRAM modules are now available through Newegg for $210 each."The X79 chipset supports unbuffered ECC with a Xeon. 16GB DIMMs are not available as ECC unbuffered, only ECC registered. You need a C600 series chipset with a Xeon to use registered memory.
Ian Cutress - Saturday, January 11, 2014 - link
Ah, I thought I had seen 16GB unregistered memory. Seems like I was mistaken (!)