Intel Z87 Motherboard Review with Haswell: Gigabyte, MSI, ASRock and ASUS
by Ian Cutress on June 27, 2013 8:00 AM EST- Posted in
- Motherboards
- Intel
- MSI
- Gigabyte
- ASRock
- Asus
- Haswell
- Z87
- Shark Bay
- Lynx Point
MSI Z87-GD65 Gaming In The Box
When a product range is diverted away from the main SKU stack with specific branding, it opens up the possibilities when it comes to in-the-box contents. An overclocking range needs extra features related to overclocking, and thus a gaming range needs extra features related to gaming. In the Z77 package this was not particularly the case, and with the Z87 package we get:
Driver Disk
Quick Start Guide
Manual
Rear IO Shield
MSI Gaming Door Sign
Stick-on MSI Gaming Shield
Four SATA cables
Flexi-SLI bridge
VCheck Extension cables
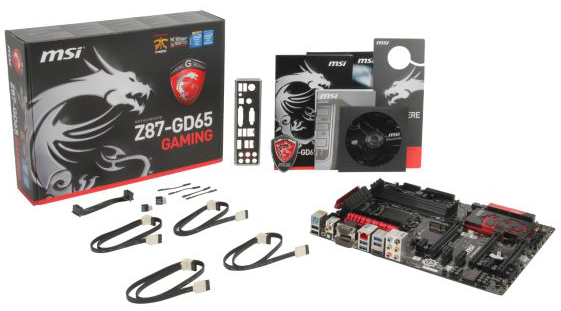
The door sign and gaming shield are arguably extras related to gaming, allowing the user to express a pro-MSI attitude, although there does not feel as if there is anything significant extra beyond the usual SATA cables and SLI bridge.
MSI Z87-GD65 Gaming Overclocking
Experience with MSI Z87-GD65 Gaming
Previous experiences overclocking on MSI motherboards have been fairly dichotomous. On the one hand, most of the time, they perform rather well, but it can be a struggle (mostly due to the lack of menu option ordering) to get there. In other situations, overclock performance can be over in left field, the wrong side of the foul line, as we saw with the Z77A-GD65 Gaming compared to later tests.
Thankfully however the Z87-GD65 Gaming has stepped up to the plate in terms of performance, but still has a small issue of menu option ordering. To start, the automatic overclock options are very simple – you have OC Genie on or off, and you can select between two levels (high/low, or gaming/extreme if you prefer). This to a certain extent does not help when dealing with manual overclocking as there is nothing to guide the manual settings, but based on our previous experience we were able to push our good CPU to a decent CPU speed. One other note worth mentioning is that the LLC performance of the Z87-GD65 is spot on – a case of what you set is what you get / is reported, and confirmed by a fellow UK overclocker.
The only issue with the beta BIOS we tested was that we could not reduce the VRIN voltage – the lowest option was 1.80 volts or Auto. This should be fixed in a later BIOS update.
Methodology:
Our standard overclocking methodology is as follows. We select the automatic overclock options and test for stability with PovRay and OCCT to simulate high-end workloads. These stability tests aim to catch any immediate causes for memory or CPU errors.
For manual overclocks, based on the information gathered from previous testing, starts off at a nominal voltage and CPU multiplier, and the multiplier is increased until the stability tests are failed. The CPU voltage is increased gradually until the stability tests are passed, and the process repeated until the motherboard reduces the multiplier automatically (due to safety protocol) or the CPU temperature reaches a stupidly high level (100ºC+). Our test bed is not in a case, which should push overclocks higher with fresher (cooler) air.
Automatic Overclock:
OC Genie can be applied either physically on the board or in the BIOS with a click. Both give the same overclock settings, and both are affected by the OC Genie DIP switch on board, which gives the option of two levels of overclock. Here are our results:
At OC Genie Level 1, the CPU was set to 40x100 at 1.100 volts in Static mode, leaving LLC on Auto and boosting CPU Power/Current limits to 255 W and 256 A respectively. At this setting, the system reported a load voltage of 1.099 volts, passed PovRay with a score of 1661.79, and passed OCCT with a peak temperature of 67C. The setting also applied XMP.
At OC Genie Level 2, the CPU was set to 42x100 at 1.200 volts in Adaptive mode, leaving LLC on Auto and boosting CPU Power/Current limits to 255W and 256A respectively. At this setting, the system reported a load voltage of 1.201 volts, passed PovRay with a score of 1730.08, and passed OCCT with a peak temperature of 74C. The setting also applied XMP.
Overall I would prefer a few more automatic overclock options. Many manufacturers have noticed that by offering several options from 4.0 GHz to 4.5 GHz that this allows users to see the slow climb in settings required for higher manual overclocks.
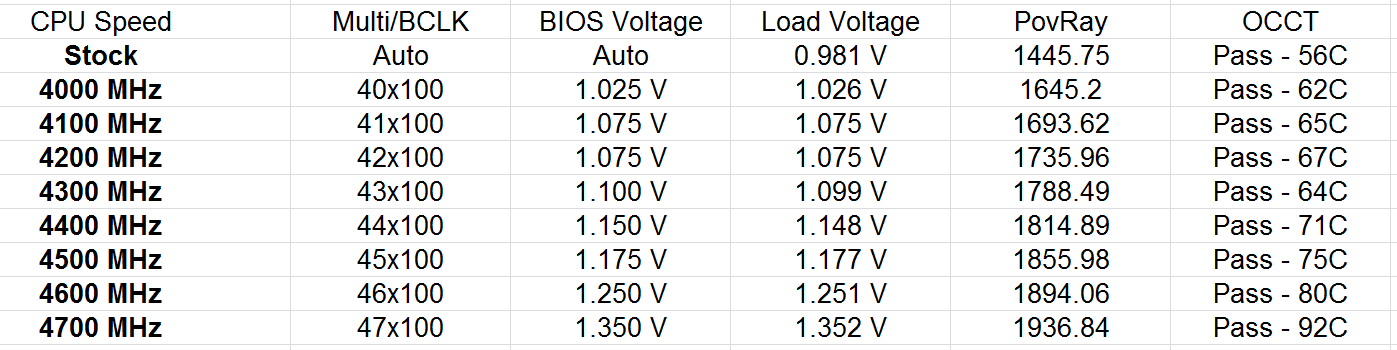
Manual Overclock:
The manual overclock options can either be performed in the OS under Control Center or Intel XTU, but I typically perform my overclocks in the BIOS so we head there. MSI’s overclock options are unfortunately far from being structured – every option is just put in a list with a sense of vague order but not really helping the user too much. Thankfully they have added in a help box to tell users what setting does what – all this needs now is suggested values.
For our manual testing we start at 4.0 GHz (40x100) and 1.000 volts. On a successful stability test, we raise the multiplier, and on a failure we raise the voltage by 0.025 volts. For the MSI board, we left LLC and CPU VRIN on automatic. Our results are:


58 Comments
View All Comments
HexiumVII - Sunday, June 30, 2013 - link
Hey Ian! Maybe run the Asrock Z87 in water and let us know how waterproof it is!Hrel - Monday, July 8, 2013 - link
You guys DO talk about how motherboard manufacturers have less and less to do now; with Intel moving more and more things onto the CPU die. Yet for some reason you still fail to ask WHY motherboards are getting MORE expensive. Not less. I got an AMAZING motherboard with SLI and massive overclocking ability that's rock solid back in 2007 for 125 dollars. Yet now that the northbridge isn't even ON the motherboard anymore I have to pay 175 for the SAME level of performance... WTF is that!adridu59 - Monday, July 8, 2013 - link
It looks like you are playing the marketing game, because ALC1150 (nominally ALC900) is just a tweaked ALC898 (same as ALC889 and ALC892).More info: http://www.overclock.net/t/1398739/is-realteks-alc...
Rafalus - Sunday, July 28, 2013 - link
Hi, Is it possible to stop TPU tuning eg when it reach 4.5GHz as I did not want to raise it higher?SilentRyder - Tuesday, October 22, 2013 - link
Honestly i believe this integrated Voltage Regulator will cause many problems. If we check the previous Ivy Bridge main boards, They do have a huge power regulator designed on the top side of processor socket. Now the whole idea of power supplied from the mainboard is gone off. May be this technology will benefit laptops or any other mobile devices. but this is certainly a bad idea for desktop users.We would certainly have HEAT problems, which i am truly afraid of. I do not think haswell will support enough for overclocking. i never over clock my self but i am sure INTEL will change this concept on its new generations.
Even laptops running in high temperature can be a issue.
How many of us are satisfied with the intel built in Graphics processor?
clyman - Tuesday, November 26, 2013 - link
So far, it meets my needs just fine. I am sure it would meet the needs of all my customers. I did put a fluid filled cooler on the processor, but that was only needed while running OCCT. I will add a video card should i ever need one.clyman - Tuesday, November 26, 2013 - link
I have the ASUS Z87-PRO mobo and was hoping someone had a few answers here for me, haven't seen anything related though. My problem is that no matter what I do, the multiplier will not go above 39 and I cannot find out why. Is that due to having 1600 MHZ memory?Another issue is that when I update AI Suite 3 from the original on the supplied CD, it will not recognize my WIFI Engine adapter, however it finds it with the original. ASUS techs have been useless on both of these points as they say have no information regarding overclocking and no one has a clue about the WIFI Engine. I have been given all kinds of advice, all fruitless. I can't get them to understand it simply will not recognize the device on the updated version. I think it is a bad update, they want to RMA it.
Any help on these issues would be appreciated.
LoCk3d - Friday, December 20, 2013 - link
A problem encountered someone USB Charger + function? I do not detect the device, I enabled ERP in bios but still does not work. Help me please !