Intel Z87 Motherboard Review with Haswell: Gigabyte, MSI, ASRock and ASUS
by Ian Cutress on June 27, 2013 8:00 AM EST- Posted in
- Motherboards
- Intel
- MSI
- Gigabyte
- ASRock
- Asus
- Haswell
- Z87
- Shark Bay
- Lynx Point
MSI Z87-GD65 Gaming In The Box
When a product range is diverted away from the main SKU stack with specific branding, it opens up the possibilities when it comes to in-the-box contents. An overclocking range needs extra features related to overclocking, and thus a gaming range needs extra features related to gaming. In the Z77 package this was not particularly the case, and with the Z87 package we get:
Driver Disk
Quick Start Guide
Manual
Rear IO Shield
MSI Gaming Door Sign
Stick-on MSI Gaming Shield
Four SATA cables
Flexi-SLI bridge
VCheck Extension cables
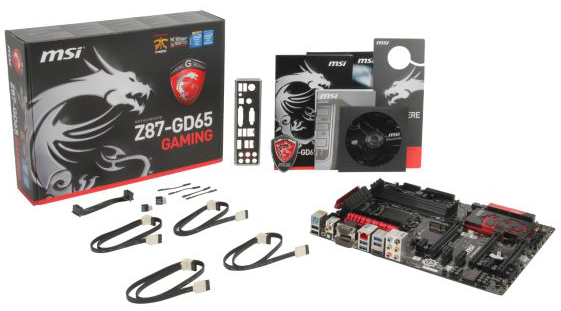
The door sign and gaming shield are arguably extras related to gaming, allowing the user to express a pro-MSI attitude, although there does not feel as if there is anything significant extra beyond the usual SATA cables and SLI bridge.
MSI Z87-GD65 Gaming Overclocking
Experience with MSI Z87-GD65 Gaming
Previous experiences overclocking on MSI motherboards have been fairly dichotomous. On the one hand, most of the time, they perform rather well, but it can be a struggle (mostly due to the lack of menu option ordering) to get there. In other situations, overclock performance can be over in left field, the wrong side of the foul line, as we saw with the Z77A-GD65 Gaming compared to later tests.
Thankfully however the Z87-GD65 Gaming has stepped up to the plate in terms of performance, but still has a small issue of menu option ordering. To start, the automatic overclock options are very simple – you have OC Genie on or off, and you can select between two levels (high/low, or gaming/extreme if you prefer). This to a certain extent does not help when dealing with manual overclocking as there is nothing to guide the manual settings, but based on our previous experience we were able to push our good CPU to a decent CPU speed. One other note worth mentioning is that the LLC performance of the Z87-GD65 is spot on – a case of what you set is what you get / is reported, and confirmed by a fellow UK overclocker.
The only issue with the beta BIOS we tested was that we could not reduce the VRIN voltage – the lowest option was 1.80 volts or Auto. This should be fixed in a later BIOS update.
Methodology:
Our standard overclocking methodology is as follows. We select the automatic overclock options and test for stability with PovRay and OCCT to simulate high-end workloads. These stability tests aim to catch any immediate causes for memory or CPU errors.
For manual overclocks, based on the information gathered from previous testing, starts off at a nominal voltage and CPU multiplier, and the multiplier is increased until the stability tests are failed. The CPU voltage is increased gradually until the stability tests are passed, and the process repeated until the motherboard reduces the multiplier automatically (due to safety protocol) or the CPU temperature reaches a stupidly high level (100ºC+). Our test bed is not in a case, which should push overclocks higher with fresher (cooler) air.
Automatic Overclock:
OC Genie can be applied either physically on the board or in the BIOS with a click. Both give the same overclock settings, and both are affected by the OC Genie DIP switch on board, which gives the option of two levels of overclock. Here are our results:
At OC Genie Level 1, the CPU was set to 40x100 at 1.100 volts in Static mode, leaving LLC on Auto and boosting CPU Power/Current limits to 255 W and 256 A respectively. At this setting, the system reported a load voltage of 1.099 volts, passed PovRay with a score of 1661.79, and passed OCCT with a peak temperature of 67C. The setting also applied XMP.
At OC Genie Level 2, the CPU was set to 42x100 at 1.200 volts in Adaptive mode, leaving LLC on Auto and boosting CPU Power/Current limits to 255W and 256A respectively. At this setting, the system reported a load voltage of 1.201 volts, passed PovRay with a score of 1730.08, and passed OCCT with a peak temperature of 74C. The setting also applied XMP.
Overall I would prefer a few more automatic overclock options. Many manufacturers have noticed that by offering several options from 4.0 GHz to 4.5 GHz that this allows users to see the slow climb in settings required for higher manual overclocks.
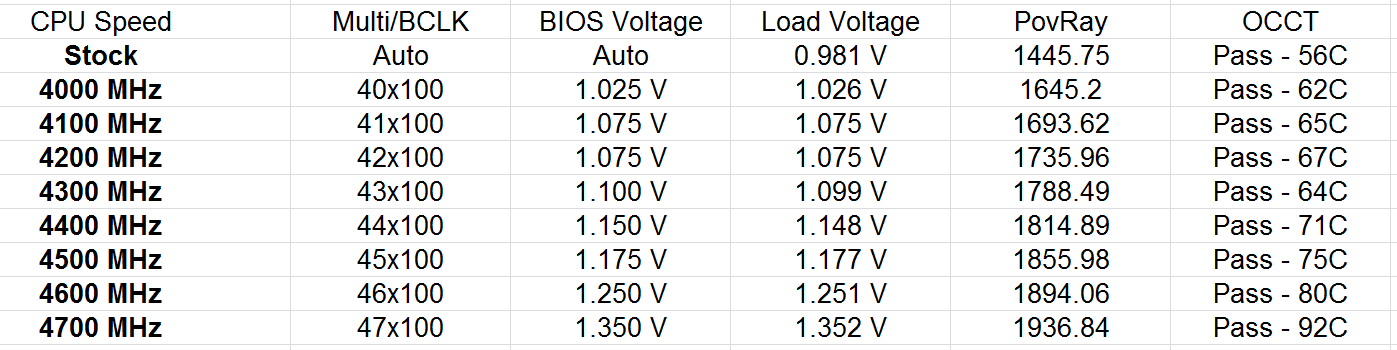
Manual Overclock:
The manual overclock options can either be performed in the OS under Control Center or Intel XTU, but I typically perform my overclocks in the BIOS so we head there. MSI’s overclock options are unfortunately far from being structured – every option is just put in a list with a sense of vague order but not really helping the user too much. Thankfully they have added in a help box to tell users what setting does what – all this needs now is suggested values.
For our manual testing we start at 4.0 GHz (40x100) and 1.000 volts. On a successful stability test, we raise the multiplier, and on a failure we raise the voltage by 0.025 volts. For the MSI board, we left LLC and CPU VRIN on automatic. Our results are:


58 Comments
View All Comments
Rob94hawk - Thursday, June 27, 2013 - link
The MSI Gaming board would not do 2560x1440 off the DVI-D port.Aikouka - Thursday, June 27, 2013 - link
One thing to note is that ASRock does have a version of the Extreme6 that does NOT have 802.11ac built in. I think it's about $20 cheaper.I thought about going with the Extreme6 when I built a Haswell machine, but I figured that some of those features would go unused. Unused chips that aren't disabled still need to be initialized during POST, so I get an increased POST time and spend more money. :P I went with the Extreme4, and honestly... I wish that I hadn't. The UEFI BIOS on my system is so flaky that it randomly hard locks a few seconds after the GUI appears. I don't know if it's a bad board, a bad batch, or an issue with that model, because I'm not the only one with that issue. I've seen other reports on the Anandtech forums and a quick Google search turns up results on other forums and in the Newegg reviews. I'm assuming that the Extreme6 did not have this problem?
DanNeely - Thursday, June 27, 2013 - link
Check your BIOS; you should be able to disable unused controllers to boost post time. This shortened my i7-920/930 post times from ~30s to ~20s.Aikouka - Thursday, June 27, 2013 - link
Oh, I know. I just figured that it wasn't worth spending more on a board just to disable the unused controllers. Although, then I ran into the Extreme4's BIOS problem, and I wish I would have spent a little more! =PJames5mith - Thursday, June 27, 2013 - link
Since when is $200 a "reasonable price bracket"? In my mind $50-$100 = budget. $100-$160 = mainstream. $160+ is enthusiast pricing. It is not reasonable at all.WeaselITB - Thursday, June 27, 2013 - link
$200 is a reasonable price bracket for the enthusiast chipset family that they're reviewing. If you're looking for lower price, check out the lower families, such as H87 for the mainstream segment.MrSpadge - Friday, June 28, 2013 - link
A solid Zx7 board without any BS used to be around 100€ (-> 100$ without VAT for you). Now that parts of the voltage supply have transitioned into the CPU the boards should not become any more expensive.I may be enthusiastic about tweaking my PC for efficiency and value, but I'm certainly not enthusiastic about paying big bucks for my toys.
crimson117 - Thursday, June 27, 2013 - link
Ian, this line/paragraph sounds a bit too much like it was lifted from marketing materials: "Whenever a user considers purchasing an ASUS motherboard they know that it is built to perform and has a great feature set"IanCutress - Thursday, June 27, 2013 - link
Haha I can assure you those are my words, although it does sound generic given that I was meant to be referring to the board in the review. Perhaps a bit subjective for a review, but I had a good experience with the board and that filtered through. Changed it a little...-Ian
snakyjake - Thursday, June 27, 2013 - link
I've had an ASUS mother board for years, and the EZ-Update never downloaded updates from the Internet. It never was able to connect with any of the update servers. I always had to go to the Asus website and download the updates, and then update the BIOS from disk.I do wish the ASUS software was all integrated, and not separate programs on my system tray.