ASUS P8P67 Review
by Brendan van Varik on September 8, 2011 10:45 AM EST- Posted in
- Asus
- Motherboards
- P67
BIOS
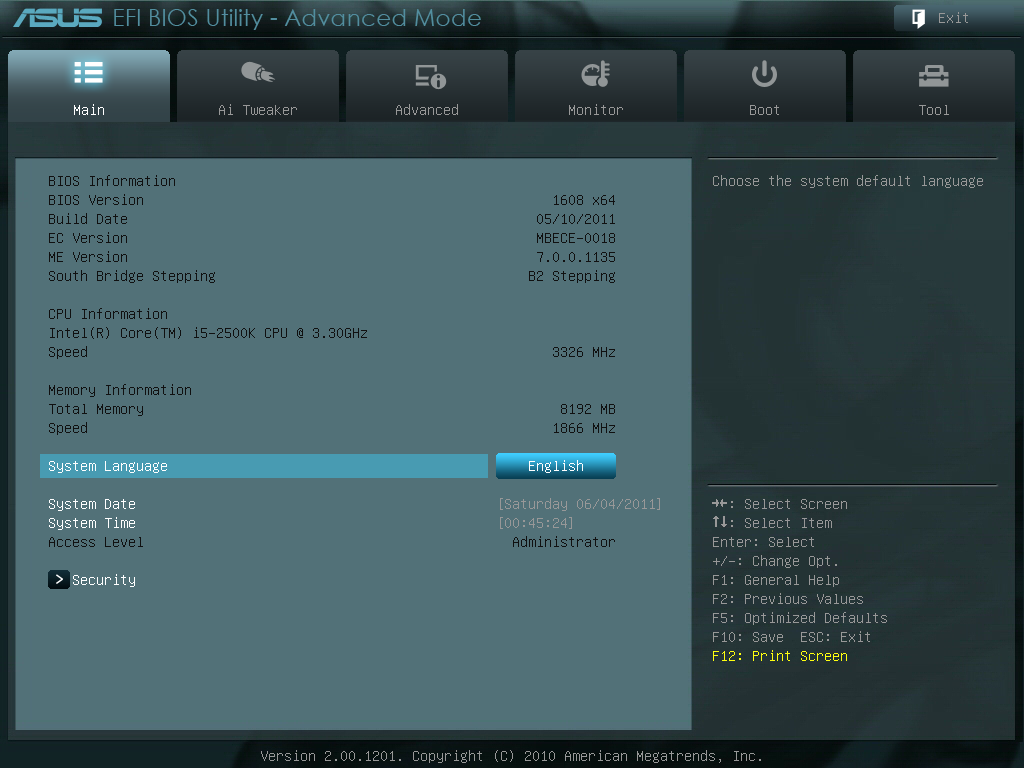
When you enter the BIOS for the very first time, you’ll be faced with the screen below. If you want to do any serious tweaking, you will have to enter the Advanced Mode, which you can do by clicking on the button located in the top right-hand corner.
At a quick glance, the basic BIOS layout shows more or less everything you need. It shows the CPU and motherboard temperatures, the voltages, fan settings with the current fan speeds and the boot sequence, which is switchable.
You can update the BIOS with relative ease with a USB flash drive. You will need to be in Windows in order to download the BIOS from ASUS’ website and to extract the .ROM file. It my experience, my 8GB stick was not detected, which is most likely a compatibility issue. However I did have a 4GB flash drive which did work in flashing to the latest BIOS.

The BIOS features a full UEFI system and it is easy to use. Everything is located where you would expect it to be and I can only find two issues with the BIOS. During this review, I used the 1608 BIOS which does not report CPU temperatures correctly. I also experienced that selecting the ‘OC Tuner’ option in the BIOS made the motherboard lock itself into an infinite boot cycle which would not disappear without a full CMOS reset.
After I did my testing, I updated the BIOS to the 1808 release which appears to have solved the CPU temperature issue.
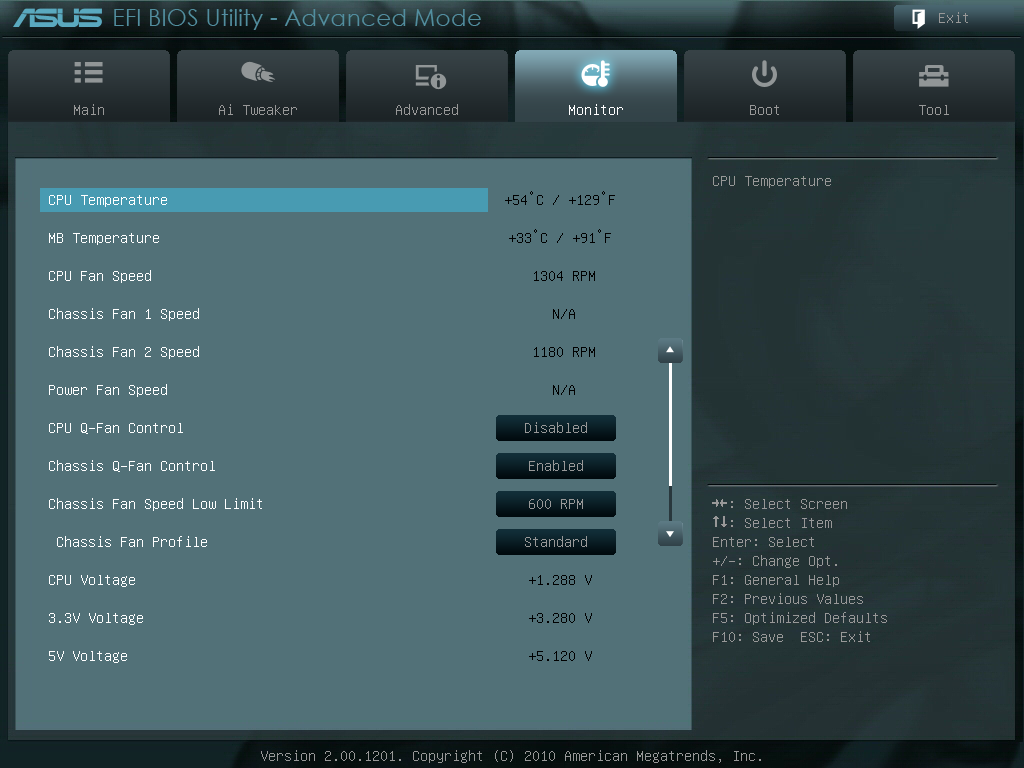
As you can see from the screenshot above, there are not very options to change your fan settings. Just like in the ASUS Suite (noted in the software section of this review), you can choose from a few presets to change the fan speeds or you can manually assign some of your own.


Overclocking
As the ASUS Suite software allows gives us an option to ‘Auto Tune’ our PC from within Windows, I figured I would start out there. The 'Fast' pre-set was tested, giving a 31% overclock. It has increased the BCLK to 103 and the multiplier is set at 42. The RAM also got a boost up to 1866MHz by using X.M.P profiling.
After an hour at full load under OCCT, CPU-Z reported a maximum voltage of 1.296v when under load – my previous tests revealed that this particular CPU needed between 1.32 and 1.34v (set in the BIOS with high Load Line Calibration/‘LLC’) to be completely stable. The minimum voltage went down to 1.27v which could be tweaked a little with different LLC settings.
Considering how the software had taken care of the overclock, I was eager to try out the ‘Extreme’ preset. Sadly the results were not as impressive - the system attempted to raise the BCLK from 103MHz which it was set at from the ‘Fast’ pre-set to 103.5MHz. The system fell over and produced a blue screen. Once the system had restarted itself, it attempted to raise the BCLK to 103.5MHz again. It failed for a second time and on the third restart it left me with the same overclock as I originally had on the 'Fast' pre-set.
Using a maximum voltage of 1.42 V (1.75 V PLL) on the CPU, I was able to successfully boot up at 46x103 which gave me a final clock speed of 4738MHz. The system was nowhere near stable but it would get into Windows and run a few tests before crashing. By lowering the BCLK to 100 and increasing the multiplier to 47, I was able to get it stable enough to run all of our benchmarks. It was extremely easy to reach a 4700MHz clock speed. It was a case of finding the right voltage to match the given CPU frequency.
So, I removed the ‘safe’ voltage boundary and boosted the multiplier to see how far this board would really go. Just so that there was some extra headroom, the voltages got a slight increase, 1.5v on the core and the PLL voltage got a slight bump up to the original 1.8v. Windows would not boot at 5GHz, or 4.9GHz for that matter. At 48x100, Windows booted up straight away but when I tried to push the system past 101.5 BCLK, it would instantly result in a blue screen of death.
I decided to opt for a CPU voltage of 1.42 V and a PLL voltage of 1.75 V to do the rest of my testing with this motherboard. I wanted to demonstrate what sort of an effect overclocking has and what the benefits to it really are. In this instance, I ran our 3D Movement benchmark. I only ran the benchmark once to give you a rough idea of the performance gains. At stock speeds with turbo disabled, the overall score came in at 104.32 for the single threaded benchmark and 331.88 for the multi-threaded version. For a 29.7% overclock, there was a 27.8% increase (104.32 to 144.87) in performance using the single threaded application and a 30% (331.88 to 474.27) increase in the multi-threaded benchmark.


52 Comments
View All Comments
LoneWolf15 - Friday, September 9, 2011 - link
I'm not trying to be sarcastic --I'm just wondering why it seems like the P67 chipset is being reviewed (in some cases, even hyped) by tech sites and a lot of users I see in hardware forums now that the Z68 chipset is out.For almost every price tier of P67 chipset, I can find a Z68 chipset board within $10-20. The ASUS P8Z68-V is only $15 more than the $150 price of the P8P67 here, and it has more features. There are also lower-priced variants (the V-LX and V-LE) and the higher end V-Pro to round it out.
I'm just confused as to why the P67 chipset is relevant now that the Z68 chipset is available.
faizoff - Friday, September 9, 2011 - link
I agree with others that reviewing a P67 board at this time is moot. I'd rather read reviews on the Z68 series and see what I'm missing out on. :-)But sometimes it's nice to look back on boards and see how they've fared months after release.