SilverStone Raven RV03: Streamlined Bird of Prey
by Dustin Sklavos on July 20, 2011 1:00 AM EST- Posted in
- Cases/Cooling/PSUs
- SilverStone
- Full-Tower
Assembling the SilverStone Raven RV03
While assembly of the RV03 is remarkably straightforward given its unusual design, you may still want to keep the instruction manual handy just in case. Thankfully, the steps we usually go through when installing our testbed into a new chassis can still be followed easily enough with the RV03: motherboard, then drives, then expansion cards, then PSU, then cable everything and call it a day.
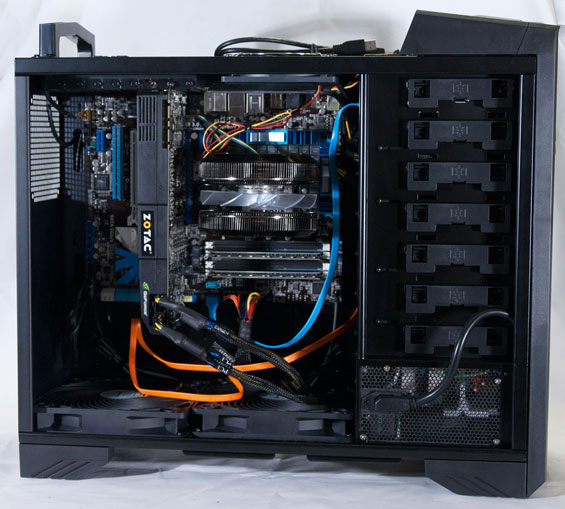
Installing the motherboard was easy enough; you'll need to place all the standoffs yourself, but the case is able to accept so many different form factors that this isn't too surprising. Our CPU cooler has pretty much stayed mounted to the board since the word "go" when we started doing these reviews, and there weren't any clearance issues. In fact this will be one of the few enclosures you'll ever see where trying to connect the AUX 12V line doesn't result in bloodletting.


Everything else is trickier--way trickier. The 5.25"-to-3.5" drive bay adapters require you to remove drive trays behind the motherboard tray in order to access the screws that keep them in place, then remove the face plates for the necessary 5.25" drive bays. Those 5.25" bay covers, by the way, are actually two pieces: a vent and an actual plate. The vents are for those that plan on using the drive bay adapters, while the plate is designed to be affixed to the front of an optical drive to maintain the looks of the face of the tower. That's a nice idea, but SilverStone only includes enough material to install just one optical drive.
Thankfully, the top 5.25" bay is empty. You'll need to pop the bay covers off with a flathead screwdriver or your fingernail and I never was able to get them to snap back on exactly right, but once you've opened up the front of the bay, the optical drive slides in easily and the tool-less mechanism works well for keeping the drive in place.
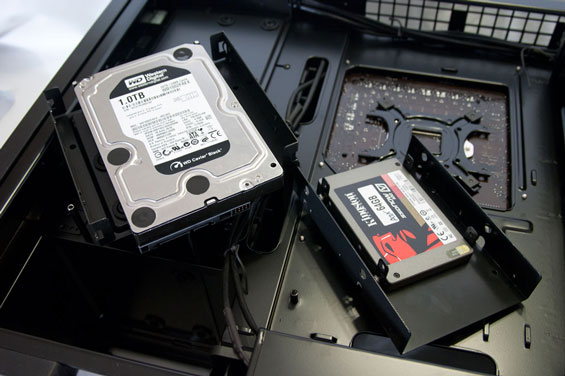
Installing 2.5" or 3.5" drives using the drive trays behind the motherboard tray isn't particularly difficult, but the optical drive was the only tool-less part of this assembly. The 3.5" drive trays each have silicon grommets that dampen vibrations, and you'll need to use special screws that come with the RV03 to mount drives in them, while the 2.5" drive tray is again--I can't stress this enough--really intended for SSDs instead of notebook-sized mechanical hard drives. (Not that most people would be interested in using notebook HDDs.) It supports two drives but it does stack them almost directly on top of each other. All of the drive trays are affixed to the back of the motherboard tray with screws, so you'll be using between six and eight screws per drive installation. This is par for the course for the unusual design, as the FT03 worked the same way.
When I mounted the GeForce GTX 580, I did note that I had to "stretch" the mounting plate on it a little more than I've normally had to in order to line it up with the screw holes. Alignment issues are honestly par for the course when assembling new cases and it's not the first time I've had to struggle a little, but this was a slightly larger gap than I've normally seen.
The power supply we use for testing cases fit into the PSU bay, but it was mighty snug and at times I was worried I was going to scratch up or damage something. You can force it almost all the way in, then use the mounting screws to get it the rest of the way (minds out of the gutter, folks) and lock it into place. I've read other reviews where reviewers have had issues with connecting the power cable to the PSU due to a cable tie on the interior of the case, but my review unit had no such tie and it's my understanding that was an issue confined to early review hardware. The case I have could easily connect the PSU cable anywhere within the confines of the bay.
Routing cables was for the most part simple but the space behind the power supply, despite the allowance made in the design of the case panel, was still pretty tight. This has been yet another enclosure where I've been overwhelmingly glad the power supply was modular. There's definitely space behind the motherboard tray for all of the cables along with places to wrap zip ties, but part of the issue is that ventilation behind the motherboard tray is actually important in the RV03. If you're planning to install a rear 120mm fan (and it's something I'd seriously consider), this could become a bit fraught. Finally, the USB 3.0 ports at the top of the case still use routing cables to the I/O cluster instead of a front panel header. It would've been nice to have had a bridge on hand at least, but some motherboards come with a USB 3.0 port bracket that could probably just be routed internally behind the motherboard tray.

"Closing up" took about the same amount of effort it almost always does with traditional enclosures, requiring some pressure on the back panel to lock it into place. The RV03 does require an additional step beyond most cases, though: since the I/O cluster and expansion slots are at the top of the case instead of the rear, there's a vented cover that needs to be snapped on and off. I've read some people concerned that the cover is fragile, but I removed and reattached it quite a few times and it seems fine. Cables get routed out a special loop in the back of the case and there's enough space there for even the menagerie coming out the back of my own case. Note that if you're using any type of display connector changer, like DVI-to-VGA, there isn't enough clearance for the large block adapters; you'll need a flexible one.


25 Comments
View All Comments
Dustin Sklavos - Wednesday, July 20, 2011 - link
In terms of physical space, we do at least tell you how much stuff you can theoretically cram into the enclosure. Beyond that I think you're being unreasonable.Getting the hardware to do the kind of testing you're asking for isn't impossible, but it's not really practical either. Having done enough of these tests at this point, I already feel like our overclocked rig is pushing it in terms of just noise.
Also, understand that while multi-GPU subsystems aren't as uncommon as they used to be, they're still far from being the norm, and a good single GPU system is often still going to be preferable to a dual or multi-GPU configuration. The soundcard and PCIe SSD you're suggesting aren't actually going to really change test results either, they may increase the case's ambient temperature by a degree or two at most.
And then, let's say we move over to a dual-GPU configuration. Which cards? Do we use a board with ample spacing between the two PCIe x16 slots or sandwich the cards together to see if the case can handle that kind of load? Do we use cards with blower-style coolers or coolers that exhaust heat back into the case?
Honestly I think you're selling the testing short. Off the top of my head, just from looking at documentation, I'd've thought the Raven would've murdered the competition, but instead its lead is nowhere near as comfortable as I expected and hoped.
Ananke - Wednesday, July 20, 2011 - link
This is one ugly piece of cheap looking plastic. $19 including all fans shall be the maximum paid, before discounts.Totally - Friday, July 22, 2011 - link
Isn't the Raven a scavenger and not a bird of prey?The0ne - Monday, July 25, 2011 - link
They are both. I hate them so much.AEternal1 - Tuesday, July 26, 2011 - link
I've always made my own case contraptions for my computers, because i run insane configurations, and ive yet to find a case that can keep up to my expectations. this is the first case ive bought that i still use.I run my I5 2500K @ 4.8 and my gtx 560 TI @ 1ghz. needless to say, heat is always very hard for me to dissipate in a case, especially since I prefer big air over big water.
I've got nearly every fan option running in this case, I spent about 120$ for extra fans to fit, since most of my extra fans were smaller.
I mounted all 4 of my mechanical hard drives in the back tray, and with this case's thermal design, they all run cooler than they ever did in my open air cases that ive built.
my cpu runs at 40* to 55* with a noctua nh d-14. with the thermal layout i was able to implement with all the fan layouts i had available to me, i can actually put my hands in the case, and one hand will feel cool air, and the other will feel the warm air. thats pretty awesome. i have my cpu air being pushed onto the backs of my graphics card to help cool the backside of them, as opposed to venting the cpu straight up and out. with this cases bottom fans, and then the added fans, it takes all the heat from this area and diverts it perfectly. my graphics cards finally run cooler than in an open air solution, and my cpu stays just as cool as always.
the end result is that this is the first case to actually out perform an open air solution.