Canon Digital Rebel XT: Hardly an Entry-Level DSLR
by Stephen Caston on May 3, 2005 12:05 AM EST- Posted in
- Digital Camera
Recording Features
In all recording modes, the 350D can record images as either JPG, CR2 (RAW), or both. JPG files can be recorded with either Fine or Normal compression. When recording images as RAW files, you can choose to have a Large/Fine JPG stored at the same time. The image quality options are below:| Setting | Compression | Resolution (pixels) |
| L | Fine/Normal | 3456 x 2304 |
| M | Fine/Normal | 2496 x 1664 |
| S | Fine/Normal | 1728 x 1152 |
| RAW +Large/Fine JPEG | None | 3456 x 2304 |
| RAW | None | 3456 x 2304 |
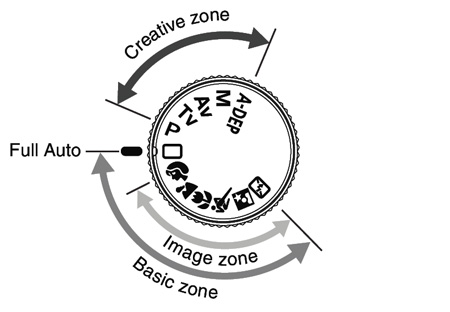
Image courtesy of Canon
| Creative Zone | |
| P (Program AE) | Aperture and shutter speed are set automatically. The Main Dial can be used to adjust both values at the same time while the camera ensures a proper exposure. |
| Tv (Shutter-priority) | The user selects the desired shutter speed with the Main Dial and the camera sets the appropriate aperture. |
| Av (Aperture-priority) | The user selects the desired aperture with the Main Dial and the camera sets the appropriate shutter speed. |
| M (Manual) | The user selects the aperture and shutter speed. |
| A-DEP (Auto Depth-of-Field) | The camera uses all AF points to determine the nearest and farthest subjects. Then, the camera sets the aperture and shutter speed to maximize depth-of-field. |
In the Creative Zone, there are numerous recording options available to the user via the Menu button. Below, we have outlined these options:
| Record Menu 1 (Creative Zone) | |
| Quality | L, M, S (Fine, Normal) |
| Red-eye | Off, On |
| Beep | Off, On |
| AF mode | One Shot, AI Focus, AI Servo |
| Metering mode | Evaluative, Partial, Center-weighted average |
| ISO speed | 100, 200, 400, 800, 1600 |
The 350D uses a 7-point auto-focus system (same as the 300D). The active focus point can be selected by pressing the AF point selection button and then rotating the Main Dial until the desired point is outlined in red. If all the focus points are selected, the camera will attempt to focus on the subject(s) closest to the camera. One Shot AF mode is intended to be used for still subjects. When it is selected, the camera will lock focus when the shutter is half-pressed. AI Servo AF mode is designed for moving subjects. When the shutter button is pressed halfway, the camera will refocus continuously as the subject moves. The 350D uses "Predictive AF" that allows the camera to track a subject moving at a constant speed. This allows the camera to predict where the subject will be to ensure a good focus when the frame is taken. AI Focus AF mode is recommended for more general circumstances when a subject may start moving. If the camera detects motion, it will switch over to AI Servo mode and begin tracking the subject. Evaluative metering uses information from the entire frame to determine the appropriate exposure setting. This is usually the best metering choice for normal situations. However, in circumstances where there is significant backlighting or large differences in light intensity across the frame, Partial metering is recommended. With Partial metering, the camera uses approximately 9% of the center of the frame to determine the exposure. Finally, Center-weighted average will measure light from the entire frame, but will give extra weight to the information in the center.
| Record Menu 2 (Creative Zone) | |
| AEB | +/- 2 stops in 1/3 or 1/2 stop increments |
| Flash exp comp | +/- 2 stops in 1/3 or 1/2 stop increments |
| White balance | Auto, Daylight, Shade, Cloudy, Tungsten, Fluorescent, Flash, Custom |
| WB SHIFT/BKT | Shift amount/BKT amount |
| Custom WB | Set |
| Color space | sRGB, Adobe RGB |
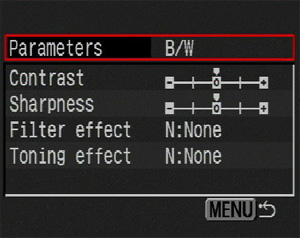
| Parameters | 1, 2, Set 1, Set 2, Set 3, B/W |
AEB (Auto Exposure Bracketing) and Flash exposure compensation are available as +/- 2 stops in 1/3 or 1/2 stop increments. The increment amount (1/3 or 1/2) can be set via a Custom Function, which we will discuss later. After a bracket is specified, the camera will indicate on the LCD panel the picture in the bracket that you are about to take. The order will be normal, underexposed, overexposed.
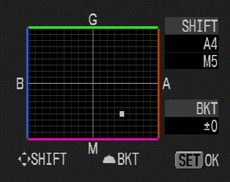 WB Shift |
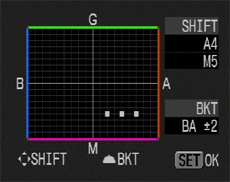 WB Bracket |
The White Balance Shift/Bracket option is identical to the one seen on the Canon 20D. You are given the option to shift the WB along two axes: Blue-Amber on the horizontal axis and Magenta-Green on the vertical axis. To set up a WB bracket, you can simply rotate the main dial clockwise to create a Blue-Amber bracket or counterclockwise to create a Magenta-Green bracket. When a WB bracket is set, the camera will save 3 pictures each time that the shutter button is pressed. The order will be normal, blue, amber or normal, magenta, green. On the 350D, the options to select either sRGB or Adobe RGB color space are separate from the parameter options.
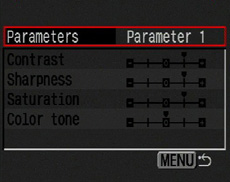
Parameter 1 VS Parameter 2
Hold mouse over image.
B/W parameter
| Basic Zone | |
| Full Auto | The camera selects the aperture and shutter speed. If the camera determines that more light is needed, the flash will pop up automatically and fire. Evaluative metering, AI Focus, Drive mode set to Single. |
| Portrait | The camera selects a large aperture to blur the background and keep the subject in focus. Evaluative metering, One shot AF, Drive mode set to Single. |
| Landscape | The camera selects a small aperture to keep the foreground and background in focus. Evaluative metering, One shot AF, Drive mode set to Single. |
| Close-up | Designed to take pictures of objects at a small distance. Evaluative metering, One shot AF, Drive mode set to Continuous. |
| Sports | The camera selects a fast shutter speed. Evaluative metering, AI Servo AF, Drive mode set to Continuous. |
| Night Portrait | The camera uses a slow-sync flash to capture ambient light along with the flash. Evaluative metering, One shot AF, Drive mode set to Single. |
| Flash Off | The camera will disable the flash. Evaluative metering, One shot AI Focus, Drive mode set to Single. |
In the Basic Zone, the camera uses preset camera options. Advanced options such as ISO, WB, AF mode, and Metering are unavailable. Below is a list of the options available via the record menu:
| Record Menu (Basic Zone) | |
| Quality | L, M, S (Fine, Normal) |
| Red-eye | Off, On |
| Beep | Off, On |
At any time, two Setup menus are available via the Menu button. Below, we have outlined the Setup menu options:
| Setup Menu 1 | |
| Auto power off | 1, 2, 4, 8, 15, 30 min, Off |
| Auto rotate | On, Off |
| LCD brightness | 5 increments |
| Date/Time | Set |
| File numbering | Continuous, Auto reset |
| Format | Cancel, OK |
| Shoot w/o card | On, Off |
The "Auto power off" option refers to the length of time that the camera should wait before going into standby mode when there is a period of inactivity. You can simply half-press the shutter button to bring the camera out of standby mode. When Auto rotate is enabled, the camera will tag portrait-oriented photos so that they will appear upright when viewing the photos in an application that recognizes the tag information (this includes viewing them on the camera's LCD monitor). Although the 350D offers 5 levels of LCD brightness, we found even the highest setting to be difficult to view in brighter lighting conditions (i.e. in the sun). The 350D offers two different file numbering options: continuous or auto reset. When set to continuous, the numbering system will not reset even if a new media card is inserted. When it is set to Auto reset, the camera will reset the folder name to "100" and the image name to "IMG_0001" each time a card is inserted. If a file/folder already exists on the flash card, however, the camera will start with the next available number. The option "Shoot w/o card" is a feature that was missing from the original Rebel (300D). When this is set to "Off", the LCD panel and viewfinder will blink "No CF" when trying to take a picture without a card. This is a great option to ensure that you don't shoot a bunch of incredible photos only to find that there was, in fact, no CF card in the slot.
| Setup Menu 2 | |
| Language | Select |
| Video system | NTSC, PAL |
| Communication | Print/PTP, PC connection |
| Custom Functions | (See additional table below) |
| Clear settings | Clear all camera settings, Clear all Custom Functions, Cancel |
| Sensor cleaning | Cancel, OK |
| Firmware Ver. | Update |
The Communication option allows you to specify whether the camera is connected to a computer or a printer. The Clear settings function lets the user clear all changes to the original factory default settings. There is also an option to reset the Custom Functions back to their defaults. The Sensor cleaning option will flip up the mirror to allow the user to clean dust off the sensor. It is absolutely necessary to have either a full battery charge or to have the camera powered by the optional AC adapter during sensor cleaning in order to reduce the risk of damage to the sensor or mirror. The Firmware Ver. option will display the current firmware version installed (1.0.1 for this review) and will give you the option to update.
| Custom Functions | |
| 01 SET button/Cross keys funct. | 0: Normal 1: SET:Quality 2: SET:Parameter 3: SET:Playback 4: Cross keys:AF frame selec. |
| 02 Long exposure noise reduction | 0: Off 1: On |
| 03 Flash sync. speed in AV mode | 0: Auto 1: 1/200sec. (fixed) |
| 04 Shutter button/AE lock button | 0: AF/AE lock 1: AE lock/AF 2: AF/AF lock, no AE lock 3: AE/AF, no AE lock |
| 05 AF-assist beam | 0: Emits 1: Does not emit 2: Only emits ext. flash |
| 06 Exposure level increments | 0: 1/3-stop 1: 1/2-stop |
| 07 Mirror lockup | 0: Disable 1: Enable |
| 08 E-TTL II | 0: Evalutative 1: Average |
| 09 Shutter curtain sync. | 0: 1st-curtain sync. 1: 2nd-curtain sync. |
One of the major upgrades from the 300D is the addition of some Custom Functions available through the second Setup menu. Custom Functions allow you to change the functions of some of the camera's operations. For example, the first function allows you to change the behavior of the SET button and the Cross keys. With the Long exposure noise reduction option enabled, the camera will use a dark frame subtraction method in an attempt to eliminate noise that may show up during a long exposure. With function 06, you can specify whether you want to make exposure adjustments in either 1/3-stop or 1/2-stop increments. Another new feature to the 350D is the option to enable mirror lockup. This helps to reduce blurring caused by mirror vibration. The mirror will flip up prior to the exposure so that any vibrations will be avoided. When the mirror lockup option is enabled, the self-timer delay changes from 10 seconds to 2. E-TTL II refers to the 350D's flash metering system. With the Custom Functions menu, you can change the metering type to either Evaluative or Average. With Custom Function 09, you can select when the flash will fire during an exposure. With 1st-curtain sync., the flash will fire at the beginning of the exposure. However, a more natural effect is created by selecting 2nd-curtain sync. Imagine a person running through the frame. With 2nd-curtain sync. selected, the motion trail will follow naturally behind the subject. If 1st-curtain sync. was selected, the motion trail would appear in front of the subject.

Info screen
Below is a table that we constructed to help visualize some of the major differences between the original Rebel (300D) and the Rebel XT (350D).
| Rebel XT (350D) | Rebel (300D) |
| 8.0 megapixels | 6.3 megapixels |
| DIGIC II processor provides very fast image processing | DIGIC processor (much slower) |
| Metering and AF mode selection | No control over metering or AF mode |
| Nearly instantaneous startup | Average startup |
| Continuous drive: 3 fps for 14 frames (JPEG); 3 fps for 5 frames (RAW) | Continuous drive: 2.5 fps for 4 frames (RAW and JPEG) |
| E-TTL II | E-TTL |
| Mirror lockup | No mirror lockup |
| Improved parameters now allow B&W shooting with Filter and Toning effects | No color filter options |
| Extensive WB Shift/BKT | No WB Shift, just bracketing |
| Custom Functions menu | No Custom Functions |
| RAW mode has option to record a separate JPEG file | RAW files include an embedded JPEG |
| Smaller and lighter body | Bulky and a bit heavier |
| Smaller battery (same as S60/S70) | Larger battery (same as 10D and 20D) |


27 Comments
View All Comments
DVad3r - Tuesday, May 3, 2005 - link
Hmm possibly, what page is the blurb on?STaSh - Tuesday, May 3, 2005 - link
That's probably the sensor that tracks if the camera is vertical or horizontal. It's used to determine how you want a vertical image to be displayed on the LCD.There should be a blurb in the manual about it.
DVad3r - Tuesday, May 3, 2005 - link
I have a question to XT owners. I have noticed last night when holding my camera, that there seems to be something loose inside. I was just moving it up and down in my hands trying out different angles when I noticed what seems like something is moving around inside. The camera was brand new when I got it, and packed very nicely, and certainly has not been dropped or exposed to any shock at all. I was wondering if you guys have it too?Rebel II - Thursday, August 25, 2005 - link
I agree about the noise, there seems to be something loose in the camera. Mine is brand new and has not been subjected to any shock. I've been practicing using it and never noticed anything for the first six days. It is very quiet at times when I am practicing but I have never noticed a sound until the sixth night. I was using a "long exposer time" and after that I noticed a sound everytime I tilted the camera back and forth. I can even feel it as I move it. Everything seems to work the same. I can't figure out why I didn't notice it before. I was ready to return it but decided to check on the web to see what others have experienced. You are the second person to mention this so far as I have just began my search.Possessed Freak - Tuesday, May 3, 2005 - link
Hrmmm, I may actually have to try one of these out. I still use my Canon AE-1 program for all my picture taking. This DSLR really has me intrigued.NFS4 - Tuesday, May 3, 2005 - link
Stephen, I got my D70 Kit a few weeks ago from OneCall.com for $899.99 after a $100 Nikon rebate.Also don't forget the Nikon D50, which I hope you will be reviewing soon along with the Nikon D70S
Xtremist - Tuesday, May 3, 2005 - link
Anyone want to buy the original Rebel? ;-) Man, I WANT one of these lol!roibm - Tuesday, May 3, 2005 - link
glad it's fixed... I freaked out seeing it didn't work with my default browser(opera) and then not even with firefox.I can confirm it works with both as well.
stephencaston - Tuesday, May 3, 2005 - link
#6, the javascript problem has been fixed. It now works fine in Firefox, Opera, etc...#7, yes the Rebel XT shoots at 72 dpi
rootaxs - Tuesday, May 3, 2005 - link
Thanks for the review, would you mind posting though if the processed photo's that come out of the XT are at 300dpi or 72dpi? (e.g. at max resolution, not resized to become a 300dpi image).