FLIR ONE Pro Thermal Camera Review
by Ganesh T S on June 6, 2017 8:45 AM EST- Posted in
- Gadgets
- Thermal Imaging
- FLIR
- USB-C
Usage Impressions
The presence of a USB-C connector ensures that the FLIR ONE Pro is compatible with a wide range of Android phones. Like the previous generation FLIR ONE, the unit has an explicit button to turn the device on or off. The button includes a light indicator (flashing orange while booting up, green when active). The FLIR One app needs to be installed before thermal images or videos can be taken.
As mentioned in the previous section, the FLIR ONE Pro includes a 1440x1080 image sensor for capturing visible images. Even though the thermal sensor itself is only 160x120, FLIR's patented MSX blending algorithm combines the HD image from the image sensor with the thermal sensor's output. The result is a thermal image with a perceived resolution closer to that of the image sensor, rather than the thermal one. It must be noted that the number of radiometric data points in the result is still limited by the Lepton 3's resolution of 160x120.
The FLIR ONE Pro also includes additional signal processing technology (termed as VividIR in FLIR's marketing) to further enhance the image clarity. We found that the thermal images created by the FLIR ONE Pro were definitely of much better quality compared to what we got with the second generation FLIR ONE. But, it is not clear how much of that is due VividIR in particular.
The FLIR One Android App
The home screen of the FLIR One app is divided into four panes, with a direct link to the gallery of recorded media in the local device, and three links to online content. The drop down menu provides the more interesting options. The Camera menu takes us directly to the preview pane.

The viewfinder icon brings up the temperature meter. There are three different types (spot, rectangle, and circle), and users can create up to three of each. The flashlight icon turns on the phone's LED flash (useful for capturing visible and MSX images in dark environments). There is also a timer for triggering the capture (instant, 3s, and 10s are the available options).


Adjacent to the battery level indicator, we have an icon to trigger the shutter and clear the image data on the screen (I used it to get rid of apparent app glitches). Other options in the photo mode include the option to view either the visible image, blended MSX one, or the thermal image alone in the preview pane. The palette can also be changed (9 different options are available, as seen in the above gallery). The IR scale brings up a temperature range scale to one edge of the preview pane, with the default setting extremes being the highest and lowest temperatures in the scene. This can be changed by the user. Parallax adjustment allows proper MSX blending based on the proximity of the subject. An option is also available to flip the captured image in the preview itself. The gain settings can also be adjusted if necessary (low gain is needed to see very high temperatures).
While the MSX and VividIR features deliver great image quality, the spot temperature meters and temperature tracking on a region basis help provide actionable information to professionals.
The FLIR Tools Android App
Professional use-cases often require post-processing of the gathered images. Fortunately, the pictures saved by the FLIR ONE Pro are radiometric in nature. This means that pixels have associated data with them (in this case, temperature). FLIR Tools is a program provided by FLIR to process radiometric JPEGs. I had tried using it on a PC with the thermal images from the previous generation FLIR One, but, it wasn't successful. FLIR now has an Android version of the software.
While FLIR Tools has multiple use-cases (including control and discovery of advanced thermal imaging equipment using Bluetooth etc.), our testing was limited to post processing of thermal images captured via the FLIR One app.
The app allows generation of a PDF report from any radiometric JPEG. The report includes a list of measurements activated via the on-screen editing options. The editing options include adjustment of parallax, palette, and measurements (spot, rectangular, and circular regions). Unlike the FLIR One app which is restricted to three of each region type, FLIR Tools can be used to add as many measurements as one wants, and the resulting image can be saved.
FLIR also has a developer program and SDKs for the FLIR ONE cameras. This allows third-party developers to create apps that can utilize the FLIR ONEs. A few high-quality apps are linked right from the FLIR ONE app itself.


40 Comments
View All Comments
RandomUsername3245 - Tuesday, June 6, 2017 - link
I believe FLIR typically quotes +/-5ºC on their spec sheet. In my experience, it is better than this. Also, there is a cap on the maximum intensity read out on this camera which is apparently set to 150ºC. Similar FLIR microbolometers can go way higher than this without saturating, so this is just a software limitation.JanW1 - Wednesday, June 7, 2017 - link
Sorry, my June 7 comment was meant to go here, not above...JanW1 - Wednesday, June 7, 2017 - link
Oh, so now it went back below to where it was supposed to be - edit function, maybe?JanW1 - Wednesday, June 7, 2017 - link
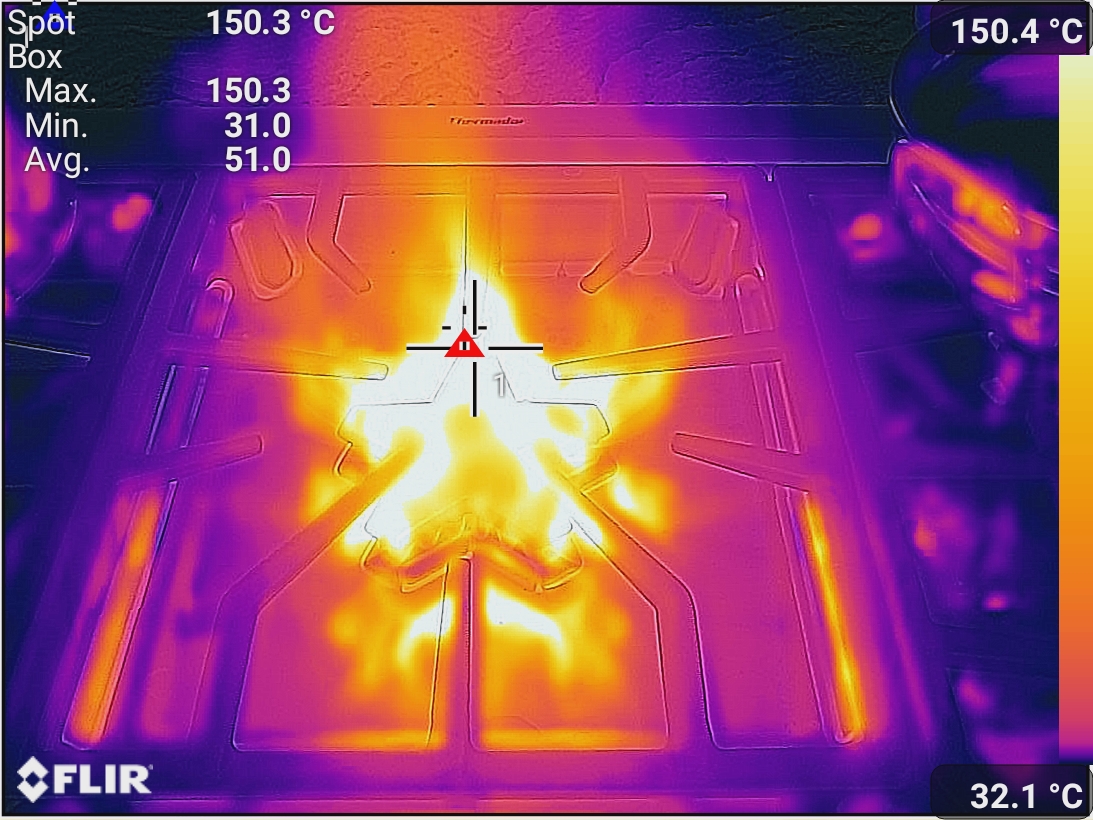
Isn't the goal of reviews to independently test the manufacturers claims? Of course I can read spec sheets, but then why review it? There are plenty of example pictures available from FLIR's website already.The review states that there is a cap of 400°C - that's way beyond the 150.3°C shown in this sample picture. Did Ganesh set the range to top out at 150.3°C (302.5°F) before taking that picture? That seems somehow unlikely. Or was the picture taken immediately after turning the burner on? But then, isn't the minimum temperature of 31°C reported for that entire frame kind of high? A serious review should include at least a few words about whether the results seem reasonable given the circumstances - otherwise, what's the point?
ThermalImager - Wednesday, June 7, 2017 - link
Unfortunately Anandtech's thermal imaging reviews aren't very useful. The key criteria when selecting a thermal imaging device for most applications is sensitivity - i.e. the minimum resolution of temperature it can distinguish, typically represented in terms of mK (millikelvin i.e. 1/1000 C). The previous Flir One was a little vague, the spec quotes 'as small as 0.1C' i.e. 100mK. Seek thermal state 100mK but only report in 1C increments - something which is difficult to interpret and may render their sensors useless for thermal imaging. A good thermal imaging camera will have a sensitivity of 70mK or less.Resolution is also useful, but you can compensate for poor resolution by moving closer, into the object, also some cameras compensate for poor resolution by clever image processing.
I carry out thermal imaging surveys professionally, so have some idea about this subject.
jabber - Tuesday, June 6, 2017 - link
So when are going to get a phone with this built it? Two years?wolfemane - Tuesday, June 6, 2017 - link
That's a lot of hardware to add to the internals of a phone. I wouldn't count on anything close to the quality of a FLiR system in a cell phone anytime soon... if at all.jabber - Tuesday, June 6, 2017 - link
It doesn't have to be in a 2mm thick 'marmoset' phone. It can go into one a normal human male can carry. I'm still fine with the idea of a 10mm thick phone with a big battery even more so if it has actually useful features.Mr Perfect - Tuesday, June 6, 2017 - link
The Cat S60 linked to on the first page of the article is just what you're looking for.Mr Perfect - Tuesday, June 6, 2017 - link
These things are pretty cool, and the reviews are fun to read too.In future articles, maybe you could show us example shots that appeal to our inner geeks? Pictures of things that give us a reason to buy one, like shots showing how to detect IT equipment that needs dust cleaned out, or a VRM that needs a heatsink. Something we can justify the price with.