The Alphacool NexXxoS Cool Answer 360 DDC/XT Liquid Cooling Kit Review
by E. Fylladitakis on October 24, 2016 9:30 AM ESTInstallation
Casual users often wonder about how much harder the installation of a kit is over a AIO solution or even an air cooler. Actually, the installation itself is not very complex – the selection of the proper parts is. As the NexXxoS Cool Answer 360 DDC/XT is a full liquid cooling kit, it gives us the chance to demonstrate the installation process and highlight some of the most critical difficulties.
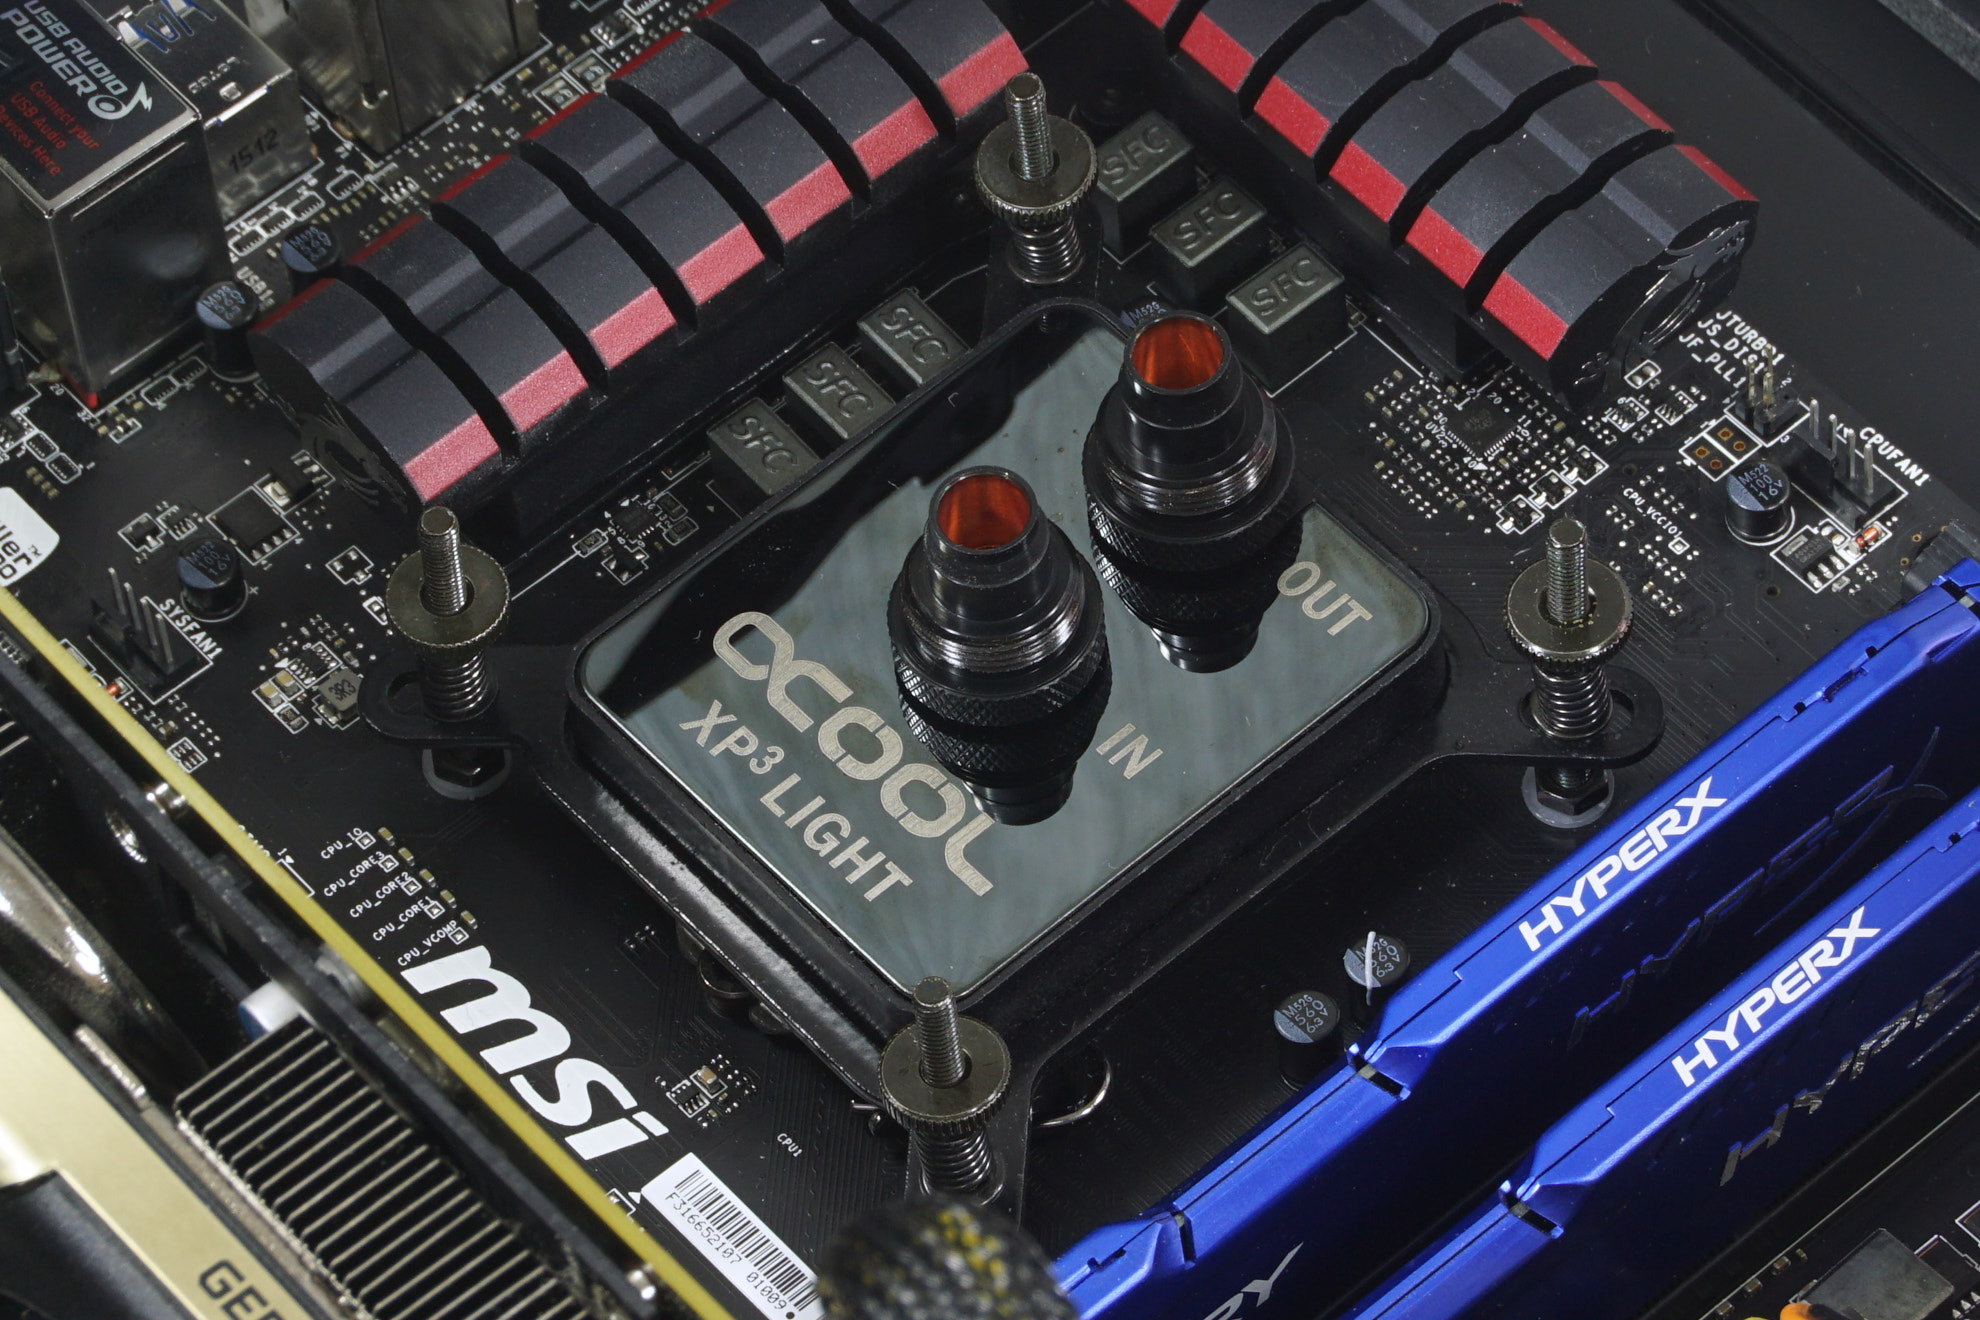
The first step is to install the liquid cooling block onto the CPU. Due to the size and the design of the block, this may be a very easy process, even easier than the installation of a simple air cooler. The Alphacool XP3 Light is a very easy to install block. Once the backplate with the support screws is attached to the rear of the motherboard, the block is simply fastened on the CPU using the thumbscrews and springs.
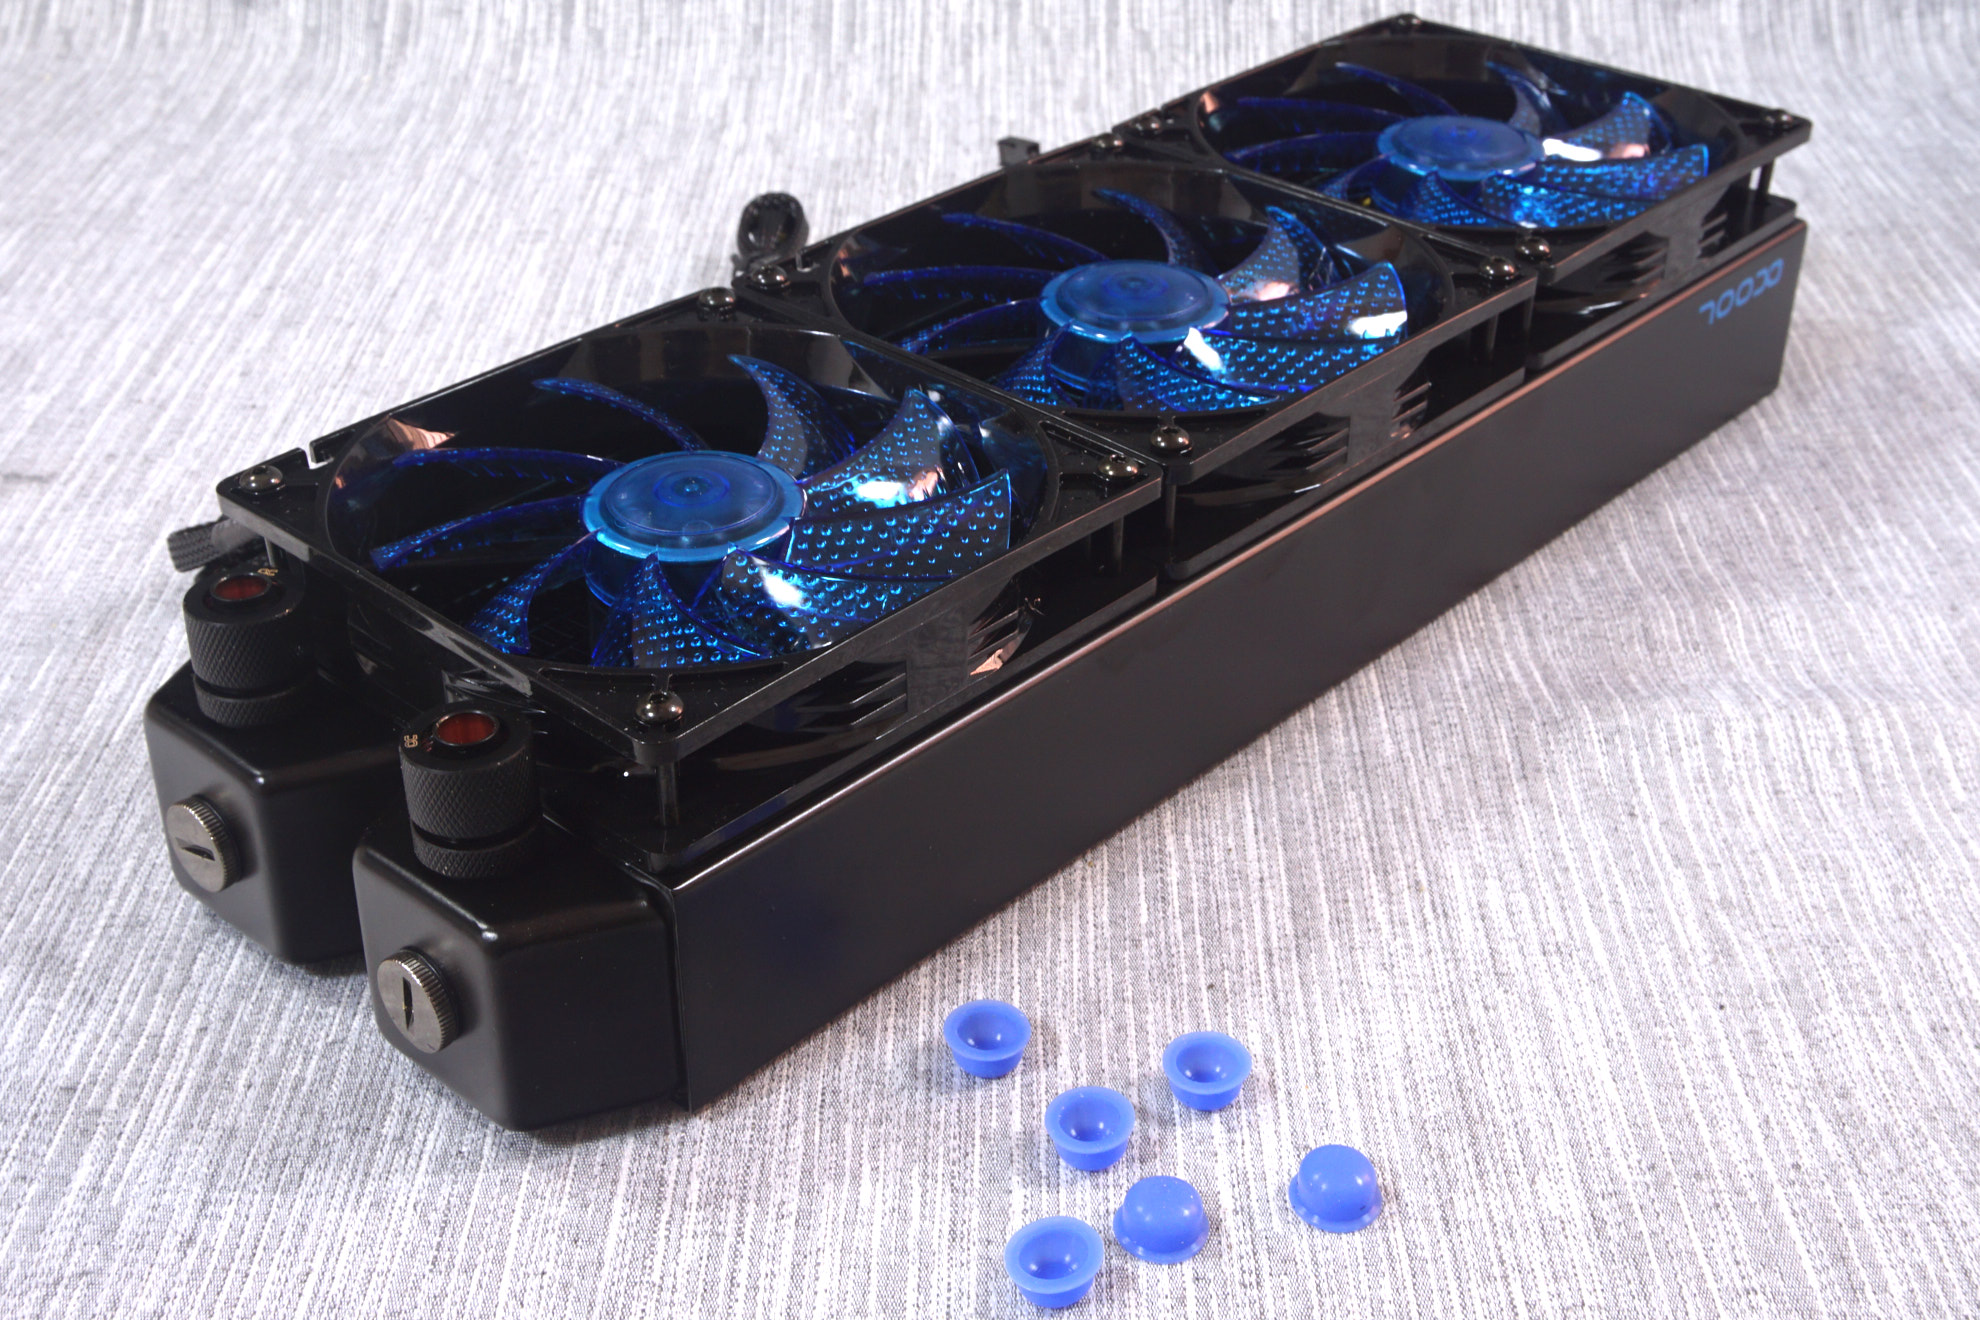
A critical issue when selecting liquid cooling parts is the selection of a proper radiator. A larger radiator will not necessarily improve performance, especially if the pump is weak and it can easily cause compatibility issues. In our case, we do have a powerful pump and the kit is configured with maximum performance and expandability in mind, so the XT45 radiator is a judicious choice.
It is however so thick that we could not fit it even in the Phantecs Enthoo Pro, a case specifically designed to support large radiators, just because the third fan was interfering with the extruding motherboard’s heatsinks. This might not have been an issue if we simply chose another motherboard with different heatsinks/layout. When selecting a high performance radiator, it is critical to take into account both the clearance of the case and the possible interference from other hardware parts.


The joined 5.25” bay reservoir and pump assembly does increase the ease of installation significantly. A stand-alone pump and reservoir would require the user to seek his/her own mounting space and methods. The placement of a reservoir in a 5.25” bay may seem very easy and straightforward, but there is a small catch; you cannot actually access the filling hole while the reservoir is inside the bay. As the reservoir needs to be pulled at least partially outside of the case, the user needs to make sure that the tubing is long enough to allow for it. For a fully clear reservoir, it is a pity that it does not have any lighting or direct support for external lighting options. This will not be an issue in a well-lit system though.
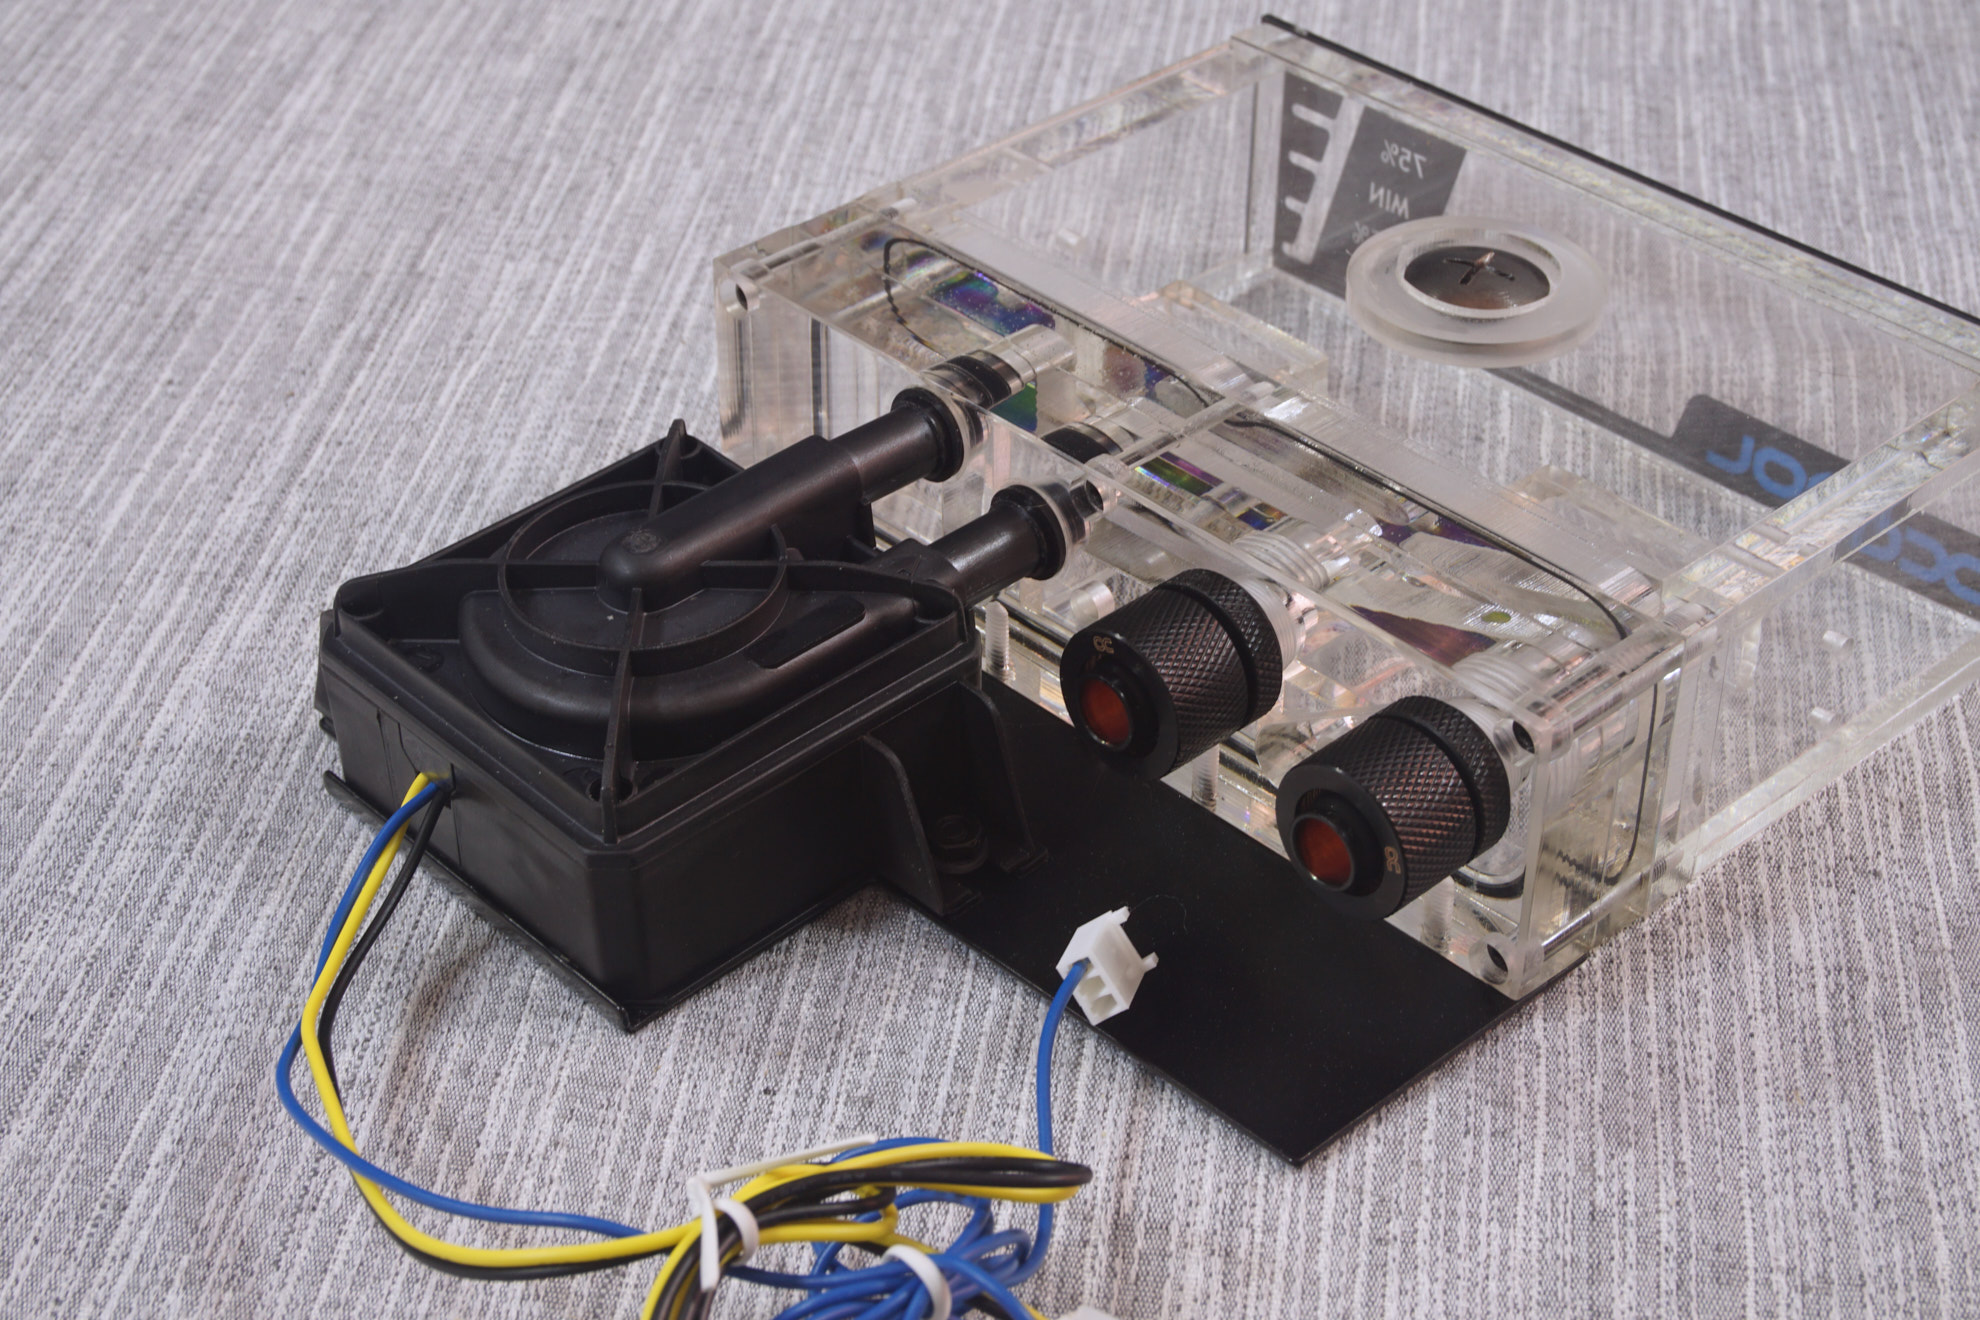
We should note that the Repack reservoir did not actually fit into the Enthoo Pro directly, as the body of the reservoir would not fit in between the side 5.25” device support tabs of the chassis. We had to bend two of the tabs out of the way in order for the reservoir to slide into a 5.25” bay. In order to effortlessly fit into any case, it should vertically have a slightly narrower body than its front faceplate, exactly like 5.25” devices do.
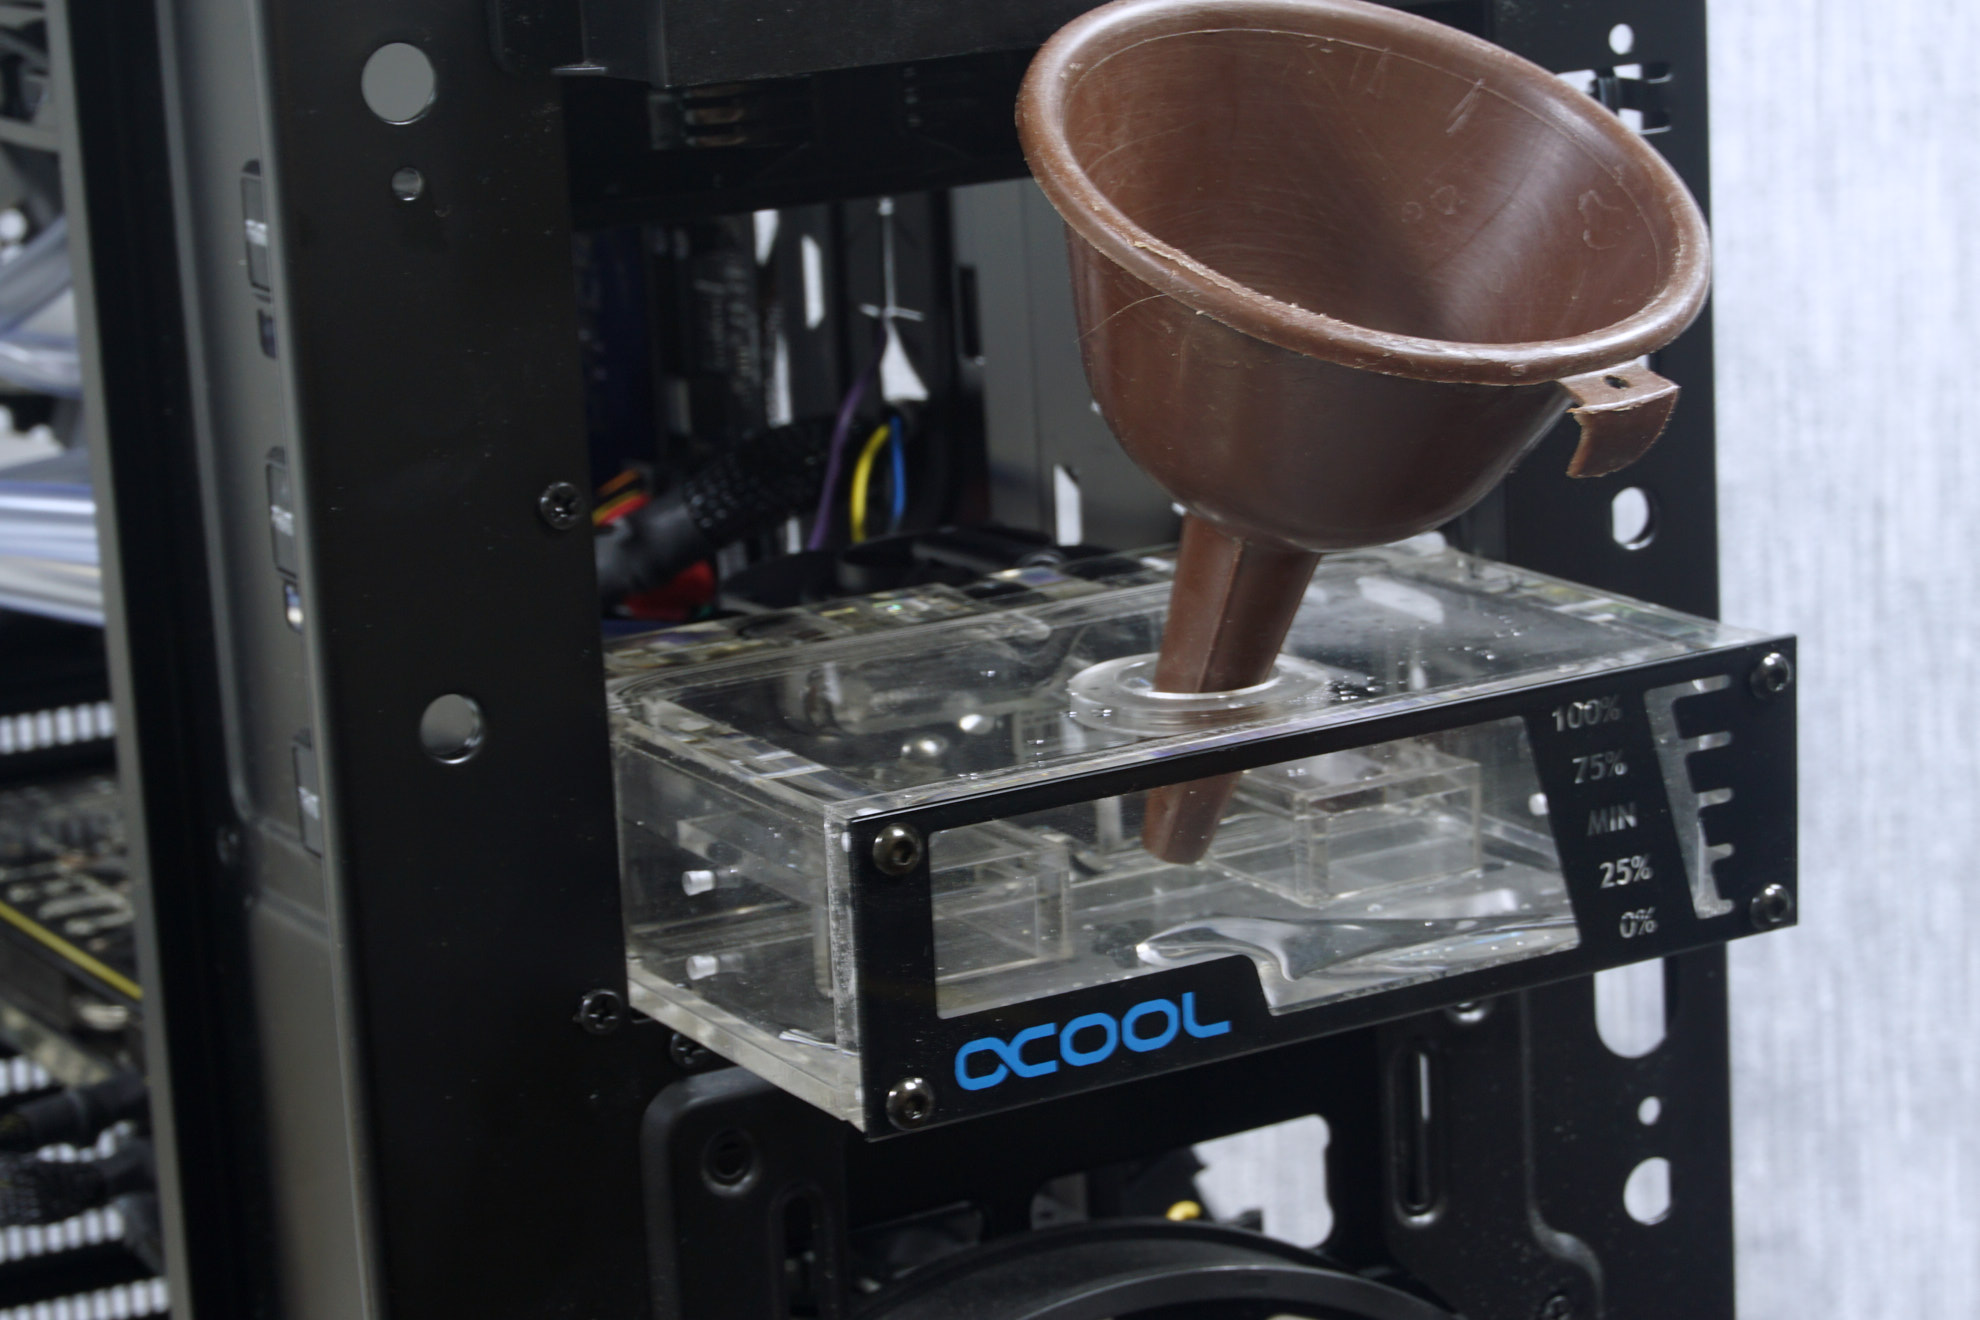
Once fully assembled, the liquid cooling setup looks very tidy and futuristic, having the system standing out from the appearance of a typical PC. When everything has been double-checked and tightened well (by hand, tools will damage most of these parts), it is time to fire up the PSU and fill the system with liquid. Note that the PSU needs to be disconnected from all of the system’s devices during this process, especially the motherboard. Alphacool provides a connector for the PSU that will start it without having to connect it to a motherboard, allowing to calmly fill the kit with liquid and check for leaks. Do not attempt to fill the kit with liquid by powering on the main system even if you are certain that there are no leaks because the CPU will overheat and risk damage in a matter of a few seconds without liquid into the loop.


40 Comments
View All Comments
BrokenCrayons - Tuesday, October 25, 2016 - link
Thats sort of the point I'm getting at here. CPU performance has become a lot less relevant in recent years. Sandy Bridge's realease is a pretty good place to draw a line in the sand about when that sort of thing happened. I'd say perhaps a little earlier than that, but the target of acceptable CPU performace is still moving along slowly, but hardly keeping up with the release of new generations these days which in turn devalues the meaningfulness of overclocking and therefore the usefulness of creative cooling methods.GPUs are another story, of course. Higher screen resolutions and maybe VR depending on whether or not it survives the coming couple of years will continue to drive GPU demand and maybe make it worth the effort to do something unusual with a video card to wring a little more out of it.
Batmeat - Monday, October 24, 2016 - link
This setup would be easy to cut the noise by simply swapping out the fans, changing the mounting location of your pump and resevoir, and finally adding some dynamat around the pump and mount site.Dynamat was used back in the day by car stereo enthusiasts to deaden vibration from the subs in your vehicle. I would imagine something better is available today as I haven't messed around with the stuff for nearly 20 years.
JoeyJoJo123 - Monday, October 24, 2016 - link
If we're talking sound isolation material, then thick Rock Wools (used as in-wall insulation or as wood-framed panels in hi-fi home theatre rooms) and Sorbothane (used to acoustically/vibrationally isolate two objects, through a sorbothane gasket, feet, pads, etc)Neither material is particularly ideal to place inside a computer case.
The most sure-fire method to totally remove the noise from a PC is to literally move into another room. You can connect the peripherals such as mouse, keyboard, monitors through extended cables running through the wall into the adjacent room's closet, for example.
Arbie - Monday, October 24, 2016 - link
I stopped even thinking about water cooling when the CPU ability trajectory crossed my needs line. In fact I no longer consider overclocking. A good Intel CPU now, stock, is almost *twice* as powerful as my high-wattage OC'd beast from 8 years ago. Even that rig rarely struggles now, and when there is a slowdown it is almost always due to the GPU or the disk I/O.If I were building now I might OC by a few percent, and upgrade a bit from the stock air cooler, but that's it.
Speaking generally here, to the average enthusiast. Put your money in the GPU, the disk I/O, and lots of RAM. Pushing your CPU will bring no perceptible gains for the expense, increased heat, and reliability concerns. In particular, forget about water cooling.
JoeyJoJo123 - Monday, October 24, 2016 - link
It really depends on the application you're running. Generally, the CPU isn't taxed much, and you're right about that.But in other cases, the CPU is taxed _a_lot_ and having a fat overclock can make a large difference. For example, right now I'm planning a dedicated streaming PC, complete with 3 general purpose capture cards (HDMI/Analog video per card). OBS can use Intel QuickSync, etc, but the entire point of having a dedicated streaming PC is to have a high quality streaming experience that offloads extra video capture work to a different PC. The best video quality comes from utilizing x264 to single-pass encode incoming raw video, and of course, this is software encoding so it's taxing on the CPU.
http://www.anandtech.com/bench/CPU/53
I can't honestly explain the outlier of the 6700 being significantly faster than a higher clocked 6700K, but ultimately that x264 single pass performance relies mostly in having high IPC first, and lots of cores second, which is why 3.5GHz 28 thread monsters sit lower on the list as compared to a 4.7GHz 8 thread 4790k.
Right now, I'd say the best possible dedicated streaming PC would have a highly overclocked (~4.8GHz) 6700k, which would likely allow the user to set up slower presets for a potentially higher quality stream, given a fixed bitrate upload speed (as in Twitch), etc.
So yeah, in some cases a fat overclock does help. It really comes down to whether the task is CPU/GPU/Storage starved. (Amdahl's law, etc.)
bearxor - Tuesday, October 25, 2016 - link
One thing I'd like to see mentioned in the review for a kit like this that I didn't see here (did I miss it?) is expandability. Can I add a vga cooler in the line and the pump/fans/radiator can handle it? Can I add two cards?qasdfdsaq - Wednesday, October 26, 2016 - link
Yes, and yes. That's basically the point of an open-loop system to begin with.(Incidentally I have the same kit and I bought it primarily to cool my ridiculous heating plant of a GPU)
bearxor - Saturday, October 29, 2016 - link
I'm not saying you couldn't do this, because obviously you can, but what's the impact to the coooing performance if you put a 150-200W GPU part in the line here.Since this is the first cooling loop review they've done in forever they're hopefully looking for feedback on what they'd like to see in future reviews and that's what I'd like to see.
Someone looking at a kit like this would obviously, IMO, be looking at it as a starter kit to expand upon in the future. A review should address what impact that expansion could have on the cooling performance of this kit.
microsofthelpnumber - Wednesday, October 26, 2016 - link
Microsoft Help Number UKMicrosoft is a brand name for many computing services. No matter what problem you are facing with which Microsoft product. Our team has expertise on every problem of Microsoft. To seek help call on@0800-098-8371.For More Details Please Click Here:-
http://microsofthelpnumber.co.uk/
Mariam24 - Wednesday, October 26, 2016 - link
Are you single tonight? A lot of beautiful girls waiting for you to https://goo.gl/PSgNLj