The Dell XPS 15 9550 Review: Infinity Edge Lineup Expands
by Brett Howse on March 4, 2016 8:00 AM ESTDisplay
Dell offers two displays on the XPS 15. The base model is a 1920x1080 IPS panel. It’s likely reasonable for most people, but for this review Dell configured out review unit with the upgraded 3840x2160 (UHD) display. This is more than just a resolution bump too. The UHD display also has a backlight which can cover 100% of the Adobe RGB color gamut, or so Dell claims. The standard offering is sRGB only, and the Adobe RGB color space is quite a bit larger, offering more saturation in colors.
However, the majority of the web and most consumer-grade applications are made for the sRGB color space only, so if you use an Adobe RGB display with sRGB as the expected color space, you’ll get an oversaturated image. Display manufacturers combat this by generally offering a way to pick which color space you want to work in. If you are browsing the web, you can choose sRGB, and if you are touching up photos that were captured in Adobe RGB, switch the display to that color space. Dell does this through their PremierColor application on the XPS 15
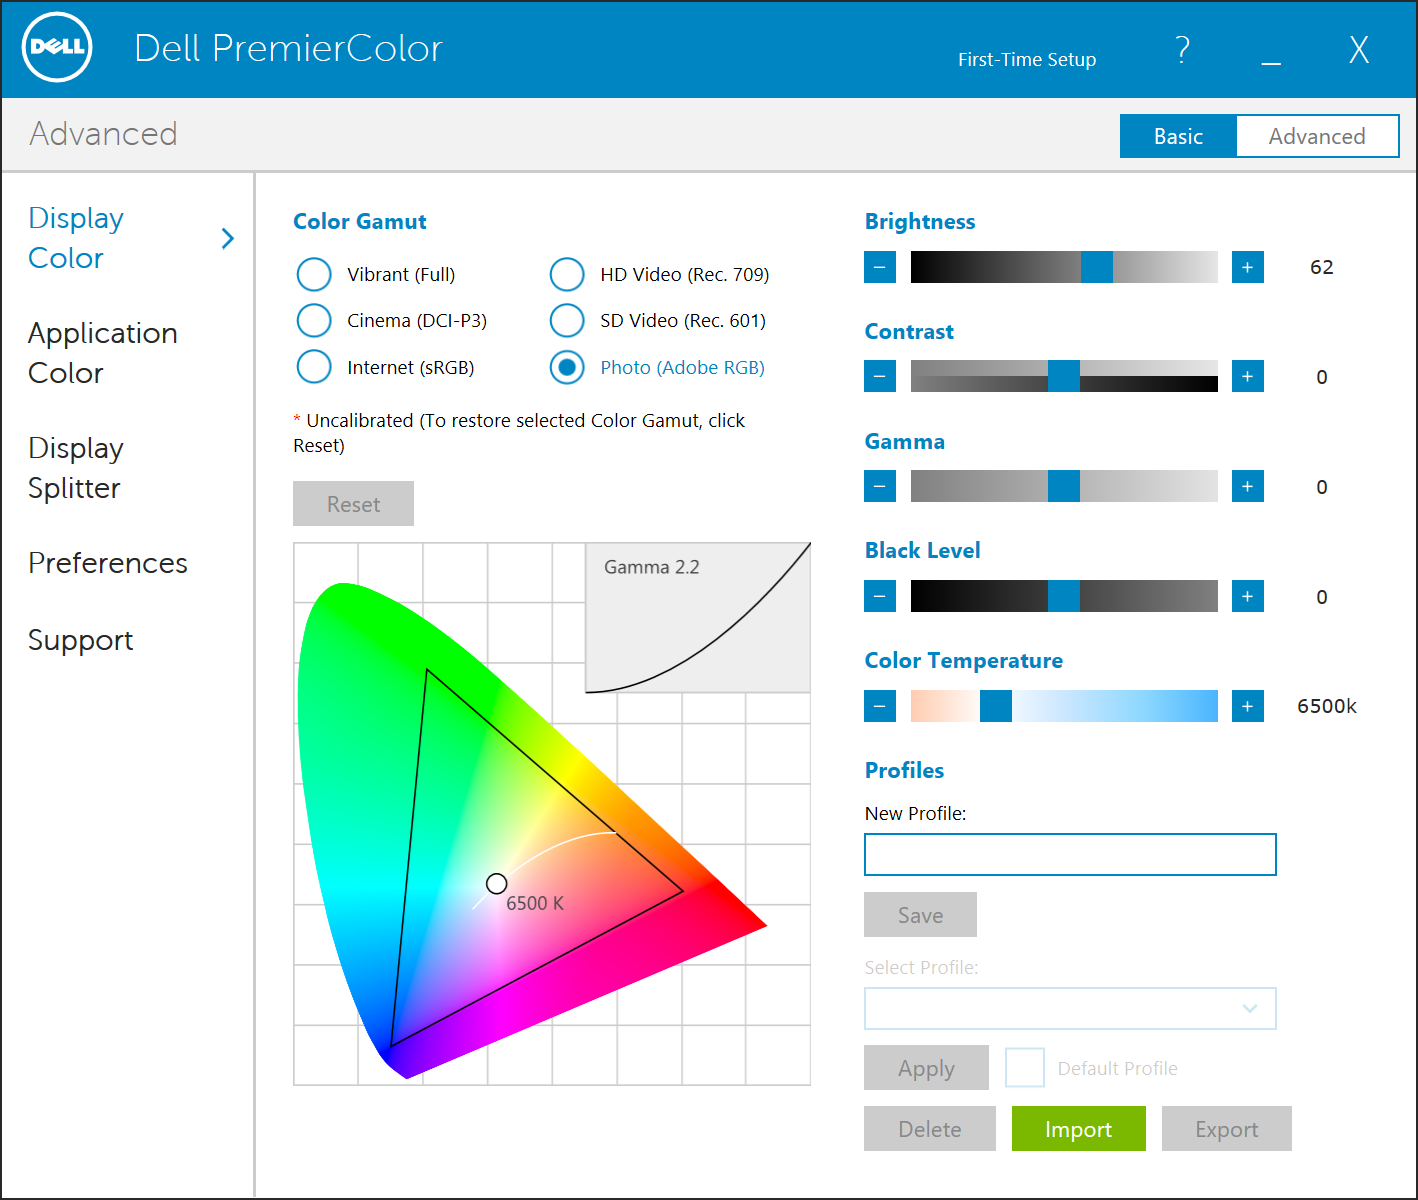
You can easily switch between the color spaces, as well as several others including DCI-P3 (though I would be somewhat surprised if it could hit it at 100%) and Rec. 709 (which is functionally identical to sRGB), depending on what you are working on. If you open the advanced features, you can tune the color temperature, gamma, and black levels as well. If you don’t have color calibration hardware, this is a quick and dirty way to adjust the display to make it more pleasing.
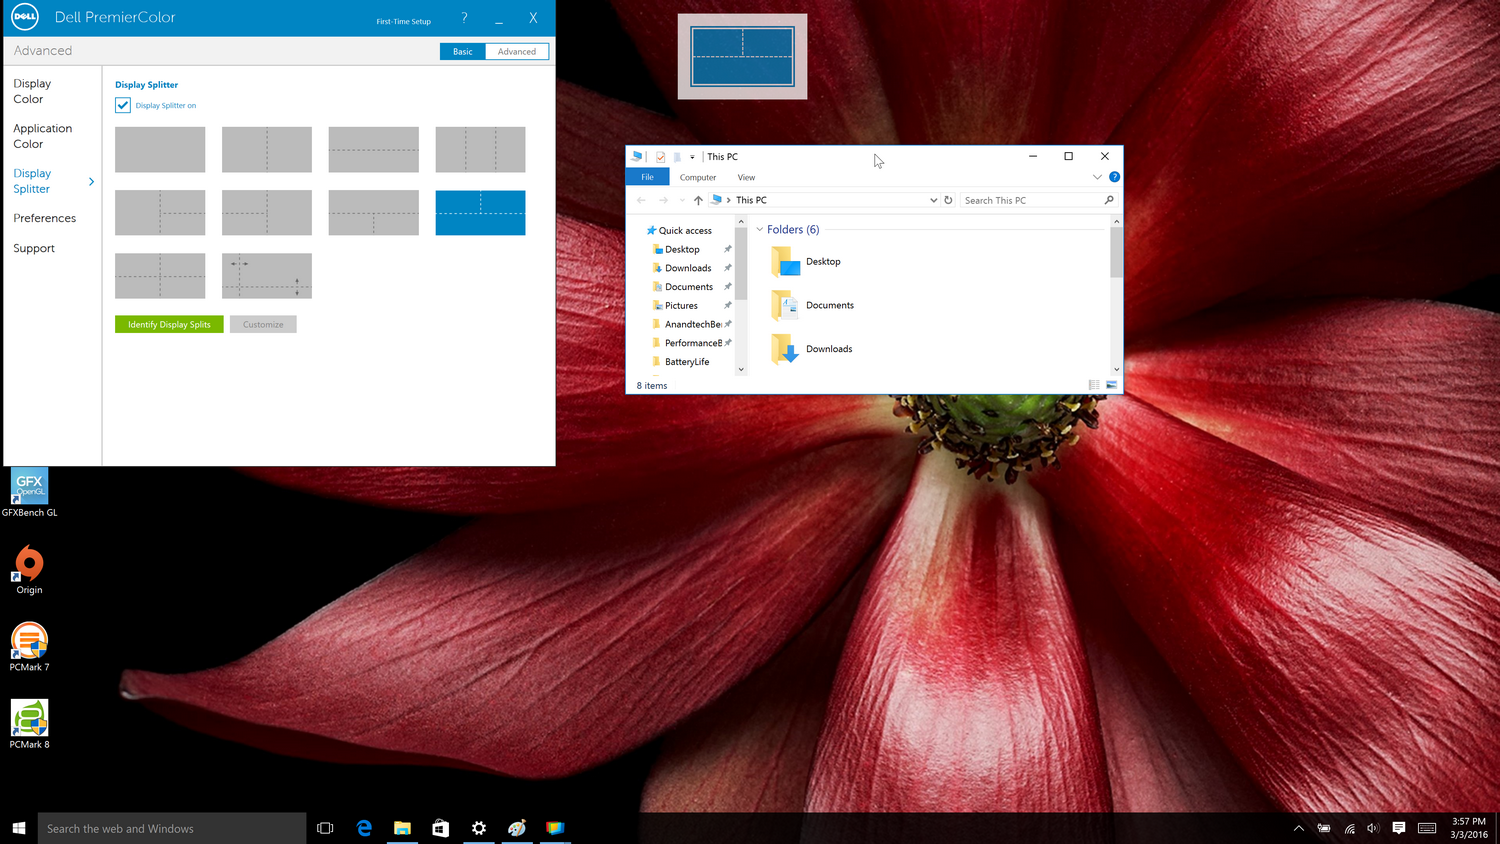
While we’re in here, Dell also offers another cool feature with this software. They call it the Display Splitter, and its basically an improved version of Windows Snap. You can pick how you want to segment your display, and then when you are dragging windows around, the Display Splitter image will appear. Put the window on the box you want, and the software automatically resizes it and snaps it to the correct location. This is pretty great, and Microsoft should take note of this and work with Dell to get it added to Windows.
Back to the display though, there is sometimes some misconceptions that a display that covers Adobe RGB is going to be more accurate out of the box than one that does not. In fact, it really has no bearing on accuracy at all. What Adobe RGB does is offer a wider gamut of colors, and its up to the laptop manufacturer to ensure that the correct calibration is done to map the correct colors to the display output. To test this, we use SpectraCal’s CalMAN 5 software with a custom workflow. Brightness and contrast are measured with an X-Rite i1Display Pro colorimeter, and color accuracy is tested with an X-Rite i1Pro2 Spectrophotometer.
Brightness and Contrast
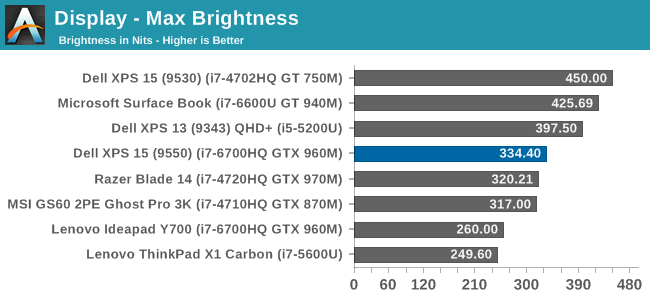
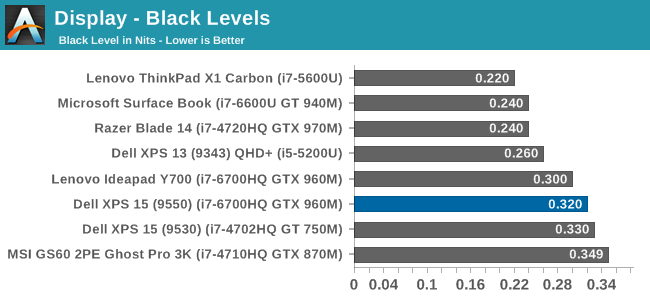
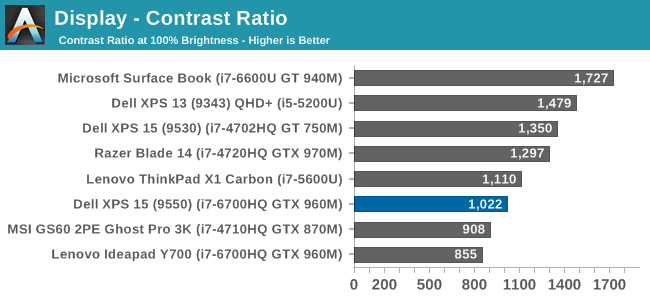
The XPS 15 display can get up to 334 nits, which is plenty bright enough for most tasks, and impressive considering the resolution. Good black levels also lead to a contrast ratio over 1000:1, which is respectable. It’s not class leading anymore, but it’s still a good result. For those that are interested, the display will also go all the way down to 13 nits which should be dim enough for working in the dark.
Grayscale
sRGB Grayscale

Adobe RGB Grayscale
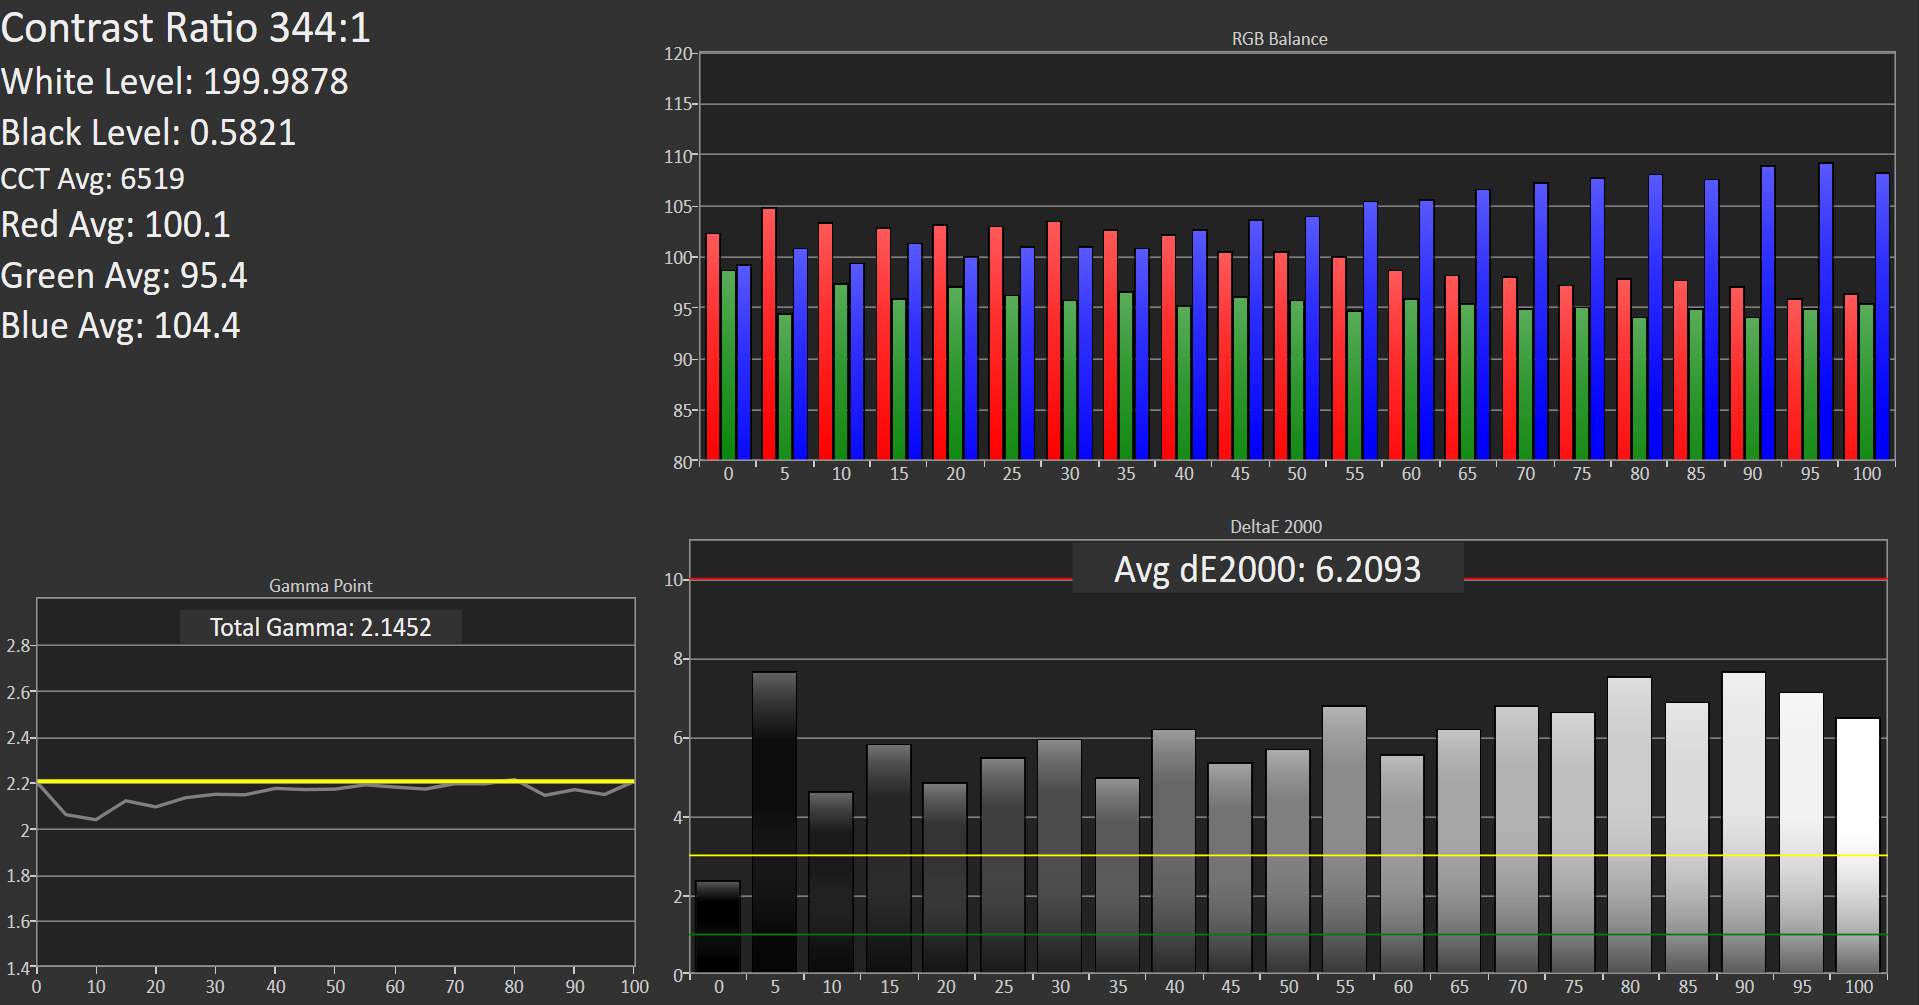

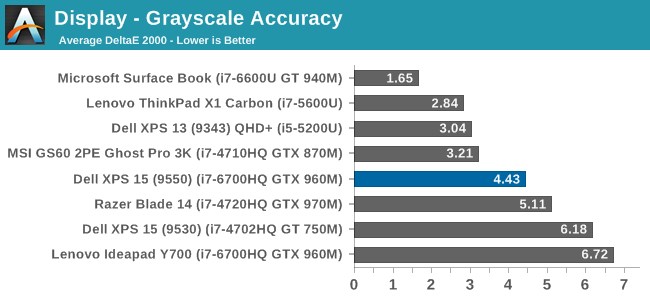
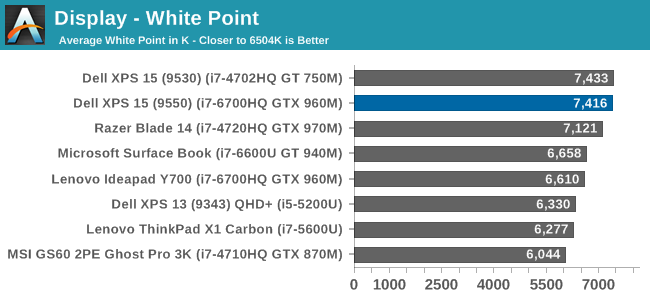
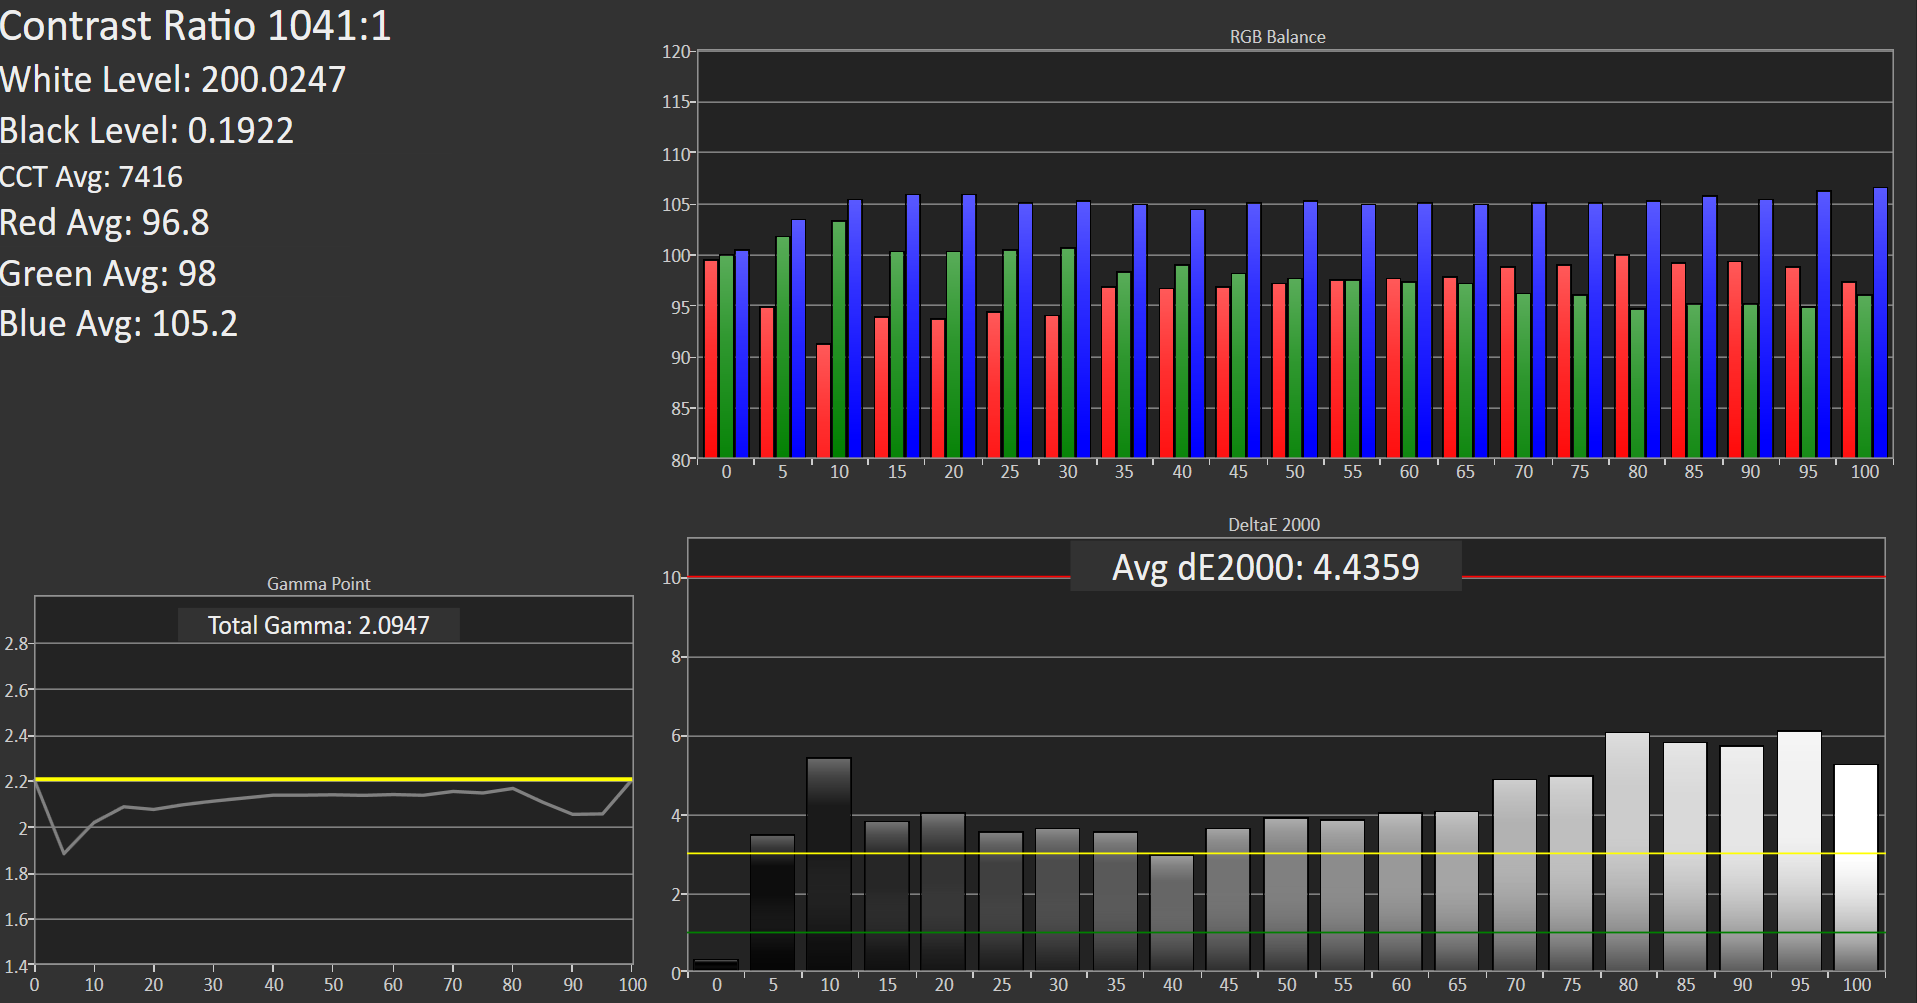
Out of the box, the grayscale is not very accurate in either the sRGB or Adobe RGB color spaces. The display has a definite blue cast to it as well, and that plays out in the high color temperature. Gamma is quite good though on both, but Dell should have provided an ICC profile at the minimum to help out with grayscale (or better yet, a calibrated LUT). The UHD display is over a $300 option, so it should be much better calibrated than it is. The color comparator shows how blue the images are.
Saturation
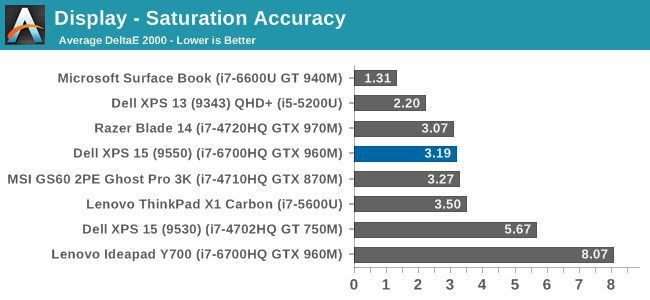
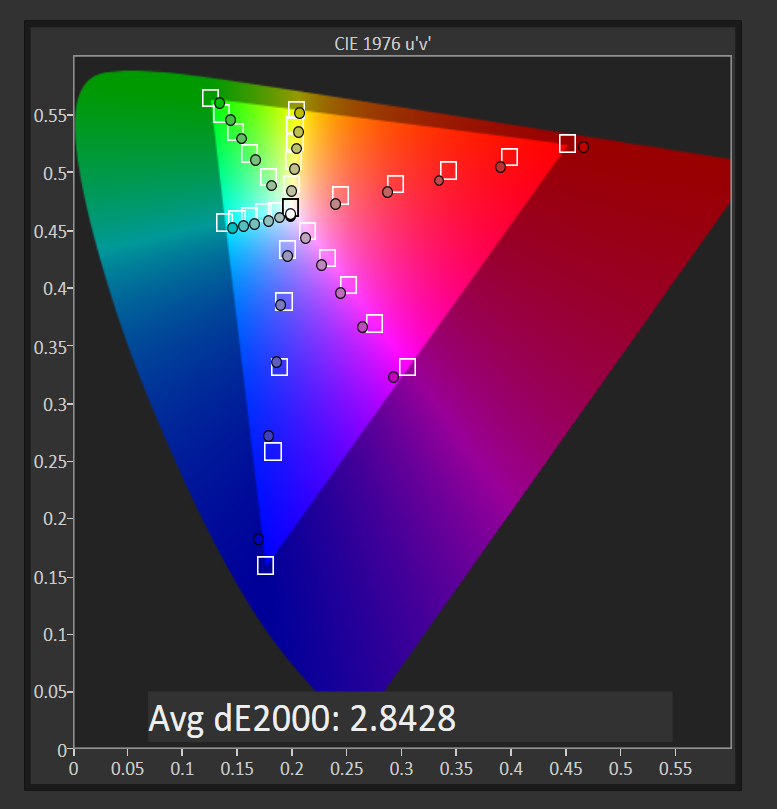
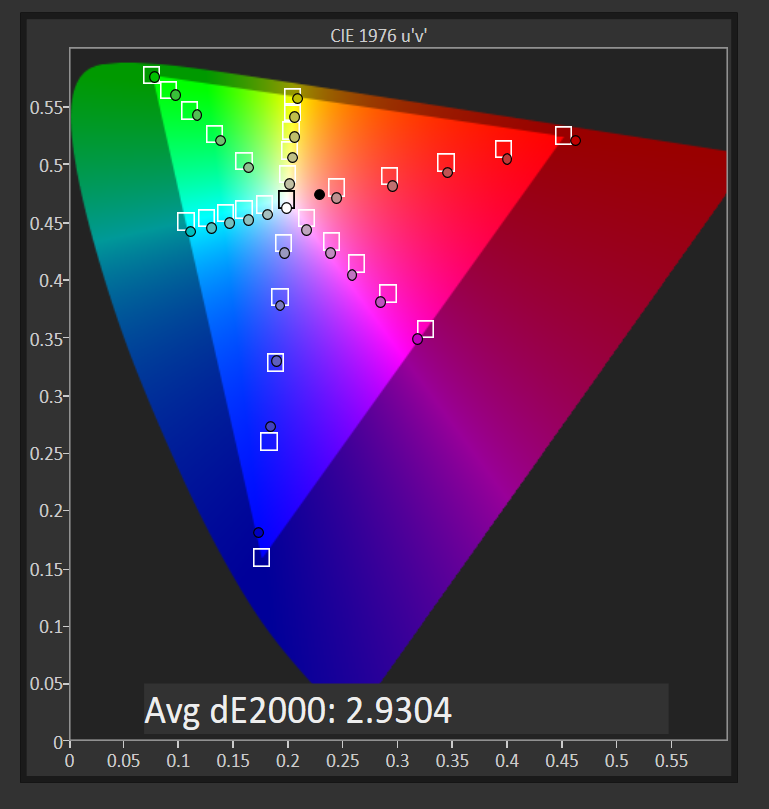
The saturation tests show a better picture than the grayscale though. On both color spaces, the saturation sweeps track nicely all the way to the edges of the gamut. Really only the poor showing on 100% white throws these scores off, with both having an average under 3.0. The images show just how much wider the Adobe RGB space is, and it’s great to see accurate tracking in both modes.
Gretag MacBeth
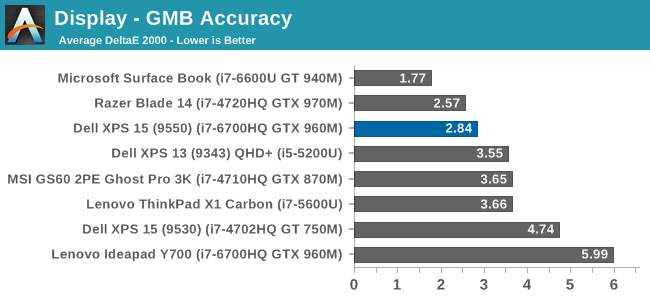
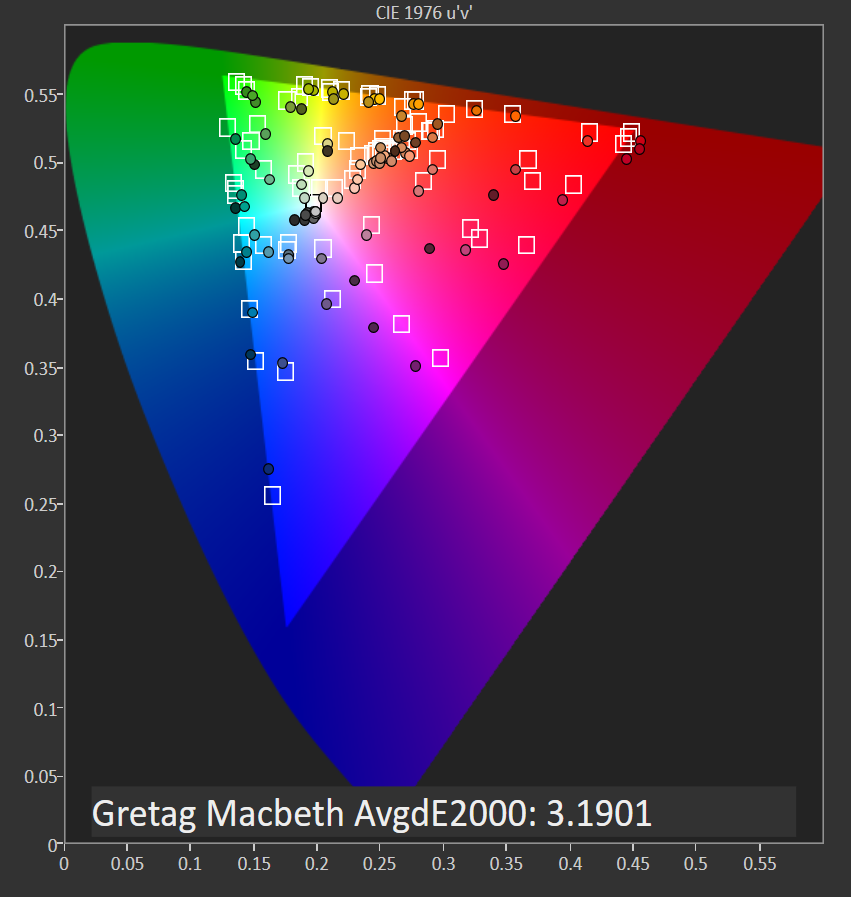

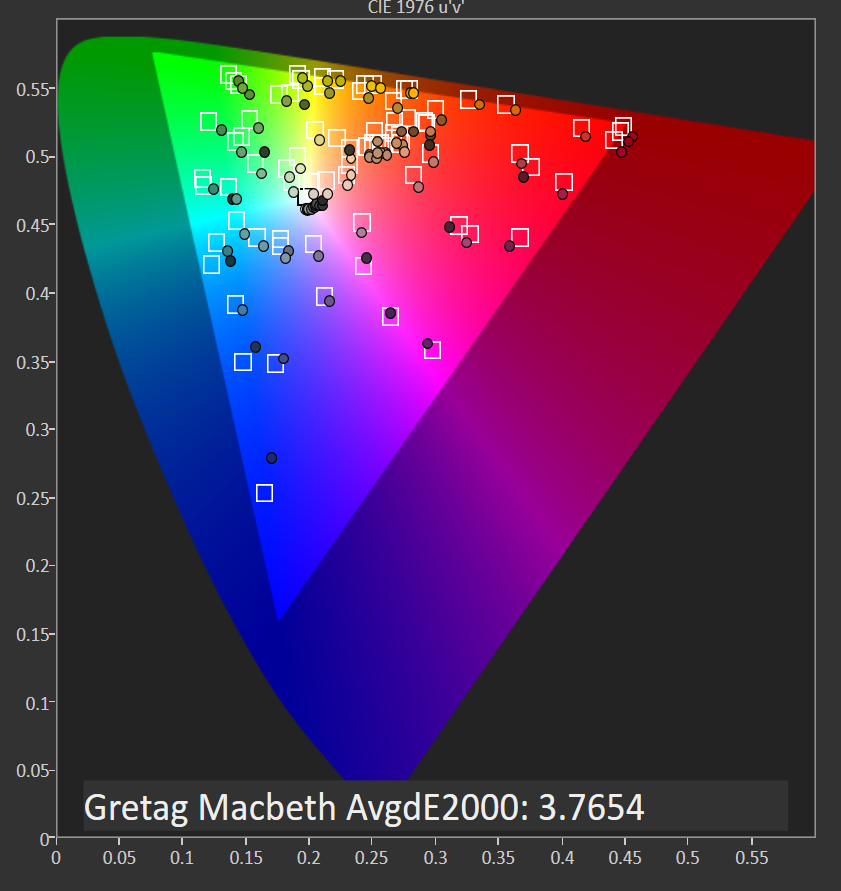

The most comprehensive test is the Gretag MacBeth, which tests an assortment of colors all over the spectrum. It has quite a few flesh tones tested as well. The XPS 15 does ok here too, but is certainly let down by the inaccurate grayscale results.
Calibrated Results
Luckily the biggest issue with the XPS 15 display is grayscale, and that is the one thing that can be adjusted through calibration. I ran the calibration on both the sRGB space and the Adobe RGB space. This had a much bigger impact on the GMB and Saturation scores than normal, since it was the inaccurate grays that were impacting the scores the most.


In sRGB mode, the Delta E for grayscale dropped to 1.6, saturation accuracy was 1.33, and GMB was 1.61, all of which are much better scores than the uncalibrated results. Adobe RGB had an even better grayscale Delta E of 0.9, saturation of 1.0, and GMB of 1.2. Once calibrated, this display is highly accurate. It’s just too bad that Dell didn’t take the time to calibrate it at the factory.
Other than the grayscale issues, the UHD display in the XPS 15 is quite good. It’s great to see more devices starting to offer wider color gamut support, and Dell was good enough to include software to switch the color space as needed.


152 Comments
View All Comments
Hulk - Friday, March 4, 2016 - link
It's really not that hard. 1. Always use a tripod. 2. White balance when shooting (white card) or in PS. 3. Go full manual or aperture priority to get the exposure right, spot meter. 4. Shoot the sweet spot of every lens which is generally f/8. Again use the tripod and timer so you can deal with long exposures which will be necessary.It's not like you're shooting a moving kid or portrait.
Beany2013 - Saturday, March 5, 2016 - link
To be honest, the best way to get an amateur to take better photos is to hunt down a professional photographer and find out how much they'd charge for a consultation. Given that AT isn't a professional photography site, I'd wager most wouldn't mind not being the ones taking the photos, and would appreciate letting an interested amateur pick up some tips from the trade to improve their overall craft.I've been trying to get a semi-client of mine who operates a photobooth to do this for near three years now (I'm not a pro snapper so I don't feel I can teach him well enough) but he still doesn't do it - presumably, texting me is cheaper as I only charge in coffee and cake ;-)
But it's definitely worth a pop. Taking a usable photo is fine, taking a really nice, professional *looking* photo is very much it's own reward.
I agree with other commenters that the main meat of the article is definitely the words though; these photos might not be studio quality, but they're plenty clear enough for their purpose. Having them a bit nicer would be a bonus, and as a techy person and amateur snapper myself, I'm pretty certain Brett would enjoy learning how to bodge some nicer pics in - it's a lot of fun messing with this stuff with 'our' analytical kind of mindset.
Shadow7037932 - Saturday, March 5, 2016 - link
Here's the thing, you don't need $10k in gear to take good photos. You can get a refurb D3200/D3300 (~$330-350) with a fast standard zoom with good sharpness (Sigma 17-50 f2.8 OS HSM) for ~$300-350. Add in an off camera flash or two (~$60-70ea). Add in a CPL filter (~$50-60 for a good one) for dealing with reflections and a light box (~$40-50 for a large one) and you're all set.As far as white balance and other things goes, shoot RAW, and deal with it in post. Or do it in camera using the custom white balance.
nagi603 - Monday, March 7, 2016 - link
As someone who has invested into photography, you don't need 10k. Not even close. Frankly, your micron shot doesn't even have correct white balance. Fixing that would be a breeze if you shoot in RAW, use the same temperature lights, and used any post processing software. And yes, I've been there, I did shoot stuff as a journalist. Now I'm shooting events as a hobby, so I know what I'm talking about.tuxRoller - Sunday, March 6, 2016 - link
It's too bad the Verge doesn't spend as much time on article content.Brett Howse - Monday, March 7, 2016 - link
Photography is clearly not my strongest suit, but I've got some things I will try for the next review which I hope will help with the photos. Laptops are not the easiest thing for my to photograph and get a good result. Please bear with me as I try to step up my game on the images.trenchtoaster - Friday, March 11, 2016 - link
I have been reading AT for years now and this is the post which drove me to create an account and comment. I literally have no idea why the image you linked is any better than the ones from the article that you posted previously. What makes the image you linked so much better? I feel like I am missing somethingsircod - Friday, March 4, 2016 - link
I didn't notice it until you pointed it out, but that is pretty bad. Looks like he is shooting on a Canon EOS Rebel T4i, which apparently doesn't correct geometric distortion on its JPEGs.Brett Howse - Monday, March 7, 2016 - link
That's exactly what I am using, and apparently it does not. I, as an amateur photographer, did not even notice the distortion until it was pointed out, but I'll try to avoid it in the future.close - Monday, March 7, 2016 - link
You think someone buying a $1500+ laptop takes the decision based on how the pictures of the laptop look like on a website? Maybe people will assume the laptop is all bendy and with uneven color, right? I mean it's obvious they made one side of the laptop too bright and the other too dark.You go to a review site for he things you can't see in the store, not for some glamour shots. Yeah, of course they could be better but personally I don't think this subtracts anything from the value of the review.
Also going for the IQ argument because you think the picture looks bad makes you look even dumber than your idea that "people won't buy the laptop if the picture wasn't shot RAW".