Gigabyte 7VAXP (KT400): Breathing Some Life Back into KT400
by Evan Lieb on October 3, 2002 12:30 PM EST- Posted in
- Motherboards
BIOS Setup and Overclocking Features
The Gigabyte 7VAXP is yet another KT400 motherboard that utilizes the Award BIOS setup that we've become so accustomed to lately. Gigabyte added some very interesting features BIOS options and features to this motherboard, so let's check them out, shall we?
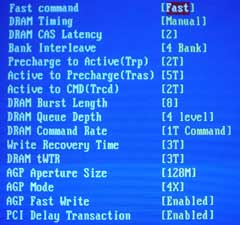
We were able to toy with DRAM timing options a fair amount with the Gigabyte 7VAXP. As you can tell by looking at the home BIOS page however, there is no Advanced Chipset Features section, which is almost always where the DRAM timing options are located. However, you can bring up the Advanced Chipset Features option in the BIOS by simply holding the CTRL key and pressing F1; voila, you get all the DRAM timing options you could want. Gigabyte tells us that they are just experimenting with their high-performance BIOSes at the moment, and so that's the reason why we have to go through the whole CTRL + F1 procedure. This feature is documented in the manual though, so it's not a hidden feature. Also, the DRAM options available in Advanced Chipset Features include an adjustable CAS Latency, memory timing mode, bank interleave, Precharge to Active, Active to Precharge, Active to CMD, Burst Length, Queue Depth, and Command Rate.
If you backtrack a bit to our Gigabyte 8SG667 (SiS 648) review once more, you'll notice that there were no DRAM timing options available via the latest BIOS. This, unfortunately, still holds true to this day, despite the CTRL F1 feature being fully operational on the Gigabyte 7VAXP. However, the Gigabyte 8IEXP motherboard (gold winner of our 845E roundup) supports this hidden CTRL F1 DRAM timing feature, so those users might be happy.
The PC Health section remains unchanged from most of the other Award BIOS PC Health sections (except the Gigabyte 8SG667) we've used before. You get a whole array of readings including PSU readings and CPU Vcore readings.
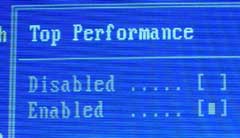
Another very interesting aspect of the internal 7VAXP M9.F5 BIOS that was finalized 6 days ago (and is going through validation as we speak for public release next week) is the Top Performance option in the BIOS. Top Performance is disabled by default in the M9.F5 BIOS as well as the F5 BIOS available on Gigabyte's web site. When we enabled top performance in the M9.F5 BIOS however, we saw an average of 8-10% increase in performance with all other DRAM and frequency settings equal to the other KT333 and KT400 solutions.
When we asked Gigabyte how this Top Performance option was able to increase performance this much, their explanation was pretty simple. Essentially, Top Performance optimizes the memory controller in the North Bridge for the best performance possible but at a stable enough state. So enabling Top Performance doesn't change any memory or frequency settings, it simply speeds up the internal timings of the memory controller. It would be interesting to see an option in the BIOS of a future Gigabyte motherboard that contained lots of memory controller tweaking options.
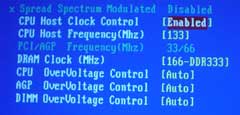
Finally, we take a look at the overclocking "features" the 7VAXP offers; unfortunately, there are hardly any convenient overclocking options. Besides the voltage tweaks available (which are pretty good for the most part, considering you can adjust AGP, Vcore, and VDIMM with slack), there are no intriguing overclocking features. The maximum attainable FSB through the 7VAXP's BIOS goes only as high as 165MHz, or if you enable the DIP switches, 166MHz-200MHz. In addition, there are no PCI divider or multiplier adjustment options in the BIOS. The board itself does contain jumpers that would allow multiplier options to be turned on, but nothing too flexible. Overclockers should be turned off by this point, which is somewhat of a disappointment since Gigabyte was actually becoming more enthusiast/overclocking friendly for a while.


0 Comments
View All Comments