Averting Disaster - A Guide To Computer Backups (2014)
by Brett Howse on May 21, 2014 9:00 AM EST- Posted in
- IT Computing
- Mac
- Apple
- Windows
- Cloud Computing
- macOS
Built-in Backup Tools Windows 8.1
While Windows 7 and Vista had the Backup and Restore applet, Windows 8 introduced File History as the default backup option. File History is a replacement for Previous Versions from Windows Vista and Windows 7. Unlike Windows 7, File History does allow backup to network shares for all versions of Windows 8 which is a good thing and makes the software far more useful. The downside is that scheduled System Backups have been removed from Windows 8 and 8.1. You can still manually create a system backup, and you can perform a system backup to a network share, but you can’t schedule this to be run. Also, File History only performs a backup of files in your libraries (Documents, Music, Pictures, Videos, and Desktop folders), as well as any files saved locally from OneDrive. Still, the most important information on your computer is your files, so let’s look at how to enable this feature to protect them:
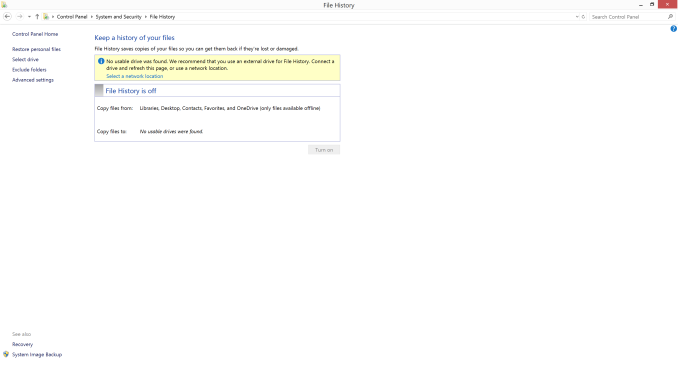
- Windows 8.1 adds the ability to enable File History from PC Settings, however the options are just to enable File History and to select a backup target, so these instructions will focus on the Control Panel applet which offers more advanced options. To launch File History, right click the Start button and choose Control Panel. Next expand System and Security and select Save backup copies of your files with File History.
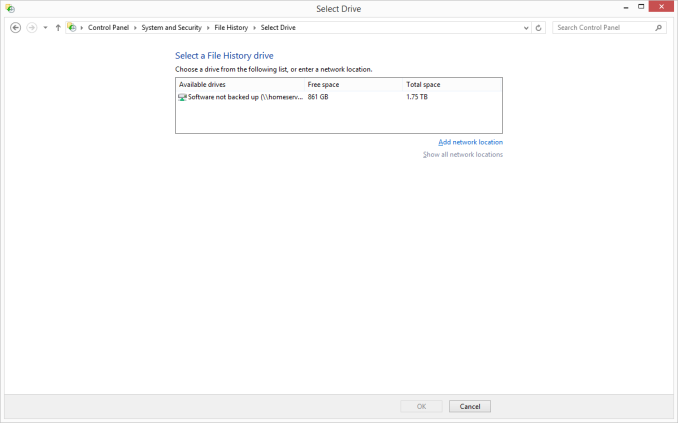
- If File History has never been configured before, the system will scan for available disks that it can back up to. You can choose the disk, or use the link Select a network location to configure the disk.
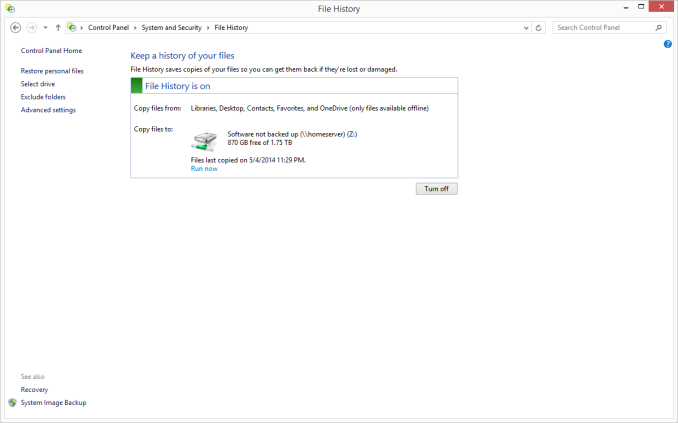
- Once configured, simply click Turn On, and File History is enabled.
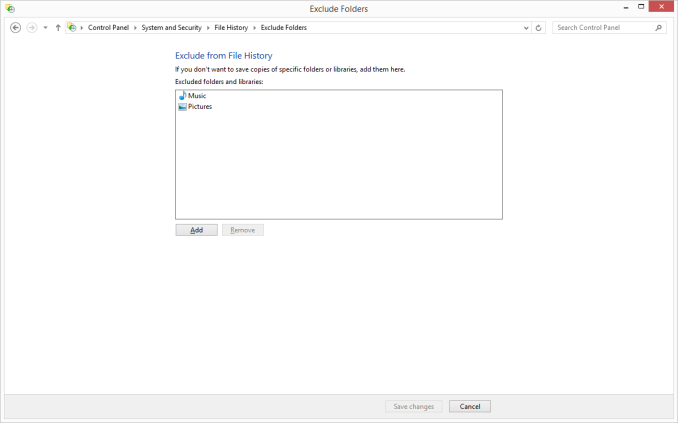
- If you’d like to modify your File History settings, that can be done in the File History applet. To exclude folders, choose Exclude Folders where you can select folders you wish to exclude from the backup. Unfortunately, you can’t add user defined folders here which you do want backed up. To add folders to be backed up, you either have to add that folder to an existing library, or create a new library.
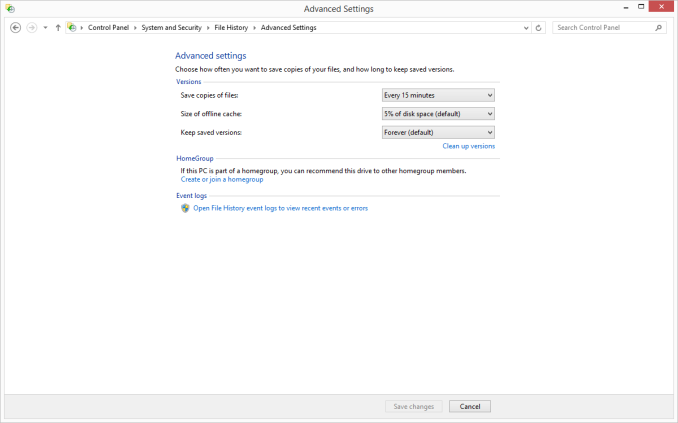
- Advanced settings are also available in the File History applet, and these allow you to specify how often to run the File History backup (from ten minutes to daily) as well as specify how much of the PC’s disk to use as an offline cache (2% to 20%) in the event you are travelling and not able to access your backups, as well as to specify how many versions of files to keep.
Unlike Windows 7, File History’s interface is all in the control panel. It’s not as elegant as Previous Versions was, where you could right click any file or folder and see a list of all versions, but the interface is fairly straightforward and does show you a list of all of the backups:
- Launch File History by right clicking the Start button and opening the Control Panel. Next expand System and Security and select Restore your files with File History.
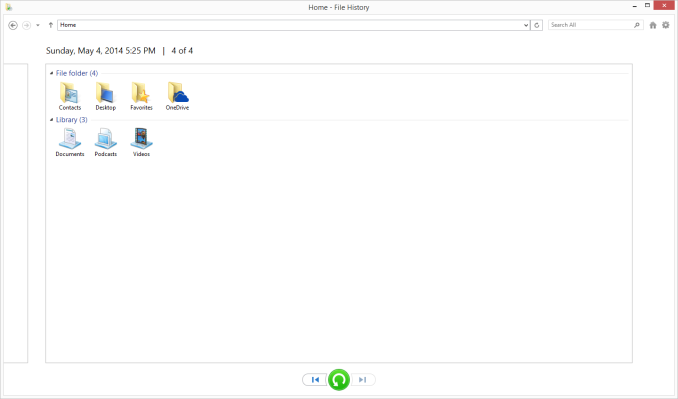
- The interface that opens up will be a listing of the locations you are backing up. The most recent backup will be displayed by default. To restore a file, navigate to the folder it was in, select the file by clicking it, and then press the green Restore button to restore it to the original location.
- If you’d like to restore it to a different location, right click the file and choose Restore To and then browse to your path.
- To navigate through your backups, you can use the skip buttons at the bottom of the page. The easiest way to sort though is to navigate to the folder where your file is (or was), and it will display only the backups that have changes in them. If a folder hasn’t been modified since you enabled File History, there will only be one backup for it. This is an easier method than trying to figure out which day you deleted a file.
Overall, File History is a decent built-in utility, but as is often the case, attempts to make the process easier to use often result in a system that is less powerful, and that’s certainly the case with this. Windows 7 lacked network backup for some versions, but overall the Windows 7 backup utility offered more features, especially with the automatic system backup. Previous Versions is also an easier way to find changes made to a file. File History also lacks a method of backing up files outside of your libraries and OneDrive folders which is not ideal by any means. Windows 8.1 forces you to make a system backup manually, and that can be done as so:
- Right click the Start button and open Control Panel. Expand System and Security, and then select Save backup copies of your files with File History which won’t actually be used, but is the shortcut to the System image backup.
- On the File History applet, click on System Image Backup in the bottom left corner.
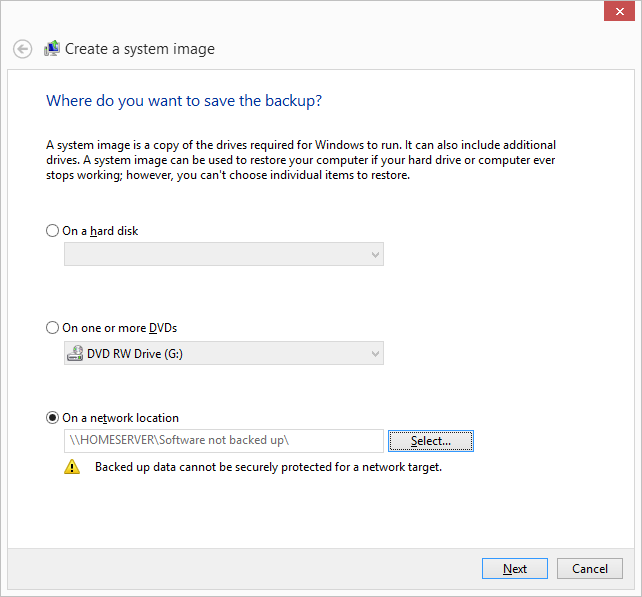
- Choose a location for your backup. If it’s on a network share, you can optionally enter login credentials if required. Click Next.
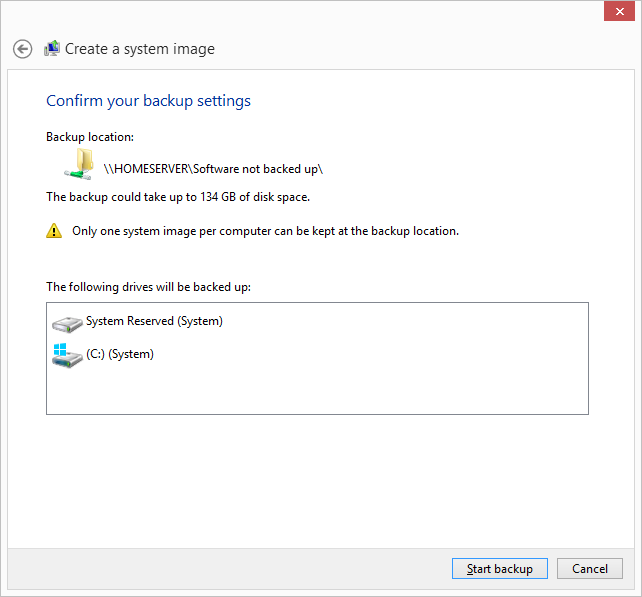
- Now you will be prompted to confirm, and if you are happy click Finish. The confirmation dialog will estimate how much disk space will be required, and warn you that only a single backup file will be kept. In other words, there is no versioning.
If you are using File History as your backup method of choice, you should definitely create at least one system backup to allow you to restore to a new hard drive or machine if necessary. If you ever need to restore this, you can create a recovery drive by choosing the Recovery option in the File History applet. If you don’t have another computer to create this on if needed, it’s a good idea to create one ahead of time.
It is possible to create full scheduled backups, but only from the command line using wbadmin but this is not something I would recommend for the average user.






133 Comments
View All Comments
mrweir - Friday, May 23, 2014 - link
If you purchase the OS X Server app ($20) for one of your macs, you can enable networked Time Machine backups for the other macs on your network. I have an external drive connected to my iMac that my wife's Macbook Pro backs up to wirelessly.While it's not technically "built-in" and does come at a cost, it's not "third party" either.
metayoshi - Friday, May 23, 2014 - link
I have been using Acronis for years to backup my main OS drive into my data drive and then do a copy of the whole data drive onto an external hard drive.I switched to Windows 7's built-in backup tool once to replace Acronis to see if I could just have a free tool. Well, I corrupted my Windows 7 OS once, and after I restored the image, a ton of programs didn't work, including Microsoft Office. I tried uninstalling an reinstalling some programs, but for some reason, there were still some things messed up. I had to do a clean install of Windows 7, and I vowed to never use the Windows 7 built in backup ever again. Since my Acroins version was old at the 2009 version, I went ahead and got the 2013 version, and now that's what I have for backups. I have had to restore images from Acronis before (the 2009 version), so I know I can at least trust them.
I'm not too fond of using the cloud to backup files. I used to put some non-private files on megaupload, and we all know how that went - goodbye megaupload. Now I just fear any sort of cloud storage as a backup - I simply use it for syncing, and then I back up my cloud data locally.
I also tried a NAS once to backup both mine and my girlfriend's computer, but that WD MyBook Live (before they went to this whole MyCloud thing) ended up dying after a random power outtage we had. Granted, it was a single drive nas box, but I thought I could live with it. Nope, my external drive has been my main backup source ever since. It sure isn't any sort of advanced backup solution, but it does the job for me.
KPNuts - Saturday, May 24, 2014 - link
Great article learnt a lot as I just copy my documents onto USB two hard drives on a weekly basis one kept in my computer bag the other in the office. I have a MacBook Pro and an iMac with files shared between so its a bit of a nightmare to keep track of the most up to date ones.A question; would things be easier if I invested in a TimeCapsule and used it with TimeMachine? would TImeMachine work with both computers on the one TimeCapsule or would I have to have one for each machine? if I need two then it starts to get expensive
Look forward to getting so useful feedback to decide which way I should go
Brett Howse - Saturday, May 24, 2014 - link
You can backup multiple machines to a single Time Capsule so that won't be an issue.KPNuts - Saturday, May 24, 2014 - link
thanks Brett Hoswe think thats the way i'll go then as its personal stuff and i have no real need for cloud storage My off site hard drive will be there and if I get broken into or theres a flood or firetitanmiller - Saturday, May 24, 2014 - link
Just putting in a plug for Backblaze. Great service. I store about 1.5TB on it for $3.96/month.Kvanh - Saturday, May 24, 2014 - link
If you use full disk encryption on your computer make sure your NAS/local drive backups are encrypted as well!I turned off Time Machine and switched to using CrashPlan for both local & cloud backups. I get the the same every 15 minute snapshot as Time Machine but I found crashplan more reliable.
I also use Super-Duper! to make a boot drive clone nightly.
While my main storage is RAID-5, the external drive I use for backups is RAID-0. With the redundancy of the RAID-5 and offsite of crashplan I figure the risk of losing the local backup is acceptable. I'm not in dire need of an infinite timeline of files, the important ones are in the offsite backup anyway. So losing a year of backups and starting over with new drives is no biggie.
nytopcat98367 - Monday, May 26, 2014 - link
great article Brett Hoswe. i've been using shadow protect software to backup my desktop pc, the C: drive to a 2nd internal drive for about 6 years. it never fails. i have 23 GB on my main drive which takes 12 minutes to backup. OS windows 7.Stylex - Monday, May 26, 2014 - link
I use windows8.1 and DriveBender to pool my drives, ala WHS as my NAS. Awesome thing about Drive Bender is that it stores the data in NTFS so if something craters I can still grab the data off the drives without worrying about RAID. Also, selective folder duplication across drives is awesome. Some stuff needs backup, some stuff does not.Conficio - Monday, May 26, 2014 - link
I'm less looking for a backup tech, more for an archive tech. I want to put my data (photos/documents/PDFs) onto a server that can index them for meta data and full text search and ultimately off load the files onto DVD/bluRay disks for long term storage.I'd expect the meta data index to be fully backed up onto the cloud and the files being kept safe on media.
Any pointers?