Corsair Obsidian 250D Case Review
by E. Fylladitakis on January 21, 2014 12:00 PM EST- Posted in
- Cases/Cooling/PSUs
- Corsair
- Mini ITX
- Case
Corsair Obsidian 250D Interior
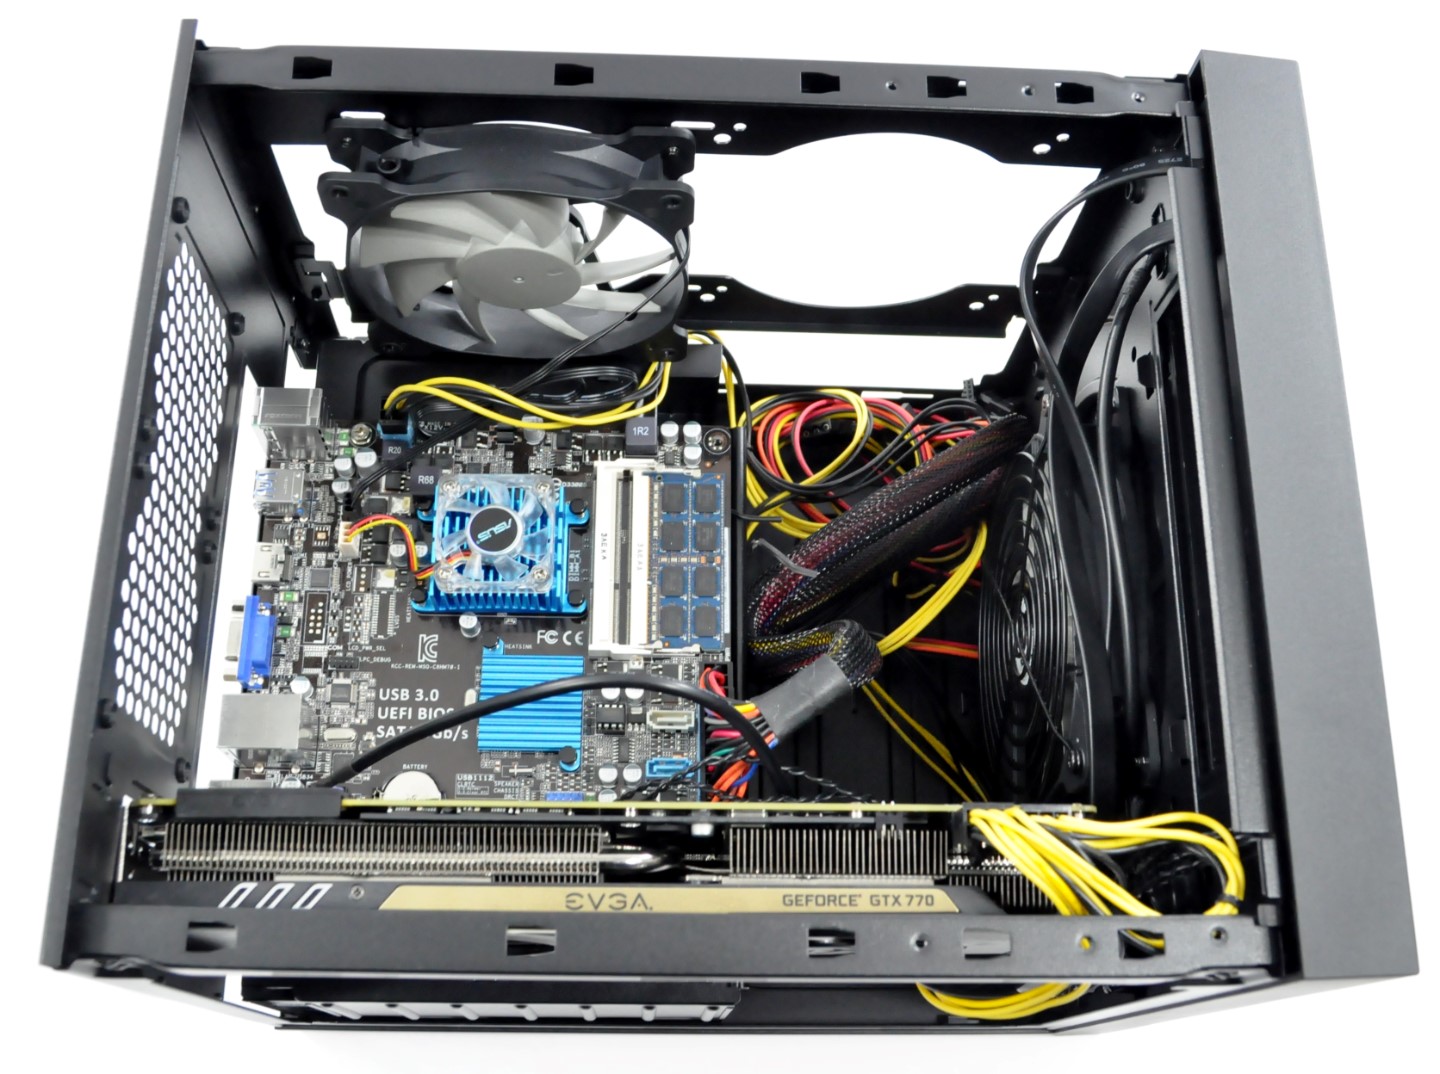
The all-black interior of the Obsidian 250D is very roomy for a Mini-ITX case. As we mentioned on the previous page, the interior of the Obsidian 250D is split so that the motherboard is installed horizontally on the top half of the case. A metallic frame forms the motherboard's tray but is no longer than the motherboard itself, allowing for the easy routing of cables in-between the compartments of the case.
It is noteworthy that the frame is almost entirely open beneath the motherboard, in order to allow for the installation of high-end coolers while the motherboard is still installed inside the case; however, the opening leads directly to the PSU partition, meaning that the PSU will have to be removed before attempting the installation/removal of a CPU cooler. Nevertheless, though perhaps not even Corsair realized this, the opening can also work to the advantage of overclockers. If the PSU is placed with its fan facing upwards, it will be drawing air from beneath the motherboard, effectively cooling the motherboard in the process.
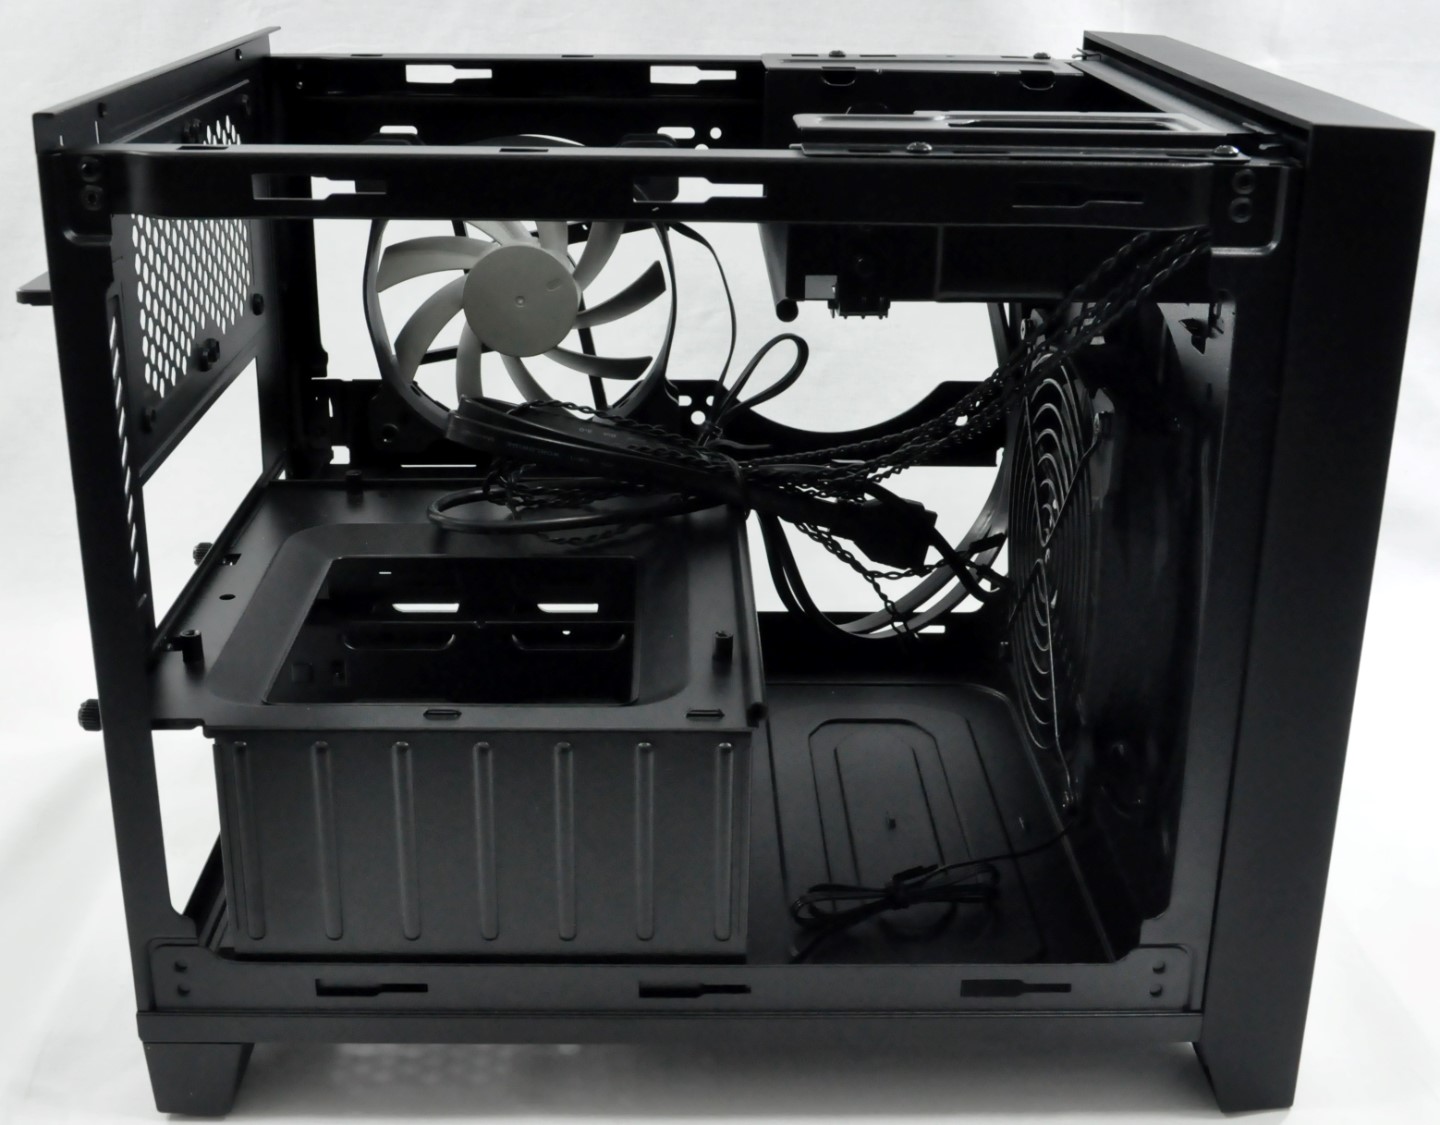
To the right side of the case, which is where the top side of the motherboard will be, the frame of the Obsidian 250D with the help of a removable middle support brace is designed to support the installation of 2 × 120 mm fans. One fan, a very quiet A1225L12S-2 sleeve bearing 1300 RPM fan, has been installed from the factory. Liquid coolers with up to 2 × 120 mm radiators can also be installed here. Note however that liquid coolers with "enhanced capacity" (thick) radiators will not fit in the Obsidian 250D; only radiators up to 28 mm thick will fit.
An intake 140 mm fan has been installed on the front of the case, again a sleeve bearing model from the same manufacturer (Hong Sheng) and with a maximum speed of just 1000 RPM. The design allows this fan to be replaced by a 200 mm fan if required, which is probably overkill for a Mini-ITX system. A 140 mm liquid cooler radiator may also be installed here as well, regardless of thickness this time.


The metallic brace that holds the 5.25" device may be removed from the case entirely and we strongly suggest its removal before the installation of a full system, as it allows for much easier access to the interior of the case. A plastic lock on the side of the metallic frame holds the optical drive in place, no tools are needed; however, the installation of other accessories that are meant to be mounted in a 5.25" bay, such as fan controllers, may not be possible at all, as there are no front row holes for the installation of such devices. The two holes at the bottom of the brace look like they could be used for the installation of a 3.5" device but they do not align with the holes of a hard drive. The brace has no functionality at all if no 5.25" device is installed, which is a shame as it could easily be designed so as to support smaller devices instead, thus it is probably best if left removed entirely unless the user wants an optical drive.
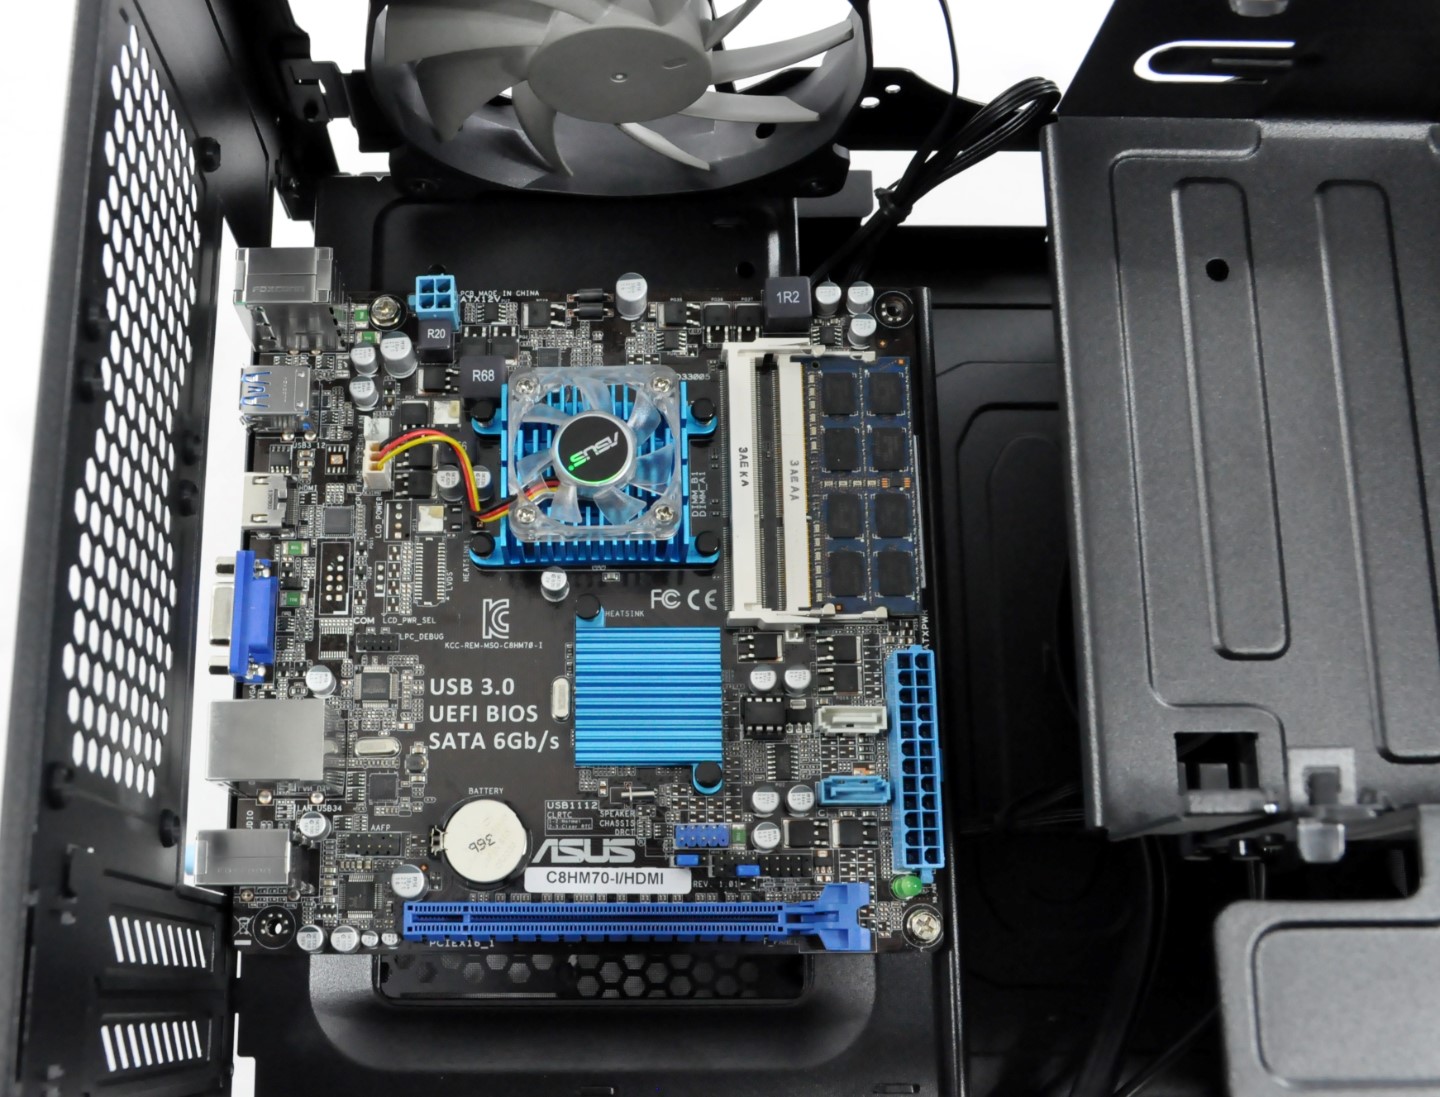
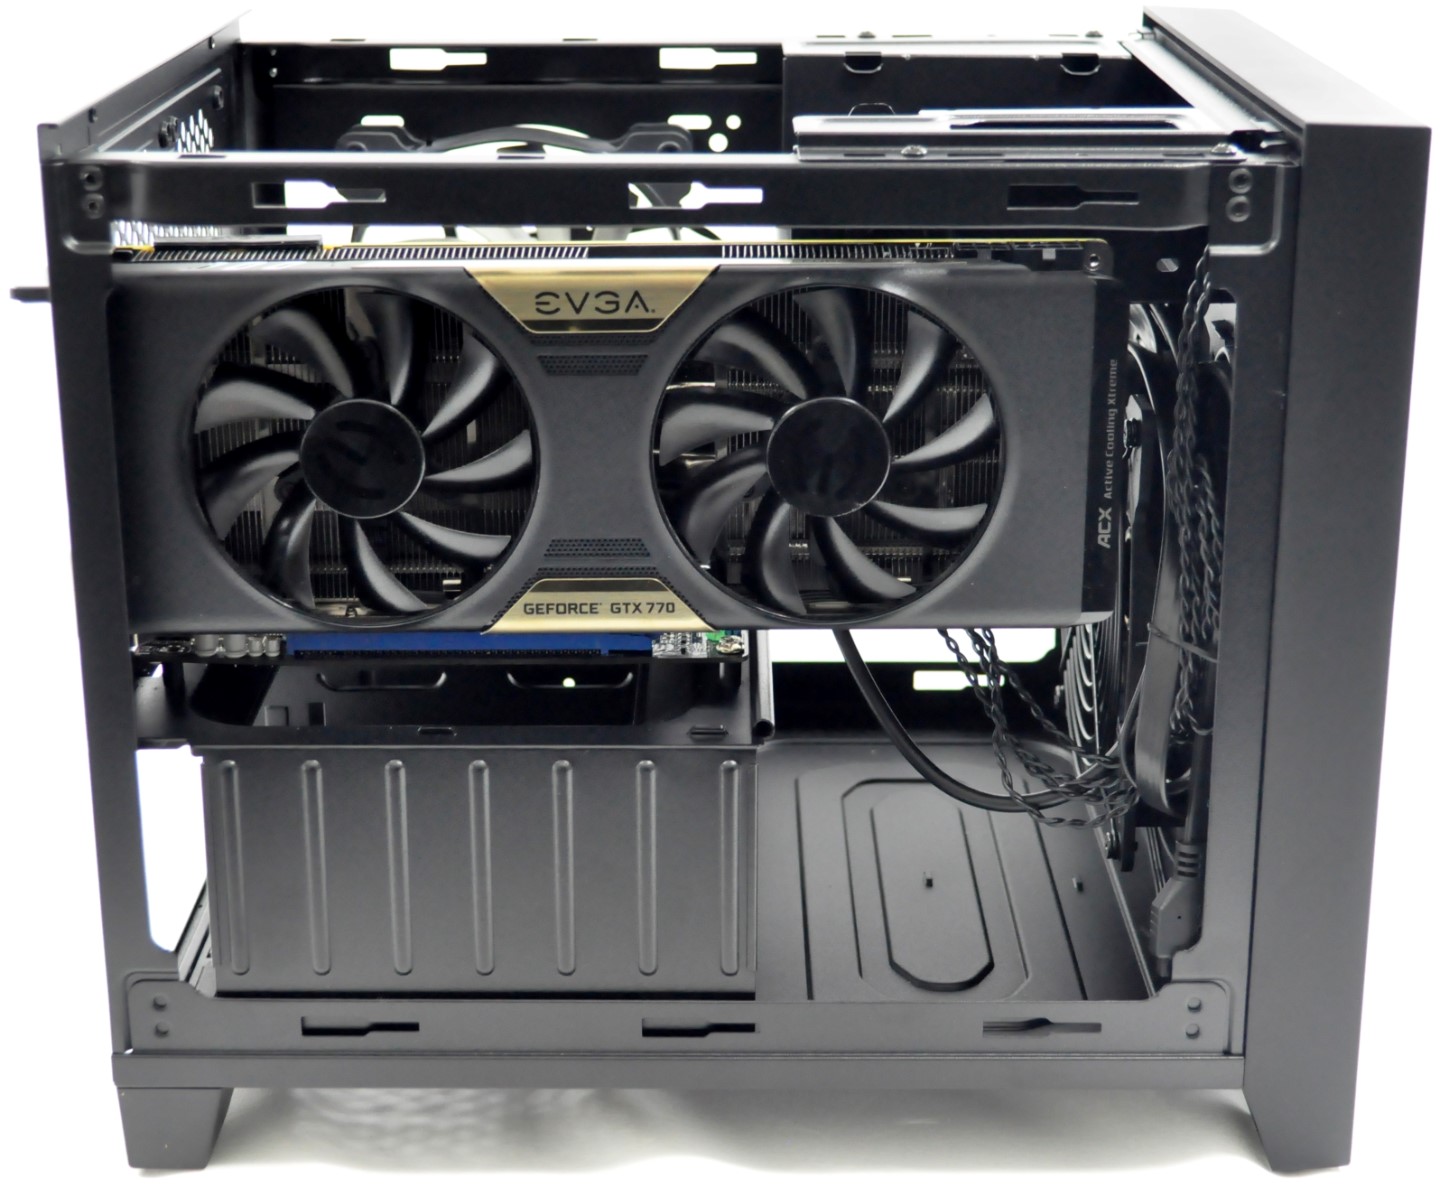
As expected, a Mini-ITX motherboard is a perfect fit inside the Obsidian 250D, although the spacious tray can easily fit a little longer and/or wider motherboards as well, should any special "high-performance" ITX designs arise in the near future -- a scenario that is not unlikely considering the fever surrounding the ITX format lately. A CPU cooler of about up to 14.5 cm tall may fit, which is not enough for monster tower air coolers, denoting that the Obsidian 250D is mostly optimized for the presence of a liquid cooling solution. Nevertheless, the clearance is more than enough for plenty of very good air coolers. It can be seen that the Obsidian 250D actually has two expansion slots instead of one, regardless that currently no Mini-ITX motherboard has more than one expansion slot. This however was necessary for the installation of high-performance GFX cards, which require two consecutive expansion slots.
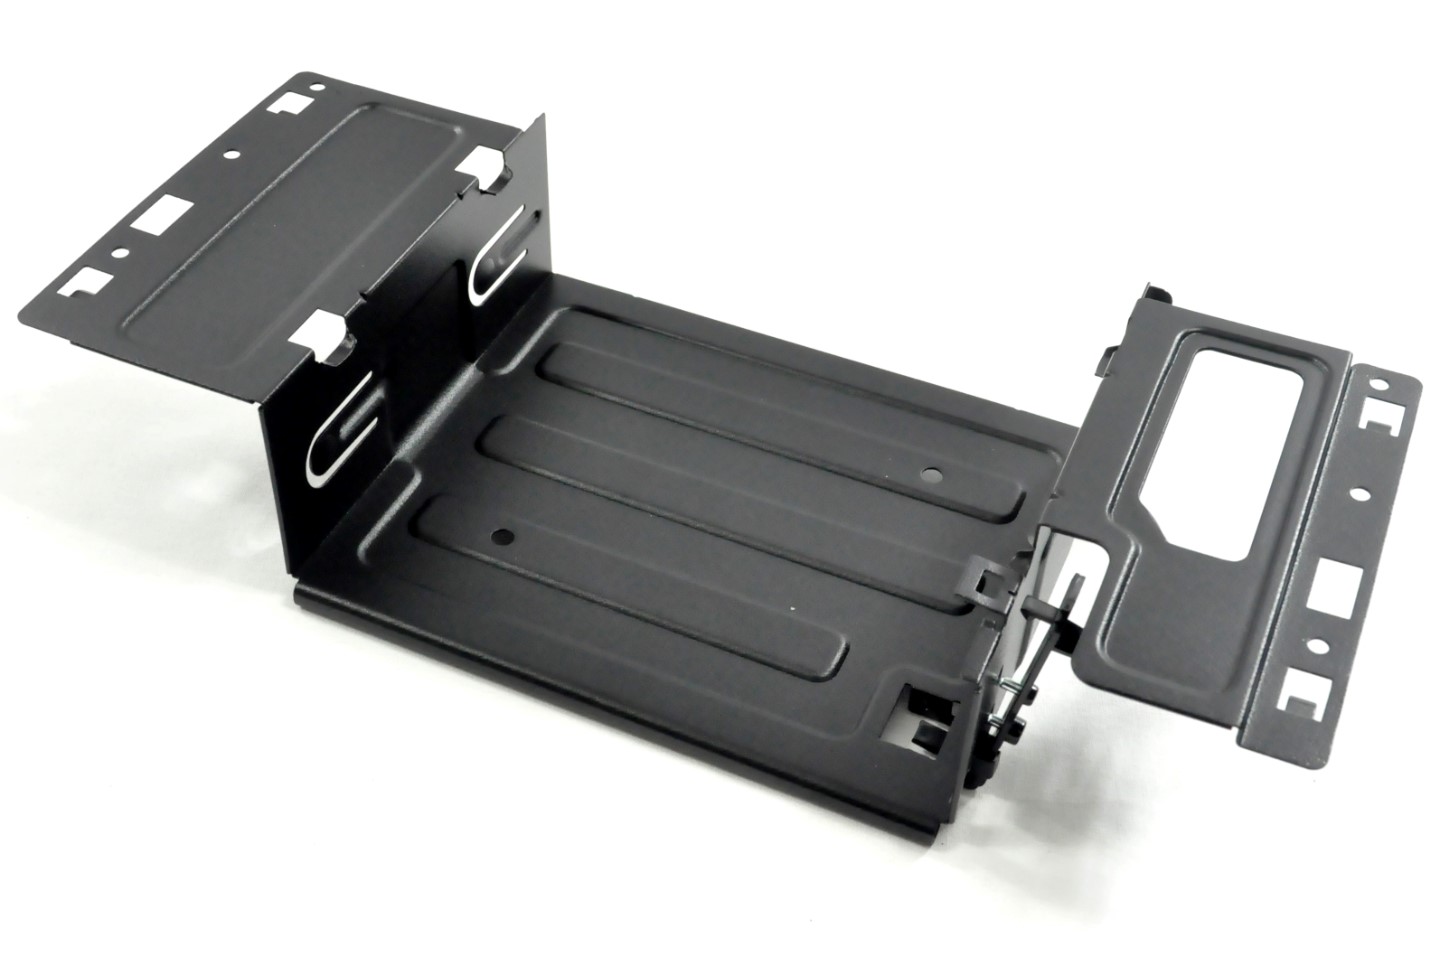
The 2.5" / 3.5" drive trays must be accessed from the rear of the case, after the removal of four thumbscrews. Two 2.5" and two 3.5" trays can be found in the Obsidian 250D, all supporting the tool-less installation of SSDs/HDDs; the trays simply lock the drives with metallic studs, no screws required. The 3.5" trays can also hold 2.5" devices if needed.
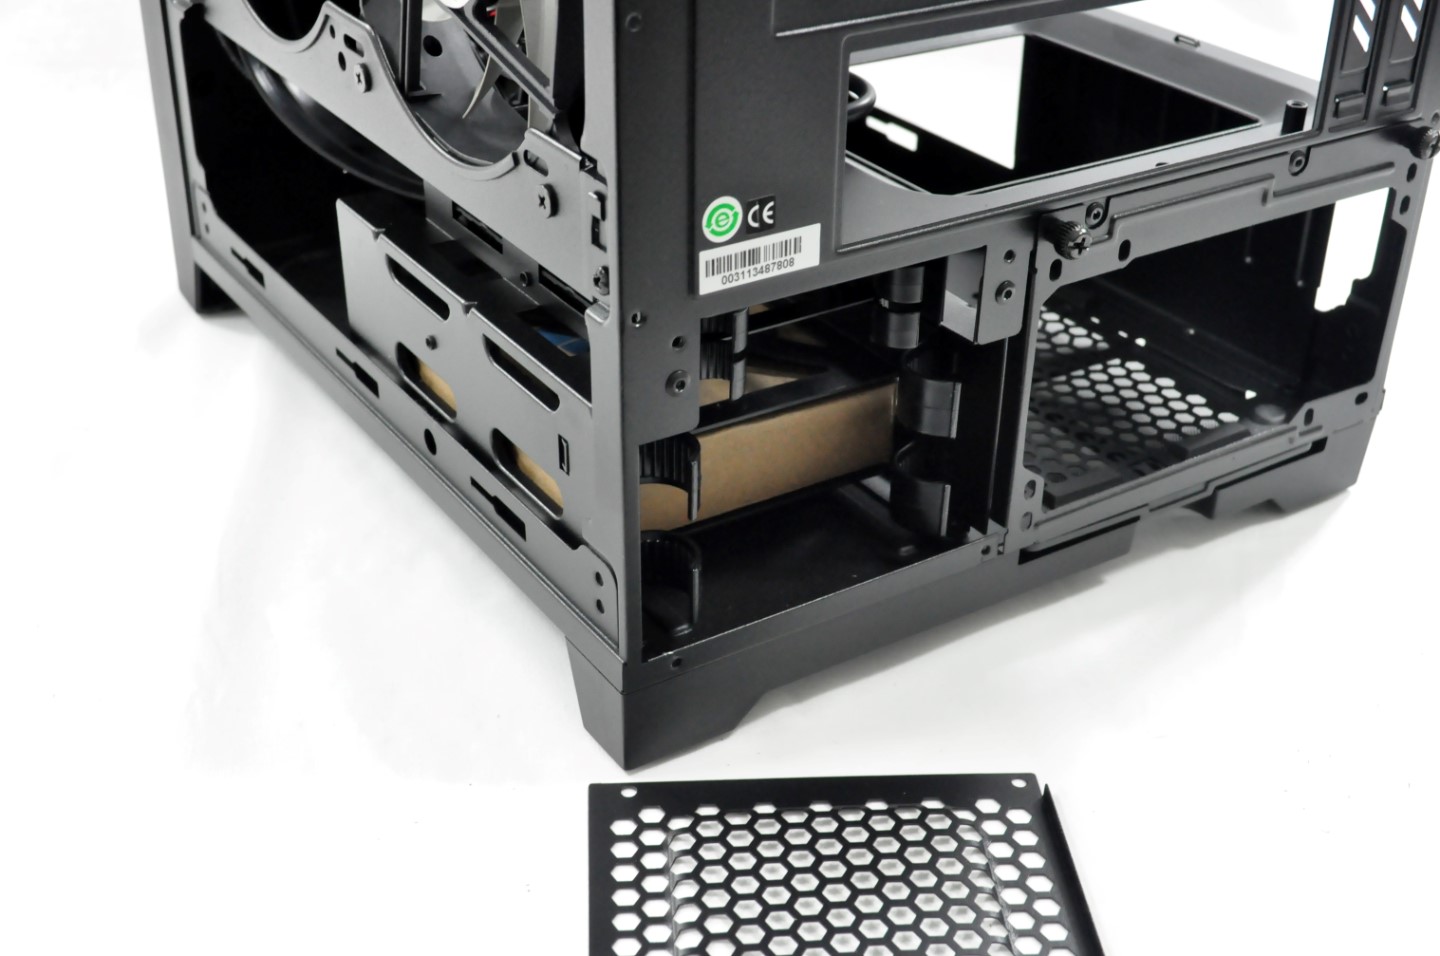
Due to its design, an installed PSU can span nearly the full depth of the case. Pretty much any ATX power supply will fit in the Obsidian 250D, irrespective of its length. The installation of a power supply with an output greater than 500-600W for a Mini-ITX system though is most likely going to be pointless, regardless of the system installed, as no single CPU and the most powerful GFX card that may fit inside the Obsidian 250D can use that much power. Due to its relatively compact size and design, we strongly suggest buying a power supply with few short cables and preferably a modular model as well. Visually and technically, Corsair's new CS series would most likely be a great fit.
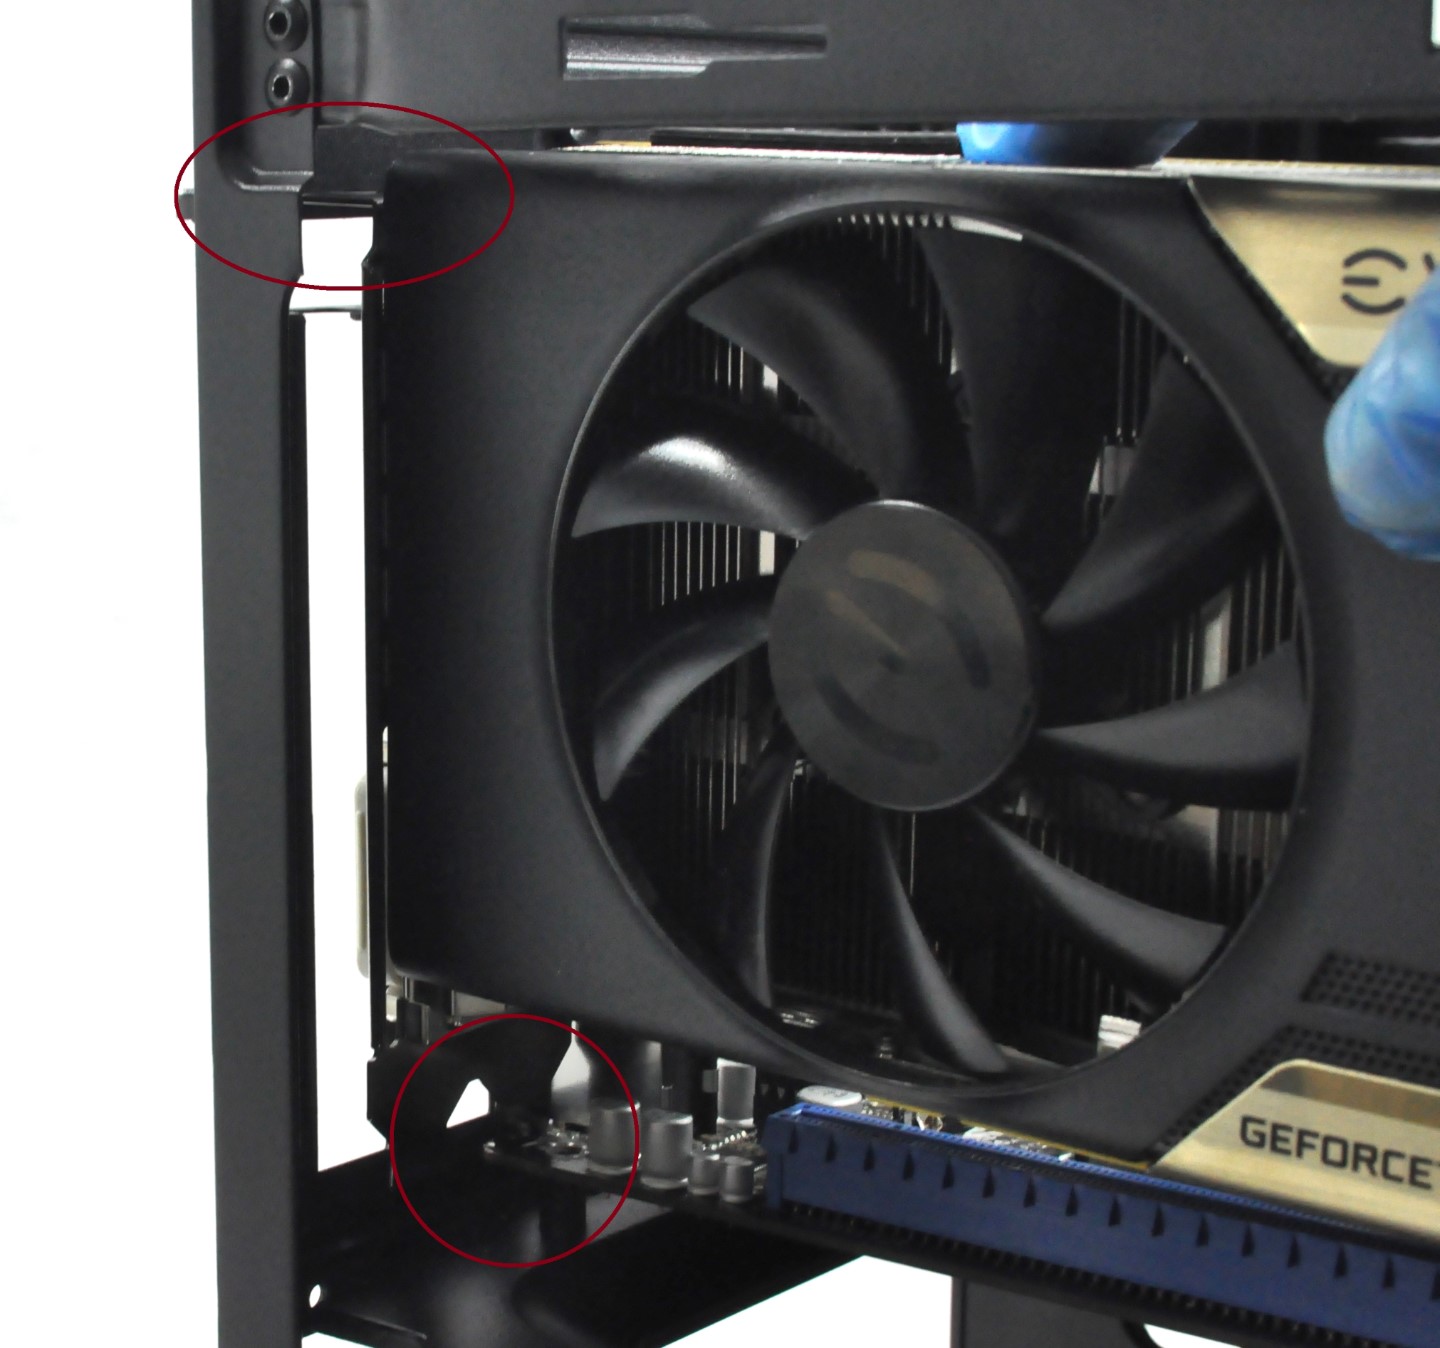
Large, powerful GFX cards are no problem for the Obsidian 250D -- though not too large, as only cards up to about 295 mm long will fit. Once installed, the card's intake fans align perfectly with the side panel opening, allowing the card to draw fresh air in from the side of the case. The installation of our test GTX 770 card proved a little troubling though, as there is not enough clearance for the support brace of the card to enter the opening of the expansion slot easily. As a result, the card will touch both the motherboard and the frame of the chassis during installation, as shown in the picture below for your reference. Pushing it into place requires force, and we are not really fond of pushing metallic braces against the edge of our motherboards. We do not think this is a major problem or that it will create significant difficulties for any user, but we do think that a clearance of a few more mm is required for larger GPUs.
With the motherboard at the middle of the case and the PSU/Drives at its bottom, most of the cables will amass at the front bottom part of the case, where there is plenty of space. Thankfully, the Obsidian 250D also is literally filled with cable tie mounting points, allowing for modders to work wonders when it comes to cable management. The design of the Obsidian 250D allows for all of the cables to be instantly routed out of the way of the motherboard and major components (i.e. the parts which will be visible via the windowed top panel).


52 Comments
View All Comments
Death666Angel - Wednesday, January 22, 2014 - link
"it can also backfire if the user is far too negligent"You can say that about every case. I've seen enough people coming to forums saying that their 1 year old PC suddenly freezes or has terrible performance or is super loud. Some time late we find out the CPU and/or GPU throttle and it is mostly the case of the the coolers being clogged by dust and debris. In my opinion, it is far easier to see and remove dust from filters than it is from the coolers themselves. So I'd still give this one a better grade than most other cases (note: many Silverstone ones have positive air pressure with filter designs which helps this a lot!).
E.Fyll - Thursday, January 23, 2014 - link
That's true. However, the clearance between the side panel filter and the graphics card fans is but a few mm in this case. Other cases could end up with clogged filters and yet, even if the air could not easily enter/exit the case, there would be room for air circulation. If the side panel filter of the Corsair 250D gets clogged however, I fear that the card will "suffocate", there is just not enough clearance for it to continue sucking air from the side of the card.Hrel - Wednesday, January 22, 2014 - link
Still prefer the Fractal Design Node 304faster - Wednesday, January 22, 2014 - link
Dimensions 350 mm ×277 mm ×290 mm(D × W × H)I could go convert this to inches, but it would be nice if the author did it for me.
Slomo4shO - Wednesday, January 22, 2014 - link
Welcome E! Thank you for the review. I would like to see a write up on the Cooler master Elite 110 as well in the near future :)bobbozzo - Wednesday, January 22, 2014 - link
Try a CPL (polarized, rotatable, filter), and rotate it until the glare (mostly) disappears.And/or move lights around.
Bob
bobbozzo - Wednesday, January 22, 2014 - link
Hi,I'm all for a consistent thermal load for repeatability, etc., but I worry that the noise levels will be misleading.
e.g. imagine 2 cases with similar fans in similar locations and similar airflow (direction, position, and CFM)...
with no component fans, they might sound about the same, but if case A has extensive noise dampening internally, and case B has none, then in the real-world, the components in case A would be harder to hear, resulting in a quieter system.
Perhaps your testing should be expanded to include some noise sources to simulate CPU and VidCard coolers (and maybe liquid cooling pumps).
The PSU fan is another possible source of noise; some cases (e.g. FD Node 304) now have the PSU mounted in the middle, so a noisy PSU might be quieter in such a case.
Thanks!
E.Fyll - Thursday, January 23, 2014 - link
Good thinking bobbozzo,Indeed, a case which has sound insulation will most likely result to lower noise levels than a case which has not (even though that is not always the case). However, I fear that currently I can only assess the noise level of the stock case and still end up with comparable results. You see, the sound pressure level, the position of the sound source, its frequency and several other factors are in play here. You could even use two configurations which generate similar acoustic pressure and yet end up with different results for each of them. Even if I do use some equipment to simulate the sound of a system, the results can vary depending on the configuration of the sound sources. For example, the liquid cooling pump of kit A could be reading less dB(A) than that of kit B during an unobstructed test, yet the sound wave could be at far higher frequency (the annoying whine that some kits make is such a wave) and the results would end up being significantly different if they were installed inside a case, depending on the case's size (echo), materials (rebound), the position of the pump and the insulation. Also, results can vary if there is difference between the sources of sound. For example, if the rest of the system remains the same and just a single fan becomes louder, it does not mean that the test results will just change scale, different cases will react differently.
However, I do consider it a very good idea and I will see what I can do about it. At the very least, I could perform a test with some additional noise sources, just as a basic reference.
Thank you for the advice. :)
just4U - Thursday, January 23, 2014 - link
Dustin not doing cases anymore? :( Hope he's still with Anandtech. Anyway, great first review there E. Would be nice if you could snag a modular PSU with ribbon cables for these case reviews. Their easy to work with and show what many of us might do in one of the builds.. Corsair should send you one! Or CoolerMaster.. It's free advertising for them after all :DJohnMD1022 - Thursday, January 23, 2014 - link
How about posting dimensions and weight in English as well as metric?I shouldn't need a calculator to read the review.