The Pain of Assembly
Building a small form factor system is an exercise in flowcharts. If you’re using a highly compact case, like the Silverstone SG04B, the order of assembly is critical. The power supply, for example, goes in last.
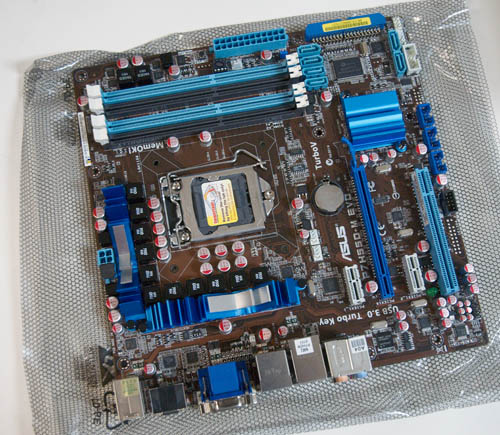
The Asus motherboard offers a fairly clean layout, so there’s ample room for a large CPU cooler. However, I discovered late in the game that the SATA ports are poorly located, which means a long graphics card butts up to some of the SATA connectors. The board has plenty of ports, however, and does support USB 3.0, with an onboard NEC USB 3.0 controller.
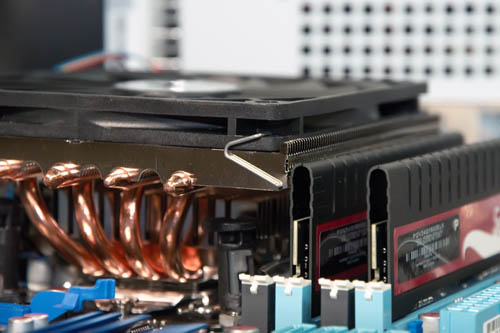
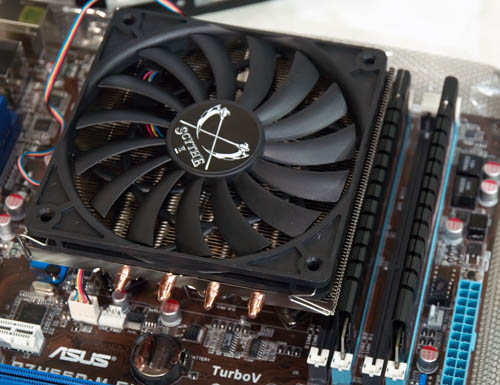
Attaching the CPU cooler was challenging, too. I’ve generally liked Scythe coolers, but the designers often don’t think about how you actually mount the HSF. The Shiruken is a very low profile cooler, just 58mm high, including the skinny, 120mm fan. However, it’s fairly large, at 4.7 inches square. Plus, the Intel mounting tabs are under the radiator.
All this meant two things: I needed to install the HSF before installing the motherboard in the case.
Installing the cooler was an exercise in patience. I needed a large, flat bladed screwdriver, because there was no way I was going to get my fingers in between the HSF radiator and the top of the mounting pushpin, and still exert enough force to press the connector down until it snapped into place. Even then, I wasn’t 100% sure that all four pushpins had locked down.
And the Patriot memory modules, with their slightly taller silhouette, meant that two of the memory sockets weren’t usable. Lower profile memory modules would have allowed me to install four modules instead of two, if I wanted to go beyond 4GB.
Once the heat sink, CPU and memory were in place, the motherboard slid into the case nicely. It’s definitely a snug fit, since the case is just the right size for a micro ATX motherboard.
The biggest pain, though, was installing the Radeon HD 5850 graphics card. The XFX card is based on the reference design, and is 9.5 inches long. However, the power connectors are on the rear of the card. This had two consequences: you needed to attach the PCIe power plugs before installing the card in the case. Secondly, getting the card into the case meant slipping the card in at an angle, holding cables out of the way, and making sure you didn’t bump SATA or front panel connectors.
Due to the location of the SATA ports, I had to route the SATA cables over the top of the graphics card. Otherwise, I’d need to run them under the card, and that space is already pretty crowded.
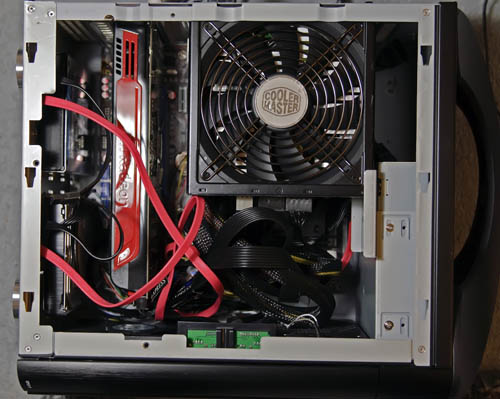
The Silverstone case mounts hard drives in the base of the case, which is removable. However, as with the motherboard tray, space is tight, so you need to attach SATA and drive power after you close up the case bottom. I needed to be very careful, as the power adapter and SATA plug have barely enough room. It would be very easy to damage a SATA drive connector.
Once I figured out cable routing and got the graphics card running – which took several cycles of installing and removing the card, then re-routing cables – I booted the system. Everything was good. Installing Windows went smoothly.
The OCZ drive is fast, too. It’s in a 3.5-inch shell, rather than the more common 2.5 inch mechanism, and is really two 128GB modules pre-configured inside the shell for RAID 0. (Users never see the RAID configuration.)


81 Comments
View All Comments
ctbaars - Wednesday, January 27, 2010 - link
I agree with Morphologia. Don't stop writing a wide variaty of articles. I love your ssd pick. Big lol. and I'm dying to know how it turns out ...morphologia - Wednesday, January 27, 2010 - link
This is a hobby-build article by an author who tends to write such things...seriously, if so many of you don't like this type of article why did any of you read it????I found it interesting, maybe because I didn't go in thinking it was a hard-hitting blood-and-guts in-depth review/critique. It's just a by-the-way fascinating autobiographical thing and that's all it needs to be. And the response from the peanut gallery? Mostly a bunch of Simpson's Comic-Book Guy types whining "Worst...build...ever."
Not to mention all the "you are clueless because what I would've done instead is..." garbage sprinkled in there. So? Start your own blog.
Sorry...just sick of all the hubris and bravo-sierra from people who could better express their disdain by simply reading something else next time.
strikeback03 - Thursday, January 28, 2010 - link
If the author had given a coherent explanation of some of the component decisions, I would agree with you more, but some of the choices seem to directly contradict the explanations given. Why the i5-661 instead of the i5-660, which would seem to better meet his goal of low-power/little heat while not losing anything since he isn't using the IGP anyway? Why use a Colossus when a 2.5" drive would likely provide more storage for less money and also take up less space, helping with the problems regarding breaking a connector he mentioned. In some ways this build seems to be less about a well-thought-out combination of components and more about just buying the most expensive item available in each category.yacoub - Wednesday, January 27, 2010 - link
Core i5-750: $149 at MicroCenter (up until about three weeks ago)EVGA P55 Micro E652: $130 (on sale at Amazon.com three weeks ago)
Antec MiniP180: $79 (on sale at Amazon.com three weeks ago)
Radeon HD5770: $169
HardDrives: 40GB Intel V-series G2 SSD: $120; WD 1TB Caviar Green: $89
RAM: 4GB Corsair XMS3 1600MHz DDR3: $93
PSU: Whatever you want for $130 or less. I'd get a Corsair HX650.
Optical drive: I just go with DVD/CD, don't care about BluRay, so we'll just keep your BluRay drive ($110).
OS: I run Win7x64 Pro, which was $99 pre-ordered. We can keep your $105 lesser edition though, whatever.
Total: $1174.
In my build, I got 8GB of RAM, but my OS was a little cheaper, and my optical drive was a LOT cheaper. I spent $994 (including tax) and I have a $10 rebate on my Corsair PSU that I mailed out, so should get $10 back on that eventually.
And this thing is ridiculously power efficient compared to the Core2Duo/8800GT rig I was running previously.
Between the Core i5 & P55 C-state/speedstep/whatever power saving technology and the HD5770's power saving technology, this system is amazingly more efficient.
And working with the MiniP180 was probably a lot less of a hassle when it comes to the build and installation. Oh and I used an extra Arctic Cooling Freezer 7 Pro I had laying around for my CPU hsf, which was probably easier to install than that Scythe.
spunlex - Wednesday, January 27, 2010 - link
I find it very strange that the i5-661 was chosen over the i5-660 considering the goals of this build. Why do you want an igp dumping more heat if your not going to use it?Paulman - Wednesday, January 27, 2010 - link
I think I have a couple improved suggestions for how to spec this system out on a budget:1) Instead of a $800 SSD drive, you can just go with a ~$200 64GB SSD drive like the OCZ Agility and pop in a $50-60 500-640GB 72000 RPM drive for storage. You will not lose much general usage performance.
2) Keep the Radeon HD 5850. You can save about $80+ dollars by going with a Core i3 530 instead of the i5 661, and again, you won't lose much performance at all. Maybe 10-20%? You WILL lose about 50% performance in games, I would guess, if you went with the 5770 instead of the 5850, though.
juliusdavies - Wednesday, January 27, 2010 - link
+1 to Alphacheez's comment.The Core i5-660 is rated at 73W TDP compared to the i5-661's 87W.
I would really like to see the following comparisons:
Discrete Graphics: i5-660 vs. i5-661
Integrated Graphics: i5-660 vs. i5-661
Otherwise keep everything else the same!
I think such a series of comparisons would be fascinating.
jtroutma - Wednesday, January 27, 2010 - link
I actually did something very similar to this build for my system a few months back. My goals were a bit different however; i7 920 system, overclock it, and watercool it. I documented a lot of the details here: http://tinyurl.com/ya4pgfq">http://tinyurl.com/ya4pgfqWould love to chat with the author of the article however and share details on how he got around some more of the challenging details involved with his build (same case just an earlier version)
Cheers!
Mr Perfect - Wednesday, January 27, 2010 - link
I don't know why, but I'm always surprised when a "SFF" build turns out to be a MATX board and not MITX. OEMs like Dell and HP have been pumping out nothing but MATX machines for years, and I haven't had to fix a full size ATX at work since... 2007?MATX isn't SFF in consumer circles, it's standard. I'm glad to see it's finally gaining ground in the enthusiast market.
strikeback03 - Thursday, January 28, 2010 - link
I don't really see the point of mITX if you are fitting a card the size of the 5850. If this were a small box using the integrated graphics of Clarkdale then it would make much more sense.