Biostar IDEQ 330P (Cont'd)
Construction
Discussing the construction and build quality of SFF cases is rather mundane at times, as almost every case does quite well. Unlike the ATX cases where build quality can vary a huge amount between manufacturers, SFFs are all more expensive and thus, can afford to spend a little more time to make sure that there aren't any major problems. The 330P is no exception.The exterior of the case is made of aluminum panels and plastic molding and gives us little, if any, cause for concern. While the high-gloss paint does make fingerprints easy to see, it was resistant to scratches during regular use. There are three panels on the 330P, all secured by thumb screws, and they all slide off with relative ease. On the bottom is the small mini-PCI compartment, covered by another panel that's secured by a screw.
 |
 |
| Click on images to enlarge. | |
The internal structure is mostly steel and is free from any noticeably sharp edges. Even with the hinged frame, we still found the case to be relatively sturdy. Access to all of the areas is easy to obtain, which is the benefit of the flip-top case. It is possible to remove the CPU HSF and swap CPUs without moving anything else, so if that's something you're likely to do, the 330P is perhaps the easiest out of any 939 computer that we've seen. It takes about a minute to pull off the sides and top, and another minute to open the hinged case and remove the HSF and CPU. Applying thermal grease and cleaning off your hands is likely to take more time than the actual CPU swap. The only issue that we had with the hinged frame was in closing the case. Getting the front of the case to align properly so that it would close all the way took a little bit of effort, which is why we say that the case was only "relatively" sturdy. As long as you're not careless, we'd trade a bit of structural integrity for the ease of accessing the CPU and RAM - but then, we're more likely to be swapping parts than many people.
 |
 |
 |
| Click on images to enlarge. | ||
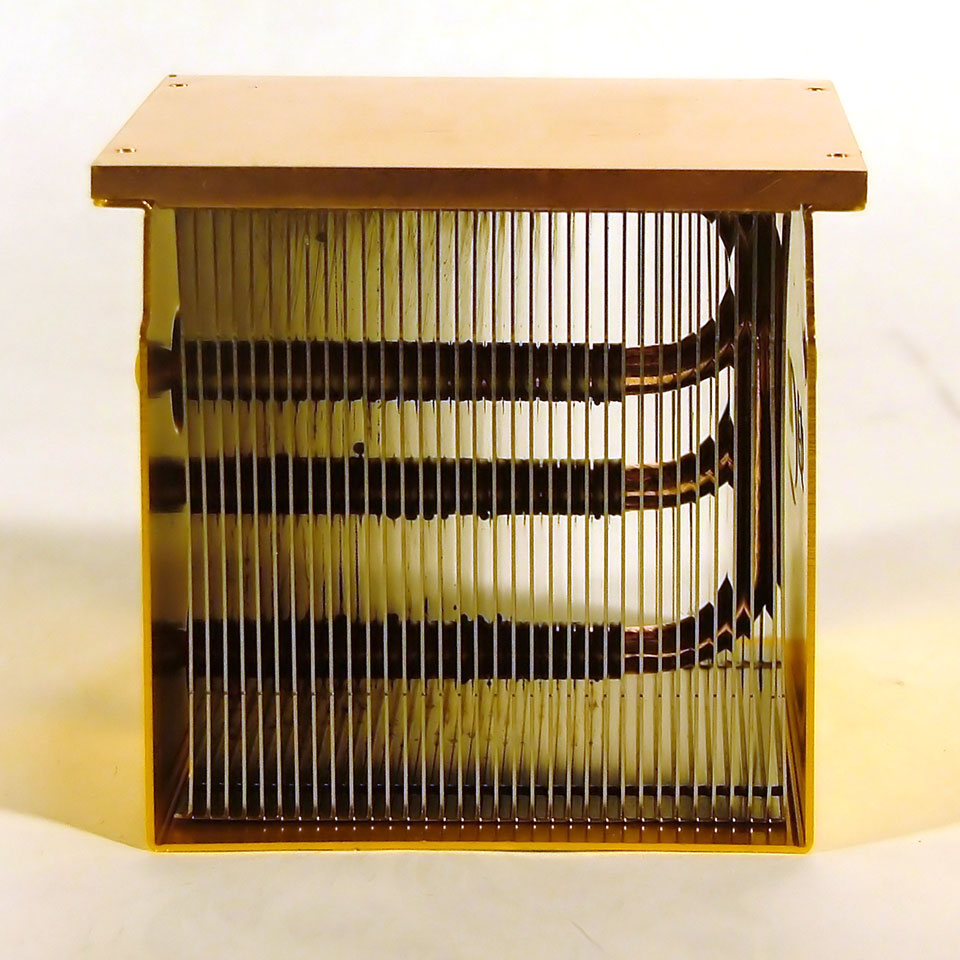
The construction in other areas is also good. The heat sink is a solid copper design that also includes three heat pipes to help remove heat from the CPU surface quickly. A fan at the front of the case blows air directly over the heat sink, and the air is then directed over the chipset heat sink - also copper - and out the rear of the case. A second fan at the rear of the case helps to remove the remaining air in a sort of "wind tunnel" design. Biostar rates the case as being able to handle everything up to an FX-57, and we didn't encounter any issues with the CPU overheating. Unfortunately, the "wind tunnel" does appear to limit the amount of air circulating in other areas of the case, and we did have a few stability problems that may be related to the RAM and/or GPU getting too hot. We'll say more on that in a moment.
When compared to the SN25P, the 330P definitely comes out ahead in a couple of areas. First, two fans compared to five fans is a definite advantage in the noise arena, though it does come at the cost of slightly higher temperatures, which likely played a part in stability concerns. At idle, the 330P is very quiet - the quietest of this roundup, in fact. The other area where it comes out ahead is in ease of accessing the CPU. That's actually one of the worst parts about the design of the SN25P, as getting to the CPU requires the removal of the HDDs up top as well as the DVD tray, and then you still have to deal with unscrewing the HSF mount.
 |
 |
 |
| Click on images to enlarge. | ||
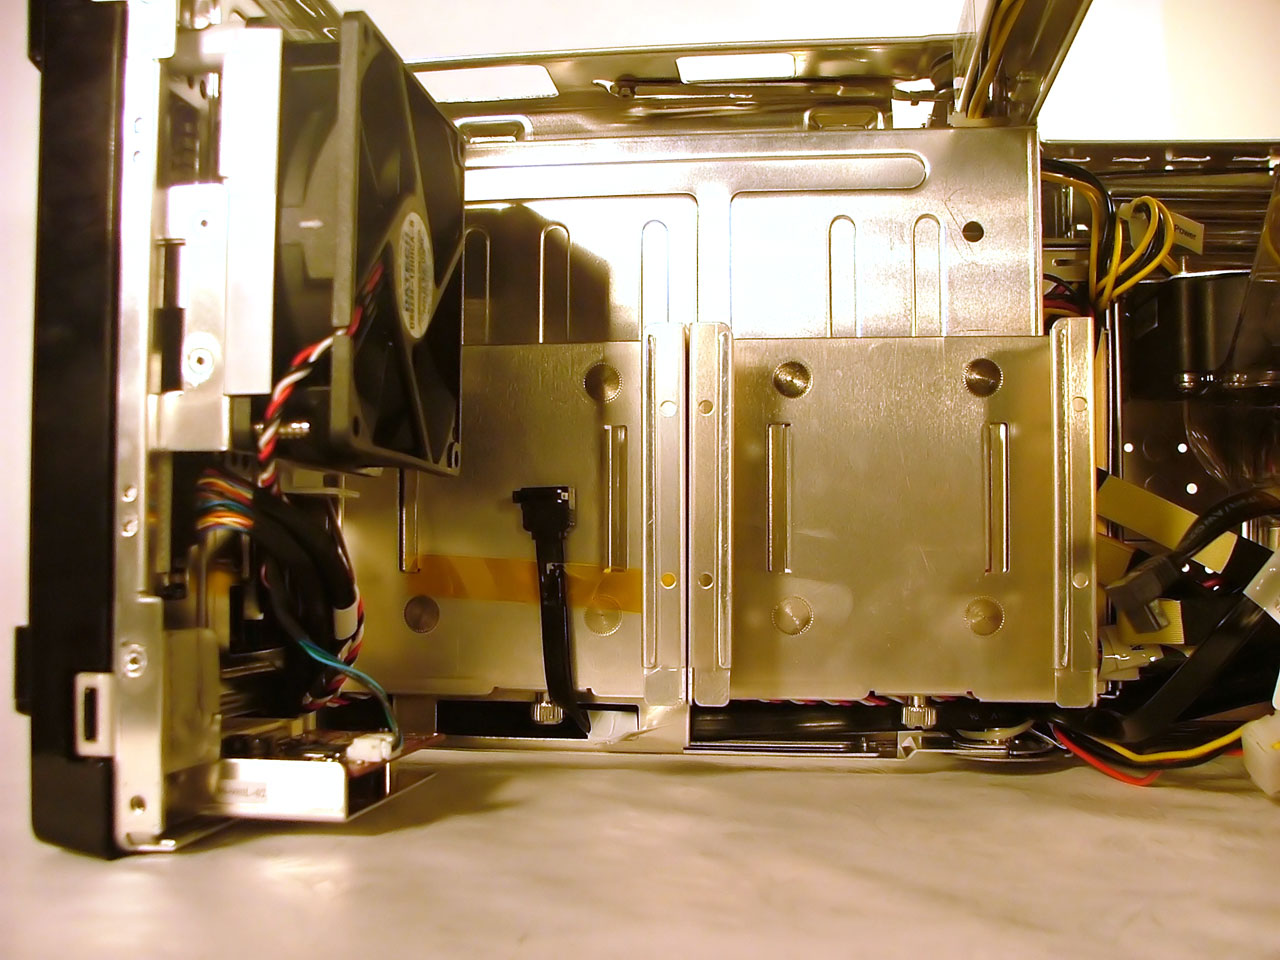
We did have a few complaints with the internal construction, however. One is that the retention clip for the PCIe X16 slot is very difficult to release - every bit as bad as the Shuttle X16 slots, and worse than the best options that we've seen. What's the best option? The sliding latch of the Aopen SFFs, no question. It can be moved into the open state from anywhere along the length of the graphics slot, and it doesn't require small hands or Superman strength to budge! The HDD trays are also a bit of a concern. The enclosures make installing and removing hard drives a bit easier, but in terms of construction, they really don't slide in and out of the case very easily. Since a thumbscrew secures the trays in place, we'd like the friction to be a little less - they're not just going to accidentally fall out in either case.
 |
 |
 |
| Click on images to enlarge. | ||
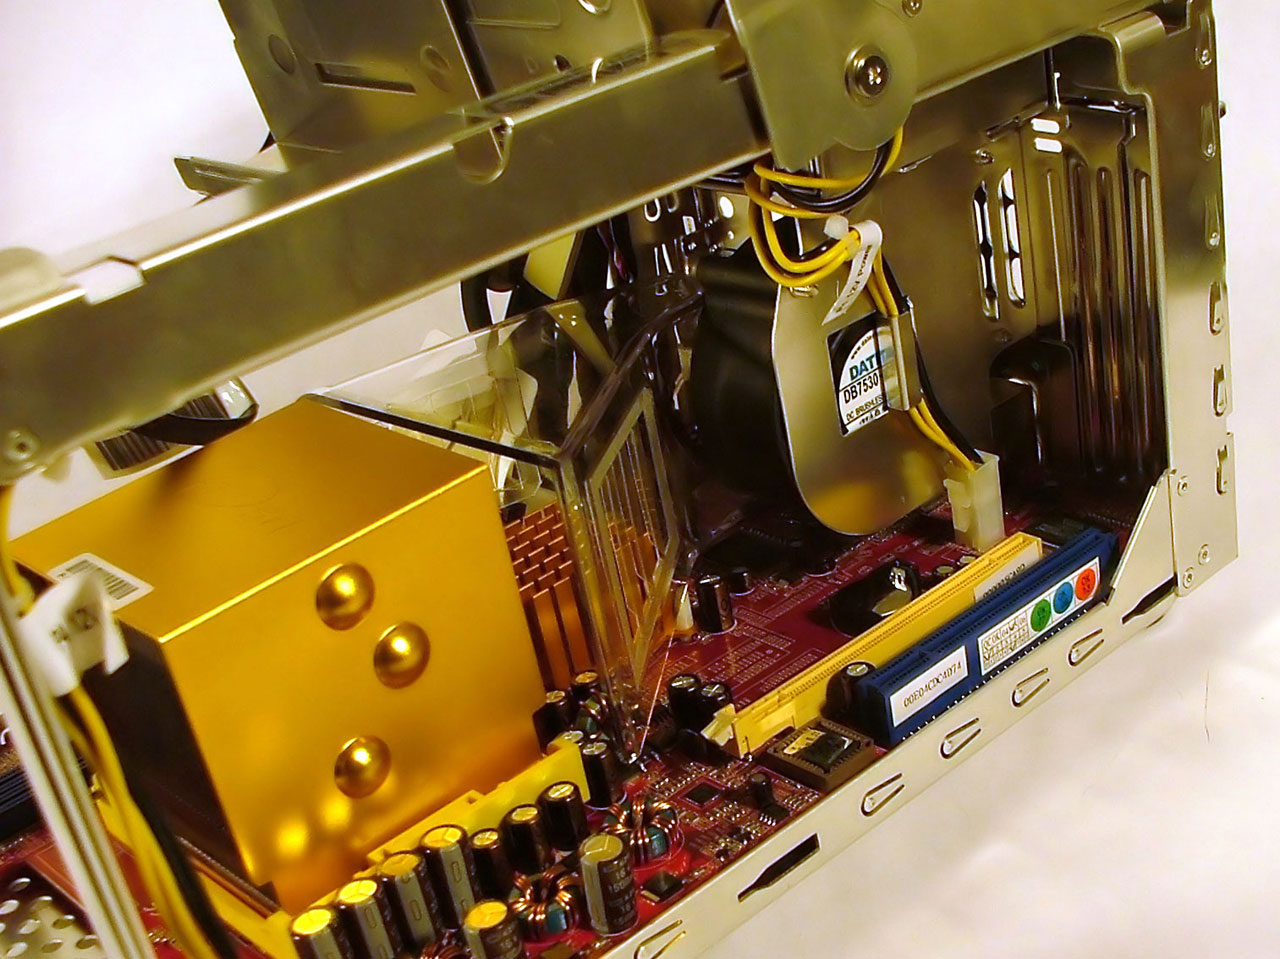
The final issue that we have with the internal construction is the lack of pre-installed cables. It's not that Biostar completely omitted the cables, but they didn't have all of the required cables routed to every area. The optical bay has an IDE cable and power cable readily available, but the IDE cable isn't really tucked away and features two connections, so if you only use a single IDE device (which is the likely scenario), you have the extra cable length and the unused plug just getting in the way, resting on top of the HSF and plastic shroud. Getting the IDE cable to reach both the DVD and a hard drive would be rather difficult if it's even possible, and a second IDE port makes this a moot point. The hard drive bays have SATA cables installed, and they're mostly tucked out of the way.
The real problem is the power cabling. Power for the HDDs comes from a single 4-pin molex connector, to which you attach an included splitter cable that has two SATA and two molex connections. Things are further exacerbated should you require a PCIe power adapter for your graphics card. Our X800Pro card needed such an adapter, and that was just one more cable adding to the mess - and the cable had to come from the opposite side of the case, over the top of the CPU HS, and then to the graphics card. Once all the cables are installed, the internals feel more cluttered than what we like. If you were to max out the system, you'd also end up with two hard drives and the PCIe power adapter all running off a single source molex, which could be the cause of the periodic crashes that we experienced.
The hinged design of the case is something of a Catch-22 here, as pre-routing cables can be tricky. Opening the case can pull on the cables, so they would need to ensure that all the cables have enough slack to allow the top to open. We didn't have issues with lifting the hinged section in the current design, but closing the case again required a bit of time rearranging the cables to our liking. The SATA power cables also seemed to come loose if you open and close the case frequently.
This all probably sounds highly negative, and we want to make it clear that this is not the end of the world for the Biostar case. The design works, and it works well; it just needs some adjustments in a few areas. Biostar has indicated that the design that we are reviewing is something of a prototype, and they are re-evaluating the cabling system and power supply. The main changes that we'd like to see are the inclusion of pre-routed power for the HDD bays, and a PCIe 6-pin power connection (or at least an adapter) would be great for those who need it. (Skip forward to the ST20G5 section and read our Power Problems comments on the PCIe adapter for more information on why including a connection/cable would be appreciated.) Version 1.0 isn't bad, but there is definitely some room for improvement, and we hope that version 1.1 can clear up the few remaining issues.
Setup
With all of the discussion on the construction, you can probably already guess how the setup process works. Removing the side panels followed by the top panel is the first step, and then you release the latches on the bottom-front section of the case and lift up the top of the frame. The frame has a catch that keeps it up while you work, which you can see in the right image below. |
 |
| Click on images to enlarge. | |
Once that's done, you can remove the HDD cages and install the drives into those, as well as install the CPU, RAM, and graphics card. At that point, it's time to argue with the cables for a bit to get everything properly supplied with power. We saved the installation of the optical drive for last, after we had lowered the top back down. It could have been done earlier, but either way works. Lining the DVD buttons up with the case button is pretty simple; although, maybe we're just used to the process now: place the DVD into the bay and then position it so that the DVD eject button works properly with the case's eject button, and then secure the drive with screws.
After installing the hardware, you have to lift up the top a bit and then push that locking pin up so that you can lower the lid again. Once you've latched that into place, put the top back on followed by the sides and assembly is complete. Despite our complaints about the cables, it really isn't too difficult to accomplish this task, and the setup time was probably a bit less than the other cases, though still in the 15 to 20 minute range.
 |
 |
 |
| Click on images to enlarge. | ||
Setting up the BIOS is the next stage of assembly, and we didn't encounter any problems. We've included a couple of screenshots here, but if you want to see all that the BIOS offers, grab the full image set. We did have to force the RAM timings to 2-2-2-7, as they defaulted to 2.5-3-2-5 when set to auto timings, but other than that change, there wasn't much that we needed to muck with in the BIOS. Absent from the initial BIOS is a setting for command rate, and we have to assume that the 330P defaulted to 2T rather than 1T. A later BIOS from Biostar gave us the 1T option, and we reran the benchmarks. Performance improved by as much as 10% with the 1T command rate and updated BIOS, so you'll definitely want to get the latest BIOS.
 |
 |
| Click on images to enlarge. | |
Overclocking features are all present and accounted for on the 330P, but actual overclocking performance was sporadic. With the Newcastle 3800+, we were able to run all of our tests with a HyperTransport bus speed of up to 285 MHz with a 3X multiplier and 1T timings, but we had to use an 8X CPU multiplier, giving a CPU speed of 2284 MHz. Dropping to a 2T command rate, we managed to get the bus to 299 MHz, bringing us back to 2.4 GHz. We could not, however, get that last 1 MHz to 300x8 - close enough, though. Switching to a Venice 3200+ 2.0 GHz, we managed to run at up to 2.6 GHz with a 289x9 (3X HT) configuration. However, we had to drop the RAM to DDR333 in order to reach this speed - no combination of RAM timings would allow the Venice core to run at anything above 250 MHz at present. The end result is still positive, however, and ranks as the second best overclocking unit in this group.
The bus speed maxes out at 300 MHz with the most recent BIOS, though there are some peculiarities at present. In one BIOS, bus speeds increase in .5 MHz increments from 200 to 210, then 1 MHz increments from 210 to 230, followed by 2 MHz increments for 230 to 250. A later BIOS revision added up to 300 MHz in 4 MHz increments (the above screenshot is of an earlier BIOS). The current BIOS shows 1 MHz increments from 200 to 300, but while everything for 250 and above works properly, the 200 to 250 range actually has the wrong labels and appears to reference the earlier values. When we set the bus to 240 MHz at one point, it actually ended up running at 232 or something. While it's a bit odd, it's still possible to figure out using a combination of the BIOS and CPU-Z, but Biostar will want to address this with another BIOS update.
Installing the OS and drivers was straightforward, as usual. The driver CD includes the chipset, audio, and networking drivers, and after a couple of reboots, we're ready for benchmarking.
Noise, Heat and Performance
In terms of day-to-day use, the 330P is an interesting system. Idle noise levels - particularly with a fanless GPU - are among the lowest of any of the systems that we've tested. In typical use, you would hardly notice the presence of the 330P in the room. Adding our X800Pro card to the system increased noise levels by around 10 dB, which took it from near silent to being merely quiet - it was still quieter than almost all of the other systems in this roundup. Once we began stress testing, though, noise levels increased quite a bit.We list the maximum of the stress test noise levels, so it appears worse than it really is. Under full CPU load, the fans would speed up and slow down frequently, increasing noise levels by as much as 10 dB. The majority of the time, the system was closer to the other units. We were also surprised by how quickly the fan speed would increase under high CPU loads; 1 second after starting AutoGK, the CPU fan would audibly increase in volume.
This testing was done using the system control utility from Biostar - without the utility, idle noise levels are a bit higher, but the fans never get quite as loud. Unfortunately, the CPU became too hot and caused a system crash when looping 3DMark03 as well as a few other CPU intensive tasks, so the utility at present is required. Ideally, we prefer all the fan speed controls to be contained in the BIOS, and that doesn't seem to be fully functional right now. Having a Windows utility isn't bad, but it shouldn't be required.
 |
 |
| Click on images to enlarge. | |
The System Control utility also has some other issues. You can see two screen shots from Windows' Task Manager that we took while the system was sitting idle at the desktop. Note the CPU usage in time as well as on the performance tab. Running System Control ends up reducing performance in other applications by 7% (if they're CPU limited) because System Control is eating up CPU time. We could clearly see this in Half-Life 2 benchmarks, as there appeared to be a stutter every second or so - most likely when the utility was polling CPU temperature and adjusting fan speed. A linear 7% performance difference wouldn't be all that noticeable, but a 15 to 20% drop once a second becomes annoying in games.
We came up with a hack to help reduce the impact, but we didn't use it during testing. (Our tests reflect the way that most users will run the system.) The trick is to modify the way that System Control loads so that it runs as a low priority process instead of normal priority. This can be done by changing the shortcut to read:
When the system is idle, it won't change the fact that your CPU runs at 7% load all the time, but it will make CPU limited applications get more CPU time than the utility. We did a few quick tests and found that performance increased about 5% in 3DMark03/05 CPU tests. We'll check into this more for the follow-up article, and of course an X2 CPU would eliminate this bottleneck unless you were able to get both CPUs to 100% load.
The heat levels were generally in line with what we see in the other systems for some components, but others were warmer. The temperature of the RAM and GPU RAM are both 4 degrees C higher than the next closest system, while the CPU and HDD are slightly cooler than average. The reason for the higher temperatures is most likely due to the wind tunnel design combined with the positioning of the GPU: the HSF for the GPU faces the inside of the case rather than the outside, so it doesn't get as much cool air. Having the GPU HSF face the internal area does appear to help noise levels, as the noise projects into the internals rather than emanating directly through a nearby vent. This can be seen in the lower idle noise levels.
Performance is the one area where the 330P is trailing, and as we mentioned, the System Control utility certainly plays a part. When we first received the 330P, the BIOS lacked a command rate setting and that hurt performance quite a bit. An updated BIOS closed the gap, and the 330P actually comes out ahead in several tests. Most 939 motherboards are relatively close to each other in performance, especially when they use the same chipset; the Biostar 330P is up to 12% slower than the fastest SFF in a few instances, which is a little surprising. (That's still much better than the 22% margin that we experienced with the first BIOS revision.) If temperature and fan speeds can be controlled better from directly in the BIOS, we would expect the 330P to come out on top in many benchmarks and be close enough in the others that we wouldn't have any reservations about recommending it. For now, you'll definitely want to make sure that you get the latest BIOS from Biostar's web site, and you can try the low priority hack listed above to improve performance a bit.
Overall Impressions
The feature set of the 330P is impressive. It should be, considering the price (currently about $370 from Newegg and ZipZoomFly). Then again, the only real competition in the SFF market is the Shuttle SN25P, which runs about $10 more. If you want socket 939 and PCI Express graphics in a SFF case, you currently have three choices, and all of them are pretty expensive. We can't really fault Biostar for charging $370 given the current market rates of competing products, but many will certainly scoff at spending over $300 for such a system. When you consider that a case, PSU, and motherboard can be had for $200 or less for a basic model, it is quite expensive. Then again, good LCDs cost over $300 and many people wouldn't hesitate to buy an attractive LCD instead of a "boring" CRT. If you're interested in SFF cases, go into the purchase knowing that it's a luxury rather than a requirement.How does the 330P compare to everything else? It's a case of "win some, lose some". Performance is a little lower and noise levels are rather high when the CPU is busy, but the appearance and chassis design are very good. Expansion options are also good, basically equaling or surpassing what the competition offers. Some of the other cases support more total hard drives, but none of them offer three expansion ports (counting the mini-PCI slot). If you think that you want wireless networking and an add-in audio card or TV tuner, this is the only SFF to support that. If you want RAID and a floppy drive, or if you're interested in maximum performance, it doesn't offer that yet.
We like the design, we like the looks, and depending on how you want to use your SFF, the 330P will either work great or possibly not at all. That's really the story of small form factors in general. For now, we feel that the initial version of the 330P needs some work before it can truly reach its full potential. We have an updated BIOS, but we'd still like to see some improvements in stability and performance. Add a few minor tweaks to the internal design and power supply and we'd give it a full recommendation. If/when Biostar updates the product, we'll be happy to return to it and give it a second look. If you're mostly interested in the outward appearance, you can probably look past the issues that we've mentioned. Out of this roundup of SFFs, several of us would pick the 330P as the most visually appealing model, and looks count for a lot in this market segment.


29 Comments
View All Comments
JarredWalton - Wednesday, August 10, 2005 - link
So I spoke too soon. After finishing this article, I just happend to come across http://www.newegg.com/Product/Product.asp?Item=N82...">the new Aopen 939 SFF. That actually looks pretty promising, though the IGP isn't going to beat the ST20G5 that I can see (no DVI port). Time to put in a request for that unit....rqle - Wednesday, August 10, 2005 - link
Price of these SFF are getting quite pricey lately. So much to the point when you add the cpu, hard drive, memory, video card, optical drive AND LCD it will comes very close to the price of a good high end laptop on a good day. Dell 17inch 9300 w/6800 on a VERY good sale day comes just over the price of these SFF 'system.' Big fan of these SFF, but prices should be a little bit more reasonable for me to buy again.JarredWalton - Wednesday, August 10, 2005 - link
I agree with you on a lot of that, but a SFF with a 19" (or larger) LCD and a 6800GT/X800XL is pretty much going to stomp all over any similarly priced laptop. There's basically a $150 price premium to get a high-end SFF case, which is going to prevent many from buying. Still, some people buy $200 cases just because they look nice, so it's all a matter of taste.If you need portability, though, there are very few options other than getting a laptop. Personally, laptops and gaming are something I just don't care about. I'd get a cheap laptop for the office work I do and then keep a second system at home for any gaming. Some of course feel otherwise, but laptop keyboards and such just don't do it for me.
R3MF - Wednesday, August 10, 2005 - link
love it.BigT383 - Wednesday, August 10, 2005 - link
I have a first-generation SN95G5. I bought it thinking that since it's socket 939 I'd be able to upgrade to dual-core when it came out.Apparently this isn't the case, but I haven't seen anybody say they've tried it yet- so far there seem to be only rumors.
So I know this is a weird request but what I'd like to see right now is an article testing a CPU like the Athlon X2 4400+ on the three different versions of the SN95G5.
I can understand that X2s need a bios update, but the physical motherboard shouldn't be holding me back, right?
dcuccia - Thursday, August 18, 2005 - link
X2 support for the SN25P w/o USB2 issues is now available through a BIOS upgrade:http://www.shuttle.com/share/fae/hq/download/bios_...">http://www.shuttle.com/share/fae/hq/download/bios_...
JarredWalton - Thursday, August 18, 2005 - link
Thanks, I made a quick comment on the SN25P page to mention this.JarredWalton - Wednesday, August 10, 2005 - link
I'm going to be dropping an X2 3800+ into the SN95G5v2 just to see what happens. I'll try to get some official word from Shuttle on the matter as well. I really have no idea what the SN95G5v1 will support. I think the main change between it and v2 was a switch from an 80mm fan to a 92mm fan.Zirconium - Wednesday, August 10, 2005 - link
I love the roundup articles. I find them to be the most useful because they allow you to hone in on what you are looking for quickly, and then you can go to other sites and check the reviews that are solely for the products you are looking for.That said, one thing I'm interested is the quality of the integrated graphics on these computers. I have an SK41G and I could tell the difference between the quality of the built-in graphics and the AIW Radeon 7500 that is currently in it. When the integrated graphics were hooked up to a TV (I tried two) you could notice bands moving up the TV.