ASUS X99-A Motherboard Review
by Ian Cutress on December 22, 2014 2:00 PM EST- Posted in
- Motherboards
- Intel
- Asus
- Haswell-E
- LGA2011-3
ASUS X99-A In The Box
So far from our X99 motherboard bundles it has been rather reassuring that for the high initial cost of the parts that the manufacturers are willing to bundle enough to focus on gaming and storage. The ASUS X99-Deluxe did this with a couple of M.2 additions, a protective cover for the left hand side of the board and a bundled fan extension PCB. However the inclusions in the box from ASUS in the X99-A might come across as pricing down to a point. We get the following:
Driver CD
User Manuals
Rear Panel
Four SATA Cables
Q-Connectors
Flexi SLI Bridge
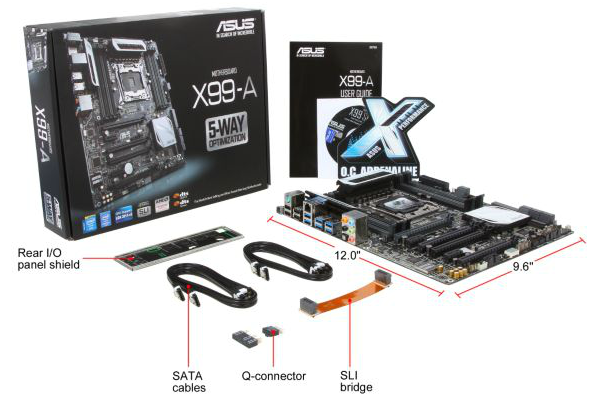
Despite there being a focus on three-way GPU configurations, only one SLI bridge is provided. Having the right size for three-way would be a help here. Four SATA cables is two fewer than almost all other X99 boards as well - this should satisfy most users trying to use X99 on the cheap.
Many thanks to...
We must thank the following companies for kindly providing hardware for our test bed:
Thank you to OCZ for providing us with PSUs and SSDs.
Thank you to G.Skill for providing us with memory.
Thank you to Corsair for providing us with an AX1200i PSU.
Thank you to MSI for providing us with the NVIDIA GTX 770 Lightning GPUs.
Thank you to Rosewill for providing us with PSUs and RK-9100 keyboards.
Thank you to ASRock for providing us with some IO testing kit.
Thank you to Cooler Master for providing us with Nepton 140XL CLCs.
Test Setup
| Test Setup | |
| Processor | Intel Core i7-5960X ES 8 Cores, 16 Threads, 3.0 GHz (3.5 GHz Turbo) |
| Motherboards | ASUS X99-A |
| Cooling | Cooler Master Nepton 140XL |
| Power Supply | OCZ 1250W Gold ZX Series Corsair AX1200i Platinum PSU |
| Memory | Corsair DDR4-2133 C15 4x8 GB 1.2V G.Skill Ripjaws 4 DDR4-2133 C15 4x8 GB 1.2V |
| Memory Settings | JEDEC @ 2133 |
| Video Cards | MSI GTX 770 Lightning 2GB (1150/1202 Boost) |
| Video Drivers | NVIDIA Drivers 332.21 |
| Hard Drive | OCZ Vertex 3 256GB |
| Optical Drive | LG GH22NS50 |
| Case | Open Test Bed |
| Operating System | Windows 7 64-bit SP1 |
| USB 2/3 Testing | OCZ Vertex 3 240GB with SATA->USB Adaptor |
ASUS X99-A Overclocking
Experience with ASUS X99-A
ASUS' overclocking options derive mostly from the AI Suite 3 software as part of the 5-Way Optimization tool. The software will find an overclock with appropriate stress tests for an automatic setting, or the user can manipulate the TPU or Turbo App software manually. For automatic overclocking a user can also adjust the TPU DIP switch on the motherboard itself. This switch gives 39x100 and 31x125 for setting one and two respectively. Manual overclocking is best performed through the BIOS which offers ASUS' usual extensive array of options.
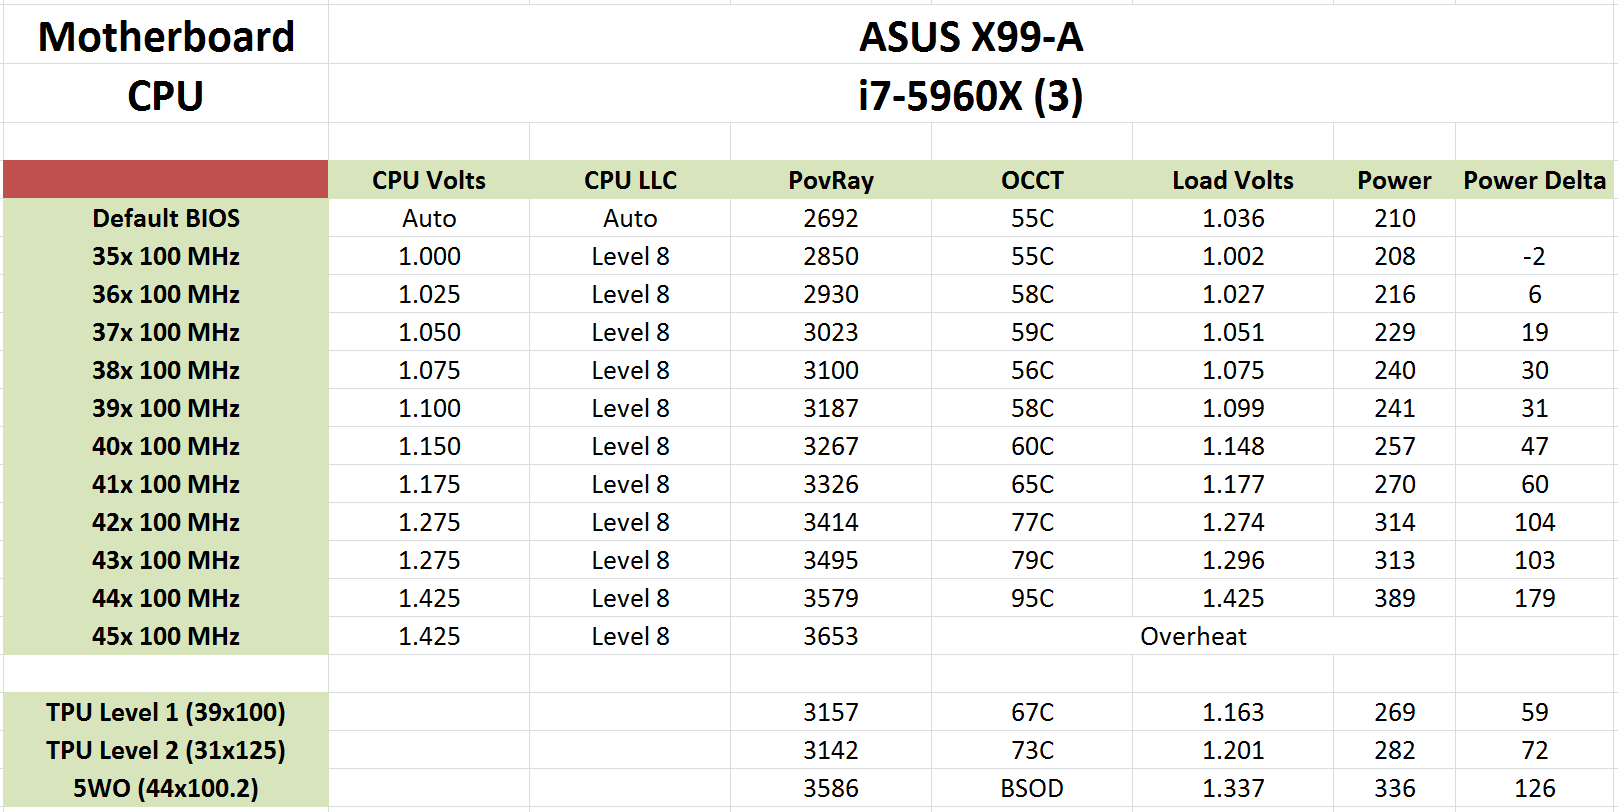
Methodology
Our standard overclocking methodology is as follows. We select the automatic overclock options and test for stability with PovRay and OCCT to simulate high-end workloads. These stability tests aim to catch any immediate causes for memory or CPU errors.
For manual overclocks, based on the information gathered from previous testing, starts off at a nominal voltage and CPU multiplier, and the multiplier is increased until the stability tests are failed. The CPU voltage is increased gradually until the stability tests are passed, and the process repeated until the motherboard reduces the multiplier automatically (due to safety protocol) or the CPU temperature reaches a stupidly high level (100ºC+). Our test bed is not in a case, which should push overclocks higher with fresher (cooler) air.
Overclock Results


37 Comments
View All Comments
stambous - Friday, December 26, 2014 - link
"In terms of performance the system does not implement Multicore Turbo, meaning that stock performance is down compared to some other products but a simple click on the TPU switch avoids this with a small 3.9 GHz overclock".I can syncronise all cores for turbo in BIOS and when CPU is under load all 8cores works on 3,5GHZ in stock config without OC.
kenshinco - Monday, December 29, 2014 - link
...and how did you do it? What settings did you set?stambous - Friday, January 2, 2015 - link
Very simply go to Adavnce mode in BIOS.Then Ai tweaker menu.You will see there CPU core ratio select from auto to "sync all cores".And thats it from this point all eight cores always work under load at 3,5GHZ instead of standard Intel turbo.Dont forget set under CPU settings C states from auto to "enabled".This will downclock CPU when idle.You dont want have always in idle all cores at 3,5GHZ:-)
stambous - Friday, January 2, 2015 - link
And what is best when you have sync all cores you can under Windows on Ai suite set higher ratio to all ocres too and have overclocked all cores together.My CPU is stable at 3,7GHZ all cores synced with stock voltages.I can go further and higher but at higher freq 3,8+ i need put voltages higher which i dont want.Iam good with small moderate OC at 3,7GHZ for all cores with stock voltages and low temps.microline - Saturday, July 4, 2015 - link
Will this board support Windows r2 Server OS?Endre18 - Monday, July 20, 2015 - link
Hey!I just recently bought a Asus x99-A/3.1 and im wondering if i can connect a thunderbolt ex II card onto it?
from what i can read at the Asus homepage it is not compatible...
Thanks in advance!
Equinox--- - Thursday, August 20, 2015 - link
I´ve used this card in my new rig for a couple of months now together with i75820, and have Antec Kuhler watercooling, using it together with the new ASUS STRIX GTX980ti 6GB Gaming, and both gaming and other more demanding tasks, as photo editing etc, runs exceptionally smooth. I can´t really see the point in shelling out for a deluxe-version for maybe 100$ more, thinking that it will seriously outperform this card in most processes. Overclocking this is a joy, watercooling should certainly be used in that case.Highly recommended!