Z97 Mini-ITX Review at $140: ASRock, MSI and GIGABYTE
by Ian Cutress on July 23, 2014 3:00 AM ESTMSI Z97I AC BIOS
One of the major positives from our first MSI Z97 review, the MSI Z97 MPower Max, was that MSI had taken a large number of our comments about the BIOS from Z87 and Z77 reviews and actually placed most of them in. The Z97 MPower Max retails for twice the amount of the MSI Z97I AC, so it was interesting to find those additions have carried down from the overclocking motherboard to the mini-ITX model. One of the additions is the easier application of XMP, which now has its own button on the front page of the BIOS:
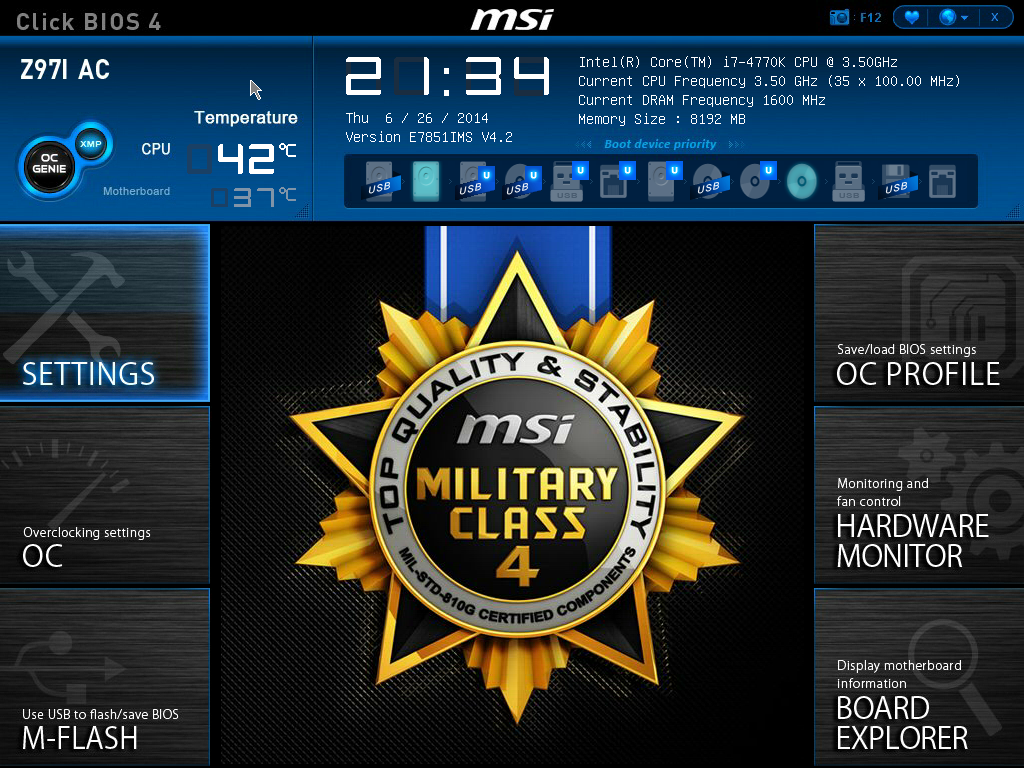
At the top left, along with the OC Genie, is an XMP button. In the past I had noted that enabling XMP on MSI motherboards, especially for users with no BIOS experience, was a minefield due to the (then) disorganized way of accessing memory settings. MSI’s solution is to move it out to this button on the top left, which simplifies things nicely.
The basic layout (as in previous generations) is a top bar featuring the Motherboard name, BIOS version, CPU installed, CPU frequency, DRAM frequency, DRAM size and CPU temperatures. The only real data missing here is voltages and fan speeds, which MSI has moved to a different part of the BIOS. To the left and the right are the main tabs which produce the list of options in the central screen.
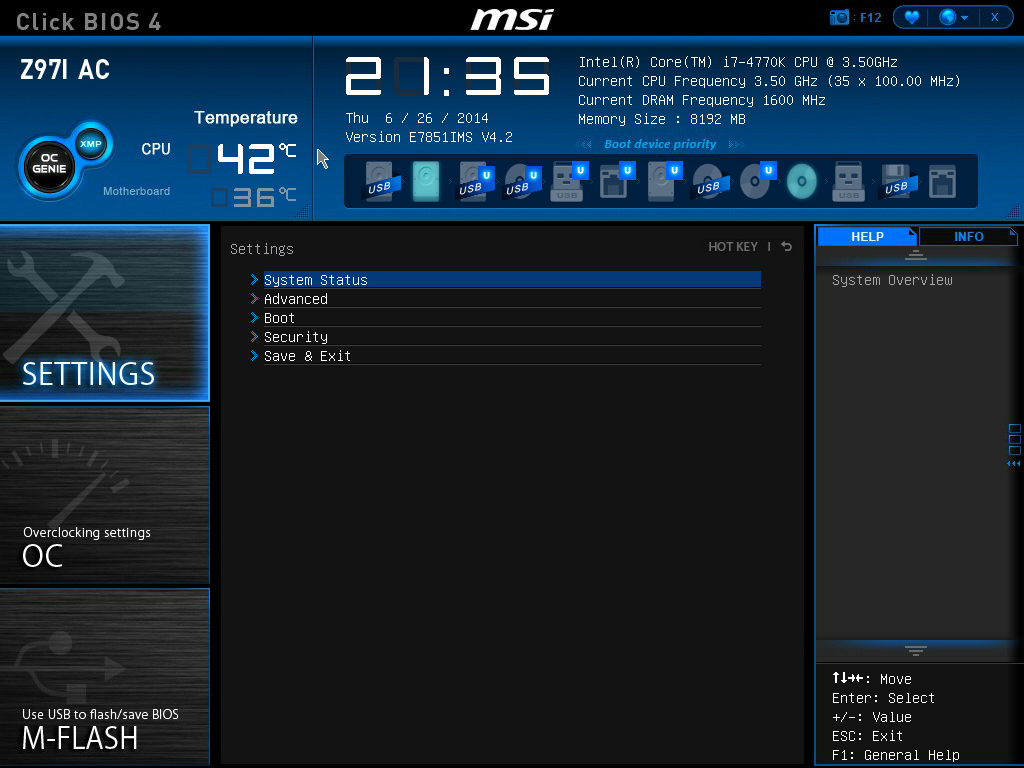
The screen above shows the settings menu, which has not changed, but the information to the right of the screen has. Users have two options here, ‘Help’ or ‘Info’.
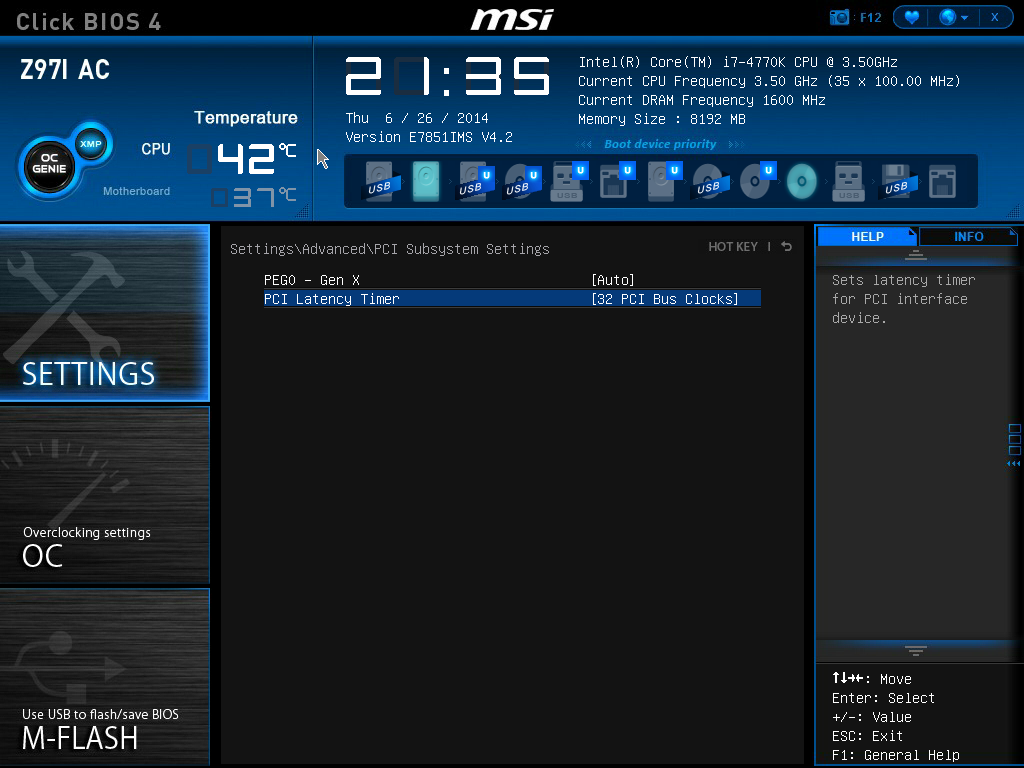
We praised MSI’s FM2 BIOS on the A88XM-E35 as MSI had decided to finally put the path of the options into each page, and here we see the ‘Settings -> Advanced -> PCI Subsystem Settings’ listed above, telling us where in the BIOS we are. I am still glad this is here, because due to MSI’s layout (compared to the other three major motherboard manufacturers), it is not always obvious which menu we are in. Now we can be sure.
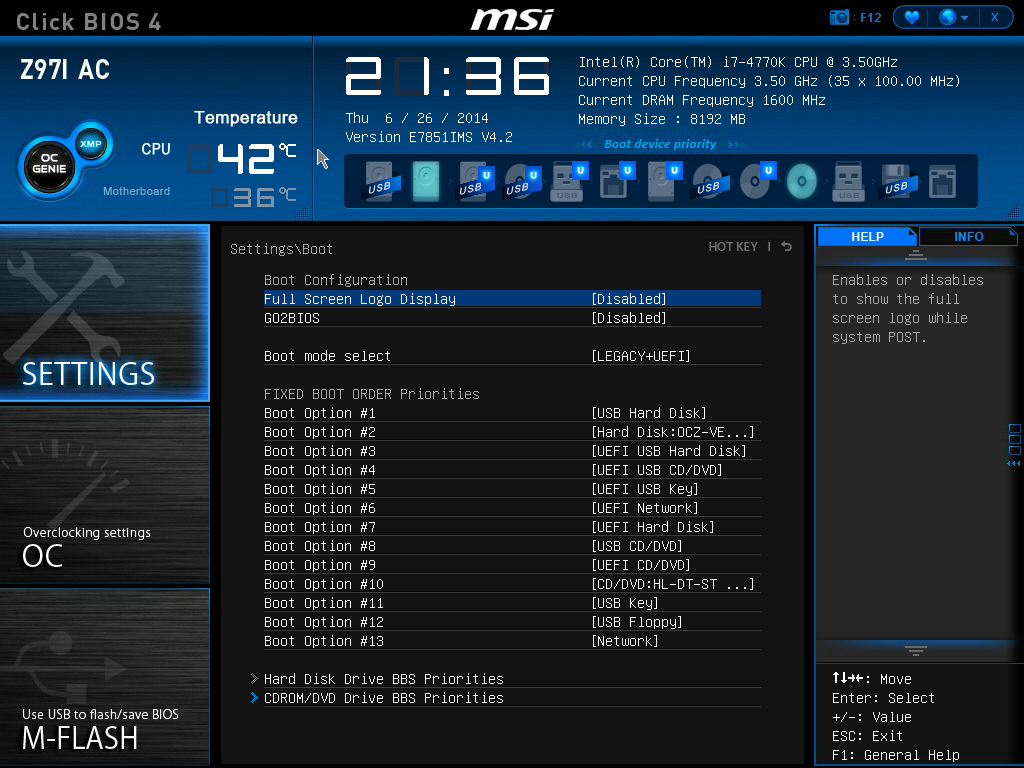
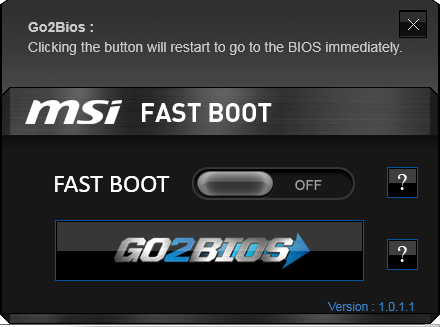
Most of the Settings tab in the BIOS is similar to previous reviews, but the Boot option is slightly different. Aside from the options we can select, the new one is GO2BIOS. The GO2BIOS option enables and disables the button on the rear panel – useful if users who might have small animals/children that have access to the rear of the machine
Now onto one of the things that I am most proud of MSI for: after several generations of bemoaning the overclock menu for being a hodge-podge of options with no discernable order, it finally has order!

The layout starts with a selection between Simple and Advanced, which enables more options in the menu when Advanced is selected. This is followed by CPU settings, BCLK settings, DRAM settings, Voltage Settings and the ‘Other’ Settings. It could be construed that MSI could hide each of these options behind another menu for each (i.e. selecting ‘CPU Setting’ gives the CPU Setting options), but it all comes down to user preference. Some manufacturers have told me that users prefer long lists of options, whereas others prefer succinct menus.
One interesting feature that I did not expect from MSI is actually the top one in the OC menu. The Simple/Advanced option helps remove/add options that might add an extra element of confusion/expertise to overclocking. Switching over to the Simple option cuts out some of the more harder-to-understand options:

Here we are reduced down to the simple overclock options, such as CPU ratios, Base Clock and DRAM frequency.
With the help section on the right hand side, we get a set of words pertaining to the option selected. The next stage would be the help section to also include the min/max of the voltage range selected, as well as the granularity.
Highlighting a voltage option says almost nothing about the capabilities of the voltage, or how it might pertain to overclocking or stability. Users have to know the intricacies of each option on the fundamental level to understand what difference adjusting a voltage would make. This would perhaps be why extreme overclockers pour hours into studying specification sheets, or hours into trying settings.
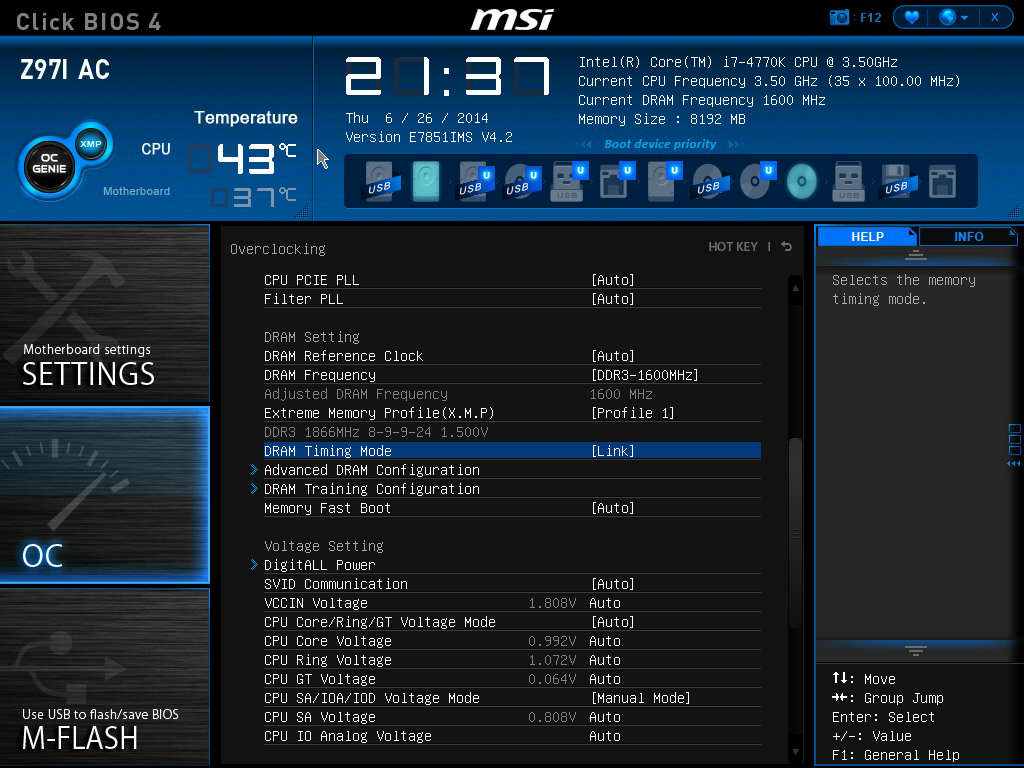
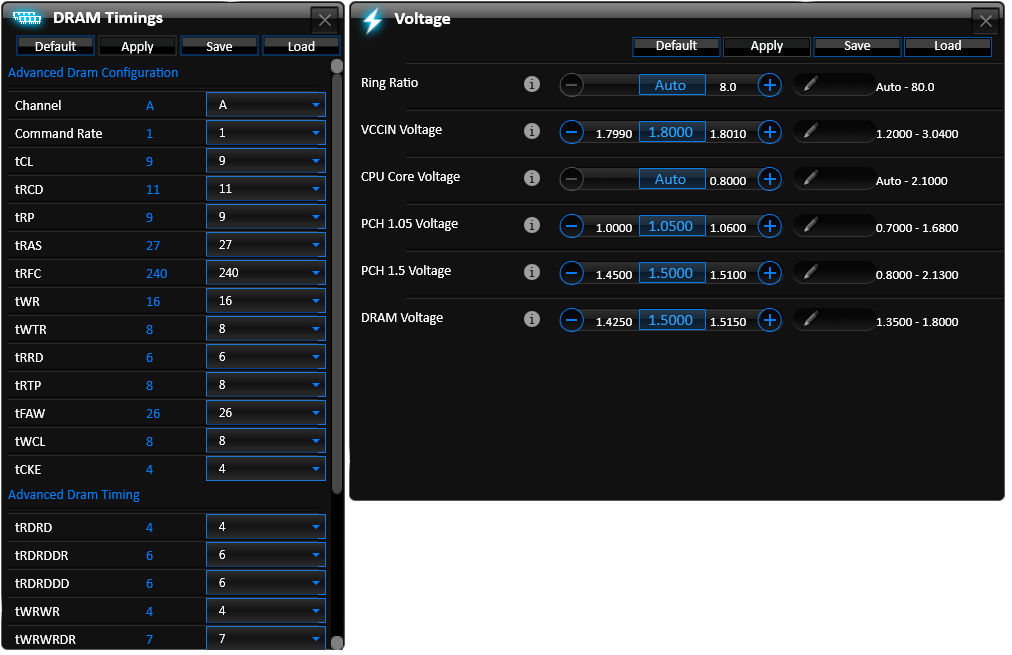
Options such as DRAM timing, DRAM Training and Digital Power have not changed from previous generations. The last option is a shame because a lot of the digital power options do not make sense:
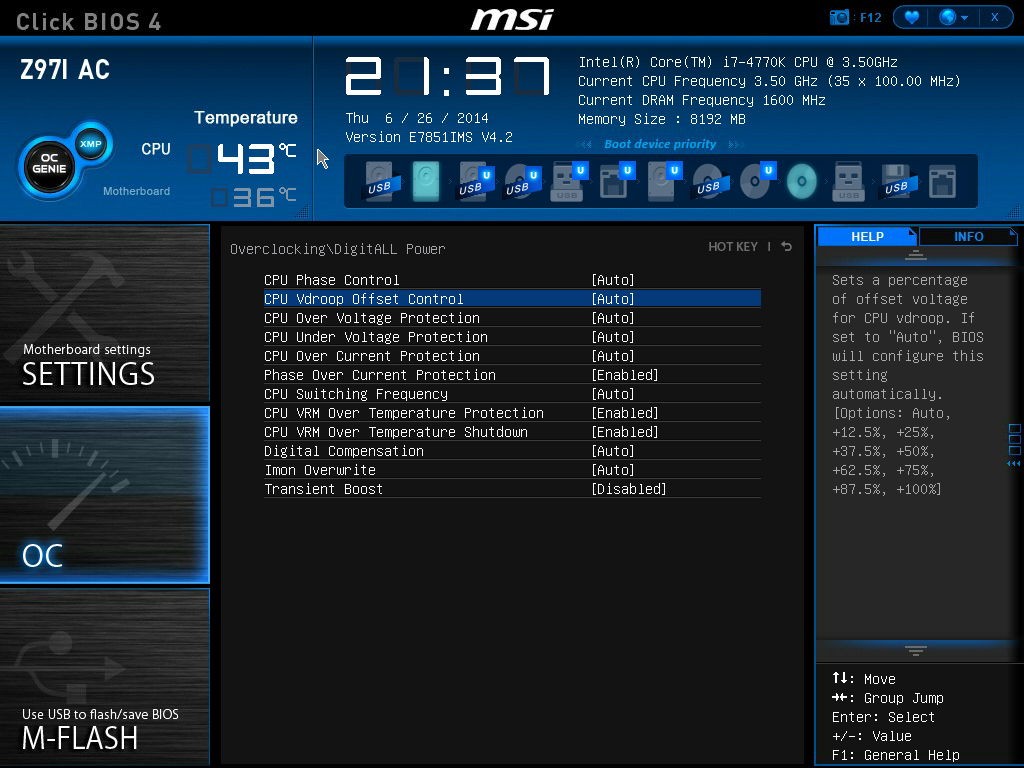
Overclockers might often user the CPU Load Line Calibration (e.g. VDroop Control) in order to maintain voltages under heavy loading. The option here in the MSI BIOS is obfuscated because the VDroop Offset is given as either ‘Auto, +0%, +12.5% to +100%’, with no indication if +0% is needed or +100% is needed. Other motherboard manufacturers have implemented a graph to show the effect of each setting, which I think MSI need to do here to get this option used and help 24/7 overclocks.
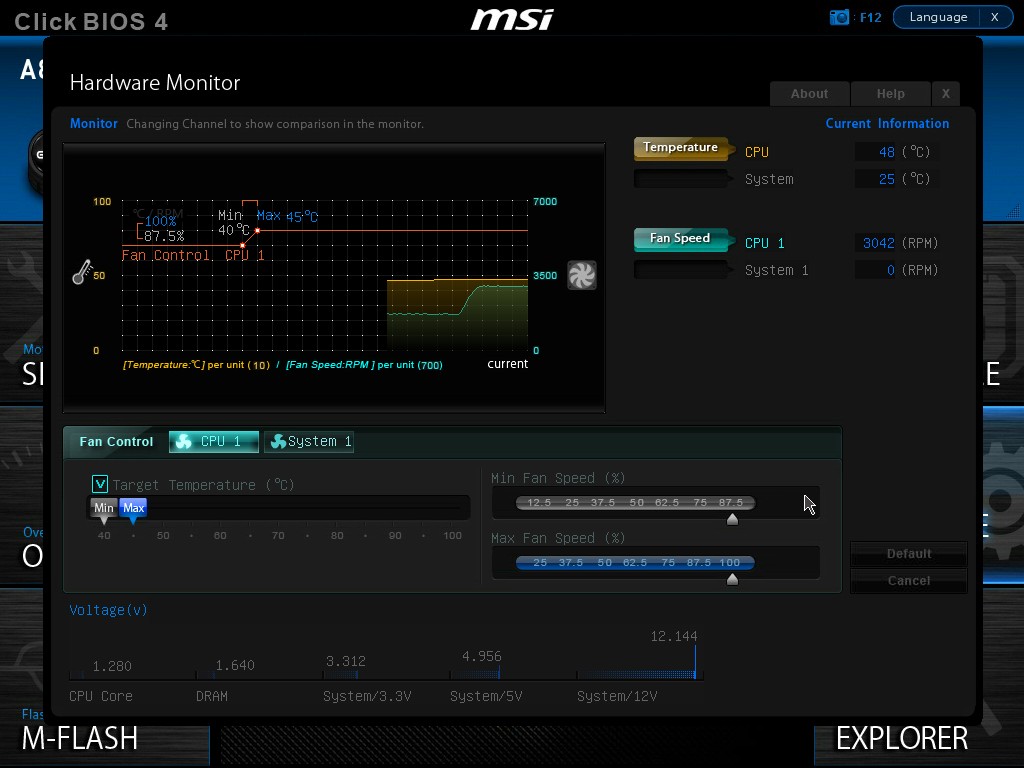
The next feature I want to get to grips with is the Hardware Monitor:
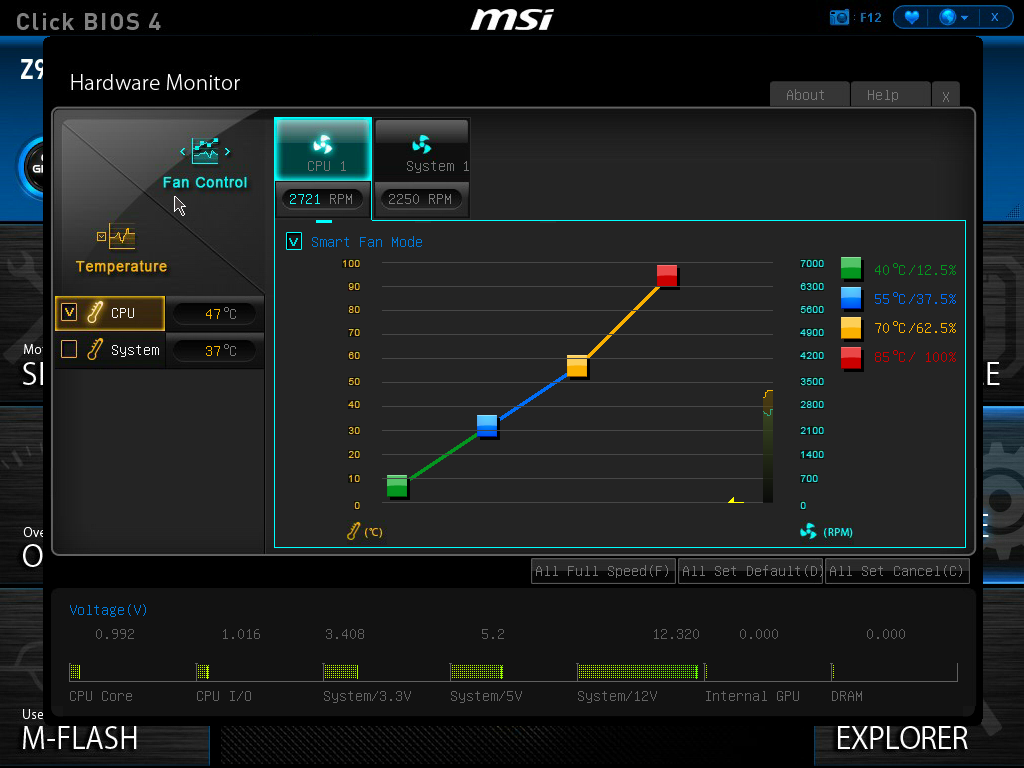
Back with Z87 MSI introduced their first version of the fan selection tool which showed a graph with two points of a gradient. Each of the gradient points was adjusted by sliders next to the graph but not on the graph. My main criticism of this, aside from only having two gradient points, was that the graph itself needs to be interactive. It was good having a graph, giving direct feedback to the user in real time, but the user needed to interact with the graph directly. The new Hardware Monitor is the result of suggestions like this.
Aside from the increase to four gradient points, each of the points is selectable directly on the graph. The color coordination helps the user to read off the values on the right hand side, and also when selecting to move the points the BIOS shows the valid selections. One could argue about having a negative gradient on a fan (MSI does not seem to allow it), but I like the implementation and style of the fan gradient selection. This is a big step up for MSI in bringing readability and user experience to the BIOS from previous generations.
One issue worth noting is that fan power is not directly proportional to fan RPM. Most fans have a dead-zone <20% power where the fan speed does not change, and above 20% power, more power is more fan speed. ASUS (in BIOS and software), GIGABYTE (in software) and ASRock (in software) are now getting this issue and are implementing the testing routines to do so. Getting them to then adjust the graph to show RPM vs. temperature rather than power vs. temperature is a little harder (it requires some interpolation mathematics which is really easy to do), but this needs to be the next stage in MSI’s fan control development for sure.
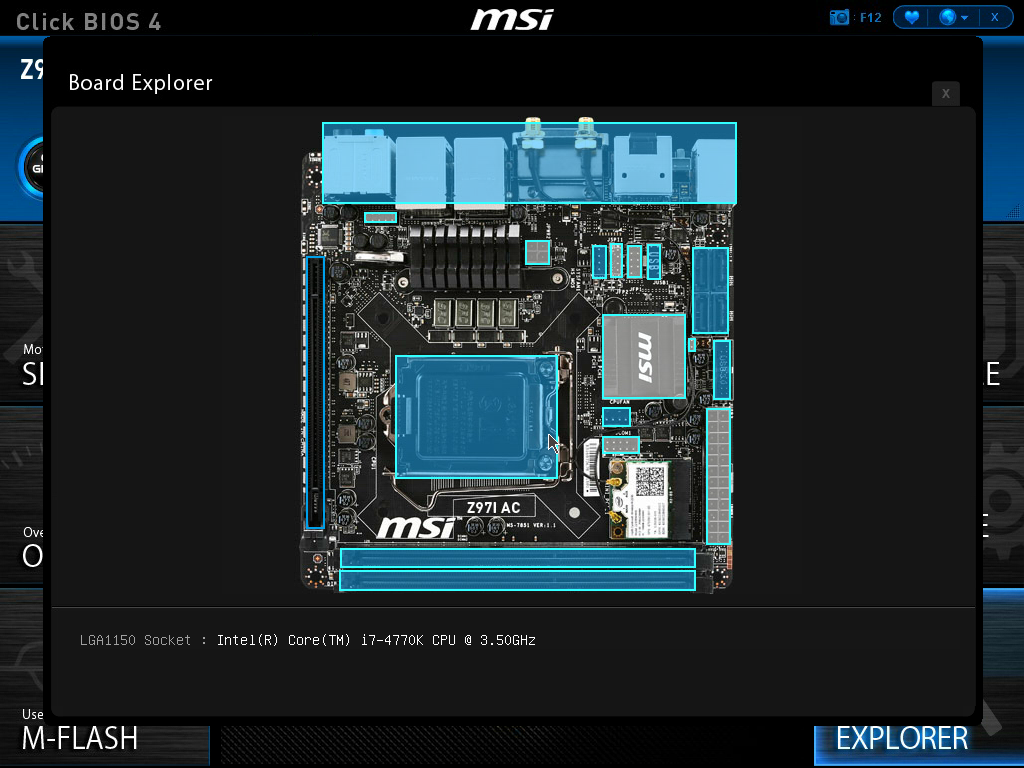
MSI still retains the Board Explorer feature, this time it expands into showing which headers are populated.
Another new feature to the BIOS is the Favorites menu. This echoes other manufacturers’ efforts in developing Favorites menus, however the MSI implementation was somewhat hidden from view, selectable only by clicking the heart symbol at the top of the BIOS. I would suggest that MSI move it to the Settings menu, which might make it used more.
The Settings Menu allows users to select which screen they want to start on when entering the BIOS:
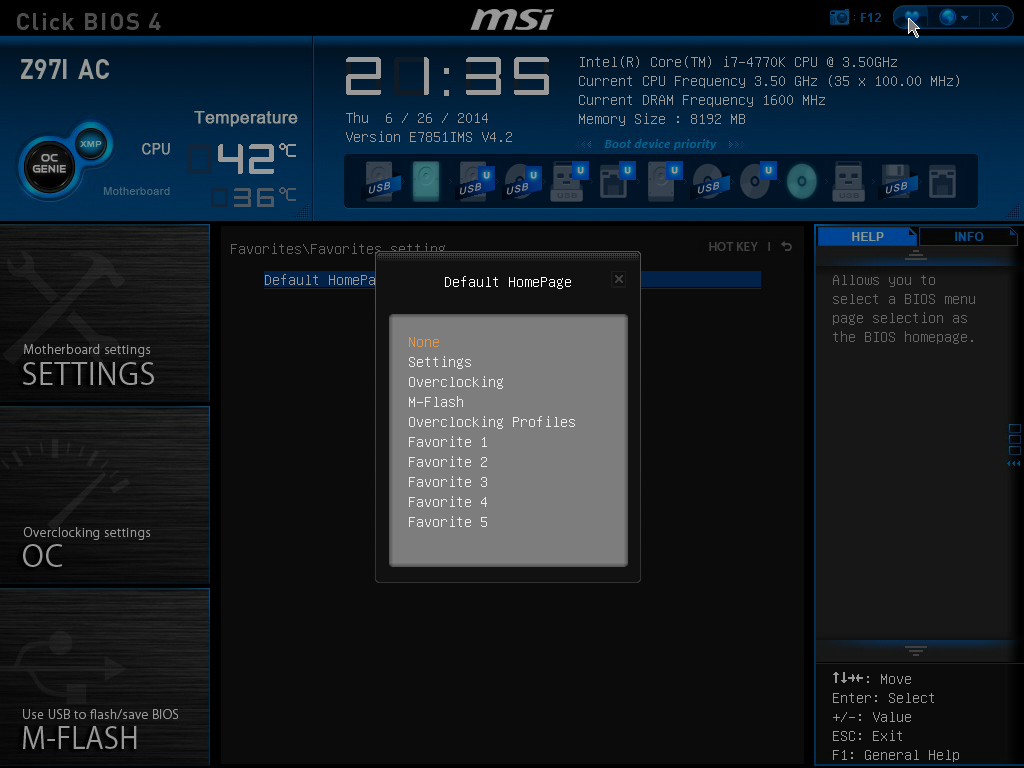
It might actually be worth MSI using their in house overclockers to create their own Favorite menus, and letting them be selectable from the selection of other menus. Although with the fact that MSI has now ordered the overclocking menu such that the options have some form of order, we might not see the Favorites menu being used that often because the BIOS is now easier to follow.
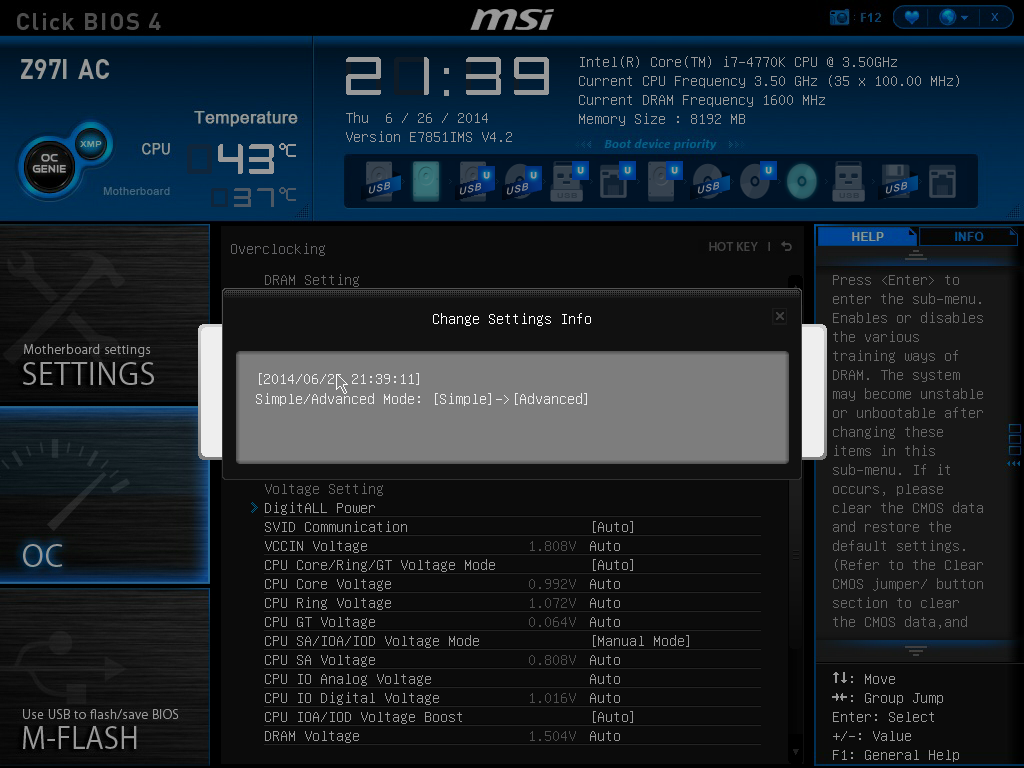
The final new feature in MSI’s BIOS is one that we find in other BIOSes – the Change Settings info (known as Last Modified with ASUS). This lets the users know what has changed since the last BIOS, although in order to select this menu the user has to select Save and Quit then navigate to ‘Change Settings Info’. It might seem like a direct copy of ASUS, but having this data listed as soon as I hit ‘Save and Exit’ really is the best idea.


MSI Z97I AC Software
In previous generations, MSI’s software has centered on many different central software themes, the most noticeable being MSI Suite that formed a list of icons at the top of the screen for each element of the software package. Unlike other motherboard manufacturers, each of those software elements was also a separate icon on the desktop, rather than under a central unified interface. With Z97, as with the Z97 MPower Max, while each element is still individual, we lose MSI Suite, Click BIOS and Control Center, and Command Center is firmly the lynchpin in MSI’s software implementation.
Most of the individual software elements for Z97 remain unchanged from Z87; however the installation procedure is different. The driver CD uses a new interface to allow users to select what they want to install:
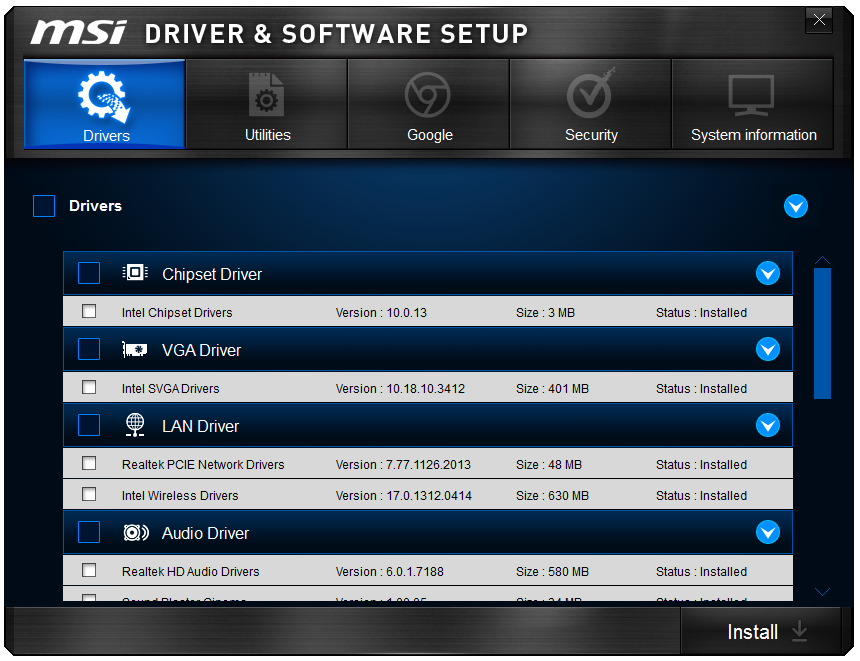
I noticed that if GPU drivers are not installed, the software will automatically adjust the screen resolution (if it can) to make sure the installer will fit on the screen. Other manufacturers do not do this. One of the downsides of the installer is that Norton Antivirus is automatically selected for install, and it also reappears in Live Update discussed below.
As mentioned, the main element of software is the Command Center, which due to the motherboard being in the ‘standard’ channel line is black and blue.
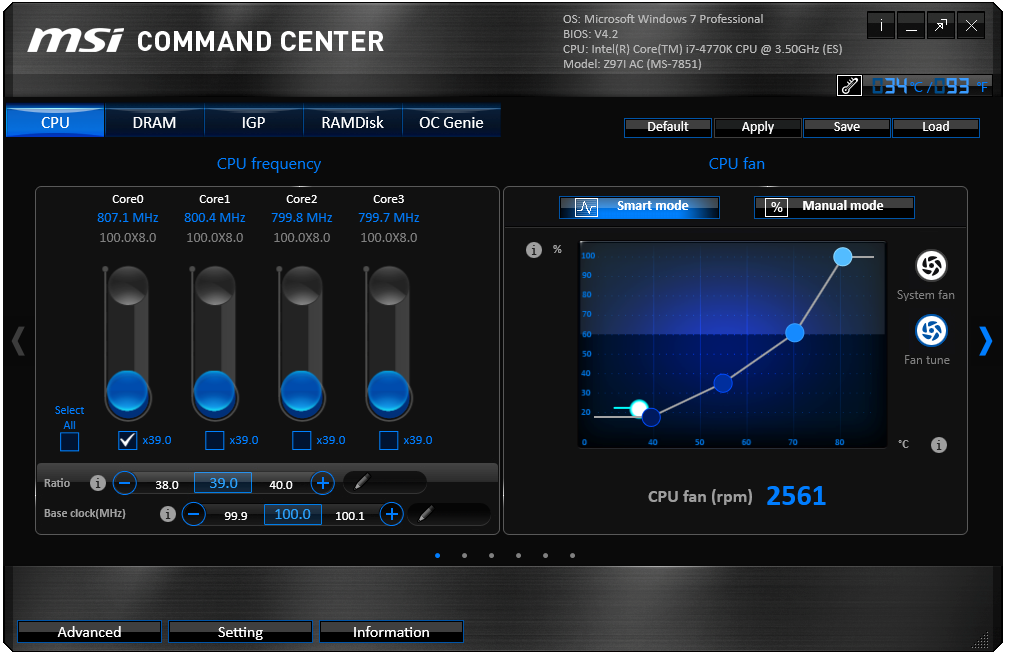
Here is a basic interface for overclocking frequencies of the CPU and the fan controls, with options to adjust each of the fan gradient points as well as the system fans. The Fan Tune option adjusts the fan gradient points to MSI’s suggested points, however the interface is lacking a set of presets (Silent, Default, Turbo, Full Speed) so users can one click adjust all their fans in one go.
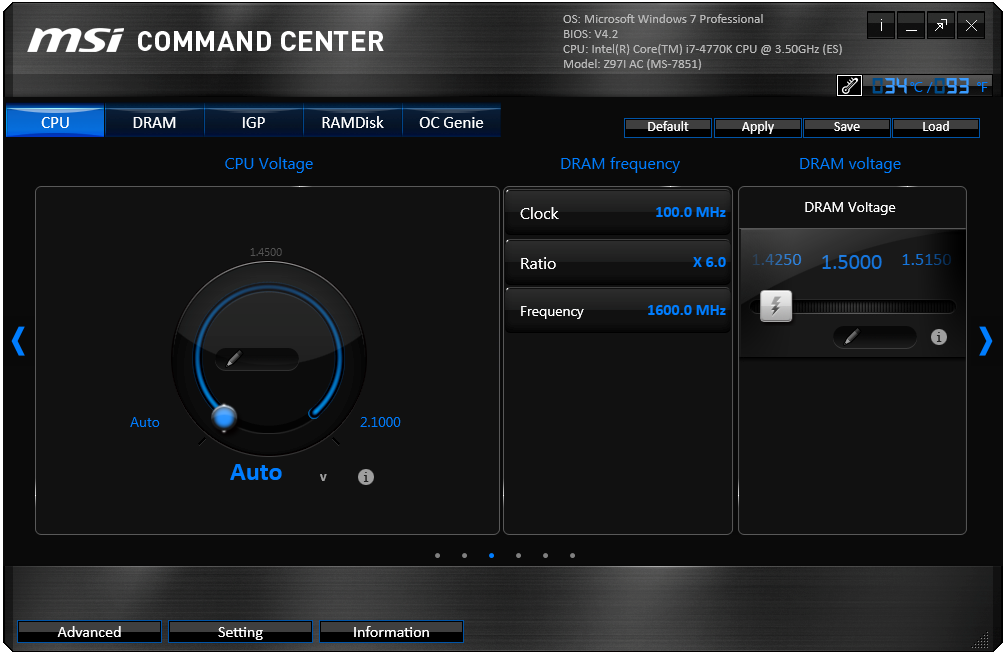
For voltage tuning, the ugly issue with Command Center raises its head again. Here is a CPU voltage adjustment option that goes from Auto to 2.1 volts, making it all too easy to select 2.1 volts! The option stares at you in the face, suggesting it is OK to put that much voltage in a CPU. I have mentioned this to MSI before – this is not on. Extreme overclockers do not need 2.1 volts, let alone regular users, and as such MSI should limit this voltage to 1.40 volts maximum. The only way MSI would open up more extreme voltage selection is if the ExtremeOC option is selected in the BIOS. That is all. Having such a large voltage on display here is a bit crazy.
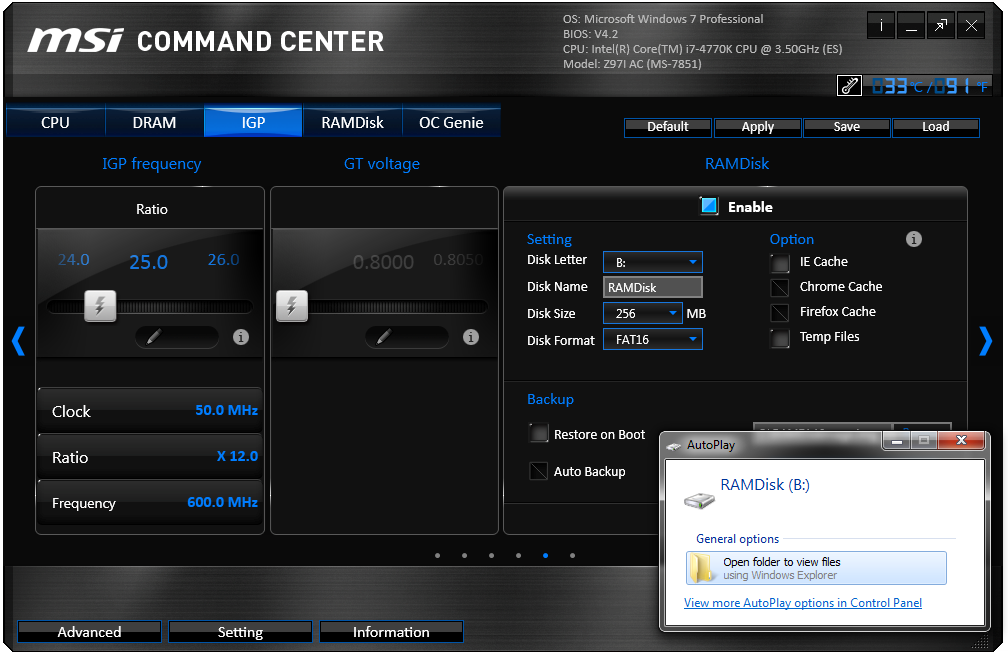
MSI also has a RAMDisk as part of their software, which on our 8GB DRAM installation offered up to 6GB in size. Unfortunately you have to enable the RAMDisk before selecting the size of it (and thus requiring a double allocation), but MSI does offer some quick options (such as temp files) for implementation as well as restoration options.
MSI does offer basic text options to avoid the graphics:
The Mobile Control tool is somewhat hidden away as part of Control Center, the idea being that with an iOS/Android app, the overclocking and monitoring can be performed via a smartphone or tablet.
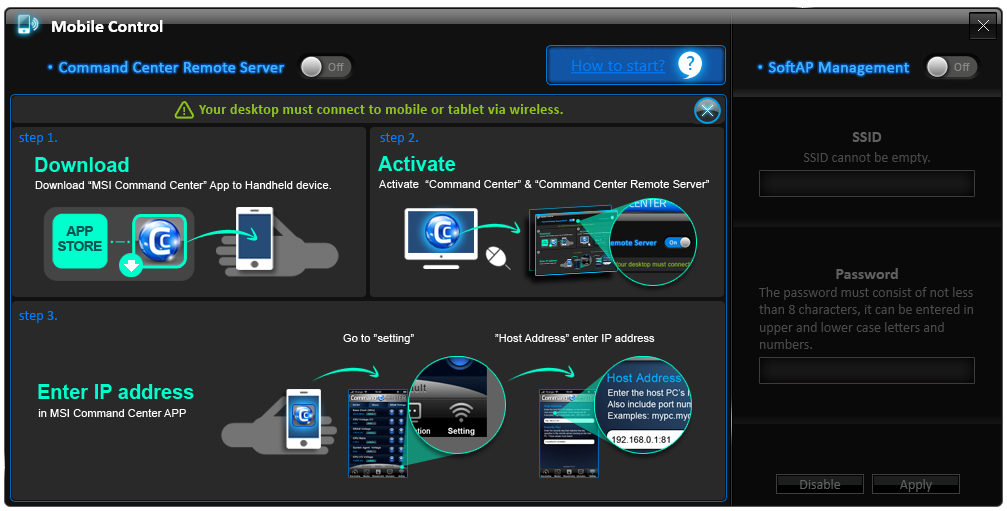
If MSI want overclockers to use this, I would suggest offering it as a standalone application rather than part of the Control Center package, that way users would not have to install bulky software that might affect the efficiency of their operating system installation.
Fast Boot
Now that Windows 8 gives options to boot into the operating system without a chance to enter the BIOS, manufacturers have developed their methods to allow BIOS entry on reboot. Fast Boot encompasses that option, along with Fast Boot options to help the overall boot time of the system to be quicker.
Live Update 6
One of MSI’s best tools in their software package, for a couple of years, has been the Live Update tool. MSI was the first motherboard manufacturer to make and deploy an auto-update tool that worked and was easy to use. Now that the other manufacturers have these tools as well, MSI do not have that unique advantage, however they seem to be taking some suggestions on board.
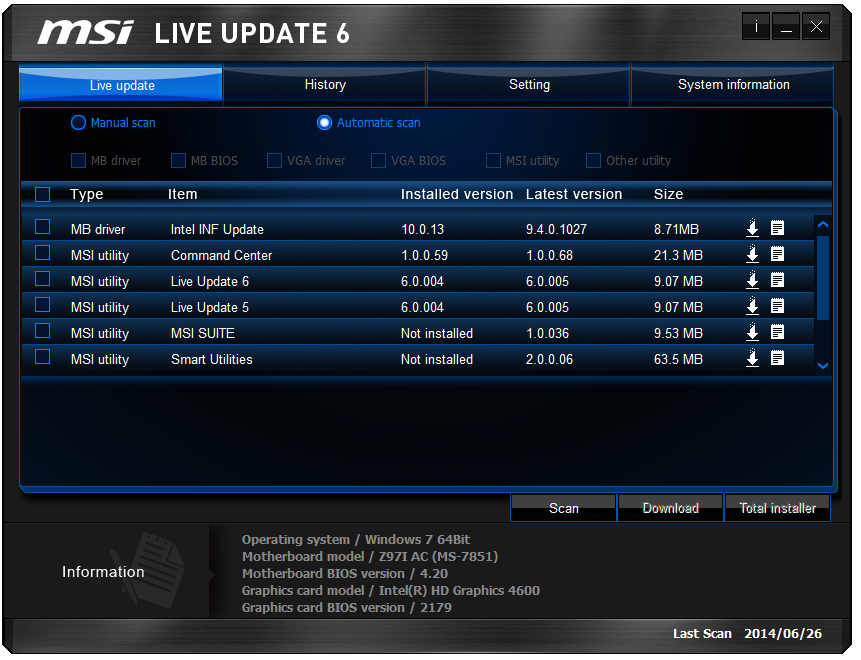
Users of MSI motherboards might notice that for this new Live Update 6 we can actually see some of the motherboard information, but also the size of downloads. One of my critical points of LU5 was the inability to see how big the audio drivers were before downloading in the event of a restricted bandwidth connection. MSI has now solved this issue.
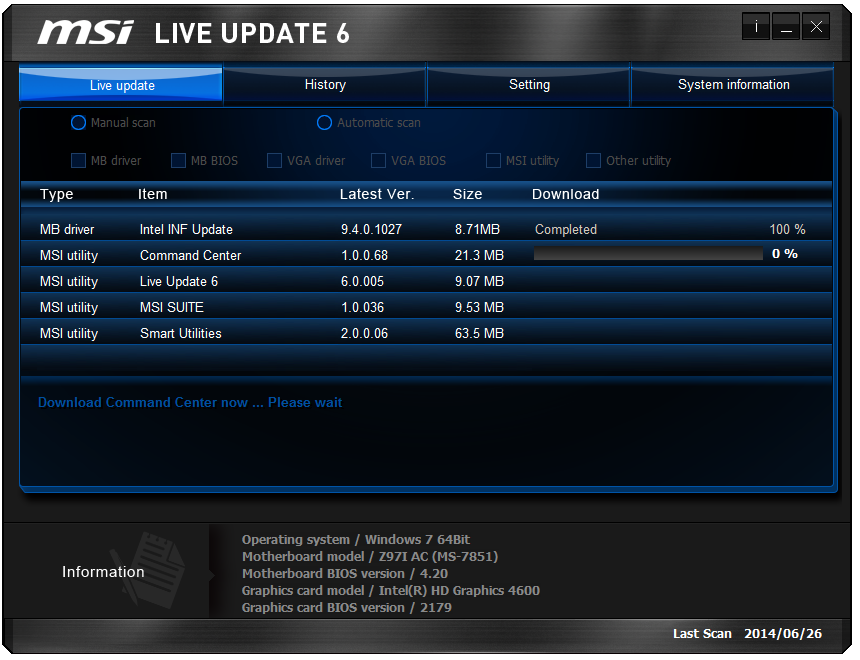
While downloading, the system will also indicate a level of completion while still retaining all the size and version information.
There is still one more issue to solve. Let me turn off Norton Antivirus as a suggested update. Please.


MSI Z97I AC Board Features
| MSI Z97I AC | |
| Price | US (Newegg) |
| Size | Mini-ITX |
| CPU Interface | LGA-1150 |
| Chipset | Intel Z97 |
| Memory Slots |
Two DDR3 DIMM slots supporting up to 16 GB Up to Dual Channel, 1333-3000 MHz |
| Video Outputs |
DVI-I (1920x1200 at 60 Hz) HDMI (4096x2160 at 24 Hz / 2560x1600 at 60 Hz) DisplayPort (4096x2160 atr 24Hz / 3840x2160 at 60 Hz) |
| Onboard LAN |
2 x Realtelk 8111G Intel AC7260 802.11ac |
| Onboard Audio | Realtek ALC892 |
| Expansion Slots |
1 x PCIe 3.0 x16 1 x mini-PCIe for WiFi |
| Onboard SATA/RAID | 4 x SATA 6 Gbps (Chipset), RAID 0.1.5.10 |
| USB 3.0 | 6 x USB 3.0 (Chipset) [4 back panel, 1 header] |
| Onboard |
4 x SATA 6 Gbps 1 x USB 3.0 Header 1 x USB 2.0 Header 2 x Fan Headers 1 x Clear_CMOS Jumper 1 x COM Header 1 x Front Panel Audio Header 1 x Front Panel Header |
| Power Connectors |
1 x 24-pin ATX 1 x 4-pin CPU |
| Fan Headers |
1 x CPU (4-pin) 1 x SYS (4-pin) |
| IO Panel |
1 x PS/2 Combination Port 1 x ClearCMOS Button 1 x Go2BIOS Button 2 x USB 2.0 Ports 4 x USB 3.0 Ports 2 x Network Ports (Realtek) DVI-I HDMI DisplayPort Audio Jacks (Realtek) |
| Warranty Period | 3 Years |
| Product Page | Link |
MSI uses a four-layer PCB, which limits routing of some features and limits the 4-pin CPU power connector to that awful position in the center left of the motherboard. On the upside, there are two NICs and a WiFi module for network connectivity, but the ASRock beats the MSI in terms of NIC quality, and the ALC892 of the MSI is also bettered. SATA ports are limited to four, whereas other motherboards have six. It makes me wonder how much margin MSI has on this motherboard compared to the other two.


38 Comments
View All Comments
Gigaplex - Thursday, July 24, 2014 - link
What standard? There are plenty of types of TV broadcast standards.Erukian - Wednesday, July 23, 2014 - link
What do you guys think of the GA-Z97N Gaming 5? It can be found for $133 after rebate currently and seems to have the higher end audio codec that the ASRock uses in addition to swapping out the intel NIC for the Atheros Killer NIC (better?). Other than that the excellent PCB layout looks very similar to the reviewed Z97N-WIFI but with some changes to the IO port and 8-pin CPU power.I'm currently in the market, which is why I'm asking. :)
The_Assimilator - Saturday, July 26, 2014 - link
Intel NIC is best in the business, the "Killer" NIC is yet another marketing gimmick. The Z97N Gaming 5 also loses a SATA port to eSATA. On the flipside, it has decent heatsinks for the power delivery subsystem, which is important for overclocking.austinsguitar - Wednesday, July 23, 2014 - link
see i love these kinds of articles because these are very important products! it's interesting to see how things stack up because this is the biggest market right now. keep up these kinds of articles anand. things have been a little funky here recently....Kmknapp - Wednesday, July 23, 2014 - link
Just built a mini-itx system and love it. Went with the Gigabyte Z97N Gaming 5 board for the audio (Realtek 1150), NIC, and deal at the time. So there are other options in this range incorporating the "improved" audio if you're not into the ASRock.2 comments/questions:
1. On the ASRock board, you mention HDMI passthrough, does this mean you can pass 5.1 or 7.1 audio through HDMI? You apparently can't do this on the Gigabyte board with same controller, and it's frustrating.
2. Open-bed overclocking strikes me as questionable in a review for this form factor due to the tendency to put these into similarly smaller cases where heat can be a real issue. My build was made specifically for gaming and HTPC in my living room, and as such, goes into an enclosed entertainment center as well.
System:
Fractal Design Node 304
Intel i5-4690k (OC to 4.1ghz, ring sync) 4.2+ is OK temp wise, but unstable in stress testing.even at 1.25V
8gb DDR3
Gigabyte GA-Z97N Gaming 5
Corsair H80i w/Cougar Turbo Hyperspiong Silent fans - H80i defaults are LOUD. these make the system all but silent, even under load.
AMD R280 3GB, Sapphire Dual-X
Corsair CX600 600W Power Supply
goinginstyle - Wednesday, July 23, 2014 - link
Can you review the ROG Impact VII please? Just returned the Z97N after a bad OC experience.Bobs_Your_Uncle - Wednesday, July 23, 2014 - link
Great article & I really appreciate the multi-board comparisons as written up here. And of course, Ian, your work is always top shelf!I'm wondering if you're (AT) planning like coverage in the M-ATX form factor, as this is the beast that really intrigues me. M-ATX offers significantly more flexibility & possibilities than the M-ITX platform while maintaining a relatively small footprint.
The M-ITX form factor seems to have a notably larger range of product offerings than M-ATX does (& subsequently more coverage in tech media) & I frankly don't understand the pronounced balance in favor of M-ITX.
homerdog - Thursday, July 24, 2014 - link
I would like to point out that the ASRock board supports DTS Connect for true 5.1 audio in games over the optical output. ASRock is very good about including this feature on their boards. Most mobo manufacturers don't even bother to list this feature even on their few models that support it.surft - Friday, July 25, 2014 - link
Hmm, great revue but I hope this comparison gets updated to include Asus' Z97I-PLUS as well.Madpacket - Friday, July 25, 2014 - link
Looks like AsRock wins this round.