Z97 Mini-ITX Review at $140: ASRock, MSI and GIGABYTE
by Ian Cutress on July 23, 2014 3:00 AM ESTGIGABYTE Z97N-WIFI BIOS
Because of the distinct similarities between the BIOS of the Z97N-WIFI and the UD5H we previously reviewed, the BIOS and software overviews are to be almost identical. Rather than refer back to the UD5H, this has been updated with options specific to this motherboard.
For Z97, the graphical BIOS ecosystem (either UEFI or EFI) has the opportunity for incremental updates. This might be fully fledged adjustments graphically, the addition of new features or the results of the engineers internally flexing some talent. For GIGABYTE, the Z97 BIOS in general uses the same topology from Z87 – a high definition mode on top of the classic mode from Z77. The main difference is the use of a ‘Startup Guide’ akin to an easy mode when you first enter the BIOS:
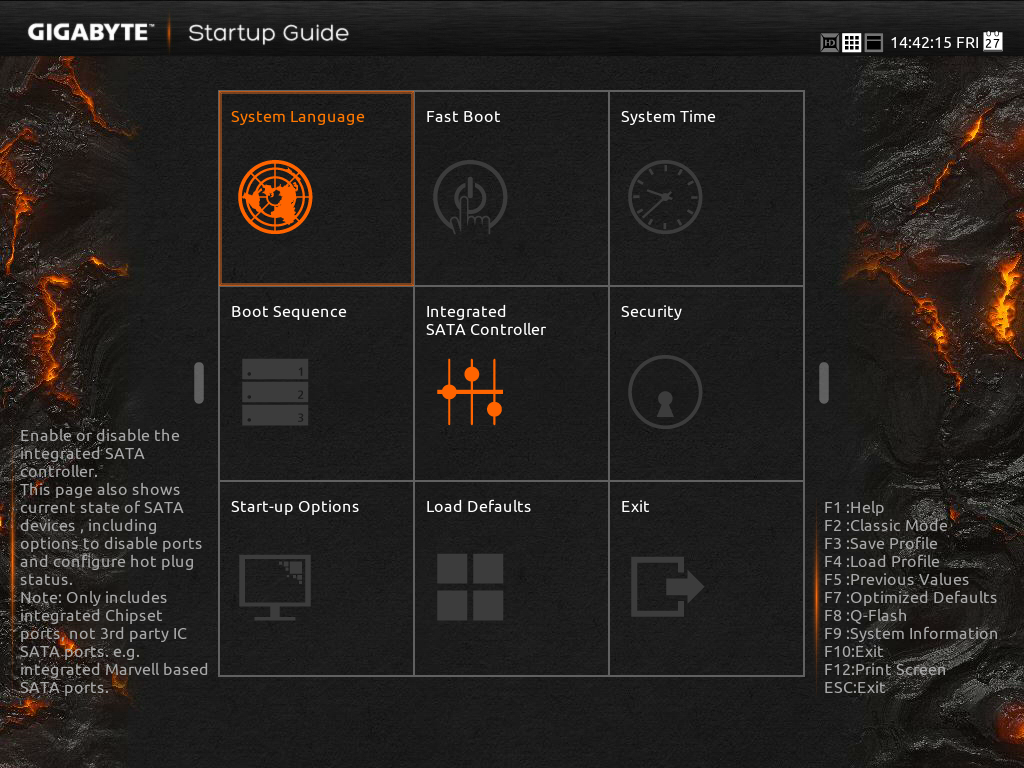
The options in the startup guide include Fast Boot options, Boot Sequence adjustment, SATA adjustment, security, start-up options (which mode to start in) and basic time adjustment. Unfortunately I have to become highly critical to this easy mode: if I had no idea what system I was dealing with and I moved into this BIOS, the only thing I now know about the system is that it is a GIGABYTE system. There is nothing on the front page about the CPU, the Motherboard, the speed settings, the temperatures or the BIOS revision. It is only because I have used GIGABYTE BIOSes before that I understand that pressing F2 will adjust to one of the other modes that will tell me this information. This menu uses a discordant amount of blank space for not very detailed icons and is not particularly that helpful as a startup guide beyond boot sequencing.
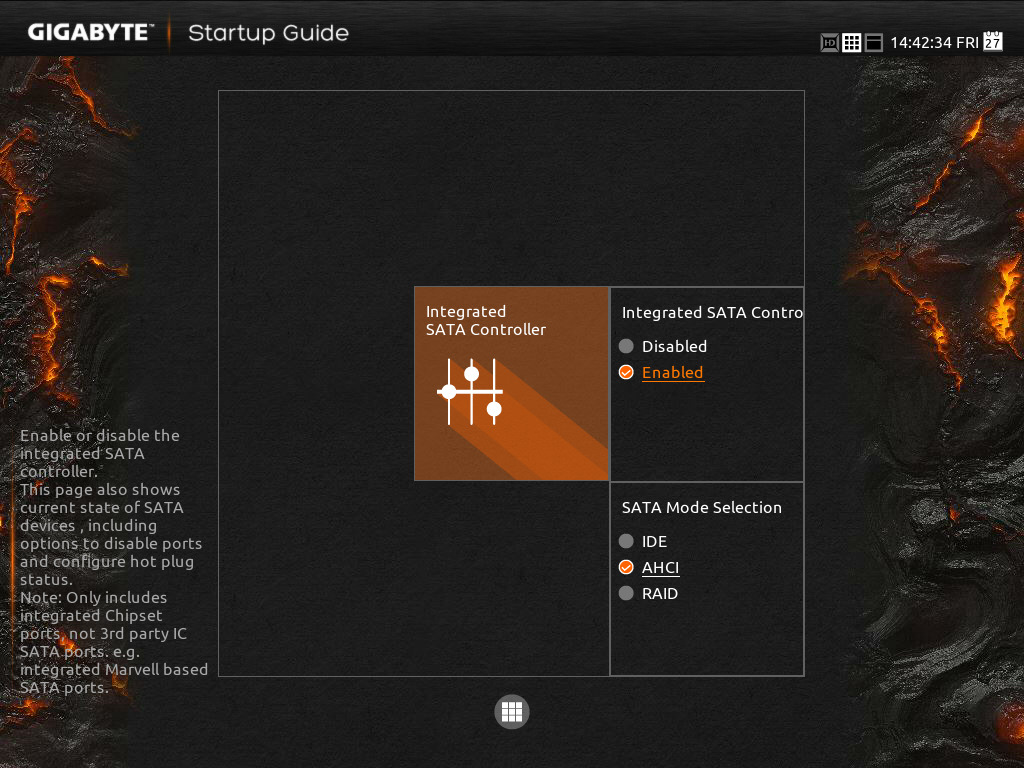
When a user clicks one of the icons the other options fade away and others take its place relating to the option chosen. Here the Integrated SATA Controller offers two options, enabling and the other is SATA Mode selection. Aside from the image above having text clipped, the information on the help description on the left does not correlate with the options on the right. This menu, similar to others is slightly unreadable due to the grey text on grey/black background. The use of the fancy background image is having a direct effect on user experience.
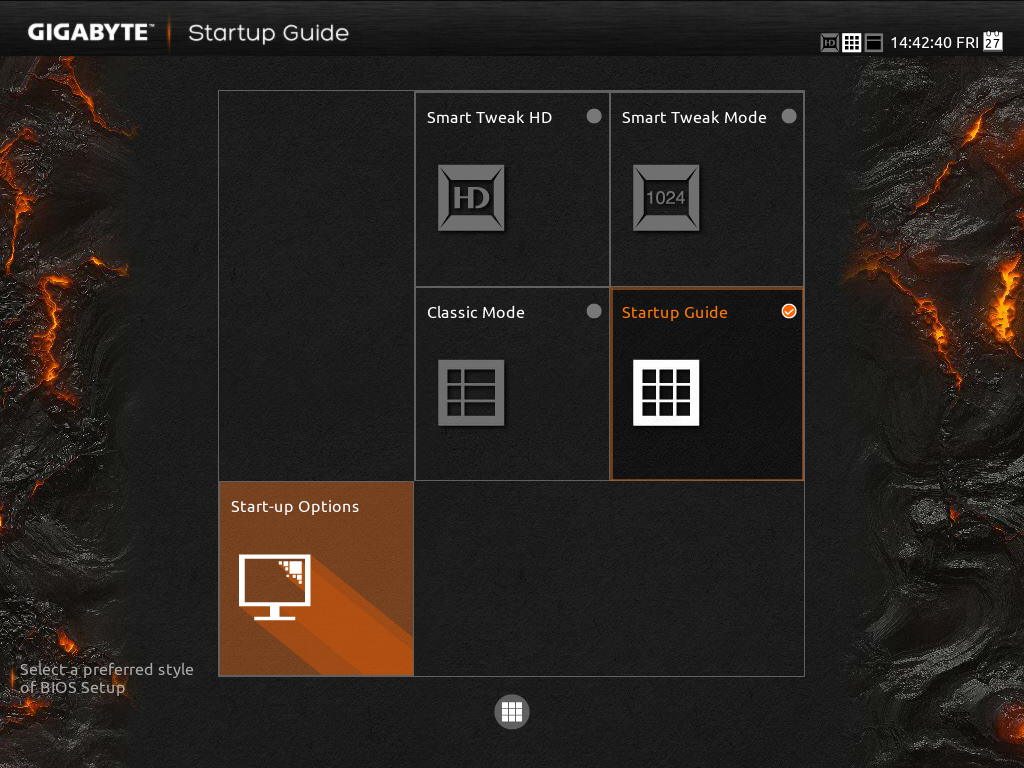
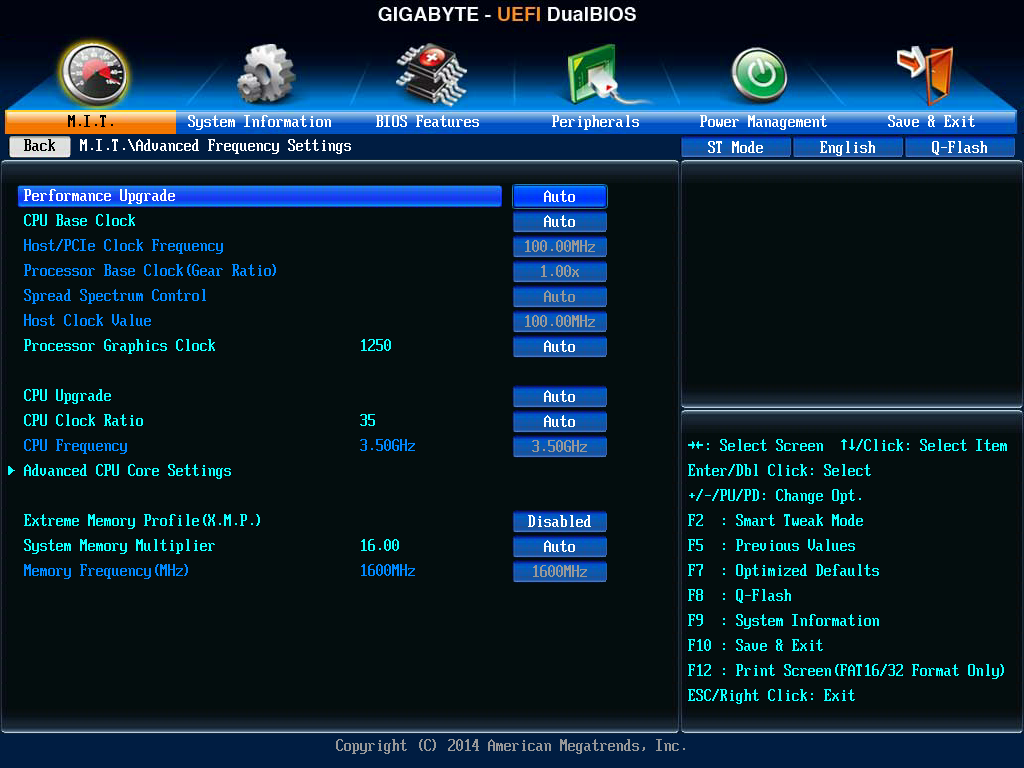
The Start-up Options tab gives the four modes which a user can set for future booting: the Startup Guide, Smart Tweak Mode/HD and Classic Mode. Note that when a BIOS is flashed to a later version, this option has to be reset. Unfortunately there is nothing GIGABYTE can do about this. However, the Smart Tweak and Classic modes are those that we saw on Z87, the first being a full 1920x1080 HD platform that shows all the information we need:
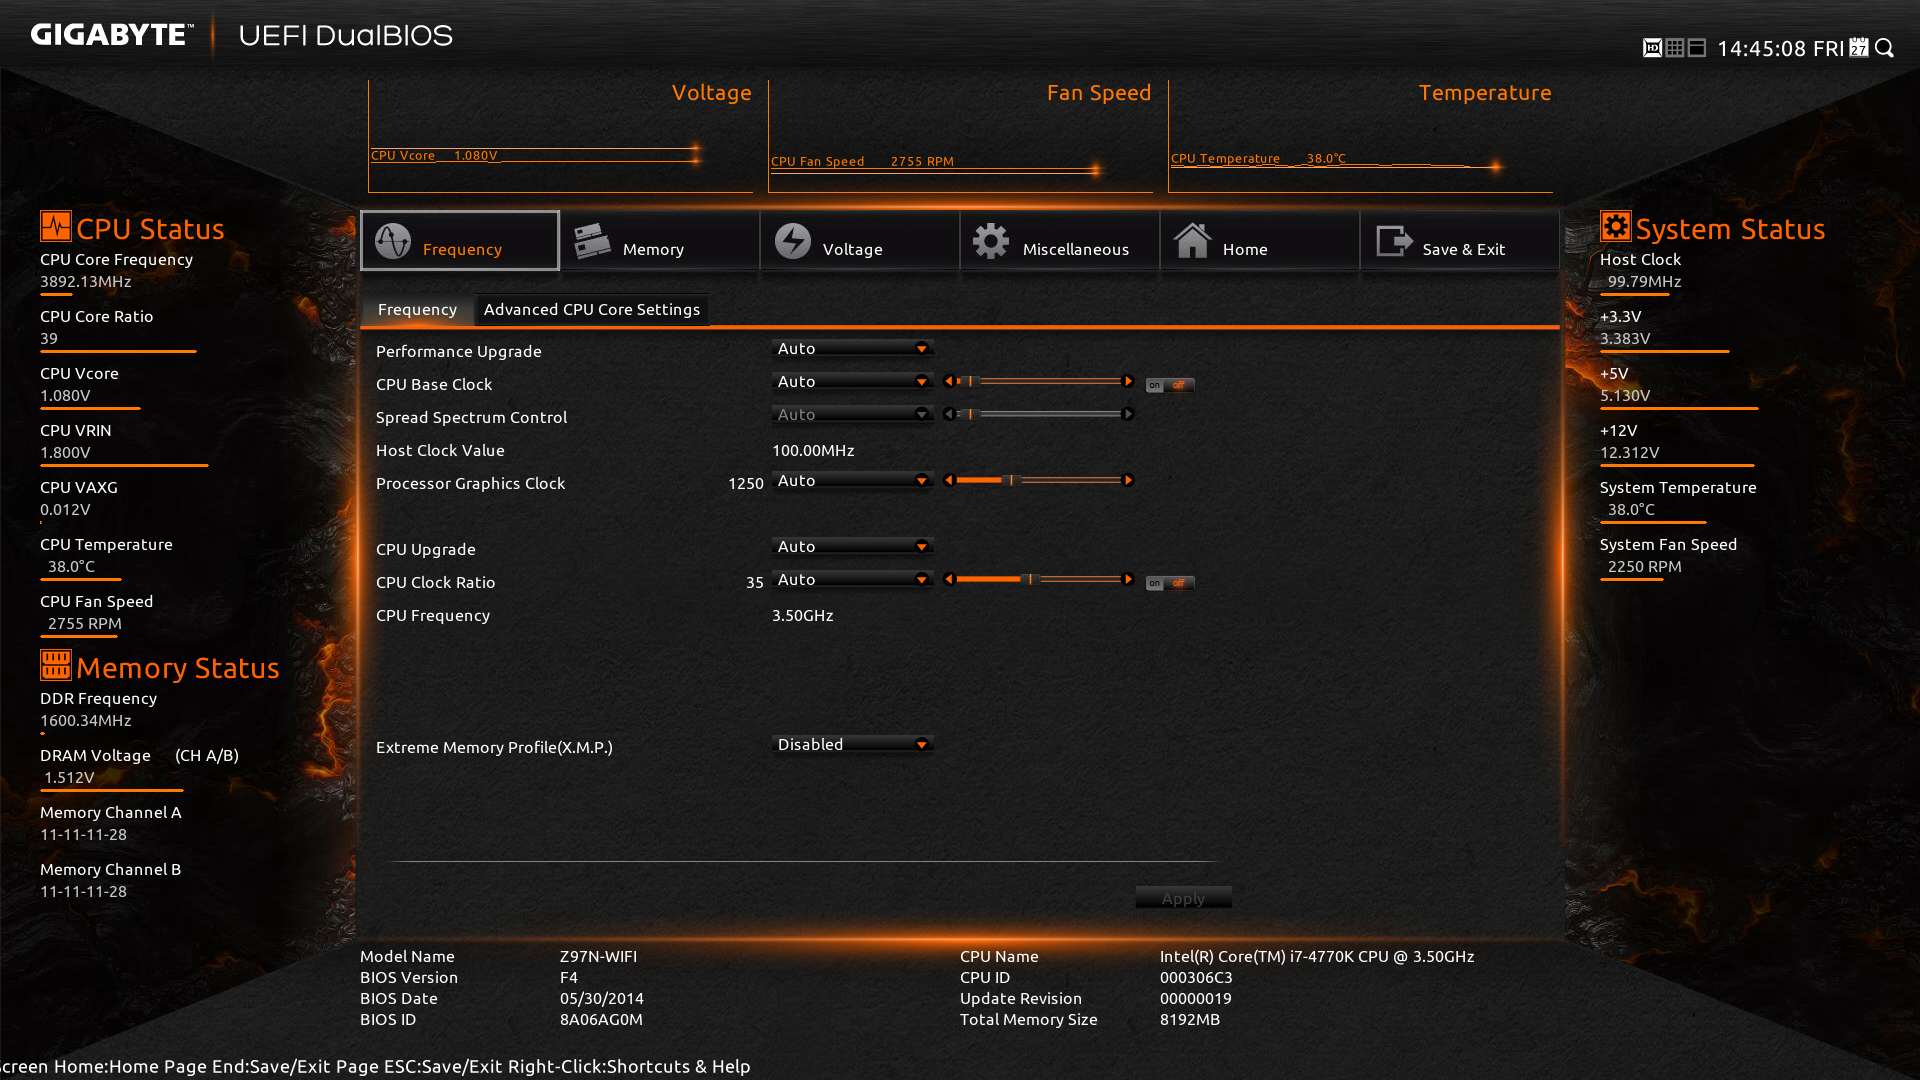
The information at the bottom and around the sides is just what we need in a BIOS – model names, frequencies, CPU installed, memory installed, memory speeds, temperatures, voltages, fan speeds, the whole lot. While I still have a mild dislike of the color scheme (I find it hard to focus on relevant data when quick glancing), the menus themselves are slightly rearranged better than on Z87.
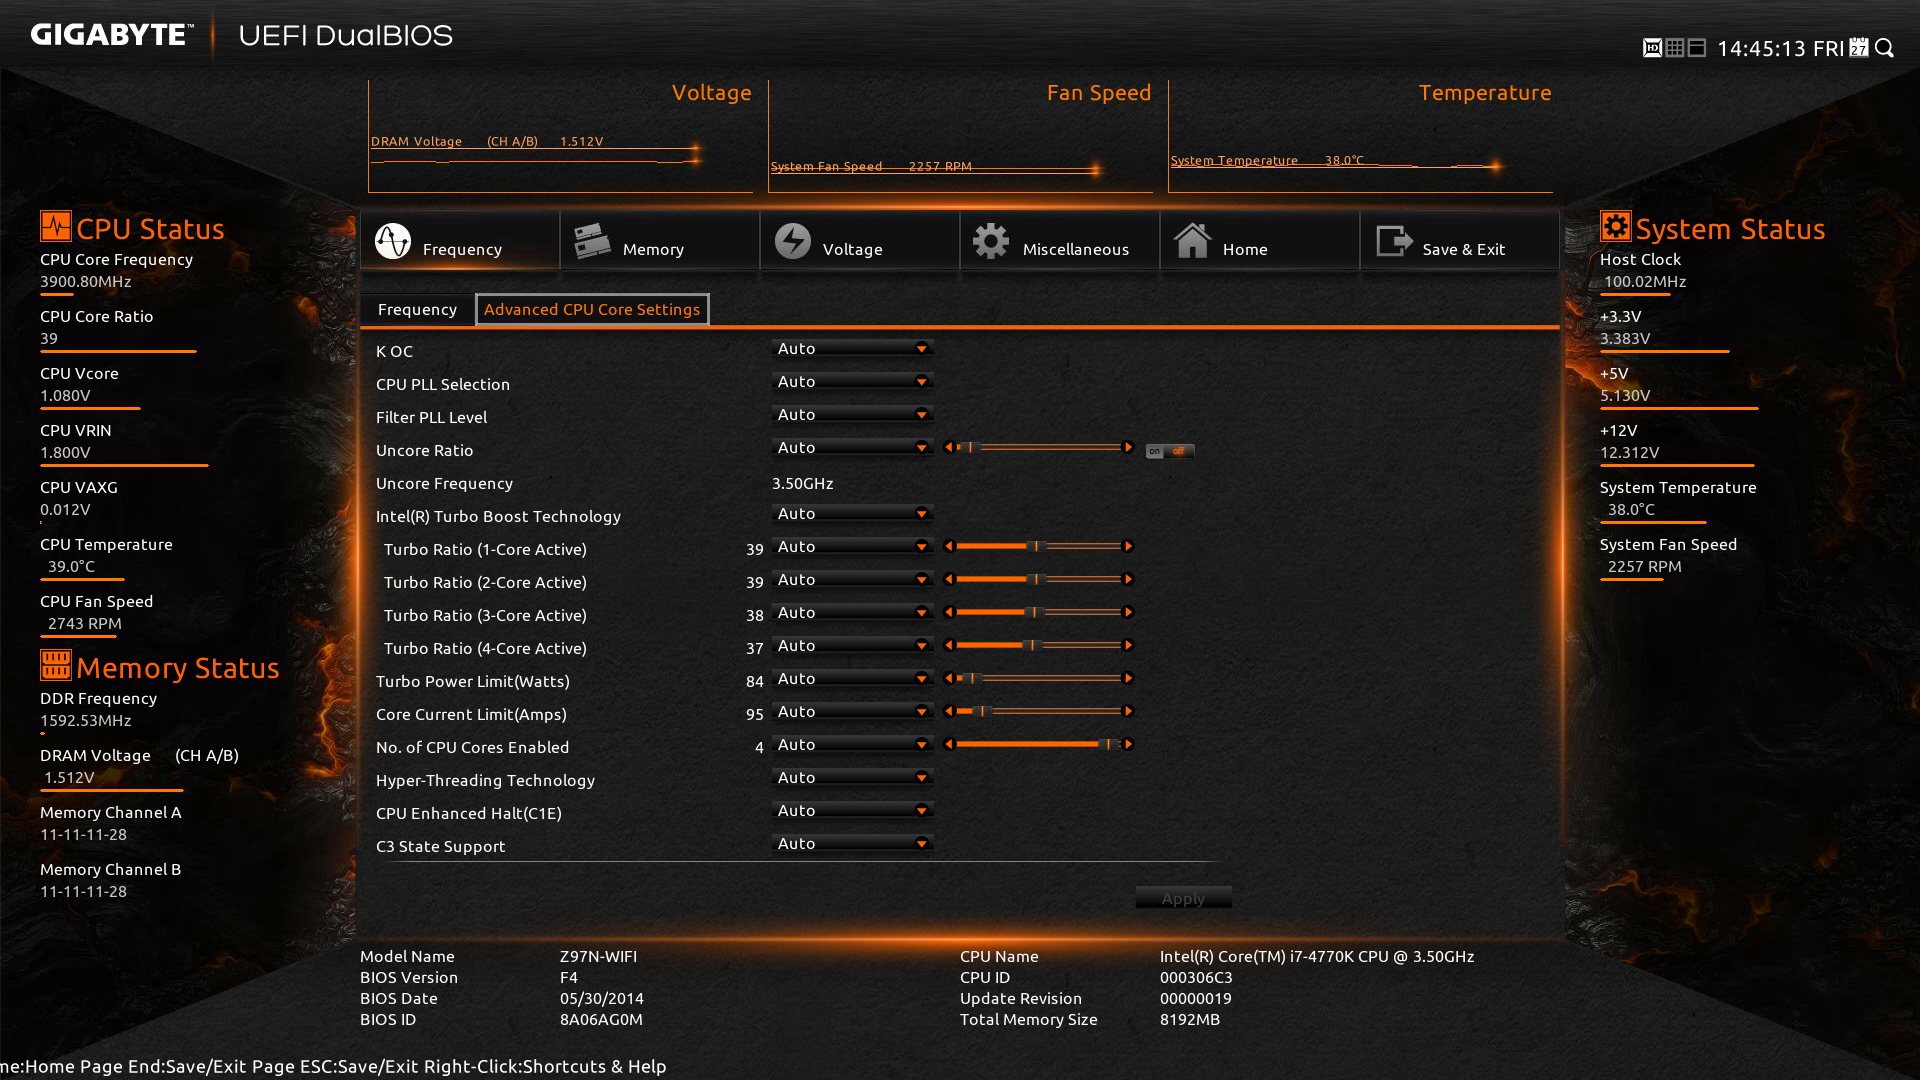
Shown above we have the Frequency Tab, which splits into the frequencies for overclocking and the Advanced CPU Core Settings. In this menu users can apply frequency overclocks on the CPU, the IGP and enable XMP. The Advanced CPU Core Settings menu opens up the options into more detail including turbo rations, power limits and C-states:
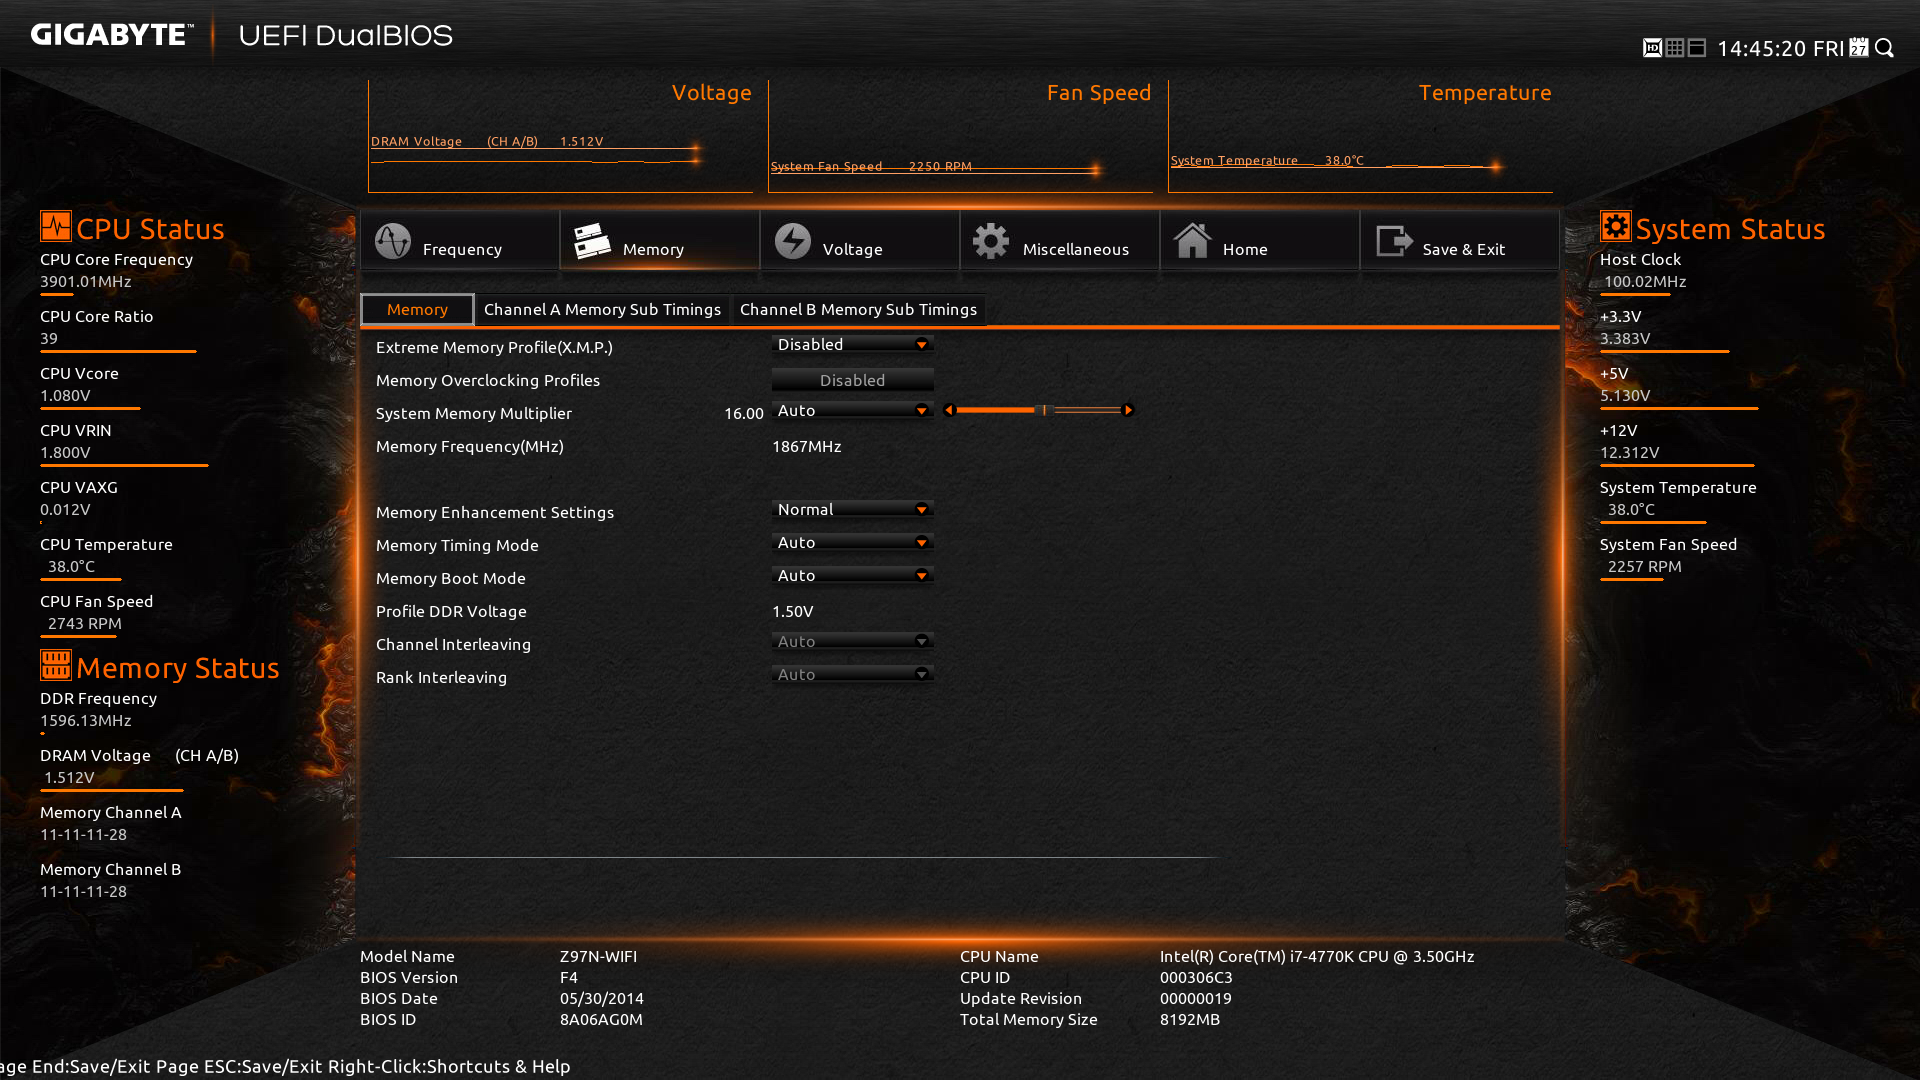
Similarly moving to the Memory main tab gives the advanced memory options, with a further tab for sub-timings and memory overclocking profiles, should a user have one of the super-unique kits that extreme overclockers like to play with:
The third tab relates to the advanced voltage options. Users of the Classic Mode in previous GIGABYTE BIOSes will notice that these three main tabs in Smart Mode mimic the main OC options from Classic Mode. This is an important level of integration, allowing users that are more accustomed to the older design to get up to speed on the new design because the two are laid out the same.
The voltage tabs are split into CPU core voltages (VCore, VRIN, RING voltage, VCCSA), Chipset voltages and DRAM voltages. Unlike the other GIGABYTE Z97 motherboards we have tested, there are no power settings options, such as load line calibrations and thermal protections.
The Miscellaneous tab offers a couple of the more obscure settings as well as PC Health, including the fan controls. For another generation GIGABYTE is giving BIOS fan controls as a function of PWM value/ºC. This is an unexplained metric in the BIOS (making it harder to understand from a user experience perspective), but I will try here.
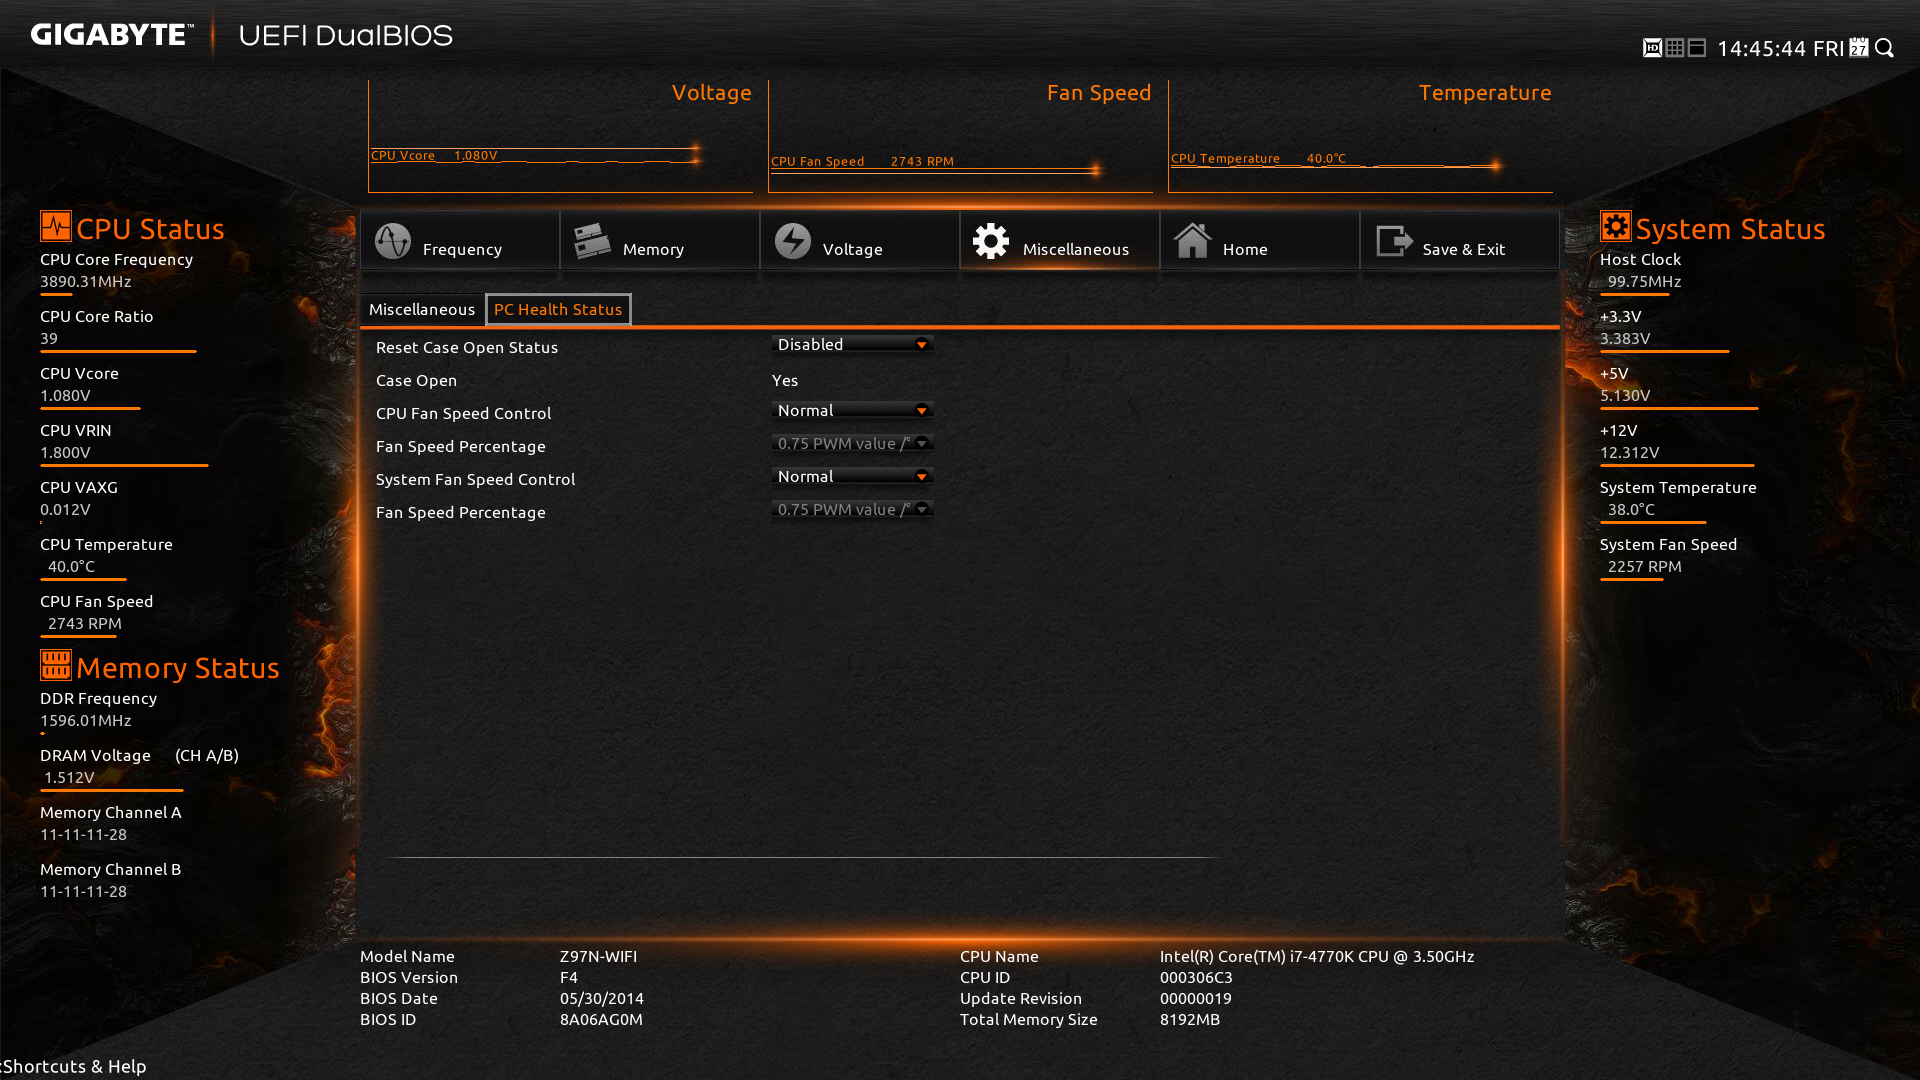
Each fan header on the motherboard can apply a power from 0 to 255 to a fan. The fan will speed up according to the power profile of the fan (e.g. nothing until 10% power, then linear increase – this is determined by the fan design, not the motherboard). The fan power is not a direct linear correlation relationship to the fan speed; however the gradient of the power increase can be controlled in the BIOS. Thus a choice of 0.75 PWM value/ºC will increase the power of the fan by 0.75 units every degree Celsius that the CPU increases.
Given the leaps and bounds that other motherboard manufacturers have made on the fan front in the BIOS, as well as GIGABYTE’s own efforts on fan controls in the OS, I was hoping that the BIOS fan control would have been improved for Z97; however it is the same method as previous generations.
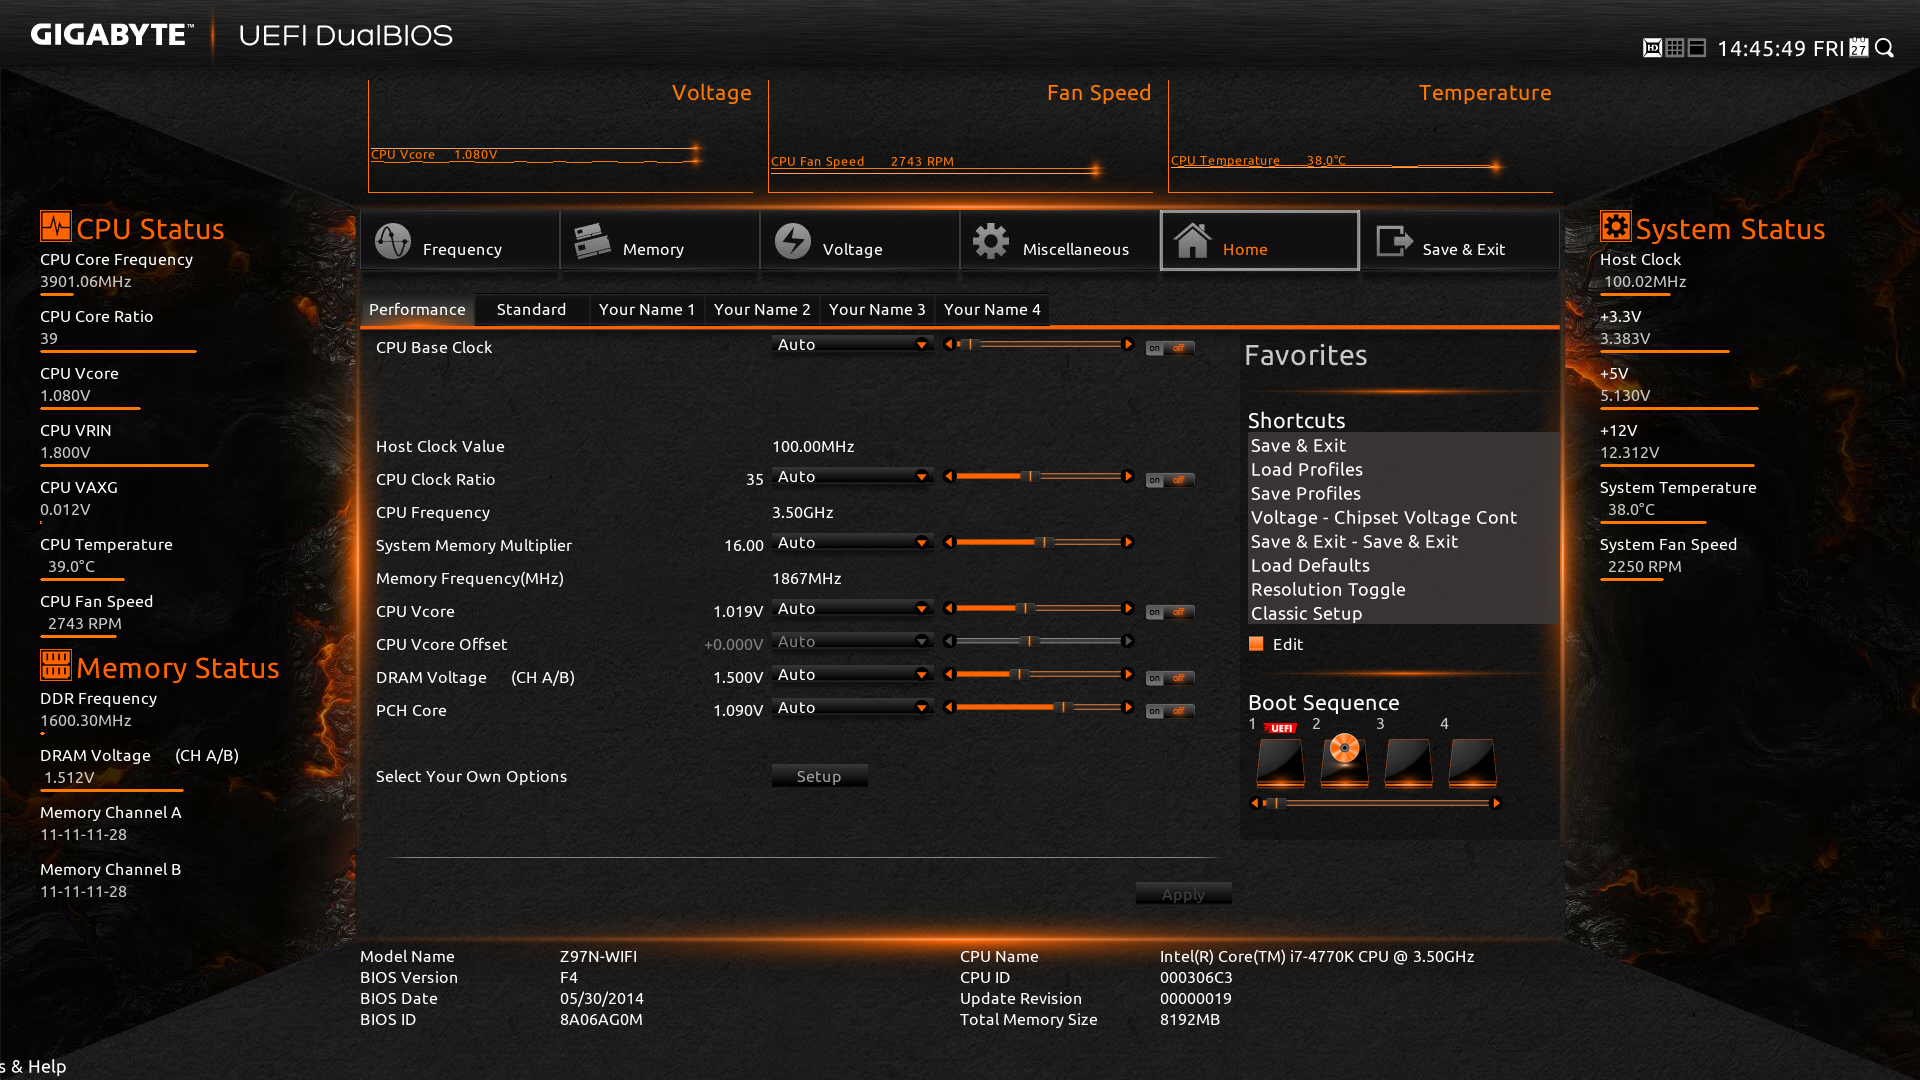
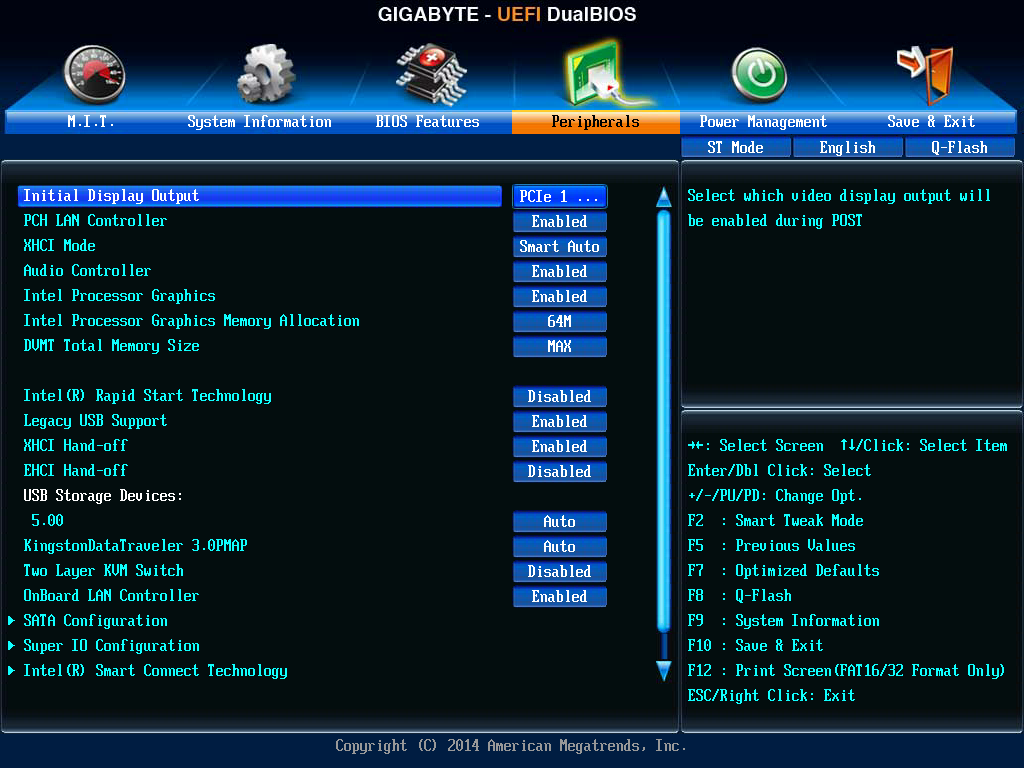
The Home screen is what GIGABYTE wants the HD BIOS to actually jump in to, which it did back with Z87. Here we have a group of overclock options such as BCLK, Clock Ratio, DRAM Multiplier and voltages. The next tab along the line is labeled ‘Standard’ and offers options such as display output and SATA options. The ‘Your Name 1/2/3/4’ menus are the custom menus that allow users to pull options from other menus and place them into a custom menu. This was also introduced with Z87; however I think the menus GIGABYTE offers here will cater for almost everyone.
Updating the BIOS while in the BIOS uses GIGABYTE’s Q-Flash interface. Attach a drive to the USB 2.0 port with the BIOS file in the root drive to ensure compatibility and ease of use.
The other mode in the BIOS is classic mode.
We have gone through Classic mode in many reviews before [1,2,3,4,5] so I will not dwell on it here, but Classic mode tends to be the go-to option for many enthusiast overclockers. I feel this is because (a) it has been part of the GIGABYTE ecosystem for a number of years and they are used to it, and (b) due to the differing contrast it is a lot easier to read. It also happens to have a lot of the peripheral options:
For a full visual outlook of the BIOS we tested, see the gallery below.
With the new graphical BIOS there are many different ways a motherboard company can adjust the BIOS to be more interactive, but sometimes the graphically simpler interfaces are the easiest to use. There has to be the right leap from old to new for everyone to change.


GIGABYTE Z97N-WIFI Software
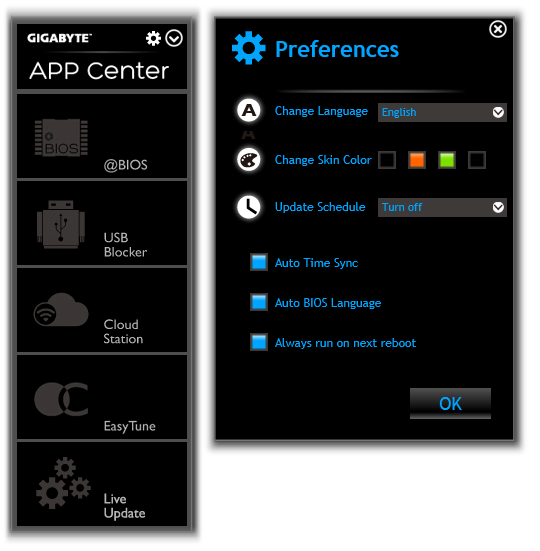
In the last generation, GIGABYTE upgraded its software package to a new version of EasyTune. The number denoting the version was gone and the interface got an overhaul onto a black background and colored text. Rather than having all the tools associated with the motherboard as different applications, the layout was homogenized from a single interface called the ‘APP Center’, with different ‘APPs’ for each software function. Back at Z87 launch it was an excellent direction to take the software, although for a first public release it was a little rough around the edges. For Z97 we get the next iteration of APP Center and the APPs, and suffice to say it comes across as a lot easier to use and a lot of the sharp pointy corners that might have affected user experience are smoothed rather nicely.
There can still be an argument made for a color-on-black livery. Typically this high-contrast layout is more suited for low power environments and to reduce eye-strain; however after a while the effect of reading color-on-black can affect a user more than the usual black-on-white (which also tends to offer better readability).
That aside, the above image shows the APP Center and the preferences. The user can change the skin color to one of four colors (to match each of the GIGABYTE product lines), as well as adjust update schedules. The APP Center list is scrollable; however the Live Update application remains fixed. If there are no updates, then Live Update will not offer a window to show no updates, but a dialog box. When updates are available, the following shows:
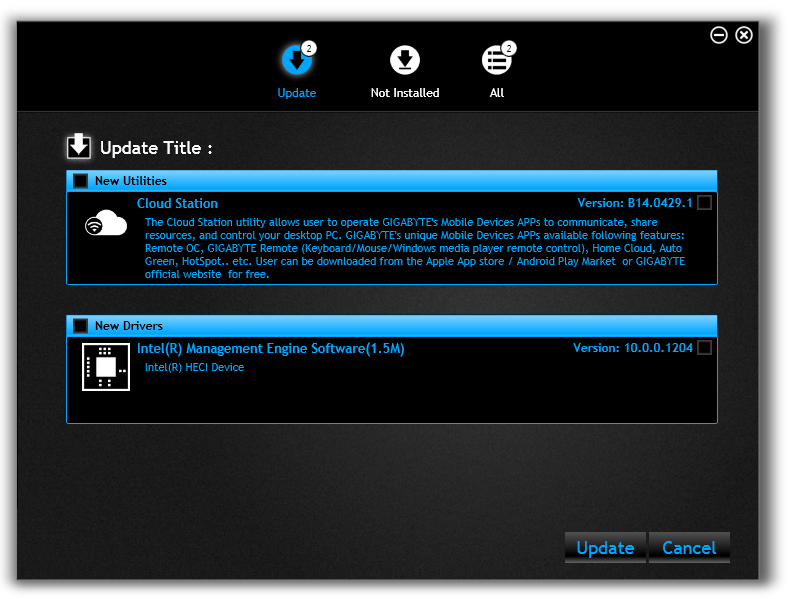
Here we see two updates, although my main criticism at this point is that it does not say how big these updates are. If I were on a limited bandwidth connection, or pay per data, I do not want to download a 400 MB update if one exists. GIGABYTE needs to implement listing the download size next to the update as soon as possible.
@BIOS
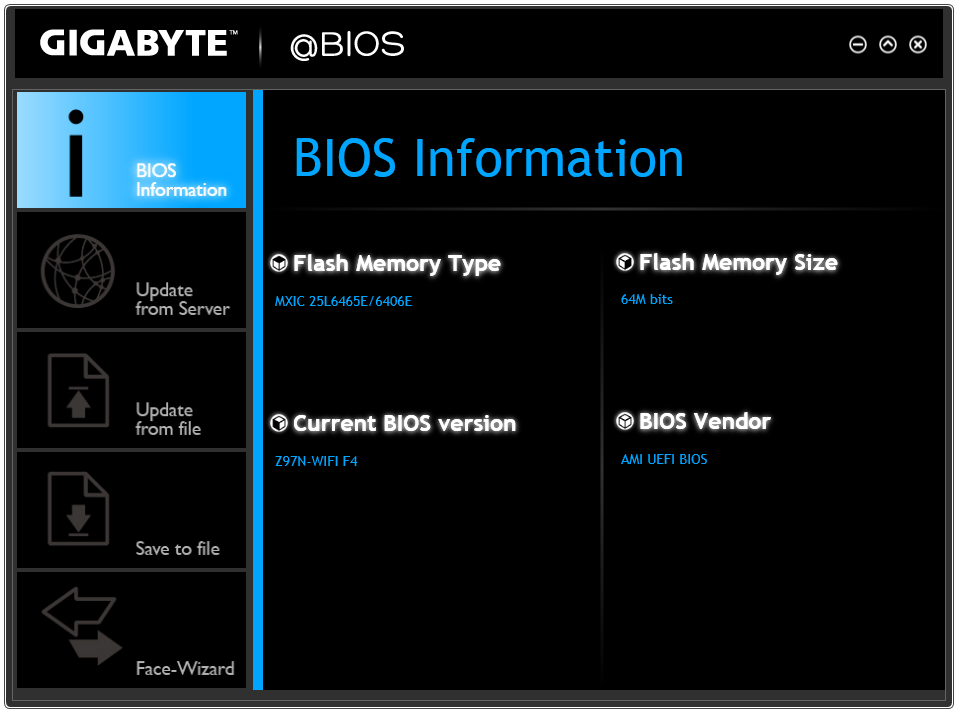
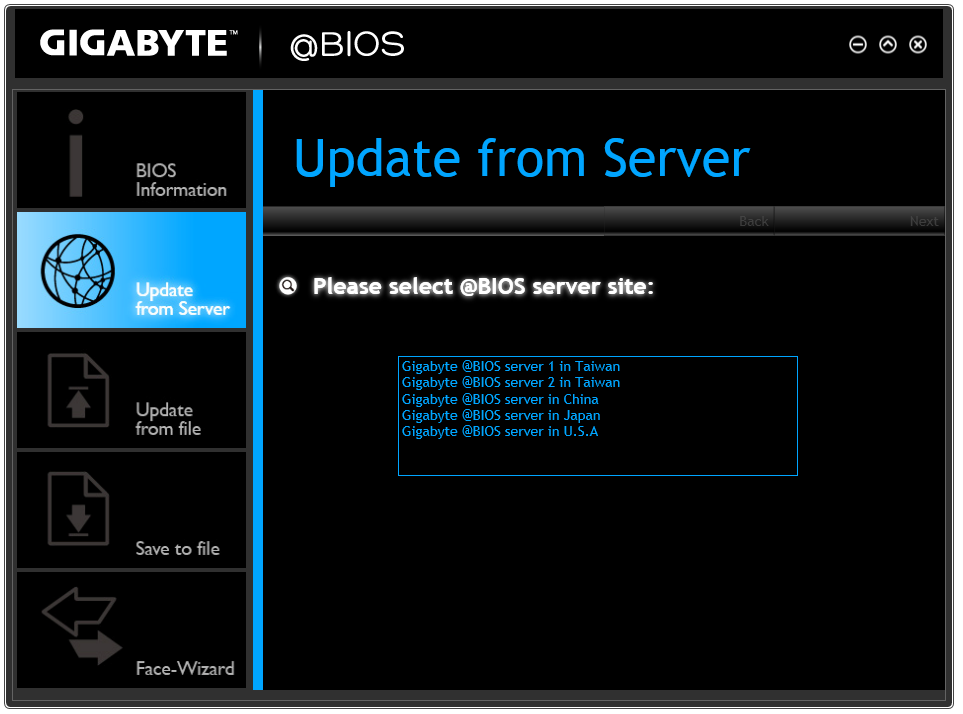
The tool to update the BIOS in the OS is @BIOS (‘at-BIOS’), and this version seems identical to that shown with Z87. Users can update from a global server or a file:
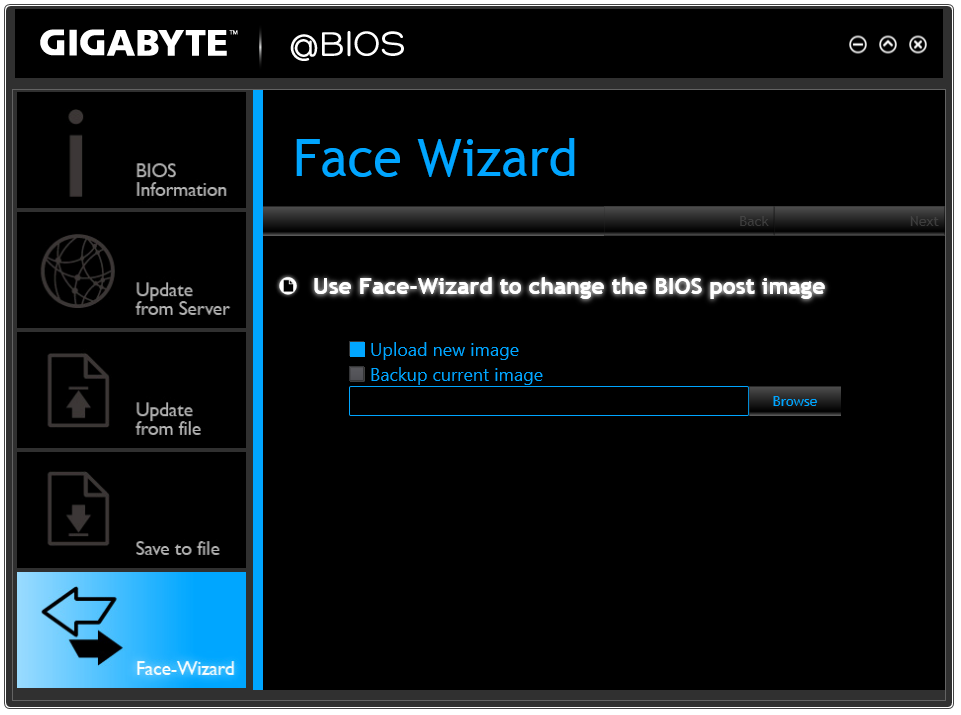
We also have the option to adjust the boot-up POST image in the Face Wizard tab:
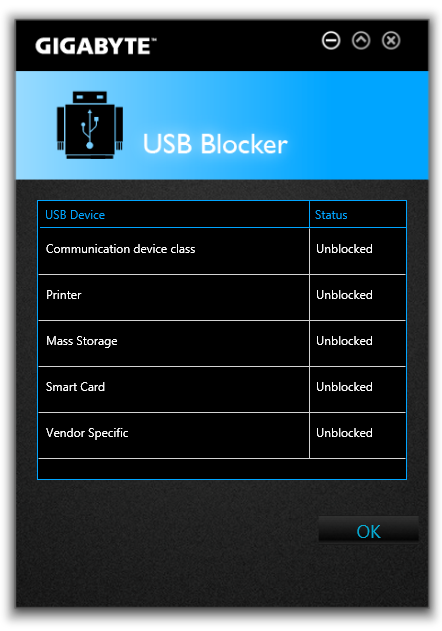
USB Blocker
The USB Blocker tool allows businesses to reject certain types of USB device inserted in the machine. As such, if you have a touch interface system or one that is to be controlled remotely, with this software you should be able to disable any other USB Input devices (mouse/keyboard) from being inserted, along with storage devices.
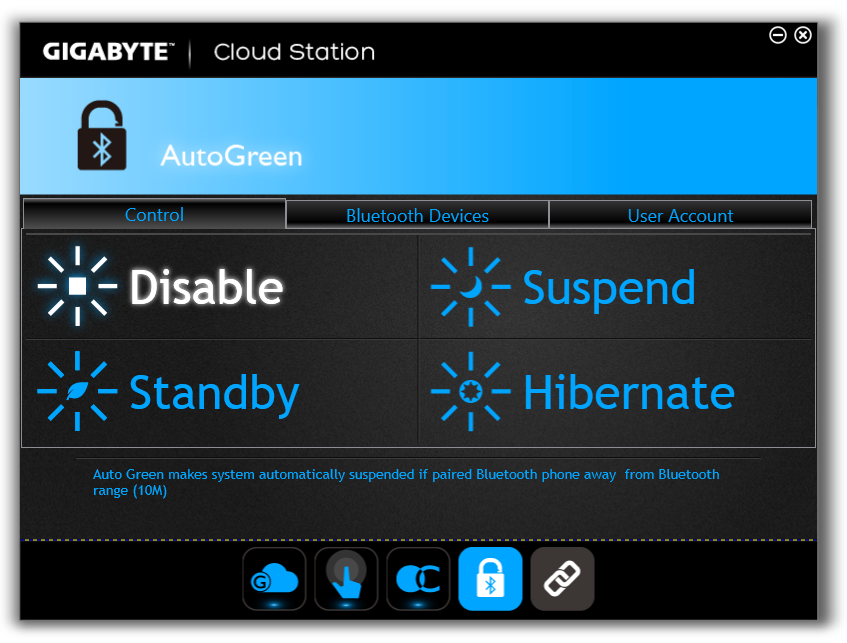
Cloud Station
One of the new features in APP Center is the Cloud Station. As more motherboard manufacturers move to tools that influence other devices other than the PC, Cloud Station is GIGABYTE’s solution. It offers several different options:
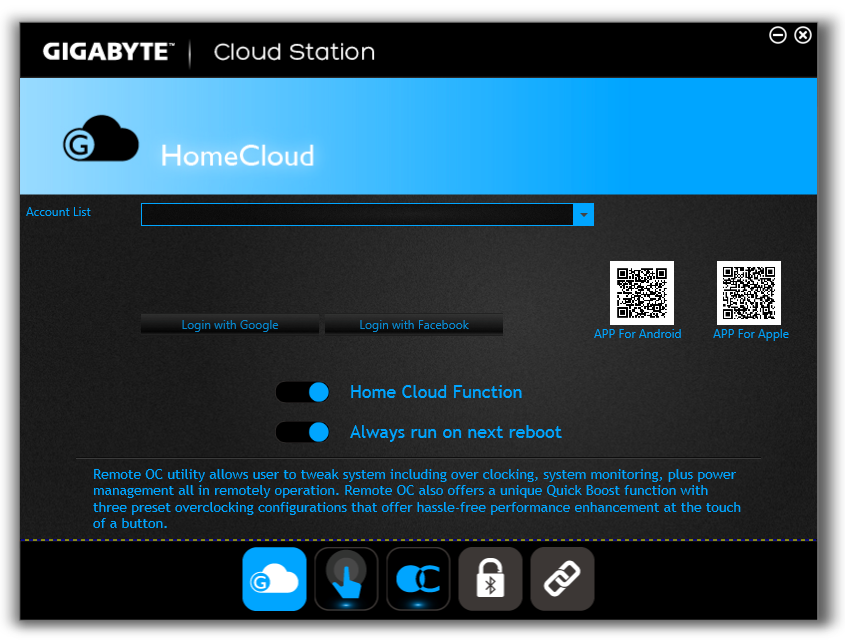
Home Cloud: Build a storage cloud for home use to synchronize data, music and photographs.
Remote OC: Use the Apple/Android apps to remotely overclock from a smartphone or tablet.
GIGABYTE Remote: Use a smartphone or tablet as a keyboard and/or touchpad.
Auto Green: Pairs with a Bluetooth smartphone and will auto-lock Windows when out of range.
HotSpot: Turn the PC into a WiFi hotspot.
EasyTune
The overclocking software paired with a GIGABYTE motherboard has historically been named EasyTune, and with Z97 it further lives up to its name by improving the controls for advanced overclocking. The main screen shows the quick overclock options:
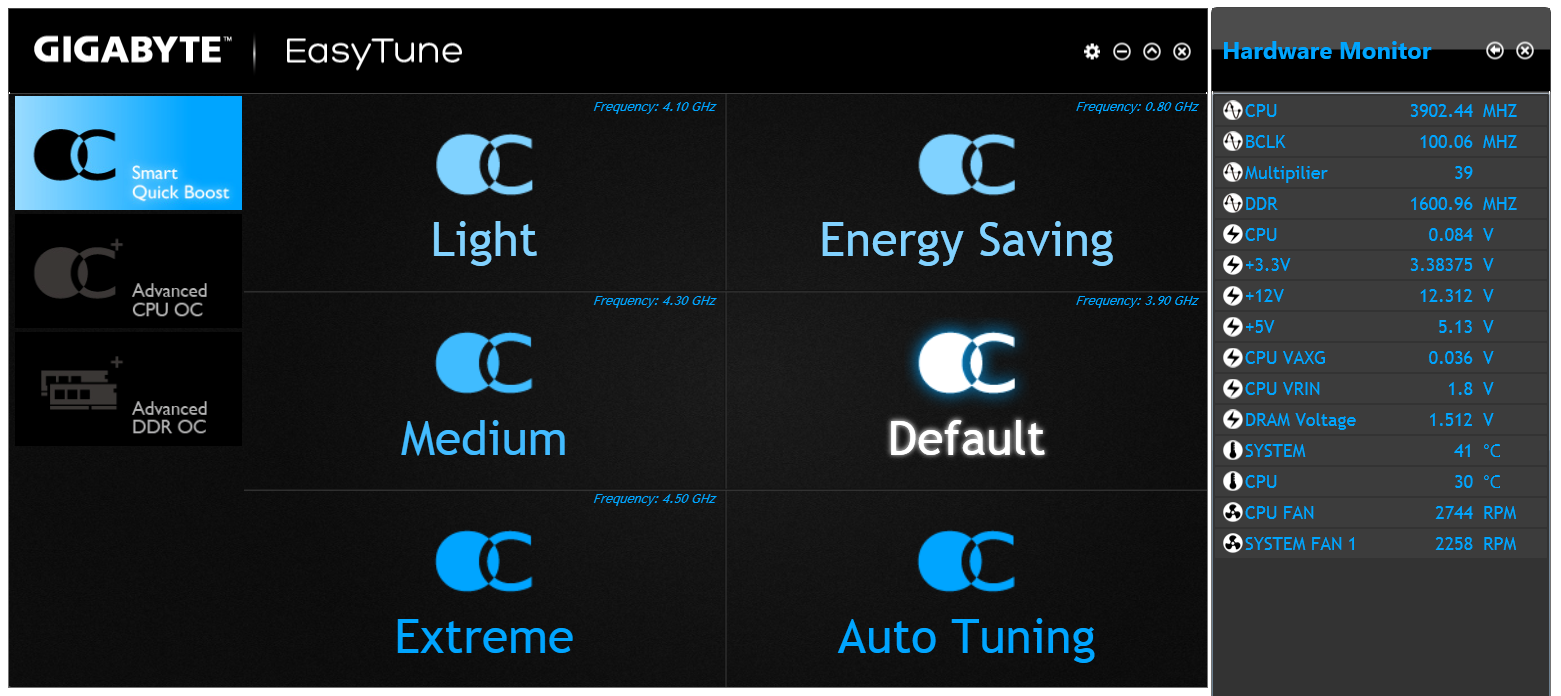
Loading up EasyTune also gives the Hardware Monitor shown on the right, useful for cross checking values. Each of the options in the Smart Quick Boost tab offers a setting from Default, Light, Medium, Extreme, Energy Saving to Auto Tuning. The results of these settings will be later in the review during our overclocking segment.
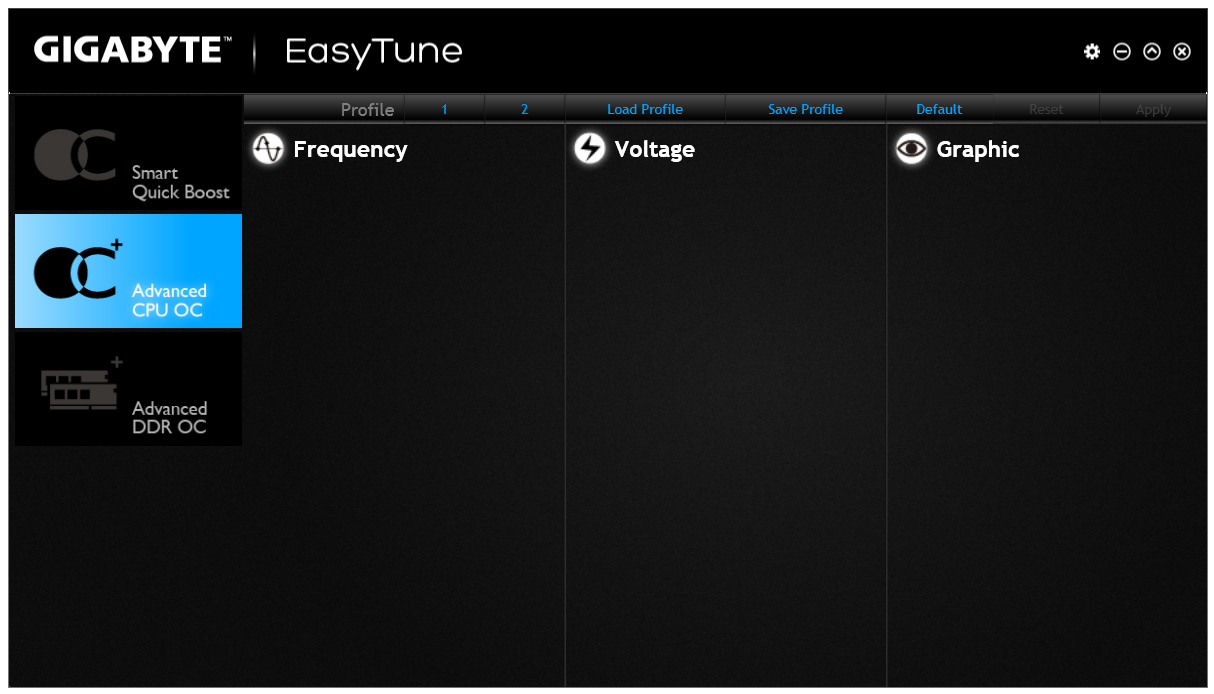
By reducing the size of the screen for EasyTune advanced overclocking options, and separating them into several different menus, EasyTune is easier to use than the Z87 version. Unfortunately, in the current version of EasyTune with the Z97N-WiFi, the Advanced tab shows no options. GIGABYTE is aware of this and should be pushing out an update to rectify the issue.
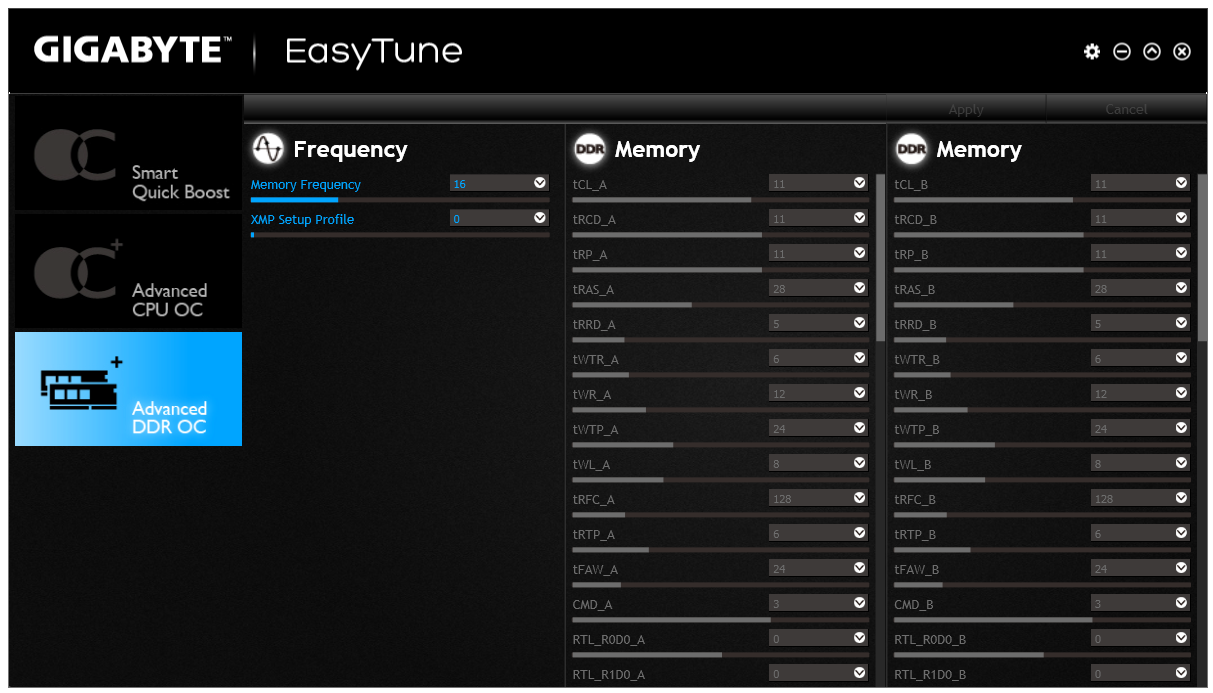
As DRAM tweaking can be a magician’s game, users can either use XMP directly, or play with all the sub-timings. I would have preferred the DRAM voltage to be in this menu as well, but GIGABYTE has typically located that option back in the CPU OC menu.
EZ Setup
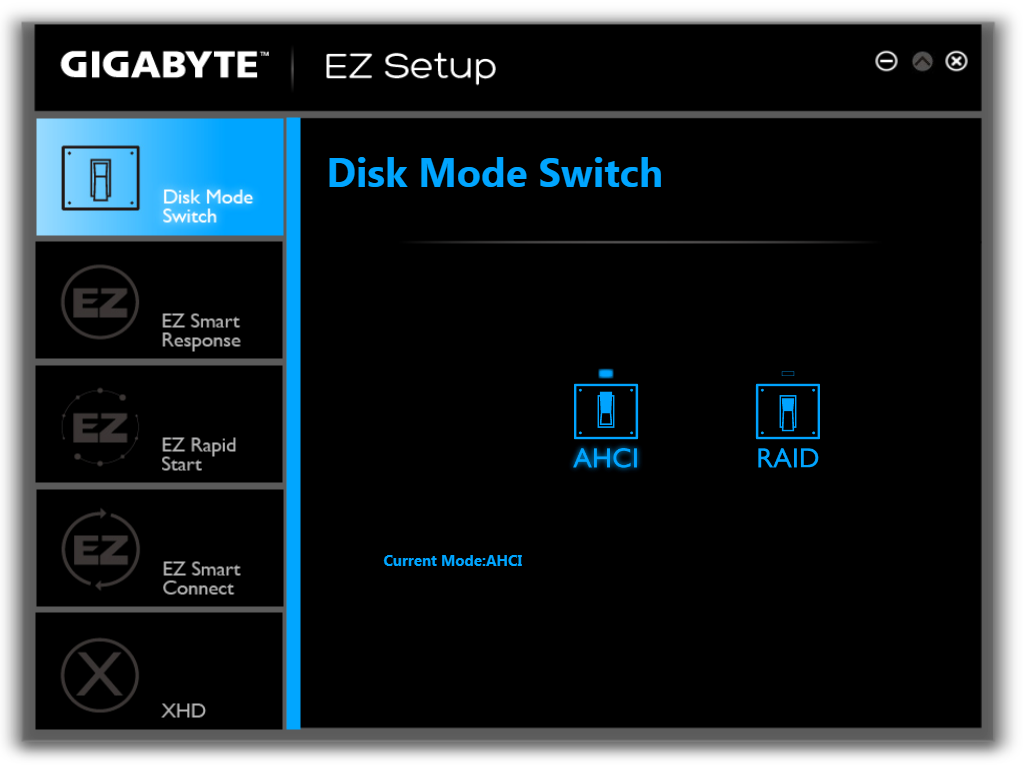
While ‘EZ’ does not translate to my part of the Atlantic (‘ee-zed’ makes no sense here), for those that derive their alphabet via the North American vernacular, the Easy Setup menu allows users to adjust their storage options. The first Disk Mode Switch tab selects AHCI/ RAID:
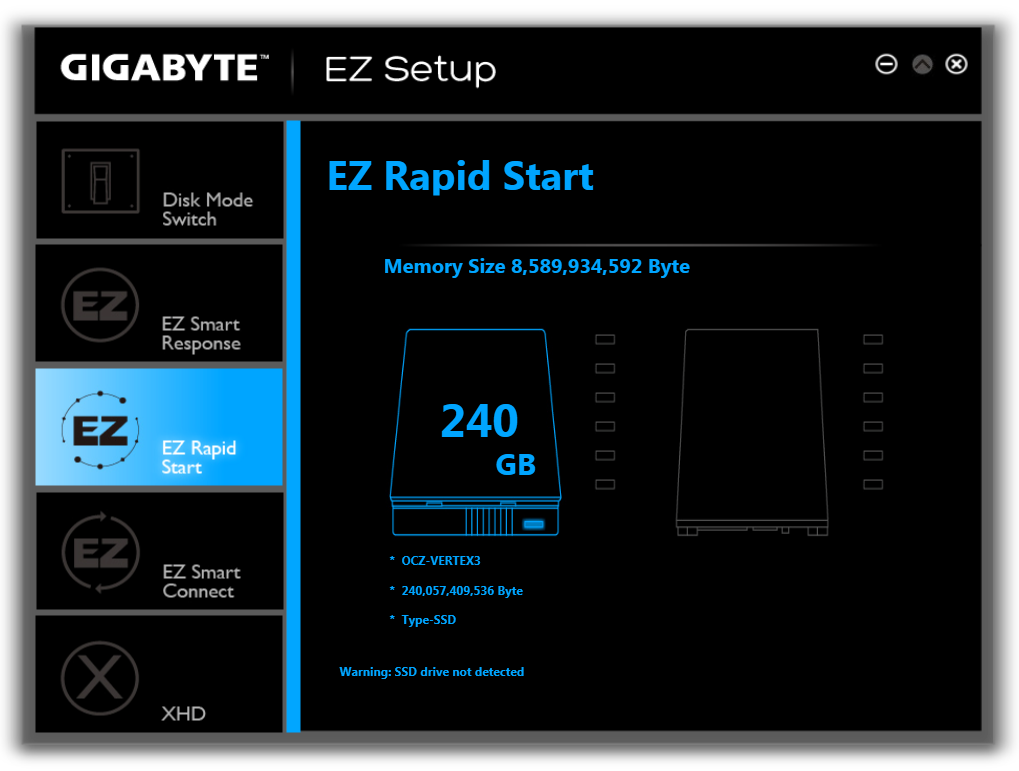
The Rapid Start tab helps implement Intel RST by pairing an SSD with the boot drive as a caching device:
Fast Boot
Due to the new UEFI/EFI topology, users of Windows 7/8 systems can decrease their POST/booting times by using faster modes. In the case of Windows 8, this often means disabling options to allow users to re-enter the BIOS during POST. The Fast Boot APP from GIGABYTE helps deal with which booting mode the user would prefer, along with an option to reboot via the BIOS.

Game Controller
Another new tool in the APP stack is Game Controller which allows users to implement macros (via user-specified hotkeys) that follow cursor movements and button presses. The other part to Game Controller allows users to enter a ‘sniper-mode’, which reduces mouse movement speed to increase sniping accuracy.
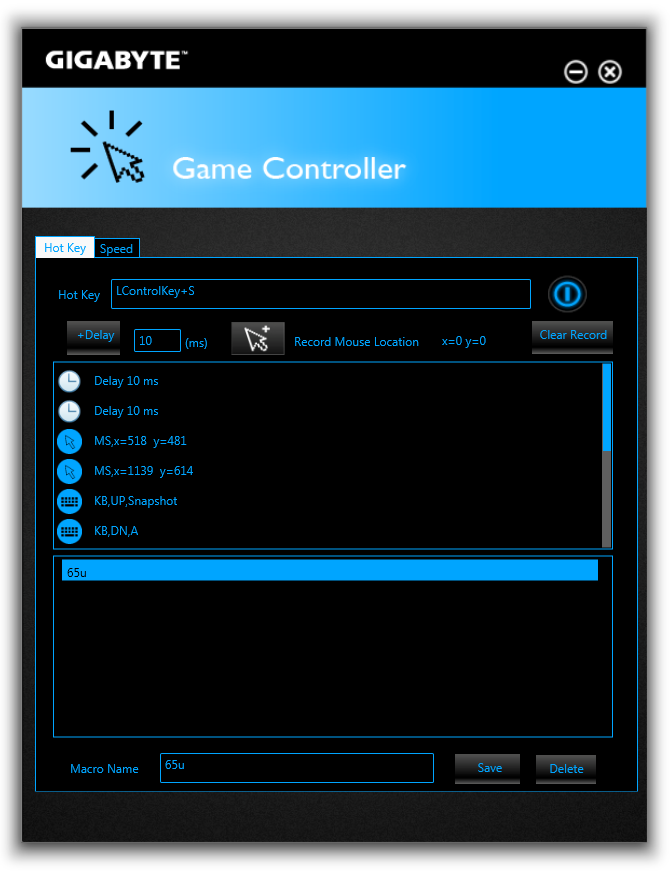
Having played with Game Controller since our UD5H review, there are several annoying issues when using it. Firstly, if a user makes a mistake on a macro, then the macro has to be deleted and restarted. When saved, a macro cannot be reloaded and edited, but it can be added to. If a user designs a macro but wants to change the hotkey, the macro is lost. When recording the mouse location, there is no information on how to use this feature – the user has to hold down the mouse button and navigate it to the part of the screen they want to click. There is no option to select a right click, or to record the position of the mouse with reference to the base location of the window being clicked (in case the window itself is in a new position). Any user with a macro enabled keyboard could perform better for keypresses, or an hour learning AutoHotKey for any coder would be a vastly better tool. GIGABYTE should be commended for attempting this software, although this is still very basic in its implementation.
System Information and Fans
As part of the reshuffle of the GIGABYTE software, fan controls have moved into the System Information section.
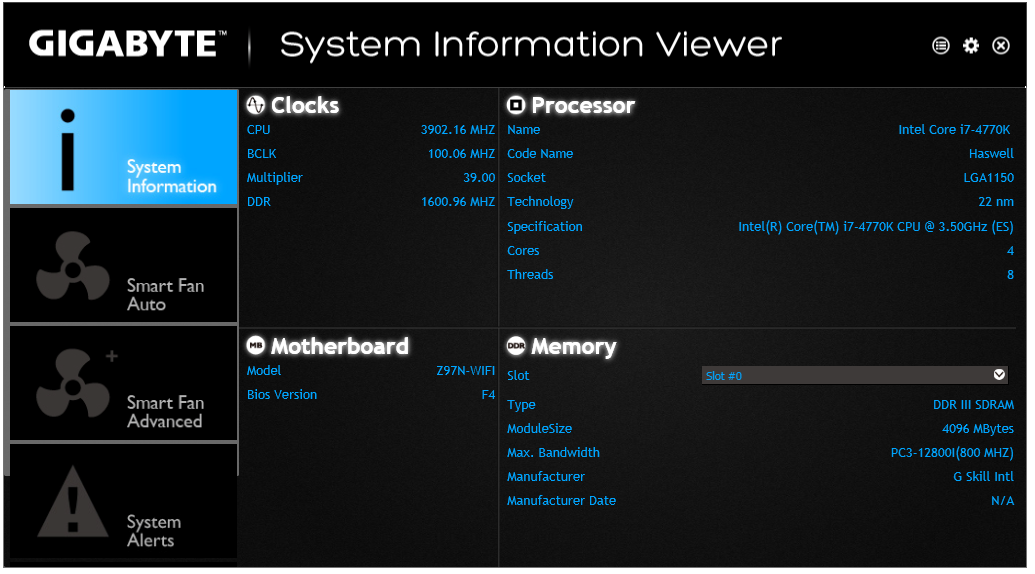
The System Information tab is self-explanatory, and the Smart Fan controls are split between Auto and Advanced. Auto offers four modes: Full Speed, Performance, Standard and Silent. The Advanced mode allows users to calibrate fans:
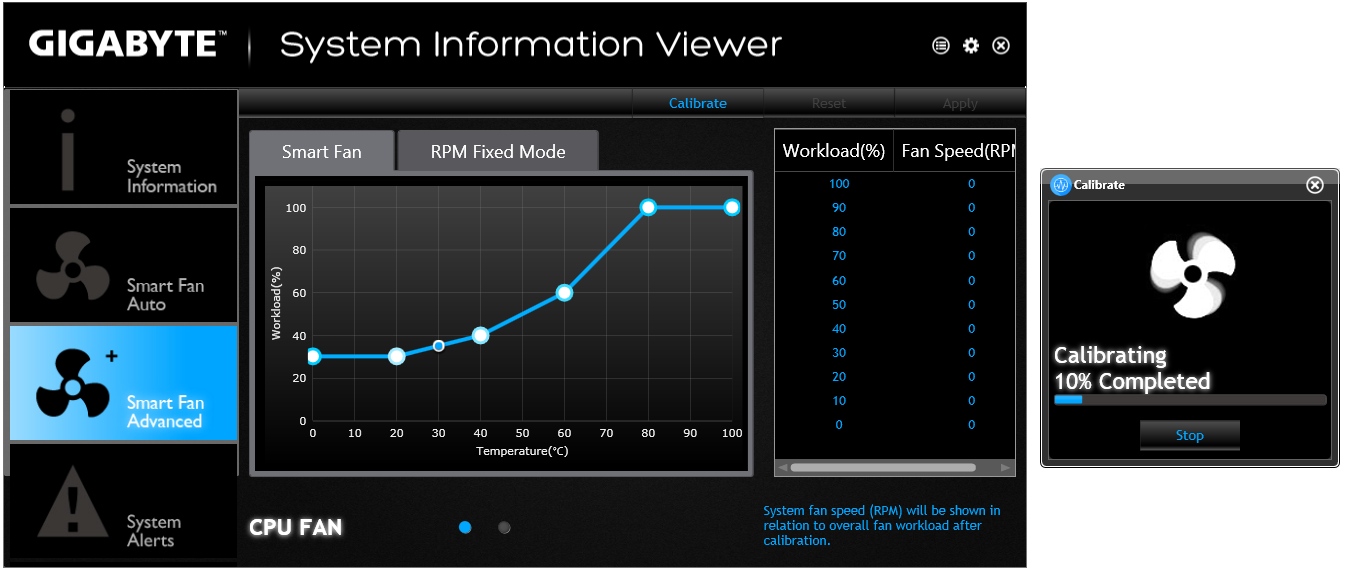
The calibration shows the voltage applied (as a % of maximum) against the fan speed. Users then have to do the mental calculations for the gradient of the fan speed. Ideally the mathematics should be dealt with on the software side (and the mathematics is really, really simple) and the graph axes updated appropriately, but at present few motherboard manufacturers are making that leap.
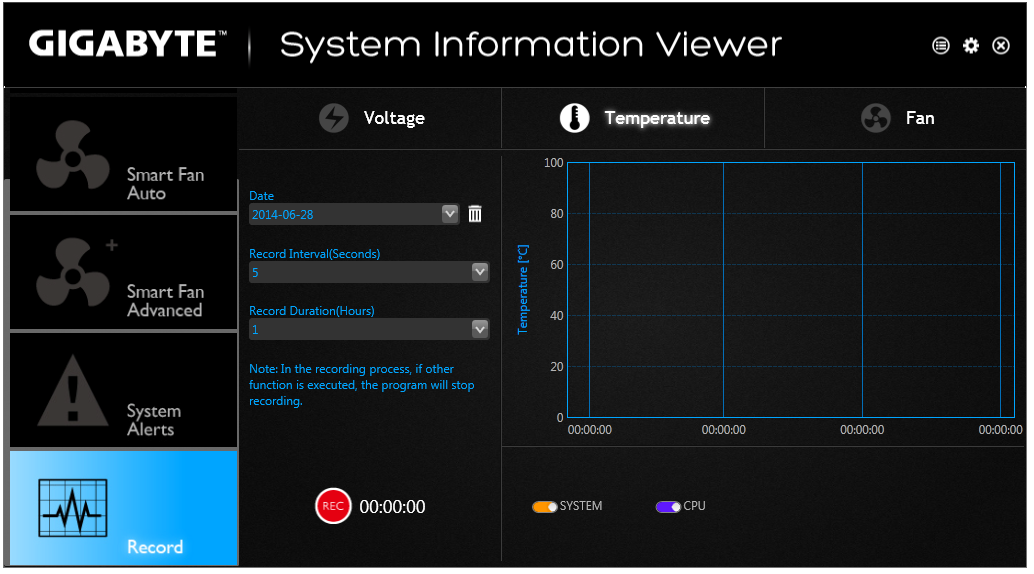
The software also allows for a recording option, with users to see some of the data as it adjusts in real time.


GIGABYTE Z97N-WIFI Board Features
| GIGABYTE Z97N-WIFI | |
| Price | US (Newegg) |
| Size | Mini-ITX |
| CPU Interface | LGA-1150 |
| Chipset | Intel Z97 |
| Memory Slots |
Two DDR3 DIMM slots supporting up to 16 GB Up to Dual Channel, 1333-3100 MHz |
| Video Outputs |
DVI-I (1920x1200 at 60 Hz) 2 x HDMI (4096x2160 at 24 Hz / 2560x1600 at 60 Hz) |
| Onboard LAN |
Intel I217-V Atheros AR81 |
| Onboard Audio | Realtek ALC892 |
| Expansion Slots |
1 x PCIe 3.0 x16 1 x mini-PCIe |
| Onboard SATA/RAID | 6 x SATA 6 Gbps (Chipset), RAID 0,1,5,10 |
| USB 3.0 | 6 x USB 3.0 (Chipset) [4 rear panel, 1 header] |
| Onboard |
6 x SATA 6 Gbps 1 x USB 3.0 Header 1 x USB 2.0 Header 2 x Fan Headers Front Panel Header Front Audio Header 1 x COM Header 1 x ClearCMOS Jumper |
| Power Connectors |
1 x 24-pin ATX 1 x 4-pin CPU |
| Fan Headers |
1 x CPU (4-pin) 1 x SYS (4-pin) |
| IO Panel |
1 x PS/2 Combination Port 2 x HDMI Port 1 x DVI-I 4 x USB 3.0 2 x USB 2.0 2 x Network (Intel + Atheros) Audio Jacks (Realtek ALC892) |
| Warranty Period | 3 Years |
| Product Page | Link |
Hardware wise, the unique point about the GIGABYTE board is the dual HDMI as well as the Intel/Atheros network port combination. The rest of the GIGABYTE benefits are in the layout.


38 Comments
View All Comments
The_Assimilator - Friday, July 25, 2014 - link
Embedded boards' DC-to-DC circuitry won't handle the high amperages required by e.g. modern graphics cards. You also won't find people running 12-drive RAID arrays off them, for the same reason. It's certainly possible to increase the capacity of the DC-to-DC converters, but then you need heatsinks and whatnot and before you know it you've integrated a switching mode power supply into your motherboard.The_Assimilator - Friday, July 25, 2014 - link
BTX failed because it was merely a revision of the ATX form factor, not ATX power delivery. What we need is the reverse - leave the form factor alone (it ain't broke) but bring the obviously-outdated power delivery spec up to scratch.Oxford Guy - Saturday, January 23, 2016 - link
The form factor is subpar for GPU cooling.owan - Wednesday, July 23, 2014 - link
When I saw this review on the front page and saw the Z97n-wifi I got a bit nervous since I just purchased one of these to go along with a G3258 for a little overclocking/backup gaming system. Glad to see it fares well, I was just as pleasantly surprised by its layout as you wereDiHydro - Wednesday, July 23, 2014 - link
In the "GIGABYTE Z97N-WIFI Performance" section, what is the red colored "1m44" result for OCCT mean?DiHydro - Wednesday, July 23, 2014 - link
Oh, I think I see. It is the time the test ran before the thermal limit was reached.Wixman666 - Wednesday, July 23, 2014 - link
After 1 min 44 seconds it overheated and started throttling.abugarcia - Wednesday, July 23, 2014 - link
FYI, some of the links on the Test Setup table lead to the incorrect products when clicked (i7-4770k and MSI GTX 770 Lightning). Looks like its this way on some older reviews as well.Ian Cutress - Wednesday, July 23, 2014 - link
Ah rats, copy/paste error from some other test setup tables I had. Fixed here, will go back to some of the older reviews. Nice spot :)Ubercake - Wednesday, July 23, 2014 - link
As more and more controllers are integrated on the CPU, one value-add I wish the motherboard manufacturers would integrate with the system board is TV-tuner functionality.