The Neophyte's Custom Liquid Cooling Guide: How To, Why To, What To Expect
by Dustin Sklavos on September 30, 2013 12:01 AM ESTIf our whole hypothesis is that watercooling is (in most cases) superior to air cooling, then we need some measure of data to prove it. That means building our system and cooling it under air first, and seeing just how much overclocking performance we can get out of it before heat becomes too serious an issue. This is difficult to fully quantify; luck of the draw means we could wind up with stellar, efficient overclockers on both the CPU and GPU sides, or absolutely lousy ones. Haswell, in particular, seems to be afflicted with unusually high variation between individual chips.
To get some idea of how assembly goes in the Corsair Carbide Air 540, you can refer to my review. Suffice to say the system came together pretty easily. The modular nature of the SSD cages allowed me to remove all but one, and the 3.5" drive sleds went unpopulated but connected for the future. My biggest concern was the lack of clearance between the Noctua NH-U14S and the top GeForce GTX 780.
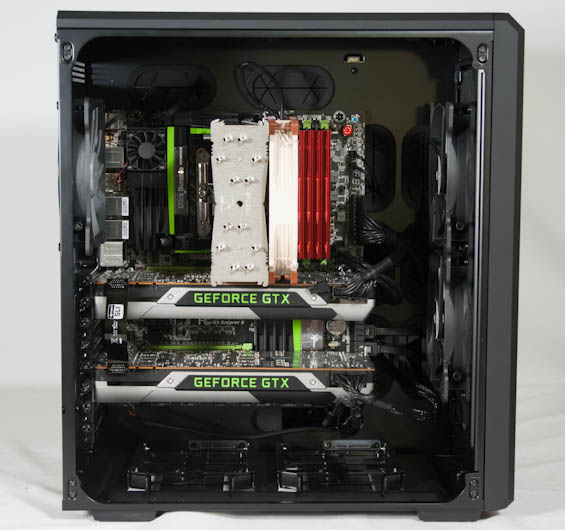
It looks like they're touching, but fear not, they're just playing the scariest game of "I'm not touching you" I've ever seen. This board is designed for quad-GPU graphics systems, which puts the primary PCIe x16 slot at the top. The upshot of that is the excellent spacing between the two cards: they're two slots apart, allowing for plenty of airflow between them.
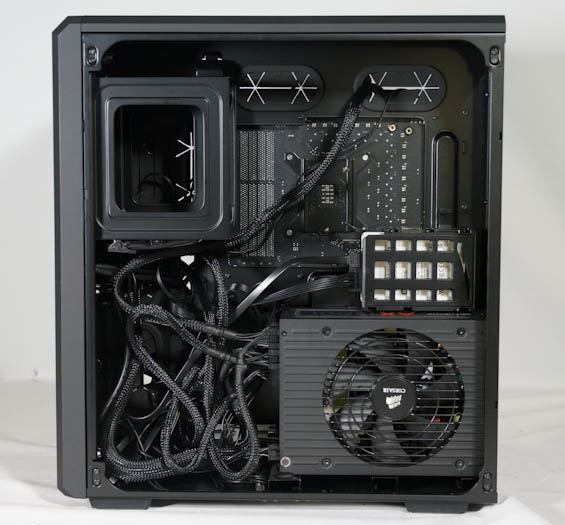
Ignoring for a moment the fact that I've always been lousy at cabling, we're presented with something of an issue. The Carbide Air 540 doesn't really necessitate neat cabling since that cubby in the bottom left of the photo is typically where the mass of cables always goes. However, the AX1200i is a very deep power supply, and that cubby is where I intend to put the pump and reservoir. This is, in my opinion, a failing of the Carbide Air 540's design: there's a tremendous amount of open space at the top right, and no real way to occupy it.
Overclocking on air wasn't actually tremendously difficult, but it's where I ran into some real issues with the i7-4770K. This is...not a spectacular sample. VRIN starts at 1.812V, and the VCore's default voltage is already at 1.2V. With load line calibration set to Turbo, I was able to get the chip stable at 4.3GHz, but VCore was reading ~1.3V in Windows. Thermals were reaching the low 90s under OCCT. 4.4GHz and 4.5GHz were both bootable, but thermally too dangerous. For stability testing, I did a five minute run of OCCT followed by a run of POVray 3.7 RC, per Ian's suggestion.
_thumb.jpg)
_thumb.jpg)
_thumb.jpg)
_thumb.jpg)
_thumb.jpg)
_thumb.jpg)
The two GeForce GTX 780s fared a bit better. I maxed out the power and temperature targets, and while the fans got pretty loud, I was able to get a +125 offset on the core and stunning +550 offset on the GDDR5, leading to a peak boost clock of ~1150MHz and a GDDR5 clock of 7.1GHz. Any higher than that on the GDDR5 would work, but produce artifacts. Peak boost was pretty tough to maintain, though, with the cards regularly dipping back at least a couple of boost bins under EVGA OC Scanner X. Stability testing was initially done with OC Scanner X, but I found it to be remarkably unreliable. Per Ryan Smith's suggestion, I switched to using a Crysis Warhead benchmark and then running Fire Strike Extreme in 3DMark. Crysis Warhead was pretty good at ferreting out unstable overclocks, but 3DMark was fantastic at it.
All in all, the overclocks were decent, although the i7-4770K apparently lived to underwhelm. I'm also a little disappointed the 780s couldn't hit 1.2GHz under boost on the core, but the excellent GDDR5 overclock takes some of the sting off of that.


106 Comments
View All Comments
St. George - Tuesday, October 15, 2013 - link
If CPU temps can be controlled with good cooling, and if I am after max CPU clock, is there a max voltage for Haswell? ASUS says 1.35v, various threads suggest between 1.4 and 1.5v, but many others seem to suggest max voltage is only limited by how much heat you can take away. What am I missing? You seem to suggest that the reason you won't run at 4.7Ghz is because you pass from what feels safe, 1.3V, to what feels risky, 1.45V. I am running archi apps that need CPU clock. Thanks. Delidding netted me 31C.spidey81 - Monday, September 30, 2013 - link
I appreciate immensely the effort and thought put into this article. But to have someone new to the watercooling experience doing this wasn't the best way to go about it.For instance, and I'm sure this has been brought up, you compared results from different overclocks like it was apples to apples. Also, the radiators and blocks you used (although I have and use swiftech components) are inferior compared to other options available. Here's ( http://goo.gl/YJ8f13) a titan/780 waterblock comparison that clearly shows not all waterblocks are created equal. In fact, the swiftech block was one of the poorer performers in the roundup.
Although good for basic loops, the radiators used could have been seriously beefed up! There are plenty of thicker rads available that use slower fans and still outperform these. Using slower fans will obviously create a more silent build. I've been using RX series rads from XSPC and they are always near the top for most efficient and pure performance.
Basically, what I'm saying is that watercooling isn't strictly slap a block on and "voila" it's a super overclocking silent beast. The component selection from blocks to pumps to tubing to fittings are all critical in meeting the goal of the build. Research goes miles and finding good resources in overclocking/watercooling communities are a must.
I was excited to see this article and left disappointed after reading it. Watercooling is far superior to air cooling in nearly every instance. Silence and performance are there to be had, you just need to have the proper selection of components and the subsequent proper arrangement of them.
mapesdhs - Monday, September 30, 2013 - link
I understand what you mean (paragraph 1), but in a way it's very useful, as it shows exactly
the kind of issues someone new to watercooling is likely to encounter. Most guides and
forums tend to assume a degree of existing familiarity. There's an information gap between
being comfortable with top-end air cooling and dealing with reasonable custom water loops.
As a newcomer to watercooling, half the problem is knowing what questions to ask. Forum
threads can help, but they're frequently hindered by the odd one or two people who are
very vocal but incorrect in their opinions, and of course it can be tedious in the extreme to
wade through hundreds of posts to find all the various relevant bits of info (I know, I've done
this with 3930K oc'ing).
Your comment about component selection being 'critical' is a good example of what I mean.
Unless one already has some experience with this, how does one make the right choices?
Thus, I can understand why those already familiar with watercooling (especially someone
with considerable knowledge/skill) might be disappointed with the article, but for beginners
it will definitely be useful, ie. discovering potential pitfalls and mistakes.
A parallel article by someone with more experience but using the same CPU/GPUs/mbd/etc.
would be fascinating.
Ian.
Menetlaus - Monday, September 30, 2013 - link
I would also love to know what the retail cost of the watercooling parts/kit used in this build.If the cost is $800-1000 as estimated above, then the overall cost for the full system would be in the $4k range.
Bang for the buck is terrible on a full, custom, watercooling setup as the $4k watercooling system was typically less than 10% faster for 33% more money.
The Von Matrices - Monday, September 30, 2013 - link
I'd say your estimate on the entire system cost is about right. My guess is that Switftech sponsored this article and the author was either barred from stating the price or not curious enough to price out the components he was given. Custom water loops are a pretty terrible value if all you want is increased performance. Even though there are a lot of people who praise them, few who build them really consider the extreme cost since it's easy to get hooked into assembling it and forget about the price. Custom liquid cooling should only be used in three situations:1) You want the absolute best performance you can get at the current time.
2) You want an extremely powerful but quiet system (mid-range systems can be quieted much less expensively with better air cooling).
3) You care about aesthetics and showing off your case (the "cool factor")
If you're only looking for increased performance, the best option to save money is just to forego the custom liquid system and use the money to upgrade the system's components more often. That will provide more consistent performance increases for the same amount of expenditure. The quietness argument is only valid if you have multiple video cards; any system with a single video card can be quietly cooled by replacing the stock video heatsink and using a better CPU heatsink and system fans. The aesthetic argument can't be reasoned with because that's a personal judgment, but generally people who use custom liquid loops for aesthetic purposes aren't particularly concerned about the price.
sunnyjuicedrink - Monday, September 30, 2013 - link
Thank you for the great article. I have one question that many people seem not to address in water cooling guides: how do you take a build apart? I've never built a water cooling system before, but I like keeping my PCs for a long time and upgrading individual parts. Is this possible, or is the deconstruction process cumbersome?cjs150 - Monday, September 30, 2013 - link
Sunnyjuicedrink: Upgrading can be easy as long as your loop allowed for draining the system. Obviously if you change motherboard then components may be in slightly different places so your tubing may need replacing, simply changing the CPU is straightforward. Changing GPU can be awkward as you will probably need a new GPU waterblock and location of inlets on the block may not be the same as previously (although that just means some new tubing). All components (usually) work on a g1/4" socketSadrak85 - Monday, September 30, 2013 - link
After reading the whole thing (you did a lot of work here!), here's some points from the peanut gallery:1) I don't think it's just the lousy TIM under the IHS for the 4770K. I think part of the blame is to the integrated voltage modules, which more and more, I believe was included solely to allow partners to buy cheaper motherboards for their laptops and desktops.
2) Thanks to IPC, that 4.4 GHz Haswell should perform (roughly) like a 5 GHz Sandy Bridge, and for what it's worth, 5 GHz Sandy Bridge chips were also rare.
3) To easily attach tubing to barbs, boil water, put the end of the tubing into the water until it also reaches the boiling temperature, then slip the hot tubing easily onto the barbs. When it cools, it will be on there VERY well; in fact, you would likely have to cut it to remove it, but the huge forces need not be applied.
DanNeely - Monday, September 30, 2013 - link
The FIVR has more to do with Intel's mobile first strategy. It lets the CPU ramp/drop voltages much faster (order of magnitude???) which helps stretch battery life out by increasing the amount of time the CPU can spent at minimum power levels. Desktop systems get them by default because it's easier for Intel to use the same power regulation design everywhere.mokre - Monday, September 30, 2013 - link
Thanks for the article. I'd like to suggest a couple of things:First, have a look at the fans you were using; I suspect for the radiators the fans do not have enough static pressure to move air through the rad, which is likely why you had to turn the fan speeds up. A buddy of mine has the same setup, but two gtx titans instead, in the same case, with slightly lower radiator capacity, and his temperatures are in line with yours, but noise-wise his system is much more quiet.
Second, using a wrench on the fittings is probably not a good idea. While you can certainly tighten them properly, it could damage the fittings or worse yet, strip the threads on the acetal material used on the waterblocks (but only if you overtighten).