Z77 mITX Round-Up: Five of the Best – MSI, Zotac, ASRock, EVGA and ASUS
by Ian Cutress on December 31, 2012 7:00 AM EST- Posted in
- Motherboards
- MSI
- ASRock
- EVGA
- ZOTAC
- Asus
- Ivy Bridge
- Z77
- mITX
ASUS P8Z77-I Deluxe Overview
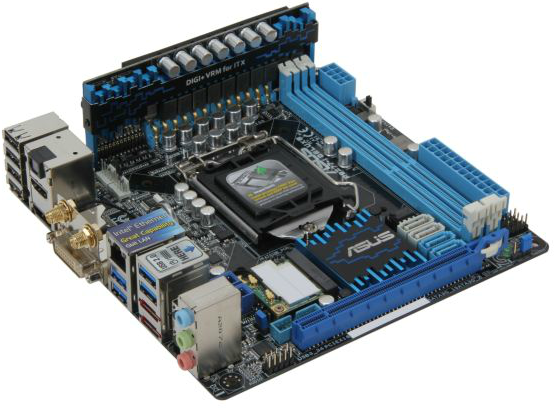
Consumer grade motherboards are for the most part two dimensional affairs – the only PCB related paraphernalia that would impinge on the z-direction are the modular components that enhance the experience, such as memory and graphics. Now take the original point and turn it on its head, and we get the P8Z77-I Deluxe. In order to save space on the mini-ITX sized motherboard for controllers and added features, ASUS have taken a leaf out of the server space and placed the power delivery for the motherboard perpendicular to the motherboard. As crazy as it sounds, the setup is tastefully done by careful planning and precision engineering.
Alongside the funky VRM placement, ASUS are also one of the few Z77 mITX manufacturers with the socket and the chipset the more ‘common’ way around when put alongside full sized ATX boards. This should give the socket more room when dealing with larger air coolers, however we are still up against the memory slots (as expected) and it is only a short distance to the rear IO panel and the power delivery daughter board. But the plus side is also in the 8-pin CPU power connector placement, which is on the other side of the memory slots. There is also room to fit a TPU switch, a MemOK button, two USB 2.0 ports, a USB 3.0 port, a 2.5/5 GHz WiFi module and a pair of fan headers on board. The WiDi version of this motherboard looks identical apart from WiDi capabilities for around $15 more.
Connectivity and controller selection are an important aspect for a mITX design, and ASUS have furnished the P8Z77-I Deluxe with more USB ports and connectivity at the rear IO than most boards in this roundup. A total of eight USB ports on the rear (four USB 2.0, four USB 3.0), as well as DVI-I, HDMI, DisplayPort, eSATA, BIOS Flashback, an Intel NIC and Realtek ALC898 audio (via three jacks rather than the standard six). The front panel audio header is in a really odd place, and easily interferes with a large gaming GPU.
Followers of my reviews will see a familiar face in the ASUS BIOS and Software departments. The BIOS is an easy mode front screen with additional advanced mode, giving overclock options as well as DIGI+ Power configuration details. Previous experience often tells me that ASUS BIOSes are often the more configurable and compatible with my memory kits than most, and I have nothing to say that the mITX board would contradict that. The software package comes in the form of AI Suite and covers all the bases software should cover – overclock options, monitoring (warning when things get too hot), fan controls with RPM detectors, energy saving options, WiFi controls, fast charging utilities, USB 3.0 Boost, Network iControl, USB BIOS Flashback options and BIOS updating.
In terms of benchmark performance, the P8Z77-I Deluxe takes an extraordinary win in our WinRAR test, beating the other mITX Z77 boards by 5-20%. I redid this test after a reboot, a fresh install, a re-flash of the latest BIOS and it remained consistent. Whatever ASUS put in the BIOS, WinRAR seems to fly. The other CPU benchmarks were more ballpark, but the gaming results seemed to swing towards the ASUS. With the USB 3.0 boost functionality, we got great results in our USB 3.0 testing as well under Windows 7. Power delivery for the ASUS P8Z77-I was also favorable in our setup.
For an all-in price of $185 for the normal version of the P8Z77-I Deluxe and $200 for the WiDi enabled P8Z77-I Deluxe/WD, we are stretching near the top of our mITX range pricing bracket – only the EVGA Z77 Stinger is more expensive, and the others are circling around the $150-$160 margin. This ASUS board pulls ahead on performance, usability and software, and the design is new and exciting. Consistent functionality from ASUS products such as USB BIOS Flashback, USB 3.0 Boost, MemOK! and numbers of ports should not be overlooked lightly, and if you are looking for one of the best all-around mITX board for a build, the ASUS P8Z77-I Deluxe pulls out a big lead. However, the positioning of that front panel audio header gives cause for concern.
Visual Inspection
All eyes on the P8Z77-I Deluxe immediately focus on the VRM add-in board. It is hard to miss, and makes the motherboard aesthetically different to its rivals.
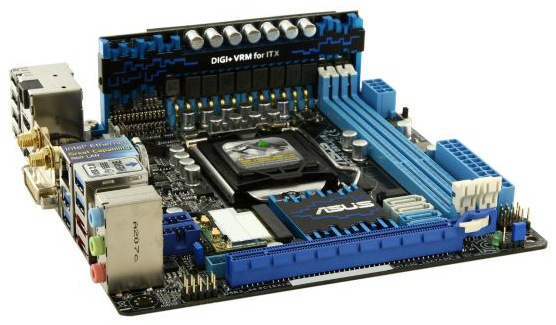
There are some questions that come up from this sort of arrangement – connectivity, power delivery, electrical losses, electrical noise, stability, and so on. Crucially the path of the power is most interesting – the 8-pin CPU power connector is on the top right of the motherboard, and this power is taken up into the daughterboard, filtered, and then passed back through into the motherboard for the processor. On the left of the daughterboard we have a series of normal pins used for control of the power delivery – issuing commands for the ‘DIGI+’ part of the system. The rest of the daughterboard is connected firmly with thicker copper pipes – mostly for rigidity but behind this is hiding the transfer of power to the board. The capacitors in front of the power delivery provide the final filtering mechanism before the CPU gets the power. The result is essentially a custom power solution, allowing ASUS to add in any height of daughterboard for any number of phases or power delivery capability. We may see something similar if ASUS ever decide to bring out a mITX Republic of Gamers product, but I would not expect a 32 phase monster to arrive in similar fashion any time soon (and it is debatable if 32 phases is even needed). There is also scope for adding something similar on mATX and ATX boards.
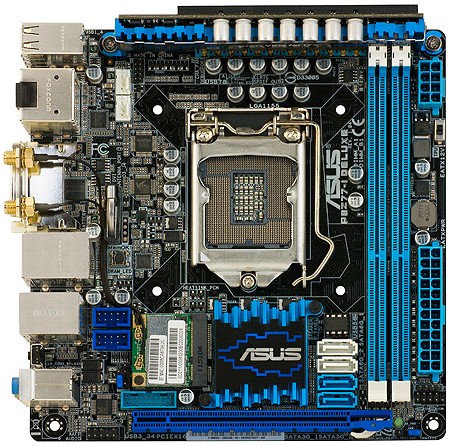
On close inspection readers may notice the ‘lack’ of mounting holes for the motherboard at the top. In order for everything to go as planned, ASUS use the two normal top holes to fix the power delivery daughterboard in place. The screws holding the board in can be removed, and ASUS has included two longer threaded screws in the box such that users can fasten the board into case standoffs. It is a little trickier if users have the push-pin type standoffs, such as those used in test beds.
The rest of the motherboard uses the extra space to add in all of ASUS’ favorite controllers. We have two four-pin fan headers at the top left of the board, suitable for a CPU fan and a case fan, as well as the TPU/EPU controllers and the motherboard battery is raised out of the board at right angles rather than the typical flat scenario. Below the battery is the MemOK! button, used when a memory overclock goes AWOL rather than a blanket Clear_CMOS button. Two USB 2.0 headers lie to the side of the WiFi module which itself is connected by a pair of wires to the rear IO panel for the magnetic antenna included in the box. The USB 3.0 header is hiding below the WiFi module, as well as the Realtek ALC898 audio codec chip. The location of this USB 3.0 header could be of concern due to either the location of the USB 3.0 case ports (typically on the front), or if a GPU with a backplate is used.
The chipset is underneath the electric blue heatsink in the middle of the bottom of the board, and on the right of this are our SATA ports – two SATA 6 Gbps and two SATA 3 Gbps. With the SATA ports all facing the same way we get the issue that if the bottom one needs to be removed, the ones above have to be taken out and put back in again. This is not an ideal scenario, and apart from spacing out the ports a little more, I cannot think of a better solution.
The PCIe slot at the bottom board is where we expect to find it, although front panel audio is to the left of this and would quite easily get in the way of any installed graphics card. This a really odd placement for the audio header, it baffles and confuses me in a number of ways, as someone at ASUS after designing the rest of the motherboard turned round and said that this placement was a good idea. It would have never got past my stamp of approval that is for sure.
On the right hand side of the board are our power connectors, a TPU switch and the front panel header. All that is missing here is a two-digit debug, and perhaps a power/reset switch. While not 100% necessary, for anyone used to building or debugging computers, they are a god-send when dealing with potential issues. At least a two-digit debug would be appreciated.
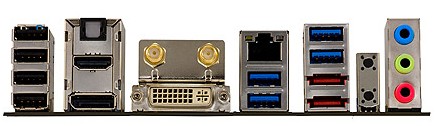
As mentioned in the overview, the IO of the P8Z77-I Deluxe is one of the more fruitful bounties in this mITX roundup. From left to right we have four USB 2.0 ports, an optical SPDIF output, HDMI, DisplayPort, two antenna placements, a combination DVI-I, an Intel NIC, four USB 3.0 ports (two from the chipset, two from an ASMedia controller), two eSATA 3 Gbps, a USB BIOS Flashback button, a Clear_CMOS button, and a trio of Realtek ALC898 audio jacks.
Board Features
| ASUS P8Z77-I Deluxe | |
| Price | Link |
| Size | Mini ITX |
| CPU Interface | LGA-1155 |
| Chipset | Intel Z77 |
| Memory Slots |
Two DDR3 DIMM slots supporting up to 16 GB Up to Dual Channel, 1066-2400 MHz |
| Video Outputs |
DVI-I HDMI DisplayPort |
| Onboard LAN |
Intel 82579V 802.11 b/g/n WiFi 2.5 GHz + 5 GHz |
| Onboard Audio | Realtek ALC898 |
| Expansion Slots |
PCIe 3.0 x16 mini-PCIe |
| Onboard SATA/RAID |
2 x SATA 6 Gbps (Chipset), RAID 0, 1, 5, 10 2 x SATA 3 Gbps (Chipset), RAID 0, 1, 5, 10 2 x eSATA 3 Gbps (Chipset), RAID 0, 1, 5, 10 |
| USB |
4 x USB 3.0 (Chipset) [2 back panel, 2 onboard] 2 x USB 3.0 (ASMedia 1042) [2 back panel] 8 x USB 2.0 (Chipset) [4 back panel, 4 onboard] |
| Onboard |
2 x SATA 6 Gbps 2 x SATA 3 Gbps 2 x USB 2.0 Headers 1 x USB 3.0 Header 1 x MemOK! Button 2 x Fan Headers 1 x mPCIe with WiFi Module 1 x TPU Switch Front Panel Audio Header |
| Power Connectors |
1 x 24-pin ATX Power Connector 1 x 8-pin CPU Power Connector |
| Fan Headers |
1 x CPU (4-pin) 1 x CHA (4-pin) |
| IO Panel |
4 x USB 2.0 1 x Optical SPDIF Output 1 x HDMI 1 x DisplayPort 2 x Antenna 1 x DVI-I 1 x Intel 82579V NIC 4 x USB 3.0 2 x eSATA 3 Gbps 1 x Clear_CMOS Button 1 x USB BIOS Flashback Button Audio Jacks |
| Warranty Period | 3 Years |
| Product Page | Link |
An interesting distinction to make between all the mITX boards in this roundup is that those on the higher cost end of the spectrum are using Intel NICs, whereas the cheaper models all go with Realtek. The same thing cannot be said with audio codec, with some low end models using the ALC898 and a high end model using the ALC889. Thankfully though the ASUS here is using the ALC898, and also has access to 6 USB 3.0 ports overall on top of 8 USB 2.0 ports.
Downsides start with the front panel audio header placement, the lack of mSATA (compared to some of the cheaper models) and no two-digit debug (but that may just be a personal preference). The use of the daughterboard for the power delivery should have opened up a little more opportunity in terms of placement of these headers, but even with the extra space it is a tight squeeze with all the ASUS features such as the TPU and USB BIOS Flashback to take into consideration. Perhaps the two-digit debug could have been on the daughterboard?


54 Comments
View All Comments
Sabresiberian - Tuesday, January 1, 2013 - link
Thanks for the great comparison review!It looks like there is a little mistake in the spec list for the Asus board, which shows it having a mini-PCIe connector. I would love it if it did, but I didn't see it on the board and it isn't mentioned in other spec lists.
It is important to me because I would ideally need connection for both a graphics card and a sound card (which I believe I could do through a mini-PCIe to PCIe x1 adapter if needed). This makes the EVGA Stinger the choice for me here, though the Asus board is the one I would prefer to buy.
I am truthfully a little disappointed in the EVGA board, which seems all too common with EVGA products in general these days. Great support is still there, but I'd rather they build bleeding edge components and not have to find out whether or not their support is as good as people say it is. The Stinger is a good board to be sure, and the Intel LAN alone puts it in the category of "will buy" for me, but I was hoping it would be something that would match or beat the Asus P877-I, and it just doesn't.
Foeketijn - Tuesday, January 1, 2013 - link
When you take overclocking out of the equation, B75 has it all, for the price just a tiny bit north of the old H61 chipset. Support for IB features (1600Mhz DDR3, PCI-e 3.0), Native Sata III, USB 3.0.It wasn't intended for the DIY market but fits the bill perfectly in my opinion. Only the very very few who need to OC, +16Gb ram or multiple SSD's @ full 6 Gb/s need the Z77 chipset.
The only thing is, that us mere mortals can't predict is, if a much cheaper chipset is used, did the OEM also cheapskate on the critical parts to? I would love to see some in-depth component analysis which I see for example, when a PSU is taken apart.
Which components are used? how well is the soldering done, does it still work at a sauna lanparty, etc.
I might be alone in this, but I would find that much more valuable information than all the performance benchmarks together (race to the bottom, be dammed!).
Including the northbridge in the CPU made motherboard and CPU reviews so predictible (or borring).Since then, I'm only interested in stability, ease of installation (nicely covered) and practical use (fan controll, MEM compatibility ect).
<offtopic> Oh I loved the XP-m 2500+ siverpainting 2001 era where you actually could get a noticeable improvement of performance and not necessarily have to sacrifice stability or risk bankruptcy</offtopic>
vanwazltoff - Tuesday, January 1, 2013 - link
i picked up an asus p8z77-i deluxe/wd before christmas and made a beast gaming computer out of it with an i5-3750k OCed to 4.5ghz and a gtx670 =]vanwazltoff - Tuesday, January 1, 2013 - link
*3570kBeaver M. - Tuesday, January 1, 2013 - link
Loved the POST screen measurements and the DPC latency testing. Something you dont see every day. Actually Ive never seen it, and yet I always wanted to know those.However I am not really interested in the Z77s, since they have a horrible layout for my needs. Only the Asus one comes close to what I need, but I just dont buy Asus anymore because of several very bas experiences.
So, I wish you would also test the B75 and H77s.
paksoy - Tuesday, January 1, 2013 - link
I love the features of this Asus mobo, but i want to use it in a really small form factor case like the Antec ISK 110 VESA Case.http://www.anandtech.com/show/6192/antec-isk-110-v...
I'm just worried that the height of the VRAM board would prevent it from using it with this case.
mi1stormilst - Tuesday, January 1, 2013 - link
I still opted for the Gigabyte Z77N and love it...Sivar - Wednesday, January 2, 2013 - link
Does this refer to the ALC889 playing an audio file encoded at 192KHz?If so, does it really matter? Failing a test is never a good thing, but I know of no widely available 192KHz audio source, and such a source would have no benefit, nor would a 96KHz source.
cjs150 - Wednesday, January 2, 2013 - link
I am a happy user of the AS Rock board in a silent HTPC. It works exceptionally well. However it is clear that some work still needs to be done on motherboard design.MSata on back is excellent - now can we have it as SATA 3 because the better MSata SSDs are all Sata 3.
Placement of Sata connectors is often awkward on these boards. On edge and at right angles please.
Similarly I would love it if someone either did the 24 pin ATX power connector at right angles or someone manufactured a right angled converter that did not require de soldering the motherboard connector. Cable management in Mini-OTX is very hard and that would really help.
Finally, careful choice of RAM can eliminate issues Ian had about the closeness of the CPU socket preventing the use of many after market coolers. I use the Samsung green low profie memory, which is so low that any after market cooler can be used (and runs at 1.35v, is an unbelievably good overclocker and reasonably priced!)
romrunning - Wednesday, January 2, 2013 - link
As has been mentioned previously, the H77 chipset is great for those who do not need overclocking. I've used the Intel DH77DF, and I heartily recommend it. Since the DH77DF has an eSATA port (not too common), I've even been able to keep an eSATA dock that I used before USB 3.0 was more readily available. If you install this board into a Fractal Design Node 304 case, you can use all of the SATA ports as well. I've used it with a Silverstone SG05 case, and the loudest part of my setup is the fan on the graphics card (Radeon 7850).One thing I've noticed, though, is the relatively low mic input from the front audio. Not sure if this is common to the Realtek ALC8xx chip series, but even after boosting the gain in Win7 to +30db, it still isn't quite as loud as an older AMD board I previously had (which didn't need a boost at all).