Z77 mITX Round-Up: Five of the Best – MSI, Zotac, ASRock, EVGA and ASUS
by Ian Cutress on December 31, 2012 7:00 AM EST- Posted in
- Motherboards
- MSI
- ASRock
- EVGA
- ZOTAC
- Asus
- Ivy Bridge
- Z77
- mITX
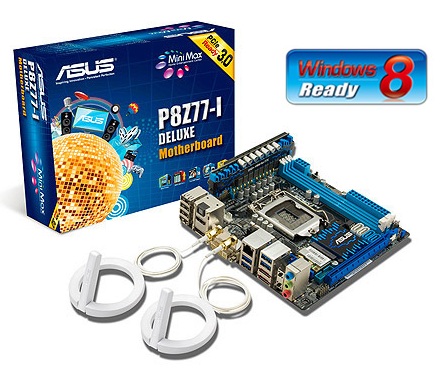
ASUS P8Z77-I Deluxe Overview
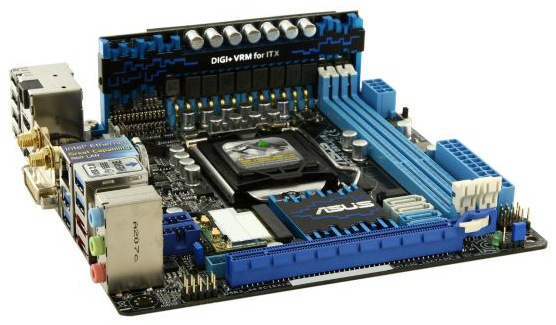
Consumer grade motherboards are for the most part two dimensional affairs – the only PCB related paraphernalia that would impinge on the z-direction are the modular components that enhance the experience, such as memory and graphics. Now take the original point and turn it on its head, and we get the P8Z77-I Deluxe. In order to save space on the mini-ITX sized motherboard for controllers and added features, ASUS have taken a leaf out of the server space and placed the power delivery for the motherboard perpendicular to the motherboard. As crazy as it sounds, the setup is tastefully done by careful planning and precision engineering.

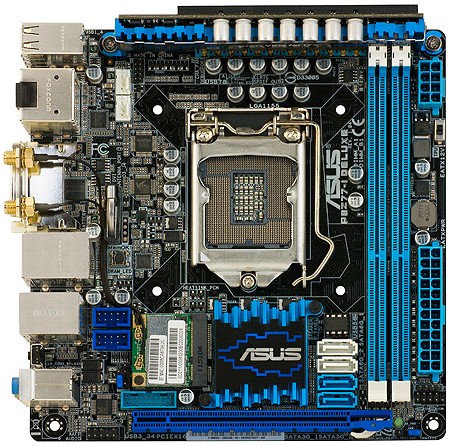
Alongside the funky VRM placement, ASUS are also one of the few Z77 mITX manufacturers with the socket and the chipset the more ‘common’ way around when put alongside full sized ATX boards. This should give the socket more room when dealing with larger air coolers, however we are still up against the memory slots (as expected) and it is only a short distance to the rear IO panel and the power delivery daughter board. But the plus side is also in the 8-pin CPU power connector placement, which is on the other side of the memory slots. There is also room to fit a TPU switch, a MemOK button, two USB 2.0 ports, a USB 3.0 port, a 2.5/5 GHz WiFi module and a pair of fan headers on board. The WiDi version of this motherboard looks identical apart from WiDi capabilities for around $15 more.
Connectivity and controller selection are an important aspect for a mITX design, and ASUS have furnished the P8Z77-I Deluxe with more USB ports and connectivity at the rear IO than most boards in this roundup. A total of eight USB ports on the rear (four USB 2.0, four USB 3.0), as well as DVI-I, HDMI, DisplayPort, eSATA, BIOS Flashback, an Intel NIC and Realtek ALC898 audio (via three jacks rather than the standard six). The front panel audio header is in a really odd place, and easily interferes with a large gaming GPU.
Followers of my reviews will see a familiar face in the ASUS BIOS and Software departments. The BIOS is an easy mode front screen with additional advanced mode, giving overclock options as well as DIGI+ Power configuration details. Previous experience often tells me that ASUS BIOSes are often the more configurable and compatible with my memory kits than most, and I have nothing to say that the mITX board would contradict that. The software package comes in the form of AI Suite and covers all the bases software should cover – overclock options, monitoring (warning when things get too hot), fan controls with RPM detectors, energy saving options, WiFi controls, fast charging utilities, USB 3.0 Boost, Network iControl, USB BIOS Flashback options and BIOS updating.
In terms of benchmark performance, the P8Z77-I Deluxe takes an extraordinary win in our WinRAR test, beating the other mITX Z77 boards by 5-20%. I redid this test after a reboot, a fresh install, a re-flash of the latest BIOS and it remained consistent. Whatever ASUS put in the BIOS, WinRAR seems to fly. The other CPU benchmarks were more ballpark, but the gaming results seemed to swing towards the ASUS. With the USB 3.0 boost functionality, we got great results in our USB 3.0 testing as well under Windows 7. Power delivery for the ASUS P8Z77-I was also favorable in our setup.
For an all-in price of $185 for the normal version of the P8Z77-I Deluxe and $200 for the WiDi enabled P8Z77-I Deluxe/WD, we are stretching near the top of our mITX range pricing bracket – only the EVGA Z77 Stinger is more expensive, and the others are circling around the $150-$160 margin. This ASUS board pulls ahead on performance, usability and software, and the design is new and exciting. Consistent functionality from ASUS products such as USB BIOS Flashback, USB 3.0 Boost, MemOK! and numbers of ports should not be overlooked lightly, and if you are looking for one of the best all-around mITX board for a build, the ASUS P8Z77-I Deluxe pulls out a big lead. However, the positioning of that front panel audio header gives cause for concern.
Visual Inspection
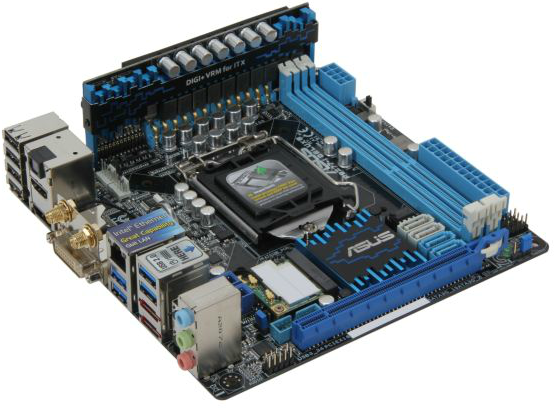
All eyes on the P8Z77-I Deluxe immediately focus on the VRM add-in board. It is hard to miss, and makes the motherboard aesthetically different to its rivals.

There are some questions that come up from this sort of arrangement – connectivity, power delivery, electrical losses, electrical noise, stability, and so on. Crucially the path of the power is most interesting – the 8-pin CPU power connector is on the top right of the motherboard, and this power is taken up into the daughterboard, filtered, and then passed back through into the motherboard for the processor. On the left of the daughterboard we have a series of normal pins used for control of the power delivery – issuing commands for the ‘DIGI+’ part of the system. The rest of the daughterboard is connected firmly with thicker copper pipes – mostly for rigidity but behind this is hiding the transfer of power to the board. The capacitors in front of the power delivery provide the final filtering mechanism before the CPU gets the power. The result is essentially a custom power solution, allowing ASUS to add in any height of daughterboard for any number of phases or power delivery capability. We may see something similar if ASUS ever decide to bring out a mITX Republic of Gamers product, but I would not expect a 32 phase monster to arrive in similar fashion any time soon (and it is debatable if 32 phases is even needed). There is also scope for adding something similar on mATX and ATX boards.

On close inspection readers may notice the ‘lack’ of mounting holes for the motherboard at the top. In order for everything to go as planned, ASUS use the two normal top holes to fix the power delivery daughterboard in place. The screws holding the board in can be removed, and ASUS has included two longer threaded screws in the box such that users can fasten the board into case standoffs. It is a little trickier if users have the push-pin type standoffs, such as those used in test beds.
The rest of the motherboard uses the extra space to add in all of ASUS’ favorite controllers. We have two four-pin fan headers at the top left of the board, suitable for a CPU fan and a case fan, as well as the TPU/EPU controllers and the motherboard battery is raised out of the board at right angles rather than the typical flat scenario. Below the battery is the MemOK! button, used when a memory overclock goes AWOL rather than a blanket Clear_CMOS button. Two USB 2.0 headers lie to the side of the WiFi module which itself is connected by a pair of wires to the rear IO panel for the magnetic antenna included in the box. The USB 3.0 header is hiding below the WiFi module, as well as the Realtek ALC898 audio codec chip. The location of this USB 3.0 header could be of concern due to either the location of the USB 3.0 case ports (typically on the front), or if a GPU with a backplate is used.

The chipset is underneath the electric blue heatsink in the middle of the bottom of the board, and on the right of this are our SATA ports – two SATA 6 Gbps and two SATA 3 Gbps. With the SATA ports all facing the same way we get the issue that if the bottom one needs to be removed, the ones above have to be taken out and put back in again. This is not an ideal scenario, and apart from spacing out the ports a little more, I cannot think of a better solution.
The PCIe slot at the bottom board is where we expect to find it, although front panel audio is to the left of this and would quite easily get in the way of any installed graphics card. This a really odd placement for the audio header, it baffles and confuses me in a number of ways, as someone at ASUS after designing the rest of the motherboard turned round and said that this placement was a good idea. It would have never got past my stamp of approval that is for sure.
On the right hand side of the board are our power connectors, a TPU switch and the front panel header. All that is missing here is a two-digit debug, and perhaps a power/reset switch. While not 100% necessary, for anyone used to building or debugging computers, they are a god-send when dealing with potential issues. At least a two-digit debug would be appreciated.

As mentioned in the overview, the IO of the P8Z77-I Deluxe is one of the more fruitful bounties in this mITX roundup. From left to right we have four USB 2.0 ports, an optical SPDIF output, HDMI, DisplayPort, two antenna placements, a combination DVI-I, an Intel NIC, four USB 3.0 ports (two from the chipset, two from an ASMedia controller), two eSATA 3 Gbps, a USB BIOS Flashback button, a Clear_CMOS button, and a trio of Realtek ALC898 audio jacks.
Board Features
| ASUS P8Z77-I Deluxe | |
| Price | Link |
| Size | Mini ITX |
| CPU Interface | LGA-1155 |
| Chipset | Intel Z77 |
| Memory Slots |
Two DDR3 DIMM slots supporting up to 16 GB Up to Dual Channel, 1066-2400 MHz |
| Video Outputs |
DVI-I HDMI DisplayPort |
| Onboard LAN |
Intel 82579V 802.11 b/g/n WiFi 2.5 GHz + 5 GHz |
| Onboard Audio | Realtek ALC898 |
| Expansion Slots |
PCIe 3.0 x16 mini-PCIe |
| Onboard SATA/RAID |
2 x SATA 6 Gbps (Chipset), RAID 0, 1, 5, 10 2 x SATA 3 Gbps (Chipset), RAID 0, 1, 5, 10 2 x eSATA 3 Gbps (Chipset), RAID 0, 1, 5, 10 |
| USB |
4 x USB 3.0 (Chipset) [2 back panel, 2 onboard] 2 x USB 3.0 (ASMedia 1042) [2 back panel] 8 x USB 2.0 (Chipset) [4 back panel, 4 onboard] |
| Onboard |
2 x SATA 6 Gbps 2 x SATA 3 Gbps 2 x USB 2.0 Headers 1 x USB 3.0 Header 1 x MemOK! Button 2 x Fan Headers 1 x mPCIe with WiFi Module 1 x TPU Switch Front Panel Audio Header |
| Power Connectors |
1 x 24-pin ATX Power Connector 1 x 8-pin CPU Power Connector |
| Fan Headers |
1 x CPU (4-pin) 1 x CHA (4-pin) |
| IO Panel |
4 x USB 2.0 1 x Optical SPDIF Output 1 x HDMI 1 x DisplayPort 2 x Antenna 1 x DVI-I 1 x Intel 82579V NIC 4 x USB 3.0 2 x eSATA 3 Gbps 1 x Clear_CMOS Button 1 x USB BIOS Flashback Button Audio Jacks |
| Warranty Period | 3 Years |
| Product Page | Link |
An interesting distinction to make between all the mITX boards in this roundup is that those on the higher cost end of the spectrum are using Intel NICs, whereas the cheaper models all go with Realtek. The same thing cannot be said with audio codec, with some low end models using the ALC898 and a high end model using the ALC889. Thankfully though the ASUS here is using the ALC898, and also has access to 6 USB 3.0 ports overall on top of 8 USB 2.0 ports.
Downsides start with the front panel audio header placement, the lack of mSATA (compared to some of the cheaper models) and no two-digit debug (but that may just be a personal preference). The use of the daughterboard for the power delivery should have opened up a little more opportunity in terms of placement of these headers, but even with the extra space it is a tight squeeze with all the ASUS features such as the TPU and USB BIOS Flashback to take into consideration. Perhaps the two-digit debug could have been on the daughterboard?


54 Comments
View All Comments
Bullwinkle J Moose - Monday, December 31, 2012 - link
Hey yeah, Ian haz a good pointThat Crappy Gigabyte H61n-USB3 doesn't have Chipset USB3
But it does however boot just fine to a USB3 Windows to go drive at USB3 speeds
It also boots to Linux and XP due to the Non-Locked down Bios so we wouldn't want that either would we
and it takes a full 9 seconds to boot XP compared to the super de duper fast 7 second Windows 8
So we should spend more money and get locked into a closed system
After all, that is the future!
Limitations are fun so be happy as we lock down the Internet as well
After all, there are scarey Monsters out there
A man has to know his limitations
Clint Eastwood
Bullwinkle J Moose - Monday, December 31, 2012 - link
Ian haz a good point about the memory tooThat Gigabyte H61 board only takes up to 16GB of RAM
How much do these Z77 boards take by the way?
Was it this site or Maximum PC where the reviewers stated that in everyday use, you will notice no difference in speed between Sata 2 & 3 when you are using the latest and greatest SSD so I probably don't need the RAID capability on my H61 either
Keep up the good work Ian
Death666Angel - Wednesday, January 2, 2013 - link
It seems that someone just discovered sarcasm. Good for you!mczak - Monday, December 31, 2012 - link
H61 is not limited to one single sided DIMM per channel, double sided are just fine. It only accepts one per channel (at least it's specced that way) but since none of these mini-ITX boards have more than two memory slots this wouldn't matter at all here (max memory is still 2x8GB regardless).Frankly I'm not sure losing PCIe 3.0 is a big deal with mini-itx boards in any case but either way it isn't exactly true there are h61 boards supposedly supporting this (as it's got nothing to do with the chipset anyway all the pcie 3.0 signals coming directly from the cpu, though it would require bios support).
This leaves us with losing SATA 6 Gbps - this might indeed make some minimal difference in real world, provided you use a SSD and not a HD.
The major point imho (aside from overclocking) would be missing USB 3.0, which obviously makes a big difference when using external harddisks etc. Granted that could be done with separate usb controller but probably not a good idea since space is limited.
H61 IIRC also will lose the possibility of using 3 display outputs simultaneously. Maybe something like H77 would make more sense for mini-ITX as it pretty much only loses overclocking (plus the ability to split the 16 x pcie 3.0 lanes into 2x8 though I guess this has nothing to do with the chipset itself really, but in any case it won't be missed on mini-itx). So if you don't want to overclock, you wouldn't miss anything at all with H77 on a mini-itx board.
Etern205 - Saturday, January 5, 2013 - link
I also notice that as well, most sites will only review Z77 mITX boards instead of H61 or H77. Not all will need a Z77, Z77 is mostly for enthusiast or for those who are into the technical stuffs. For the average Joe or Jane any mITX board will do. If you tell them it's H61 or Z77, they probably won't care too much on the difference.piroroadkill - Wednesday, January 2, 2013 - link
You can't easily upgrade the chipset later. With a small up-front investment, you get the full feature set, and why not?Bullwinkle J Moose - Sunday, January 6, 2013 - link
Oh Boo Hoo, I can't easily upgrade to an overclocking chipset or void the warranties of my hardware componentsI am just stuck with a totally stable system
Boo Hoo
How can I possibly break this ?
What has the World become ?
Poor me
Boo Hoo
Bullwinkle J Moose - Sunday, January 6, 2013 - link
Why not?Because the H61 is exactly what I wanted
and anything else is NOT !
can you hear me now?
EVGA KINGPIN - Friday, November 19, 2021 - link
I still use my Z77 FTW board , have had it running without turning it off since 2015. evga is the best ,also my EVGA GTX 980 KINGPIN is still running strong,,,thanks EVGA for quality products, JRTsherlockwing - Monday, December 31, 2012 - link
Where is the Gigabyte?