990FX Motherboard Roundup with Thuban and Bulldozer – A Second Wind for ASUS, Gigabyte, MSI and Biostar
by Ian Cutress on April 5, 2012 11:00 AM ESTASUS Crosshair V Formula BIOS
Republic of Gamers BIOSes are great. Millions of options, not a whole lot of people know what they do, if they do anything at all. What we get is the standard ASUS graphical BIOS with a lot of heavy after-market modification. First thing that catches a user's eye will be the change to a red theme to be consistent with ROG advertising, but also that the BIOS defaults to the advanced mode rather than the EZ mode of other non-ROG boards.
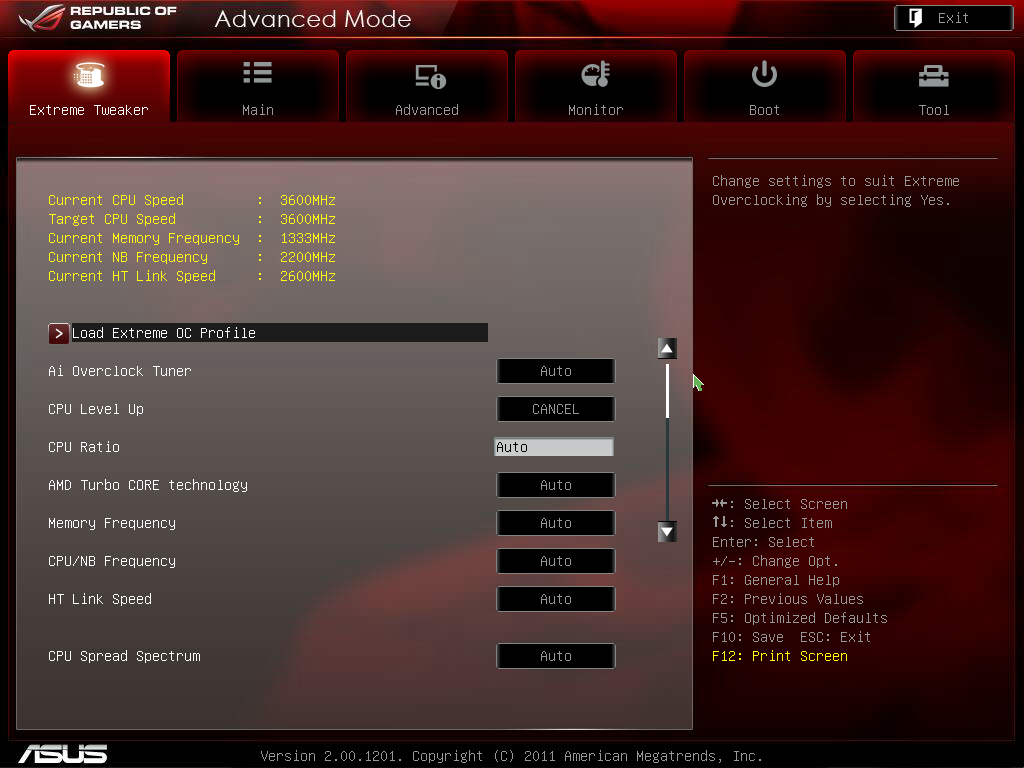
As a result we do not get the bevy of information on the front screen that I would personally like, such as CPU model, CPU temperatures and voltages all in a neatly packaged visual section. However this decision is most likely due to extreme overclockers wanting to use the board, and get to the overclocking options as quickly as possible.
There are two types of option in a ROG BIOS – ones that you know what they do (CPU multiplier, voltage, fan speed), and memory ones that you do not know (in my case, for example, the CS/ODT fine delay). For all your memory needs, Rajinder’s article for AnandTech back in August 2010 is still a fine read to get into the nitty gritty and would probably help understand a few of these options. But truth be told, ASUS seem to have put everything under the sun from the chipset manual available in the BIOS.
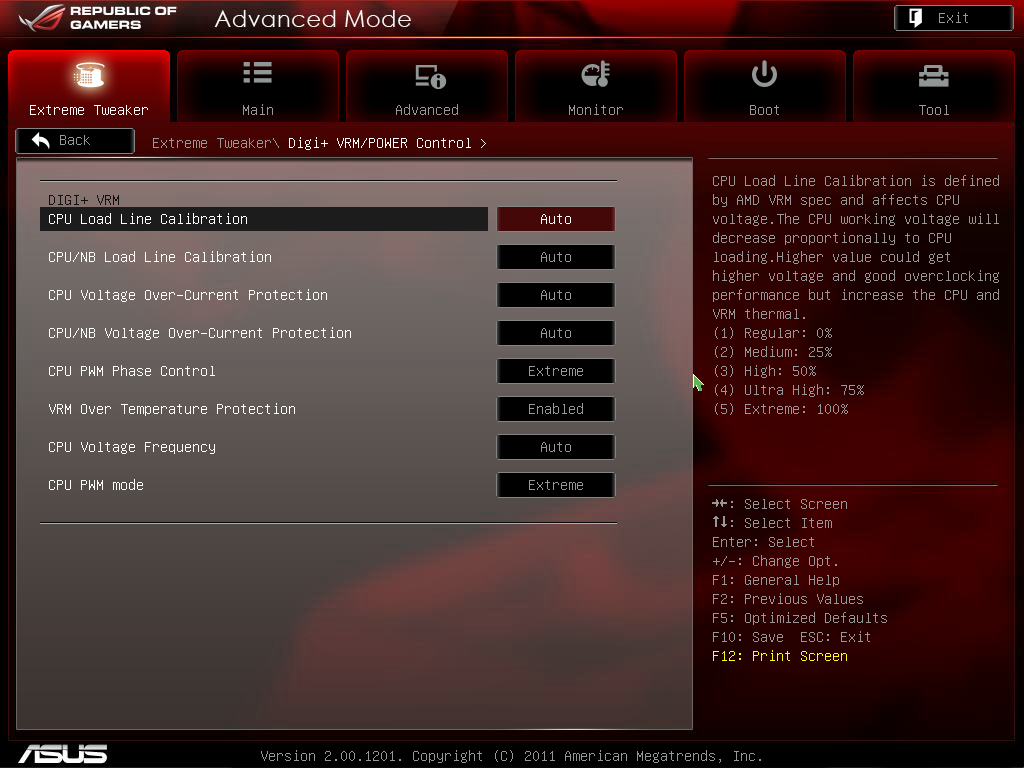
However for the likes of Johnny System Builder, or Katie Enthusiast, overclocking on the Crosshair V Formula is similar to any previous AMD system. We have options for all the standard typical AMD worries – CPU multiplier, CPU base frequency, voltages, HyperTransport links, NB frequency, memory straps, and options to enable/disable AMD’s Turbo Core. Even the Digi+ VRM solution options are present, allowing a little extra range for the power delivery components. In order to probe any XMP for your memory, ASUS has developed D.O.C.P, an option under ‘AI Overclock Tuner’ which adapts various options to try and match your memory profile. I will go through my overclocking with both Thuban and Bulldozer below.
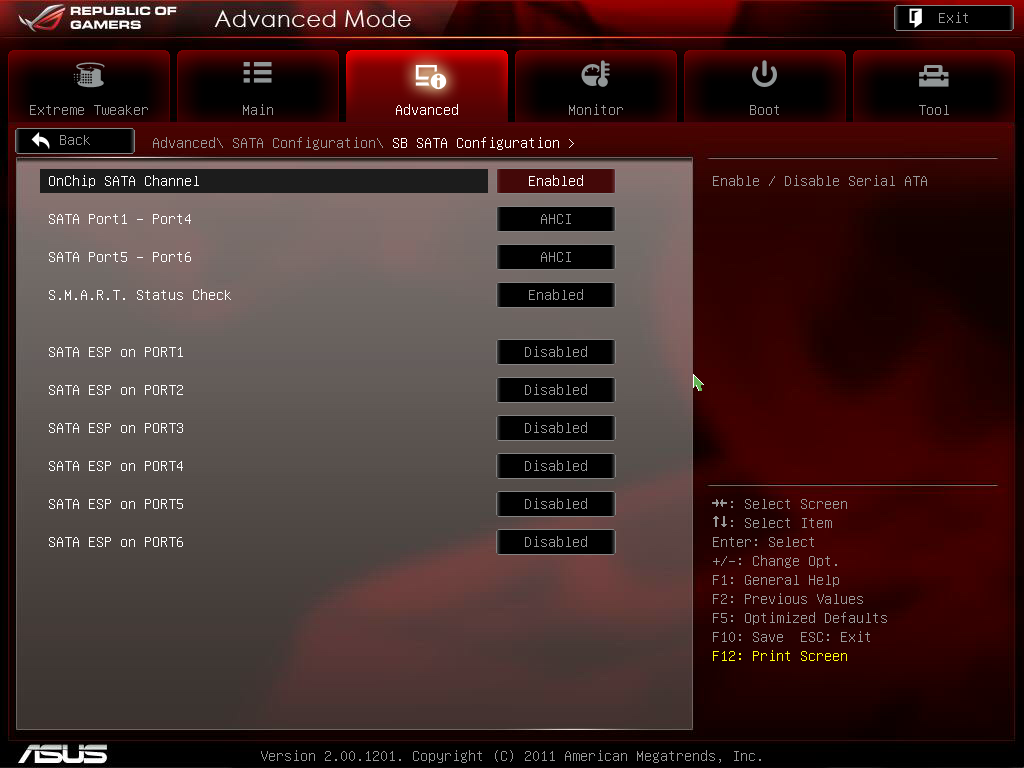
As is standard with the high end of ASUS’ range of motherboards, AHCI is enabled for SATA devices by default, which in my mind is a good thing. Also on the Crosshair V Formula is ASUS Core Unlocker, to allow users of ‘crippled’ processors to unlock cores that have been disabled. To clarify what I mean by a crippled processor, I refer to a processor that is internally a quad core, but one core is disabled as it did not conform to specifications and the package is sold as a tri-core. This technique is being used more and more in the semiconductor industry as it allows a greater proportion of CPU dies from a production wafer to be sold, reducing waste and increasing yields (at the expense of each die being a little bigger as it contains extra cores). Of course, these cores are disabled for a reason, so your mileage may vary – the processor you have may have a core disabled purely because AMD needed to increase stock numbers of one part, rather than one core being slightly malformed in the manufacturing processes. But I digress…
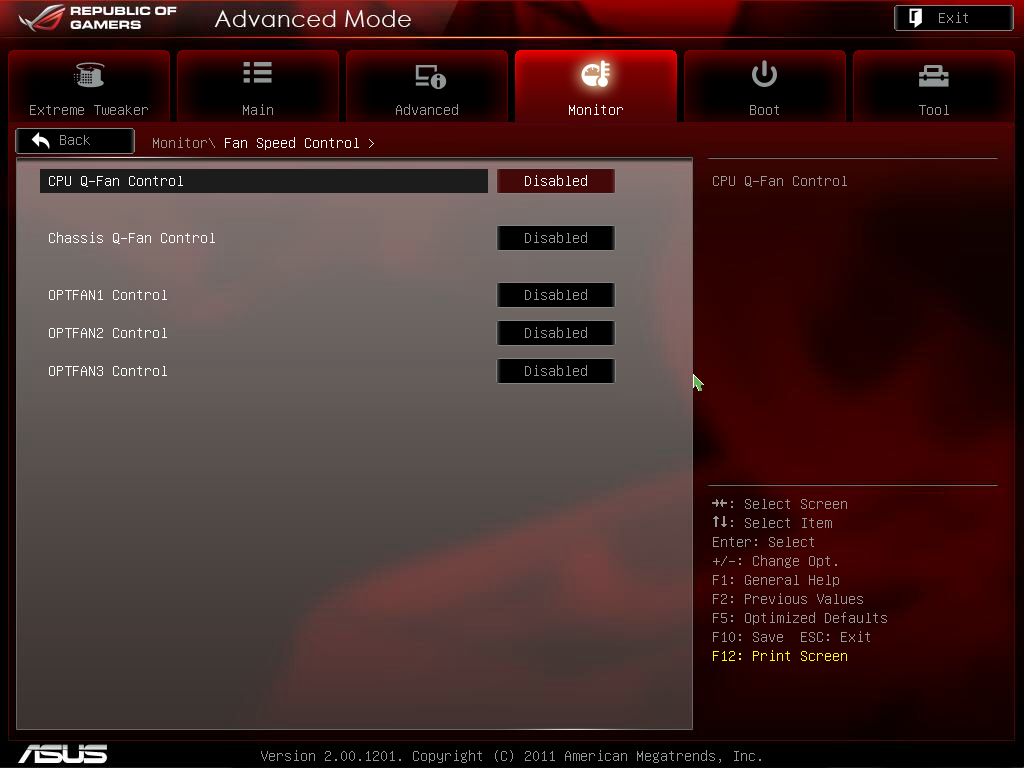
Fan controls on ASUS products are always top notch due to the more expensive but better fan controllers they use. For us in the BIOS, the CPU fans come under one setting of their own, the three chassis fans also have a single setting, but the option fans can be controlled individually as required.


Overclocking
I will level with you all – AMD overclocking on an ‘enthusiast’ level is not something I have done in a while. Fusion and Llano were low power and mainstream platforms respectively, and I was unprepared for AMD overclocking. However, after a crash course and some practice, I was able to overclock both a Thuban X6 1100T processor and the Bulldozer FX-8150 to reasonable levels with ease.
Thuban X6 1100T
The X6-1100T starts life as a 3.3 GHz component, resulting in a 16.5x multiplier at 200 MHz base frequency.
OC Button: Using ASUS’ onboard OC button, this applied a 10%/20 MHz base frequency overclock (16.5x @ 220 MHz = 3625 MHz) and raised the CPU voltage to 1.4 V. Memory likewise is increased – it was moved to the 1600 MHz strap, then as the base frequency was raised 10%, so did the memory, to 1760 MHz. The system was clever enough to also probe the XMP settings, giving sub timings at 1760 MHz at 9-11-9 sub timings. (This is despite the fact that the memory used is rated for 2133 9-11-9, meaning that 1760 9-11-9 should be a breeze.) This overclock was Blender stable, reaching 50ºC peak temperature.
AI Suite: Using the AI Suite software in the operating system, the Fast setting gave exactly the same as the OC button. The Extreme setting was a little more complex, giving the system a series of stress tests and raising the frequency until an error was encountered. There were a few downsides to this – while the system is fairly clever, it never adjusted the multiplier of the CPU, and when the system crashed it considered that the end and gave that overclock. As a result, we only got an overclock 1 MHz (0.5%) above what the fast setting had achieved, and this setting didn’t even apply an memory overclock, giving DDR3-1182 MHz. I was kind of disappointed by this.
Manual Overclock: Using the auto overclocks as a guide, I set my CPU voltage to 1.5 volts, the NB voltage to 1.15 volts, and the memory to 1.65 volts. Throughout the overclocking, I attempted to keep the NB Link frequency and HyperTransport frequency at their default levels by adjusting the straps.
My manual overclock attack has a three pronged approach:
a) Max base frequency. For this test, I reduce the multiplier down to a low level (x8), and then raise the base frequency until it is unstable. Then I raise the multiplier back up until the system is stable. Doing this, I managed 13x CPU multiplier at 320 MHz, giving 4160 MHz as a total overclock. This gave a load voltage of 1.56 volts due to automatic load line calibration, but only hit 57ºC maximum during a Blender stress test.
b) Default base frequency, high multiplier. This test is easy to understand – just keep upping the multiplier until the system is unstable. The issue with this is that AMD systems are unlike Sandy Bridge systems – rather there being a definite frequency the processor does or doesn’t work, there is a gradual decline. Nevertheless, I found that 20.5x multiplier at 200 MHz was the best I could do at 1.5 volts on the CPU, giving a CPU frequency of 4100 MHz.
c) Mix of base frequency and multiplier. For this test, I raise the base frequency until I am happy with the memory clock (as changing one changes the other), then raise the multiplier until it is stable. This is a little trickier to pin down, as there could be variations in stability across a range of frequencies. The best result which was fully Blender stable was with a 18.0x multiplier at 230 MHz, giving a total overclock of 4140 MHz.
Bulldozer FX-8150
The FX-8150 starts life as a 3.6 GHz component, rising to 3.9 GHz on heavy loads and 4.2 GHz on light loads. By default, this is a 18.0x multiplier at 200 MHz base frequency. Testing is as the Thuban core.
OC Button: Similar to the Thuban, using ASUS’ onboard OC button applied a 10%/20 MHz base frequency overclock (18.0x @ 220 MHz = 3960 MHz) and raised the CPU voltage to 1.4 V. However, this disabled the Turbo Core functionality, meaning that performance is actually decreased, especially in lightly threaded loads. Memory also received a 10% bump, to 1760 MHz at XMP sub timings. This overclock was Blender stable, reaching 57ºC peak temperature.
AI Suite: Using the AI Suite software in the operating system, again the Fast setting gave exactly the same as the OC button. With the Extreme setting, we got a little more in the system – the CPU/NB voltage was raised to 1.4 volts, but ended up with a stable 18.0x multiplier and 225 MHz base frequency, giving 4050 MHz total.
Manual Overclock: Using the auto overclocks as a guide, I set my CPU voltage to 1.5 volts, the NB voltage to 1.15 volts, and the memory to 1.65 volts, exactly the same as the Thuban setup. Again, throughout the overclocking, I attempted to keep the NB Link frequency and HyperTransport frequency at their default levels by adjusting the straps.
a) Max base frequency. For this test, I reduce the multiplier down to a low level (x8), and then raise the base frequency until it is unstable. Then I raise the multiplier back up until the system is stable. Doing this, I managed 14.5x CPU multiplier at 320 MHz, giving 4640 MHz as a total overclock. This gave a load voltage of 1.512 volts due to automatic load line calibration, and hit 77ºC maximum during a stress test.
b) Default base frequency, high multiplier. This test is easy to understand – just keep upping the multiplier until the system is unstable. Unfortunately, due to the nature of AMD systems, this was a very flawed approach. While the system often acted stable for a given multiplier, during the Blender stress test it would work fine initially then overheat and protection would kick in, causing the system to reboot. Bulldozer runs hot! From 23.0x multiplier down to 21.0x, it would keep restarting when it overheated.
c) Mix of base frequency and multiplier. For this test, I raise the base frequency until I am happy with the memory clock (as changing one changes the other), then raise the multiplier until it is stable. My attempt at 266 MHz (to give DDR3-2133) and 17x multiplier worked well, until about 12 minutes into the Blender test, where it would overheat. Consequently at lower multipliers, this would occur as well.


57 Comments
View All Comments
IanCutress - Thursday, April 5, 2012 - link
Unfortunately we don't have an infinite amount of kit to review with. We're individual reviewers here, not all working in a big office. Obviously we can't all request top end kit from manufacturers either. Plus for every time we do use new high end kit, we also get comments about testing something 'more realistic' to most users. In that circumstance, we can't win and please everyone, but we do try and be as consistent as possible.Ian
phocean - Thursday, April 5, 2012 - link
I bought the Sabertooth a few weeks ago... and it throws an annoying buzzing sound in the speakers, especially when a USB port is used (in other words, all the time).It is the sign of an isolation issue between chipsets and shows poor design and testing from Asus.
Needless to say that the support was of no help (and no willing to help).
So don't buy it, unless you don't plug any speaker in it.
richaron - Friday, April 6, 2012 - link
Mine doesn't have this problem. You either got an unlucky board, or your psu is funky.extide - Thursday, April 5, 2012 - link
Seem to me like you were probably using a bit too much voltage for the BD. I would assume that is why you had so many issues with thermal runaway. 1.4-1.45ish would probably be a better place to stay with an air cooler :)extide - Thursday, April 5, 2012 - link
EDIT: Nevermind I forgot you are using the AMD kit watercooler, which is better than straight air cooling but I'd think it would take more of a fully custom built water setup to run 1.5v vCore.Hrel - Thursday, April 5, 2012 - link
I was going to build a new computer based on Ivy Bridge this Fall, I'm still running a Core 2 Duo E8400. But I've decided I'm not building myself a new computer until the motherboard has USB 3.0 and ONLY USB 3.0. A LOT of them, EVERYWHERE!I just built a guy a Z68 based computer with an i7 2700K but I had to order a VERY hard to find adapter card to plug in the USB 3.0 based memory card reader and the USB 3.0 on the front of the Fractal Design case. Because the Asus motherboard has ZERO USB 3.0 headers on it. It never even occurred to me that was a possibility. Not only has USB 3.0 been out for years now, but it was released WAY over-due. WTF is the hold up. Make the switch. USB 2.0 is for the 2000's decade, it's 2012. I am done with USB 2.0. I shouldn't have to buy an add-in card for BRAND NEW motherboard to support basic accesories, like a memory card reader and front usb port.
This is related to this article because I think if AMD was actually competitive with Intel AT ALL, like they were with Athlon XP/64/64 X2, then Intel would step up their game all around. Or maybe I wouldn't even have to buy Intel because they constantly make shit decisions like this, and changing the motherboard socket constantly, and charging 300 dollars for a quad core with HT. Their shit is endless and I really don't want to buy their products but AMD is simply not an option; if I wanted something that slow I'd just put a quad core Penryn based CPU in my current rig and save a bunch of money.
ggathagan - Friday, April 6, 2012 - link
There are only two Asus Z68 boards that don't have the USB 3 header, but somehow it's *Intel's* fault that Asus didn't use a USB 3 header on the board you bought?Huh...
Maybe you should have been a little more attentive when board shopping.
IanCutress - Friday, April 6, 2012 - link
Hi Hrel,I actually like USB 2.0 on my boards. If you have solely USB 3.0 and use them all, there's a big chance of a bottleneck in the bus somewhere. Also, I install a fresh operating system on every board I test via USB as it is a lot quicker than CD. Unfortunately during the install program, it doesn't process anything through the USB 3.0 ports - mouse, keyboard, or even the USB stick with the OS on. So I ideally like to have three USB 2.0 ports for that purpose. It's more a fault of Windows7 than the chipset, but otherwise if a board only has two USB 2.0 ports, I have to disconnect the mouse and use the keyboard and USB install drive only. Saying that, I have a board in that is solely USB 3.0, so it's going to be fun to install an OS on that... :/
Ian
fic2 - Friday, April 6, 2012 - link
I have a Dell keyboard that has 2 USB ports on it. That would solve your problem with a 2 x USB 2 mb. I currently have the mouse daisy chained off the keyboard.B - Thursday, April 5, 2012 - link
Your article should note that sound blaster provides a software overlay, but under that aluminum skin overlay lies a Realtek chip. I was fooled by this marketing and very disappointed after configuring this motherboard and discovering this fact. You don't get soudblasters hardware acceleration or the crystalizer. You should note this in any article about the asus line with x-fi2. Had I known I would have done things differently.