Thermaltake Level 10 GT: Monument to Excess
by Dustin Sklavos on July 26, 2011 11:50 AM EST- Posted in
- Cases/Cooling/PSUs
- Thermaltake
- Full-Tower
Assembling the Thermaltake Level 10 GT
When you get north of the $140/$150 price point you do start to see a lot of unusual case designs begin to surface. Making a bog standard ATX case is reasonably easy, but tweaking and changing designs in an effort to improve both aesthetics and performance does take some effort. Likewise, the end user should be prepared for a little more thought and work to go into his or her build.


The Thermaltake Level 10 GT's assembly is actually less daunting than it looks, but it can be rife with minor nuisances. The absolute first thing you're going to want to do is take the hinged side panel off, and that's done by just opening it and then lifting it off the hinge. It's nice for quick and dirty changes internally, but for anything remotely more involved like installing a motherboard or expansion card, it needs to come off.

Someone over at Thermaltake heard my prayers when it came to motherboard installation, because I didn't have to install a single standoff into the motherboard tray. The exact standoffs for a bog standard ATX board were already in place and ready to go; all I had to do was pop in the I/O shield (a slightly tighter fit than usual) and then screw in the motherboard. It was incredibly painless.
Installing a 5.25" drive is also reasonably easy, with the bay shields designed to pop out of the front by squeezing the sides. It's a little unsightly but not a deal breaker, and the 5.25" drive is then clamped into place using a toolless clamp on the other side of the case. As I mentioned on the previous page, I do take issue with this, because I found it to be fairly difficult to get our optical drive to feel fully secure in the bay. Installing an external 3.5" drive is also a little fraught, as you'll have to carefully maneuver two screws into the enclosure to secure it in the bay.
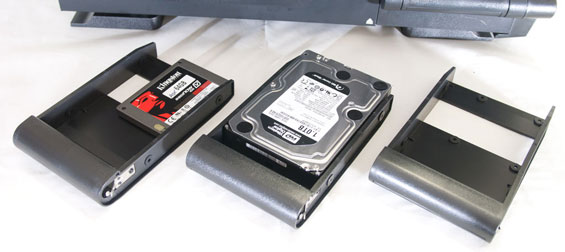
The hot-swappable 3.5" drive bays are easy enough to install into. Each tray includes rubber grommet-lined mounting holes for both 2.5" and 3.5" drives, and that's much appreciated. It highlights a reason why using drive trays in modern enclosures is such a smart idea: it makes integrating 2.5" drive support much easier.

Unfortunately, having that smooth, flat rear (heads out of the gutter, kids) around the I/O shield and expansion ports creates an issue other enclosures don't have: there needs to be a way to secure expansion card brackets while giving space to work them into place. The result is that the Level 10 GT adds an extra step: you have to remove a small plate affixed with two thumbscrews and then remove the slot covers for the expansion slots before popping in the card.
Finally, installing the power supply is fairly easy and routing cables wasn't too problematic. There's a healthy amount of space behind the motherboard tray that it can be done without too much trouble, but you're probably still going to have to squish the side panel back down and on. The only power leads the enclosure requires are a single SATA power lead for the drive bays and a molex lead for the fans; the rear fan uses its own 3-pin lead allowing it to be controlled by the motherboard. That's a detail I actually really liked: Thermaltake seemed to know exactly which fan you'd want your hardware to control.
The takeaway with assembling the Level 10 GT is simple: remove the side panels completely, and then try to approach it like a regular enclosure. It will still take a bit of time and thought, but if you're buying a $270 case that shouldn't be a problem.


46 Comments
View All Comments
Skott - Tuesday, July 26, 2011 - link
Performance wise it may be good but its not what I would call a sleek case. Beauty is in the eye of the beholder though. It looks rugged however. More like something you would take out and carry around every day in a work environment. Not that I would want to carry it around every day. It may look rugged, be rugged, but it would also be very heavy and impractical for that.jsbiggs - Tuesday, July 26, 2011 - link
Nice review, but I have a problem with the graphs. Maybe it's just my eyes, but I absolutely cannot read the white text on the bright yellow bar representing the Level 10 GT. The darker yellow is fine, but when the brightness goes up, I just can't tell what the numbers are. You can easily infer the performance relative to the other offerings, but would be better if you could read the number.tzhu07 - Tuesday, July 26, 2011 - link
I still prefer the simplicity of something like a R3 Define case or Lian Li. The Level 10 is incredibly tacky.Tetracycloide - Tuesday, July 26, 2011 - link
I can't say I've ever seen a steel and plastic enclosure that was worth over $200 before reading this article and afterward. Still no.StickyIcky - Tuesday, July 26, 2011 - link
Am I the only one that thinks this thing looks like a severely mutated Playstation 2?danjw - Tuesday, July 26, 2011 - link
If you are going for air cooled, I personally would go for the Silverstone FT02. If liquid cooled, I think the HAF X would be my choice. Personally I don't really like the looks of either the HAF X or Level 10 GT, but from a utility standpoint the HAF X wins in my book. It would be great if you guys would do a review of it.Kevin G - Tuesday, July 26, 2011 - link
Having purchased on of these a few months back, I can say that it isn't perfect but pretty good.First the negatives. Unlike this review, I took advantage of the fact that an EATX motherboard will fit into this case. Fitting such a large motherboard into the chassis isn't easy. I was further hampered by needing to remove some of the standoffs which wasn't that big of a problem. However, I discovered that the paint on the motherboard tray is a bit thin as I scratched a spot near one of the stand offs. Getting the IO panel properly mounted with an such a large motherboard is pain. Similarly, mounting a large PSU is also a pain. Another oddity is that the rear 120 mm fan doesn't match the rest of the fans which color changing LEDs. The feet rotate 90 degrees which is generally a good thing overall but they're very easy to move and feel like they're break if some one stubbed them while walking by. The USB 3.0 ports are nice but to use them on most motherboard you'll need to have them plug into the rear IO panel instead of a header on the motherboard. I wish ThermalTake included a USB2.0 header or USB3.0 header adapter so that keeping the USB 3.0 cable internal was an option (I have such an adapter from elsewhere and it works rather well).
Now for the good news. It is very quiet and it manages to keep my build cool. The ability to adjust the air flow of the side fan is a very, very nice feature to help keep a high end GPU cool. The side panel uses a novel approach to cable management with regards to the side fan: opening up the door turns off the fan due to a series of pins that don't connect when open. Speaking of the side panel, it locks independent of the hard drive bays. There is no actual back plane for the hard drives which for a consumer case works rather well. You can use you own power and data cables to each individual drive if you so choose while retaining removability. The case is large but the face that it has a handle makes moving it relatively easy. Overall I do like the case as it is functional, quiet and good looking in my eyes.
etamin - Tuesday, July 26, 2011 - link
With that many mesh panels, it looks like a nightmare to dust out. I didn't see anything in regard to filters either.Call me shallow, but if a case doesn't look good (exemplified by this one), it doesn't matter how user-friendly, upgradable, cool, and efficient it is...it sure as hell isn't going in my room.
mlosee222 - Tuesday, July 26, 2011 - link
I'd be interested to see how these new fangled cases hold up to the classic Antec 900. Often imitated but never duplicated.Money Loo - Tuesday, July 26, 2011 - link
Loved the article, per usual. However the choice of yellow for the bar graphs makes it difficult to read the numbers in them. Sure, I can sort of ascertain what it might be by looking at the other numbers above and below it, or by holding ctrl+mouse wheeling up to make them bigger. Just a small nitpick in an otherwise great write up.