Soltek QBIC 3901A-300P (cont'd)
Construction
From the outside, the build quality of the Soltek case is pretty good. The top and sides of the case are secured by three thumb screws, and once they are removed, you can pull off the aluminum cover. The front of the case is plastic with metal plates covering the doors in order to make everything blend together. The plastic hinges do feel rather cheap, and they definitely wouldn't stand up to a lot of abuse, but SFFs are only slightly more portable than ATX cases, so they should suffice. As with the Shuttle cases, removing the cover required some force, and it doesn't slide smoothly into place. The three-panel design of the Biostar is definitely an advantage in this area. |
 |
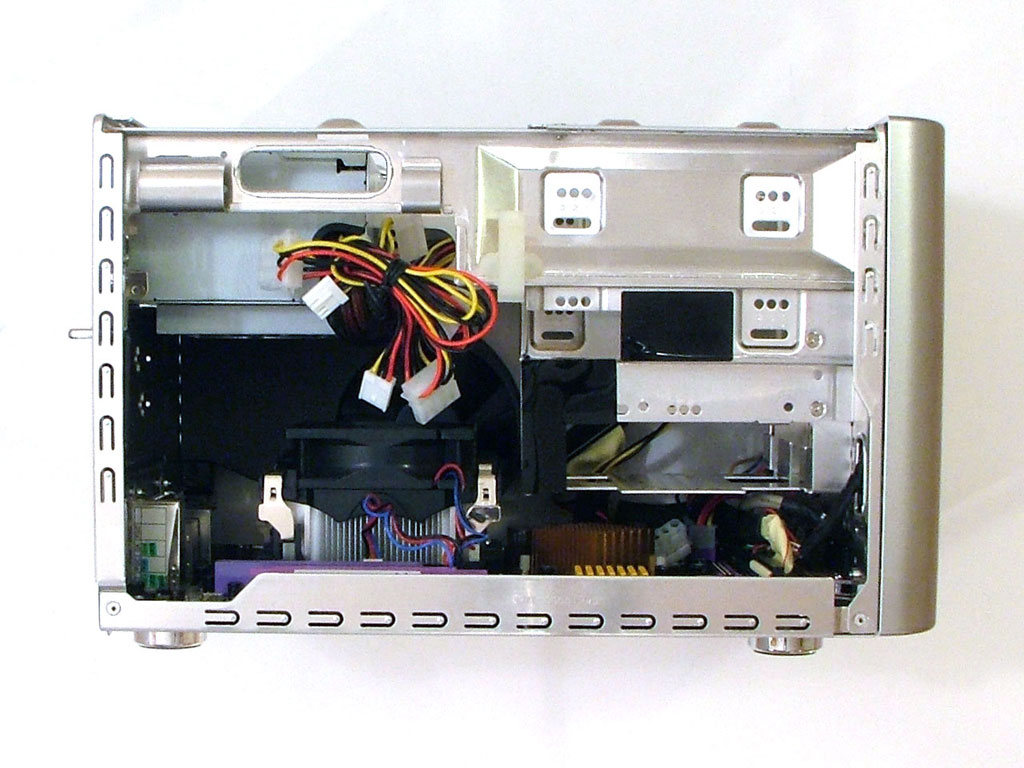 |
| Click on images to enlarge. | ||
Moving to the internals, we find the standard steel and plastic frame. Cables are pre-routed to help with assembly and air flow, and there were no sharp edges that we noticed. The included power supply is a 300W model and comes with ample connections, certainly meeting the requirements of the added space. Unfortunately, it isn't positioned very well, which we'll cover in the setup section.
 |
 |
| Click on images to enlarge. | |
The heat sink and fan are somewhat less impressive than most of the other offerings. The HSF has a copper core, but the fins are made of aluminum. A 60mm fan provides cooling, but it isn't particularly quiet. The location of the CPU socket is also obscured by the power supply, and installing the HSF on the CPU is far more difficult than in any other SFF that we've yet encountered. Finally, the latching mechanism to secure the HSF is difficult to install, and it doesn't inspire confidence. It took many tries to get all the hooks lined up properly, and even then, closing the latch didn't seem very secure.
Setup
Assembling the 3901-300P starts off the same as all of the other cases: you remove the thumb screws followed by the cover. With the cover off, you can then take out the two screws securing the drive cage and pull that out, which gives you access to the HSF. Removing the HSF is a little tricky, as we mentioned before that the PSU blocks access, but that was the easy part. |
 |
| Click on images to enlarge. | |
With the drive cage and HSF out of the way, installing the RAM and CPU is pretty simple. If you need to install an additional IDE cable for the hard drive or a SATA cable, now is the time to do so. You can also install the hard drive(s) into the drive cage at this point. The tricky part is getting the HSF back in place on the CPU. It takes some effort to even get it into place, and once you have it over the CPU, getting it properly secured can require several minutes or more. We probably spent at least ten minutes fooling around with the HSF trying to make sure that it was installed properly - this was by far the most frustrating time that we had with any HSF installation, surpassing that of the "bent" heat pipes on the e-bot.

Click to enlarge.
 |
 |
| Click on images to enlarge. | |
Eventually, you can get everything properly installed, and then it's time to add the optical drive. Like other cases, it is usually easier to install the drive cage and then position the optical drive so that the front buttons line up. The screws can be installed from the sides of the case without any difficulty once the drive is positioned. We used our "oversized" CD-RW initially, and it was a tight fit - almost too tight, as getting the power cable installed was very difficult. We definitely recommend getting a new optical drive rather than using a hand-me-down, and you can see how much more room using our shorter LiteOn DVD gives.
Due to the time spent on the CPU/HSF issues, it required a bit more than 30 minutes to assemble the QBIC. The Installation Guide wasn't particularly helpful in this matter, and the internal layout was definitely problematic. In later testing, we removed the PSU and found that assembly time was cut down to a more reasonable 20 minutes or so. Soltek could definitely spend some more time reworking the design of the 3901. The good news is that once everything is assembled, you don't have to worry about it: 10 or 15 minutes on assembly followed by months of use without opening the case makes the assembly process a minor point. However, frequent upgraders will dislike the design. If there's a critical flaw with the 3901, it's the board and case layout - the socket location under the PSU is just really inconvenient for setting up the system, and novice system builders would be better off with any of the other units in the roundup.
 |
 |
 |
| Click on images to enlarge. | ||
With the hardware installed, we move on to the BIOS screens. Most of the usual features are present, and the integrated SATA support of the chipset allowed us to use XP without any driver disk - note how the HDD shows up as IDE channel 2 master. The DRAM screen in the BIOS has most of the settings required for overclocking, but the tRP (RAS/Row Precharge) is not present in our screen shot. The latest BIOS changes the DRAM timings screen drastically, though Command Rate is still missing. We're not sure whether it was running with a 1T or 2T command rate, but we'd assume 2T. With the timings set to Auto (or default), our OCZ RAM with TCCD chips defaulted to 2.5-3-2-8, so we had to adjust those to 2-2-2-7 for optimal performance.
Installation of Windows XP SP2 - our standard for SFF systems - proceeded without any difficulty. After the initial setup was complete, we installed the VIA chipset drivers, audio drivers, LAN drivers, and the ATI graphics drivers. We rebooted once after installing the chipset drivers, as experience has taught us that this is usually a good idea. Then we installed the other drivers and rebooted one last time before commencing the benchmarking.
Noise, Heat and Performance
With the integrated memory controller, it's not too surprising that most of the benchmark results are similar. Comparing the Soltek with the closest competitor, the SN95G5, it often comes out on top, but rarely by more than a few percent. Temperatures for the case were pretty much in line with other units, and stability was very good overall. Overclocking changes the performance story quite a bit, however, so let's talk about that.For overclocking, the added RAM timing adjustments seem useful, but we still couldn't get a 1:1 overclock out of the system. We had to set the RAM to DDR333 when we used the maximum bus speed of 250 MHz or we would get crashes (or a straight out failure to POST). The CMOS clear jumper is on the rear left of the motherboard, next to the AGP slot, incidentally. We were glad to find that nothing obstructed access to the jumper, as we had to use it several times. In the end, we could get up to a 233 MHz bus with a 1:1 overclock, but we had to drop to DDR333 to get any further.
We ended up with 10X CPU and a 250 MHz CPU bus, giving a clock speed of 2.5 GHz with RAM running at DDR416 (CPU/12 ratio). While being forced to use a lower memory ratio isn't ideal, Athlon 64 chips aren't affected as much as other platforms and the maximum 250 MHz CPU bus was definitely a limiting factor. We managed to reach a slightly higher CPU overclock with the 12X multiplier, where we reached up to 2544 - the highest overclock that we've achieved with this particular 3800+ Newcastle on air cooling. Despite the difficulty of installing the HSF, it at least appears to cool well.
The one real problem with the Soltek, unfortunately, is the amount of noise that it makes. Most of the noise seems to come from the "IcyQ" cooling contraption, which is the vertical fan on the side of the case enclosed in a plastic shroud. We're not sure if the cooler is absolutely necessary, and it definitely adds to the noise levels. The shroud seems to act as something of a resonance chamber, only making matters worse. The interesting thing is that the Soltek was louder at idle than any of the other systems, but in stress testing, it didn't get much louder. The SN25P and 330P both had noise spikes that were louder than the 3901. We'd say that lower noise at idle with periodic spikes while the system is under load is preferable, but others might favor a constant level of white noise.


29 Comments
View All Comments
JarredWalton - Friday, August 12, 2005 - link
I'll hit the KLOSS as soon as I can. (I have it already.) So unless someone else votes, I guess I'll get the KLOSS reviewed next.Sokolum - Thursday, August 11, 2005 - link
For the last 2 months now i have a ST20G5 using as a MCE system. There are a few problems what i have encounbtered, one of them is that the system behaviour changes when i change a setting within the BIOS. Those aren't dramatic changes. But with every change, it looks like that the graphics runs muchmore slower, you can see this with dragging a windows screen over your desktop, you get trails from that window...The system only runs smooth when i *don't* touch those setting. Happily the things keep running smoothly when i enlarge the shared video memory.
For the MCE side, i failed to make the Hauppauge 500MCE run compleetly as it should, i am only able to run TV 'Tunner 1' without problems when i *disable* TV 'Tunner 2' within windows Device Manager. Shuttle or Hauppauge couldn't help me with this case.
As the review documented, this is one of the cases that RAID is causing the problem in this story. In my MCE setup, i don't use RAID (there is *no* room for a seccond drive when you installed a floppy drive). Why RAID is the problem, what i have been told is that RAID wants to use al of the PCI bandwith. It seems the nature of RAID in this kind of systems, just een told, i am not for 100% sure, but it seems plausible to mee.
, a nice looking machine. I solved the problem for the flash cards with buying a floppy disk what come with a integrated card readed, see link:
http://www.alternate.nl/html/shop/productDetails.h...">http://www.alternate.nl/html/shop/productDetails.h...
mino - Thursday, August 11, 2005 - link
Jared I must confes, this is the _first_ time i see everclocking test done as it should have been. I really appreciate the comments for newbies (it makes easier to me to explain to them if you could reference somthing :). Also finally use of correct term oo A64 base freq./FSB issue. I think this way is it should be done for _all_ A64 motherboard review.1) do a maximum base freq. check (by keeping memfreq. around DDR400 + CPU not overclocked
2) do a max memclock test at 1T (with some proven components, just to check quality of CPU to MEM routing on the MB)
3) do some max. overclock test (actually this may be optional since it depend mostly CPU chosen)
Keep at this route and many readers may finaly undestand the basics of A64's OCing.
JarredWalton - Thursday, August 11, 2005 - link
I'm working on some detailed overclocking articles right now. Glad you enjoyed the section, and I'll be going into a LOT more detail (with benchmarks) on some future OC articles.dropadrop - Thursday, August 11, 2005 - link
Thanks for the nice review,If you are considering a followup I would love to see you test usb. While the usb on my sn95g5 v2 works for casual things like a mouse, digital camera and memory card reader, it does not work for an ipod shuffle, external soundcard (hercules dj console), or external hardisk.
There have been alot of people with similar experiences. It wold be great if you could find a way to test the sff's with a few "demanding" usb devices, and even measure the voltage (and stability of it) supplied via usb.
I also second the request for you to test the sn95g5 with an X2. The new bios surely supports them, as people in north america have been getting their current rigs modded by shuttle for support. I would love to see how your's supports it (and maby even venice / san diego) without being modded. I believe you would have the chance to help alot of confused SN95G5 users by trying out a few cpu's in it.
JarredWalton - Thursday, August 11, 2005 - link
I will definitely give it a shot. At present, my intention is to purchase an external IDE HDD enclosure with USB2.0 and 1394A support and do some file transfers and such between that and the system. The problem with that approach is that the enclosures all have an external power source. Can anyone recommend an inexpensive USB/Firewire HDD enclosure that gets the power over the USB port? http://www.newegg.com/Product/Product.asp?Item=N82...">I found this one, but I'm not really keen on spending $160 for something I don't personally need.dev0lution - Wednesday, August 10, 2005 - link
How come the SN25P details don't mention the update from nforce4 standard to nForce4 Ultra? I'm thinking of getting one so I went to the previous review and it lists chipset in the specs as the nForce 4 standard, but if you go to Shuttle's current product page for the SN25P it lists the chipset as the Nforce4 Ultra. Who's correct?JarredWalton - Thursday, August 11, 2005 - link
I think I may have just been lazy or neglectful in the original SN25P article. I'm pretty sure it was always nForce4 Ultra. Then again, regular nf4 vs. nF4U only adds SATA-II support IIRC. I don't see anything about SN25P supporting SATA-II which is sort of odd.Cookie Crusher - Wednesday, August 10, 2005 - link
I know it may be a "dated" or more "Entry Oriented" socket, but I have found that the socket 754 SFF systems are great for gaming and general use. Was there ever a roundup for them? If not, I'd like to see maybe a limited look at them to remind everyone that they are viable alternatives to, and about $75-$100+ cheaper than, these socket 939 options.I think it's important to point this out because of the note in the article that a SFF option incurs a premium....maybe so, but there are still cost effective options in that market. thanks.
Cookie Crusher - Wednesday, August 10, 2005 - link
Nevermind.....i found the roundup I was hoping for.....still, would be nice to make that reference to the older socket types as legitimate choices for SFF hopefuls on a budget. :-)