Hardware Setup
We mentioned already the tool-less design of the case. In practice, this helps to shave a few minutes off of the time required for assembly. Realistically, it's not a huge advantage, but we do like the feature. There are a couple of areas that continue to require a screwdriver, however. First is the expansion card mounting bracket. Not only do they require a screwdriver, but we really don't like removing both screws just to add one card. The other area that still required a screwdriver was the HSF mounting. True, it does include thumbscrews, but unless you have Gumby fingers crossed with the strength of the Incredible Hulk, you won't be able to get at the two screws located near the front of the chassis, as they are blocked by the HSF. In fact, even using a screwdriver was a little difficult to get the screws back in place.First, let's start with a reminder to anyone out there who thinks that they're too good to read a manual: save yourself some time and have the Installation Guide next to you while you set up the SN25P. Due to the tool-less design as well as the air-flow shrouds around the CPU, you'll save yourself some time and confusion by referring to the manual. We had a few moments of confusion when assembling the case and the Guide was very clear and methodical in going through the entire installation process. Shuttle has clearly put some effort into making their manual both concise as well as accurate. Every one of the "gotchas" that we encountered in dismantling and assembling the case was covered, as well as several that we would have overlooked.
 |
 |
| Click on images to enlarge. | |
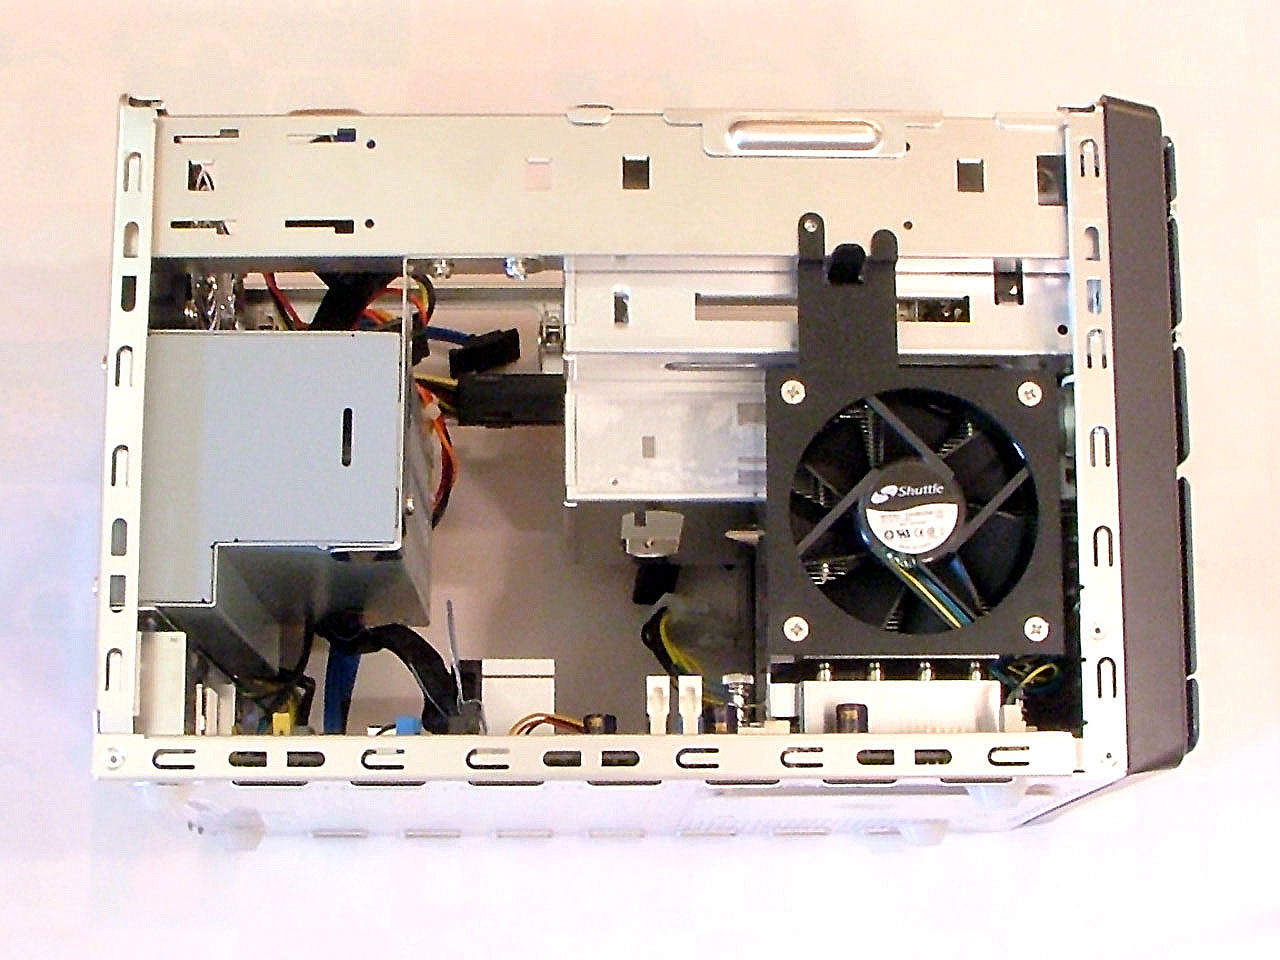
As for the assembly process, we start by removing the cover as usual. Doing so is easy enough, as you simply unscrew four thumbscrews. Next, we pull out the drive cage. There are two plastic plugs holding it in place, and pulling those out and sliding the cage back will get it out of the way. From here, things get a bit trickier. Looking at the CPU socket, it's clear that you want to remove the HSF, but the exact means to do so are not immediately obvious. The manual explains that you need to remove the air guide first by "gently lifting up on it." Well, it might require a bit more effort than being "gentle", but popping out the plastic clips at the front of the case first makes it pretty easy. Finally, the CPU HSF is secured by four thumbscrews, but two of them are rather difficult to reach. We used a screwdriver to loosen the two at the front of the case, while the other two were loosened with our fingers. Then the HSF comes out and you have access to the CPU socket.
 |
 |
| Click on images to enlarge. | |
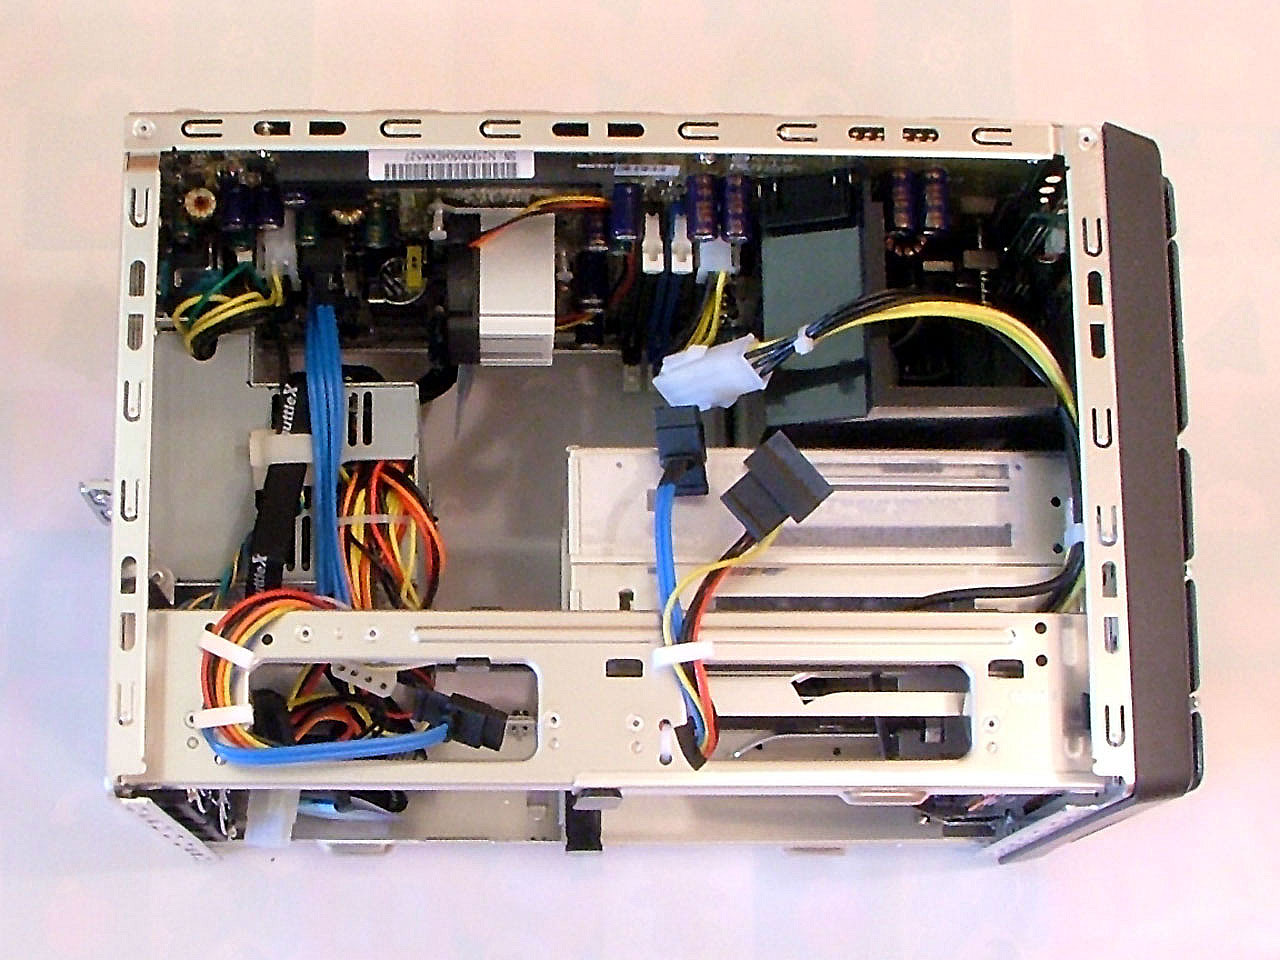
At this point, you can also swing out the fan on the left side of the case, which makes it extremely easy to insert the CPU itself. The next step is crucial, however: snap the fan back into place before mounting the HSF on the CPU. If you don't do this (we didn't initially because we were stupid and didn't read the manual), you can't get the fan back in place. The air guide for the HSF can be reinstalled after the HSF is screwed down. Installing the RAM at this point also makes sense, and you could even do that before putting the HSF back in; it really doesn't matter much.
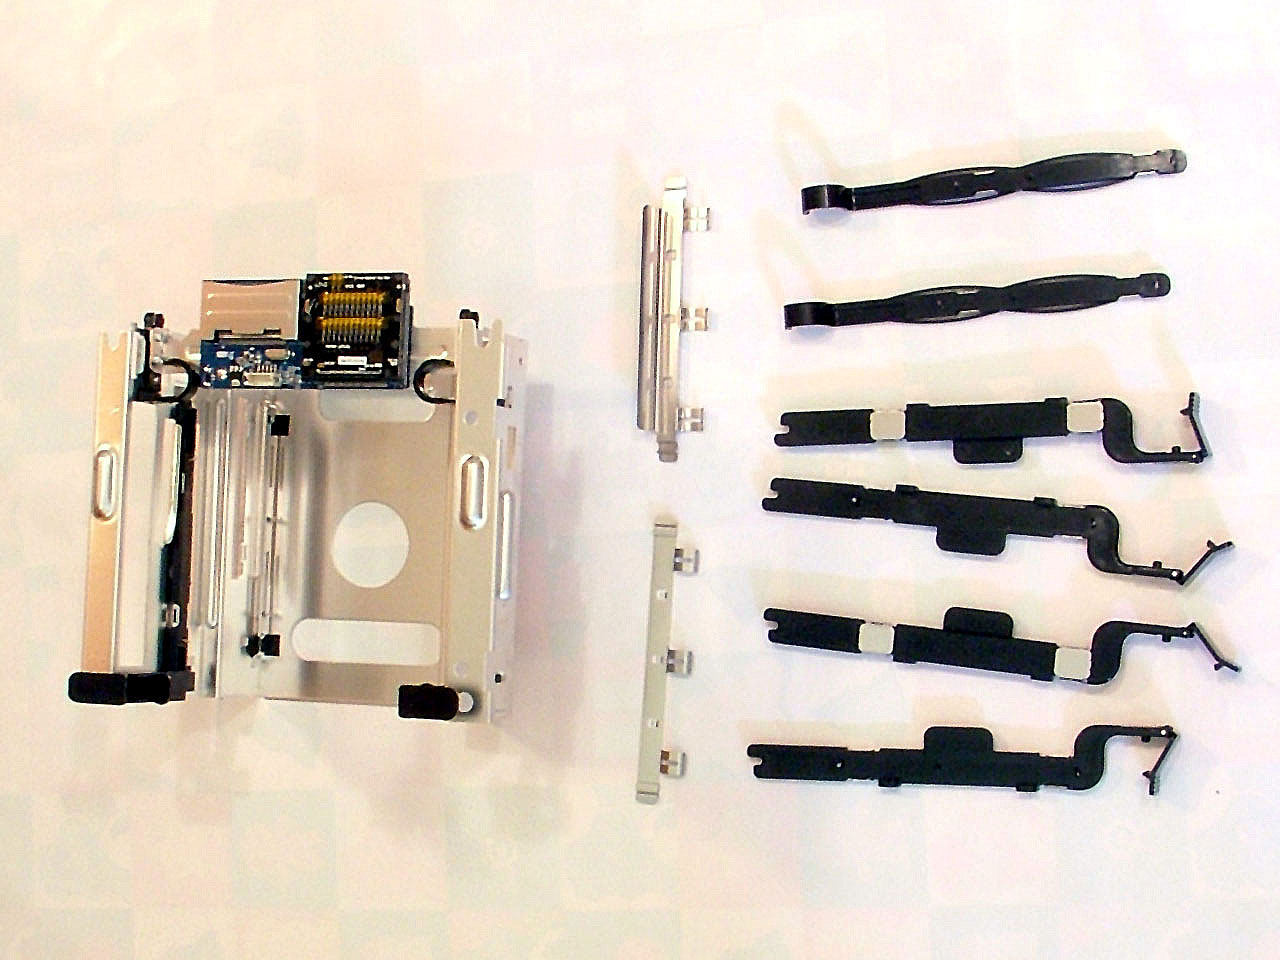
With the drive cage removed from the case, it's time to install your drives. First, remove the plastic rails and snap them into place on the sides of your optical drive. Before sliding the drive back into place, you may need to install an IDE/SATA hard drive or a floppy drive. For the HDD, four metal prongs stick up from the bottom of the cage and you simply press the HDD into place over these points. The floppy drive uses plastic drive rails and slides into place instead. If you use a HDD in this lower location, there are four rubber "vibration dampeners" that should be placed on top of the HDD. These will hold the HDD in place once the DVD is inserted above, which is the final step in assembling the drive cage.
Shuttle mentions that the rubber pads help to reduce noise from system vibration, but as far as we can tell, they are there to prevent the drive from lifting up off the pegs. Also included are two metal "EMI shields" that snap into place just below the optical drive and at the top-front of the 3.5" bay. These didn't really "snap" very well, and came loose after we installed the DVD into the cage. We're not sure if they really help all that much in reducing EMI, and since we ended up removing the HDD from this drive bay and moving it up top, we took out the EMI shield.
With the drive cage fully prepped, it can then be placed back into the case and secured via the two plastic plugs. There are also plastic clamps that will hold the DVD in place when the plugs are pressed down. We would like to mention that some users may find the space at the rear of the optical drive to be slightly cramped, particularly if they are using a longer drive. Most modern CD/DVD drives are shorter than models manufactured several years ago, and while either will fit, the newer models leave more room for the cables and such. (We used an older, longer CD-RW drive, which is why we noticed this.)

Click to enlarge.
 |
 |
| Click on images to enlarge. | |
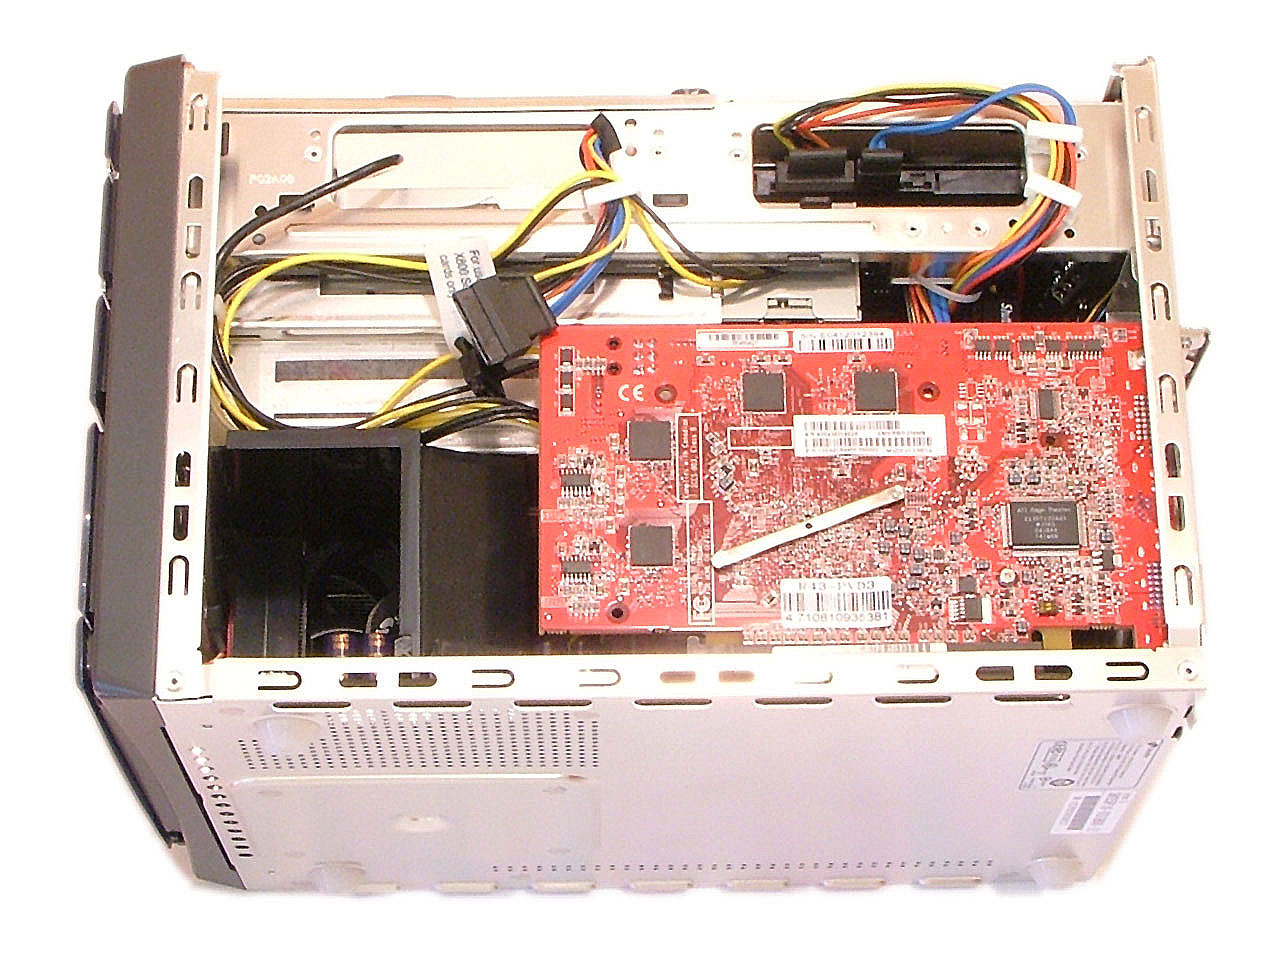
With everything installed, you can now connect the cables to all the devices and get ready to power up the system. We installed the graphics card as the final step, and we were sad to see the return of the typical metal door and two screws for securing the expansion cards. With all the effort that went into the design of the rest of the case, we wish that something could have been done to carry on the tool-less installation to the graphics card. It wasn't overly difficult, but after the hard drive and optical drive rails, it stands out.
We've gone into a lot of detail on the setup process not to make it sound difficult, but to try and help you visualize the whole installation process. Just looking at the pictures, some of the design may not be immediately clear. All told, it really is an intelligent design. Again, we just wish that the expansion slots had received some further attention, as installing the graphics card was disappointing after dealing with the rest of the case.


30 Comments
View All Comments
CrystalBay - Wednesday, March 9, 2005 - link
Nice review, 375.00 is that Shuttle's retail price ?I like the PSU is there any rating on the 12v line.
JarredWalton - Wednesday, March 9, 2005 - link
8 - I didn't have any difficulty installing a DVD drive into the SN25P. The "button" has a fairly large range of movement, which allows it to work well. Also, the screw-less design of the CD worked well for me.As far as the graphs go, my intention is to actually go back and add in figures for the SN95G5 and Soltek 3901-300 Pro when I finish testing them, so in the future the charts will hopefully become more meaningful. Having only run one set of benchmarks for this particular configuration made the benchmarks somewhat superfluous for the time being. :|
Gioron - Wednesday, March 9, 2005 - link
One thing that I noticed was that all the noise and heat graphs were on their own seperate scale. This might not be as big a deal when there are multiple cases on the chart, but when there is only one it makes it impossible to just run your eye down the chart and see what the range is. I'd really recommend picking the largest scale and sticking with it for all the charts (and preferably, do the same when there is more than one case on those graphs).Other than that minor layout glitch, a fairly good review. One thing I was wondering, however, was how well the cover over the CD drive works. I know my G5 series case takes a lot of tweaking to get the CD drive positioned just right so that the button will actually open the drive, have they improved that in the P series chasis?
OrSin - Wednesday, March 9, 2005 - link
Not impressed at all.Case too big, and no PCI slot is huge turn off for me.
I think alot SSF users use thier system as HTPC and this system just will not work. I would perfer a wider case, than a taller one. And no PCI slot means no TV tuner or FTA cards.
Maybe I will wait for the one with the ATI motherboard, or the Biostar or just get a HTPC case and get a real motherboard in it.
Oh yeah $400 is little steap even for SFF cases.
JarredWalton - Wednesday, March 9, 2005 - link
#5 - blame my camera. It's definitely NOT a high-end model. Most of the external shots were provided by Shuttle, so I used those as a better quality image. The front panel *does* have a speckled look to it. Maybe I'll see about upgrading to a better camera in the future. Right now, the originals are taken at 2048x1536 (the max of my 3 MP Fuji camera), but after cropping and misc. cleanup I resized them to a more manageable format.IceWindius - Wednesday, March 9, 2005 - link
Ok, why do alot of these picture in their large format look very grainy like it was done in 640x480 mode?IceWindius - Wednesday, March 9, 2005 - link
Well see how well this machine does in the reliable department as many people complained about the SN95g's issues.That and I want to see Creative make a PCI-E soundcard as well as onboard sucks period.
deathwalker - Tuesday, March 8, 2005 - link
#1...for the most part i agree that overclocking wont be a issue with a lot of SFF buyers. One point of concern for me would be the absence of a PCI slot for standard PCI periphrials..such as a TV tuner card..which i have in my system and use frequently.This does look like an attractive device though with a little extra room than most SFF's and a Power Supply with some performance margin in it.
pbrain - Tuesday, March 8, 2005 - link
Fantastic review. Now, where and when are they going be available?!segagenesis - Tuesday, March 8, 2005 - link
And I thought my SN41G2 was expensive at $300 when it was new. Ouch!Good review, however. I dont think overclocking is a major selling point for a SFF when most people want one for noise/size/convenience.