ASUS TUF Z87 Gryphon Review
by Ian Cutress on February 3, 2014 10:00 AM EST- Posted in
- Motherboards
- Asus
- Z87
- TUF
ASUS TUF Z87 Gryphon In The Box
Looking back on the original outset of the review, I guess I had no inclination as to what exactly the box of a TUF motherboard would have in it. Given the market for the TUF is towards the longevity and stability of a product, one could argue that safety could be tacked on as well and some form of modified screws with a special screwdriver could be added. Given that the Z87 Gryphon is a ~$162 motherboard, the box contains the following:
Driver DVD
Rear IO Shield
Manuals
Four SATA Cables
Flexi-SLI Bridge
Q-Connectors
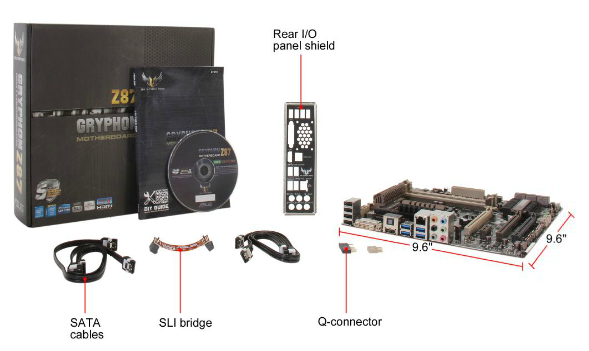
Ultimately this is almost the bare minimum ASUS could have put in the box – remove a couple of SATA cables and the SLI bridge would be the minimum compared to what we have seen with lower price segmentation. There is scope here for ASUS to have included something to represent the TUF brand, such as a sticker for a case or a poster. Though I guess what ASUS want users to buy is the Armor Kit, available separately:
ASUS TUF Z87 Gryphon Overclocking
Experience with ASUS TUF Z87 Gryphon
As one might imagine, a motherboard built for stability might not necessarily pull out all the stops to become the best overclocking motherboard on the market. This is probably seen best by the Gryphon’s lack of automatic overclock options – we only found two, and these were further down the overclocking page in the BIOS.
That being said, if ASUS was attempting to escape overclocking, they would have used the H87 chipset. Using some intuition and the manual overclock settings, our CPU still managed to hit the 4.6-4.7 GHz range similar to previous Z87 motherboards we have tested. Motherboards built for longevity and overclocking motherboards are often cut from similar bits of cloth, although the testing applied to either will be different.
Methodology:
Our standard overclocking methodology is as follows. We select the automatic overclock options and test for stability with PovRay and OCCT to simulate high-end workloads. These stability tests aim to catch any immediate causes for memory or CPU errors.
For manual overclocks, based on the information gathered from previous testing, starts off at a nominal voltage and CPU multiplier, and the multiplier is increased until the stability tests are failed. The CPU voltage is increased gradually until the stability tests are passed, and the process repeated until the motherboard reduces the multiplier automatically (due to safety protocol) or the CPU temperature reaches a stupidly high level (100ºC+). Our test bed is not in a case, which should push overclocks higher with fresher (cooler) air.
Automatic Overclock:
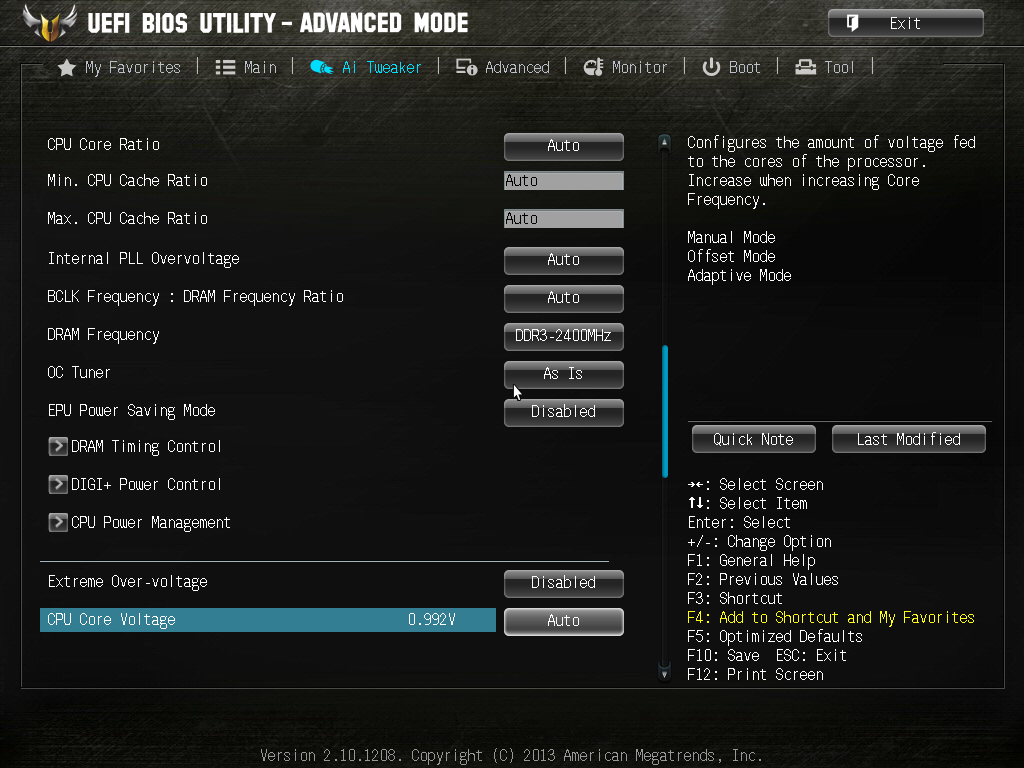
The automatic overclock settings are found in the OC Tuner option of AI Tweaker in the BIOS. Selecting this gives two further options to select: Ratio First and BCLK First.
Selecting Ratio First gives a CPU multiplier of 43x/42x/42x/41x, meaning 4.3 GHz in single thread mode down to 4.1 GHz at full load. Over the base CPU turbo, this means an extra 300 MHz on the single thread setting. The BIOS still showed ‘Auto’ for CPU voltages and Load Line Calibrations, and in the OS this gave a load reading of 1.136 volts. PovRay scored 1696.45, and OCCT gave a maximum temperature of 71C. XMP was applied automatically also.
On the BCLK First option, the CPU was adjusted to the 125 MHz strap, giving a 34x125 scenario for all threads, or 4.25 GHz all over. Again the BIOS reported an automatic setting for voltages, although in the OS this meant 1.174 volts during OCCT with a peak temperature of 75C. PovRay scored 1757.7.
Manual Overclock:
For our manual overclock we stayed in the BIOS and started from 4.0 GHz and 1.000 volts. When the system was stable (PovRay + 5 mins OCCT) the multiplier was raised, and for any failure the voltage was raised by +0.025 volts using a fixed voltage application. The following results were achieved:
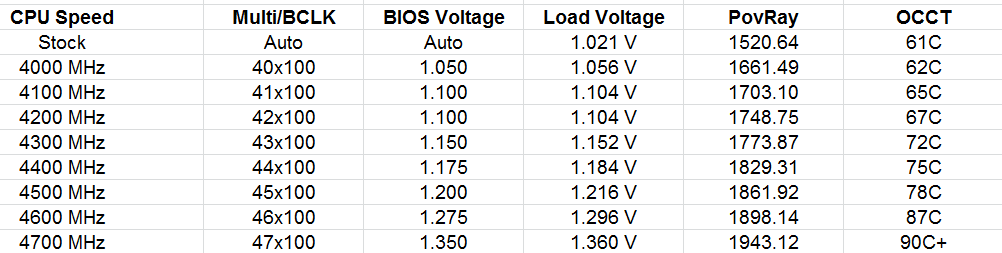
At 4.7 GHz the system was stable but failing our OCCT temperature tests, giving over 90C. Despite using a TRUE Copper heatsink for this test, better cooling would be needed to push the CPU further.


62 Comments
View All Comments
Sivar - Monday, February 3, 2014 - link
I was kind of hoping for an analysis of exactly how TUF motherboards differ from the rest. Technical details, specific component lists with a look at their manufacturer specifications, you know -- hardcore Anandtech stuff.Yes, it has a longer warranty, but is that because the "TUF" voltage regulators are rated for higher temperature environments (and similar), or is it more a marketing gimmick?
irusun - Monday, February 3, 2014 - link
Exactly! I actually strongly considered this board on my last build for a CAD workstation... Reliability and stability were primary factors. In the end, their marketing actually turned me off. The marketing seems to be more about appealing to G.I. Joe / Call of Duty fans with the over-the-top website, colors, and military lingo. I just wanted a "professional" geared board. I get the impression it might be a good board for less than ideal environmental conditions, still no idea if the board really would be any better in a typical office environment.HandsomeChow - Wednesday, February 12, 2014 - link
If you really want to see what components they are, just remove the top heatsink on the MOSFETS and there should be a product number on the Caps and the Mosfets and you can search them up along with the Inductors.jtd871 - Monday, February 3, 2014 - link
Bingo. Does the "armor" actually do anything worthwhile? Or is that just an expensive gimmick? I noticed also that the IO plate seems to have an open vent in it. => I think I see a potential path for dust entry into the armor! And how do you get enough cooling air to the heatsinks around the CPU if they're covered by the armor?! Downdraft cooler?khanov - Monday, February 3, 2014 - link
It's a great addition for people who frequently shoot at their pc's with bb guns. Also for those that open the side of the case and throw hard objects at the motherboard.Iketh - Saturday, February 8, 2014 - link
i lol'd...wish I could vote this upHandsomeChow - Wednesday, February 12, 2014 - link
In terms of Heat dissipation, the aim from Asus is to keep external heat sources from conducting to the motherboard. Hence the Armour being made out of plastic. But the internal components on the motherboard also admit some heat so it is a double edged sword. The Armour is more of a Dust protector/Moisture shield. And yes there are potential airflow gaps that will allow dust to enter but it is much less dust compared to a motherboard without the Armourkyuu - Monday, February 3, 2014 - link
Have to agree with this. We need more info on what exactly the differences are between this and a "run-of-the-mill" Z87 board. Did they use different components (higher quality capacitors, voltage regulators, etc.)? Did they undergo more validation? Does the armor kit do anything worthwhile, and does it hamper cooling in any way?FractinJex - Monday, February 3, 2014 - link
Here....I have used several for work related builds and one for myself they are awesome!TUF Black Metallic capacitors, chokes, and MOSFETs are screened by seven rigorous military-grade tests to ensure superior lifespan even under the most demanding conditions.
The components used are of about server grade quality in other words its a bit better than a standard board/mid range board 100-250$ range...most boards these days are built to last but most do not come with 5 year warranty either...and someone whos been in the industry most boards are built to last just that so go more some go less etc...
Currently atm this and the genie are the best matx boards available to date.
fokka - Monday, February 3, 2014 - link
"TUF Black Metallic capacitors, chokes, and MOSFETs are screened by seven rigorous military-grade tests to ensure superior lifespan even under the most demanding conditions." marketing speak much?