Intel Z87 Motherboard Review with Haswell: Gigabyte, MSI, ASRock and ASUS
by Ian Cutress on June 27, 2013 8:00 AM EST- Posted in
- Motherboards
- Intel
- MSI
- Gigabyte
- ASRock
- Asus
- Haswell
- Z87
- Shark Bay
- Lynx Point
ASUS Z87-Pro In The Box
With an integrated WiFi module included in the package, no doubt the box will contain a WiFi antenna – in previous generations this would be a set of magnetized antennas to be positioned on a PC case at the users’ discretion. For Z87 the antenna shifts to a single device that can be positioned flat or perpendicular. Other than SATA cables and Q-Connectors our box is relatively bare:
Rear IO Panel
Driver Disk
User Guide
WiFi Antenna
Four SATA Cables
SLI Bridge
Q-Connectors

ASUS Z87-Pro Overclocking
Experience with ASUS Z87-Pro
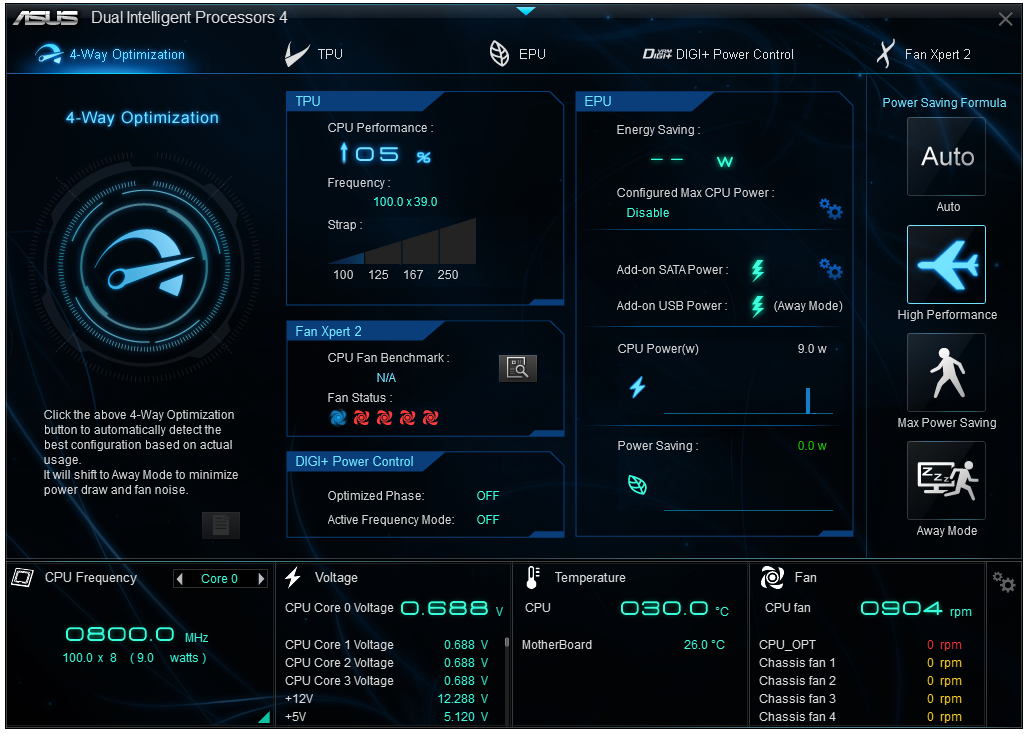
From previous reviews of ASUS motherboards, we typically have some of our best experiences on ASUS products – our recent review of the Maximus V Formula is one such example. Through the OS software we have the option of automatic tuning via DIP-IV, or manual adjustments of speeds, voltages and power control. TPU is also available via a two-stage DIP-switch on board, giving two different overclocks.
The BIOS is the place to head for manual overclocks, whereby the My Favorites menu allows the user to place the options they concern about the most into a single menu. For our overclock testing this usually means the VCore, the VRIN, Load Line Calibration, CPU Ratio and Memory Settings. Performance on the ASUS Z87-Pro matched the other motherboards in this test, whereby moving above 1.300 volts tends to increase peak temperatures by a significant amount.
Methodology:
Our standard overclocking methodology is as follows. We select the automatic overclock options and test for stability with PovRay and OCCT to simulate high-end workloads. These stability tests aim to catch any immediate causes for memory or CPU errors.
For manual overclocks, based on the information gathered from previous testing, starts off at a nominal voltage and CPU multiplier, and the multiplier is increased until the stability tests are failed. The CPU voltage is increased gradually until the stability tests are passed, and the process repeated until the motherboard reduces the multiplier automatically (due to safety protocol) or the CPU temperature reaches a stupidly high level (100ºC+). Our test bed is not in a case, which should push overclocks higher with fresher (cooler) air.
Automatic Overclock:
For our automatic overclock settings we tested the AI Suite III 4-Way Optimization option, which caters for speed, energy, digital power aggression and optimum fan speeds. The TPU Switch was also tested in both positions. Here are our results.
The 4-Way Optimization method performed a series of stress tests to increase the multiplier:
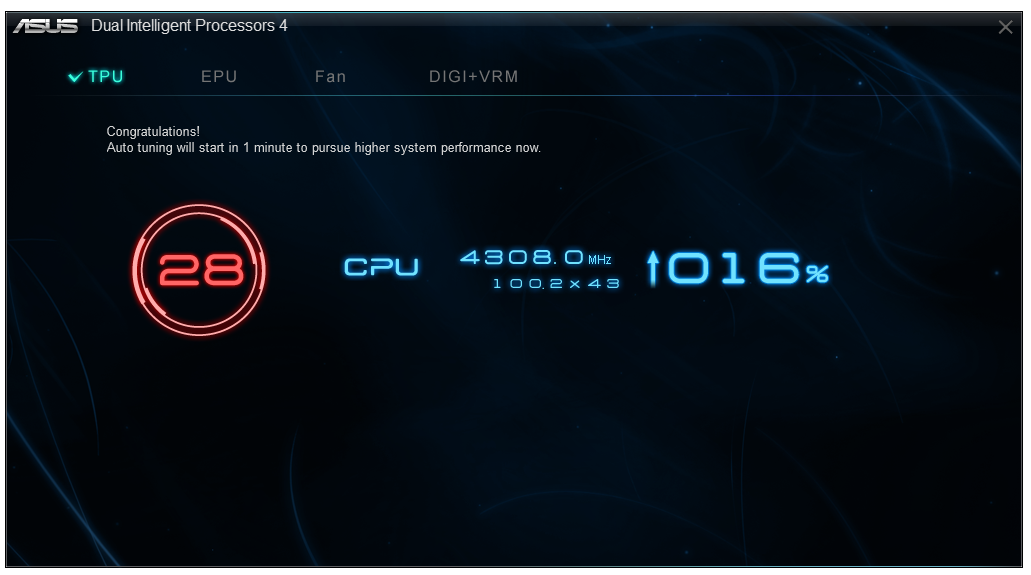
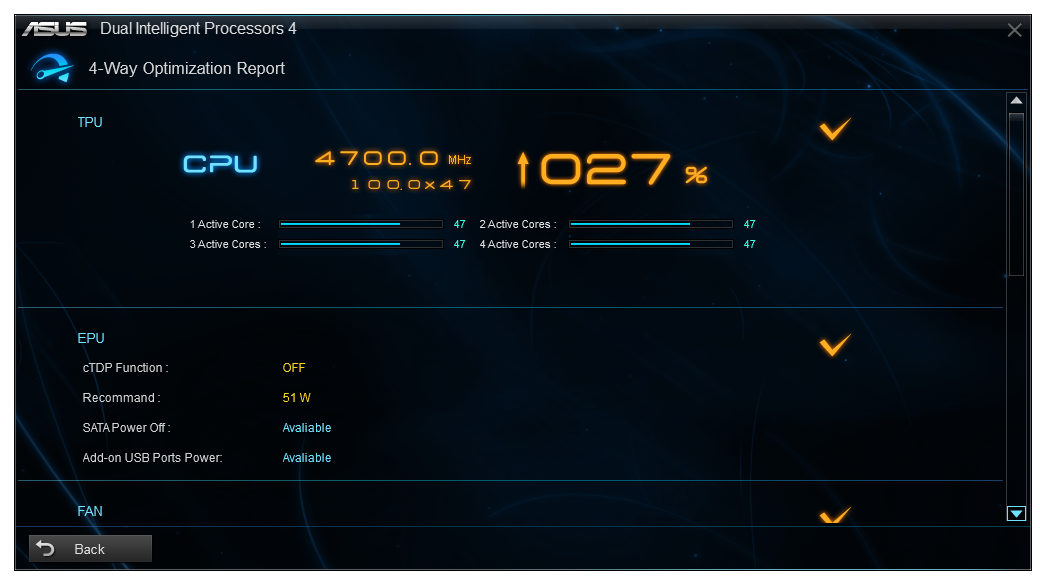
The system would restart, presumably to increase boot stability to push overclock in the operating system further. The final result was a nice and high 4.7 GHz:
At this setting the CPU was placed on a 1.250 volt setting with a 0.025 volt offset in Adaptive mode, with VRIN set to 1.81 volts and XMP enabled. With these settings, the system showed a load of 1.296 volts, a PovRay score of 1935.7 but caused a BSOD during OCCT. It has been noted that in Adaptive mode, artificial load generators can cause Haswell CPUs to request more voltage than would be requested during normal high-CPU activities such as video editing; this could be the reason for the OCCT test to fail.
With the TPU switch set to Level 1, the CPU was given a staggered multiplier setting of 43/43/42/41x at 1/2/3/4 core loading. The BIOS was automatically set to 1.150 volts with a 0.025 volt offset and a VRIN of 1.81 volts. At these settings, the system showed a load of 1.152 volts, a PovRay score of 1687.69 and an OCCT peak temperature of 72C. XMP was also applied.
With the TPU switch set to Level 2, the CPU was given a 34x125 overclock (4250 MHz) under all loading, with a CPU setting of 1.175 volts and a VRIN of 1.81 volts. With these settings, the system adjusted the memory from XMP (2400 10-12-12) to 2000 10-12-12 to compensate for the 125 MHz CPU strap, and then play it safe by reducing the memory strap. At these settings a CPU loading of 1.200 volts was observed, a PovRay score of 1749.74 and an OCCT peak temperature of 83C.
Manual Overclock:
Using the knowledge gained from previous testing, we set the VRIN to 1.65 volts and under ASUS’ recommendations left LLC on Auto. If ASUS have not already, there is an overclocking guide written by the technical guys within ASUS to aid in overclocking and how to deal with the old and new options in the new BIOS. Here are our results:


58 Comments
View All Comments
Rob94hawk - Thursday, June 27, 2013 - link
The MSI Gaming board would not do 2560x1440 off the DVI-D port.Aikouka - Thursday, June 27, 2013 - link
One thing to note is that ASRock does have a version of the Extreme6 that does NOT have 802.11ac built in. I think it's about $20 cheaper.I thought about going with the Extreme6 when I built a Haswell machine, but I figured that some of those features would go unused. Unused chips that aren't disabled still need to be initialized during POST, so I get an increased POST time and spend more money. :P I went with the Extreme4, and honestly... I wish that I hadn't. The UEFI BIOS on my system is so flaky that it randomly hard locks a few seconds after the GUI appears. I don't know if it's a bad board, a bad batch, or an issue with that model, because I'm not the only one with that issue. I've seen other reports on the Anandtech forums and a quick Google search turns up results on other forums and in the Newegg reviews. I'm assuming that the Extreme6 did not have this problem?
DanNeely - Thursday, June 27, 2013 - link
Check your BIOS; you should be able to disable unused controllers to boost post time. This shortened my i7-920/930 post times from ~30s to ~20s.Aikouka - Thursday, June 27, 2013 - link
Oh, I know. I just figured that it wasn't worth spending more on a board just to disable the unused controllers. Although, then I ran into the Extreme4's BIOS problem, and I wish I would have spent a little more! =PJames5mith - Thursday, June 27, 2013 - link
Since when is $200 a "reasonable price bracket"? In my mind $50-$100 = budget. $100-$160 = mainstream. $160+ is enthusiast pricing. It is not reasonable at all.WeaselITB - Thursday, June 27, 2013 - link
$200 is a reasonable price bracket for the enthusiast chipset family that they're reviewing. If you're looking for lower price, check out the lower families, such as H87 for the mainstream segment.MrSpadge - Friday, June 28, 2013 - link
A solid Zx7 board without any BS used to be around 100€ (-> 100$ without VAT for you). Now that parts of the voltage supply have transitioned into the CPU the boards should not become any more expensive.I may be enthusiastic about tweaking my PC for efficiency and value, but I'm certainly not enthusiastic about paying big bucks for my toys.
crimson117 - Thursday, June 27, 2013 - link
Ian, this line/paragraph sounds a bit too much like it was lifted from marketing materials: "Whenever a user considers purchasing an ASUS motherboard they know that it is built to perform and has a great feature set"IanCutress - Thursday, June 27, 2013 - link
Haha I can assure you those are my words, although it does sound generic given that I was meant to be referring to the board in the review. Perhaps a bit subjective for a review, but I had a good experience with the board and that filtered through. Changed it a little...-Ian
snakyjake - Thursday, June 27, 2013 - link
I've had an ASUS mother board for years, and the EZ-Update never downloaded updates from the Internet. It never was able to connect with any of the update servers. I always had to go to the Asus website and download the updates, and then update the BIOS from disk.I do wish the ASUS software was all integrated, and not separate programs on my system tray.