Four Multi-GPU Z77 Boards from $280-$350 - PLX PEX 8747 featuring Gigabyte, ASRock, ECS and EVGA
by Ian Cutress on August 22, 2012 9:15 AM ESTGigabyte G1.Sniper 3 Overclocking
Note: Ivy Bridge does not overclock like Sandy Bridge. For a detailed report on the effect of voltage on Ivy Bridge (and thus temperatures and power draw), please read Undervolting and Overclocking on Ivy Bridge.
Experience with Gigabyte G1.Sniper 3
Overclocking on the G1.Sniper 3 was a lot like the experiences we had with the Z77X-UD5H. Automatic overclocking had its issues depending on the memory kit used, whereas manual overclocking was easy to do and hit some good speeds.
Automatic overclocking is performed through the EasyTune6 software, and offers three levels depending on how adventurous a user you are. There is also an additional option called ‘Auto Tuning’, which uses a stress test program in order to find a good overclock given a users cooling and case situation.
Manual overclocking was performed entirely in the BIOS. Gigabyte still needs to refine this part of the overclocking procedure, as CPU voltages, speeds and load line calibration settings all in different menus (with up to four button presses to get between them). However, given the maturity of the 3D BIOS now, it was relatively quick and painless to navigate between them, if a bit slower than optimal for an enthusiastic well trained overclocker.
Methodology:
Our standard overclocking methodology is as follows. We select the automatic overclock options and test for stability with PovRay and OCCT to simulate high-end workloads. These stability tests aim to catch any immediate causes for memory or CPU errors.
For manual overclocks, based on the information gathered from previous testing, starts off at a nominal voltage and CPU multiplier, and the multiplier is increased until the stability tests are failed. The CPU voltage is increased gradually until the stability tests are passed, and the process repeated until the motherboard reduces the multiplier automatically (due to safety protocol) or the CPU temperature reaches a stupidly high level (100ºC+).
Our test bed is not in a case, which should push overclocks higher with fresher (cooler) air. We also are using Intel's All-in-one Liquid Cooler with its stock fan. This is a 120mm radiator liquid cooler, designed to mimic a medium-to-high end air cooler.
Automatic Overclock:
Using Gigabyte’s EasyTune6 software in the operating system, we applied the various overclock options it presents. These are in the form of three levels, each more aggressive than the last. The final option is an Auto Tuning, which applies a stress test to the CPU and gradually raises the voltages and CPU speed until a maximum given the cooling and the quality of the CPU is reached.
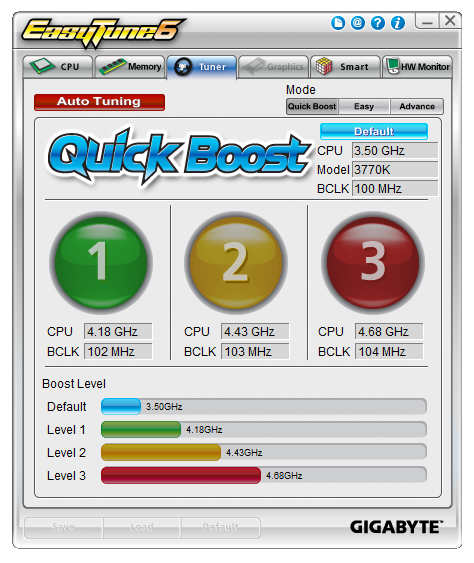
For the three EasyTune6 levels, the overclock is easy to understand – a new multiplier and BCLK is applied to achieve the relevant speed, and a voltage offset is used to keep it stable. The memory is also adjusted, to one strap below XMP. This is so the memory is not pushed above XMP due to the BCLK adjustment.
The issue we found with the ET6 overclock levels is the memory adjustment – the memory kit we use for our testing is very sensitive to adjustments, and would not work with any of the ET6 levels but did work at XMP. However a slower kit from Patriot did work with EasyTune on some of the levels.
Here are our results:
At Level 1, ET6 gave the CPU a 41x multiplier and 102.3 MHz BCLK, to give 4194.3 MHz total. A +0.110 volt offset on the CPU was also applied, as well as a memory adjustment to XMP minus one strap. However, this setting gave constant memory errors during PovRay.
At Level 2, ET6 gave the CPU a 43x multiplier and 103.3 MHz BCLK, to give 4441.9 MHz total. A +0.150 volt offset on the CPU was also applied, as well as a memory adjustment to XMP minus one strap. This was stable and gave peak temperatures of 85°C during PovRay and 89°C during OCCT.
At Level 3, ET6 gave the CPU a 45x multiplier and a 103.3 MHz BCLK, to give 4693.5 MHz total. A +0.150 volt offset on the CPU was also applied, as well as a memory adjustment to XMP minus one strap. This was stable and gave peak temperatures of 98°C during PovRay and 102°C during OCCT.
The Auto Tuning option resulted in giving the CPU a 47x multiplier and a 104.3 MHz BCLK, to give 4916 MHz total. The normal turbo bin procedure was also applied, giving 47x/47x/46x/45x for 1/2/3/4 threaded load, meaning 4707 MHz at full load. This setting showed 1.200 volts at load, and gave 90°C during OCCT but memory errors during PovRay.
Manual Overclock:
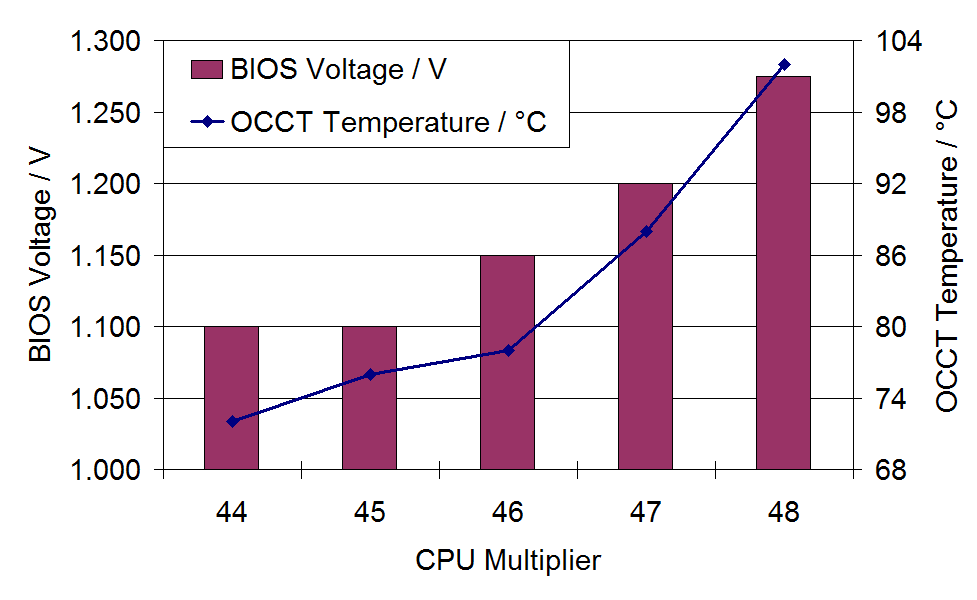
With our manual overclocking, we very early switched CPU Load Line Calibration to Extreme to improve stability and remove VDroop. On an LLC setting of automatic and a fixed CPU voltage of 1.100 volts, in the OS at load this dropped down to 1.068 volts. Changing LLC to extreme gave an OS reading of 1.104 volts, which usually results in a little extra temperature but improved stability all around. Here are our results:
Starting at 44x multiplier and 1.100 volts, the system was stable with LLC on automatic and showed an OS load voltage of 1.068 volts. This gave peak temperatures of 69°C during PovRay and 72°C during OCCT.
The 45x multiplier was stable at 1.100 volts, but with the CPU LLC set to Extreme. This showed an OS load voltage of 1.104 volts. This also gave peak temperatures of 74°C during PovRay and 76°C during OCCT.
The 46x multiplier was stable at a minimum of 1.150 volts, with LLC set to Extreme and an OS load voltage of 1.152 volts. This gave peak temperatures of 79°C during PovRay and 78°C during OCCT.
The 47x multiplier was stable at a minimum of 1.200 volts, with LLC set to Extreme and an OS load voltage of 1.200 volts. This gave peak temperatures of 85°C during PovRay and 88°C during OCCT.
The 48x multiplier was stable at a minimum of 1.275 volts, with LLC set to Extreme and an OS load voltage of 1.272 volts. This gave peak temperatures of 97°C during PovRay and 102°C during OCCT.
Understandably we did not try higher speeds or voltages due to the load temperatures already being reached.


24 Comments
View All Comments
Namesblank - Tuesday, July 26, 2022 - link
10 years later, people be looking for how to build system with 20+ GPUs lmaomayankleoboy1 - Wednesday, August 22, 2012 - link
Where are the GPGPU benchmarks? AFAIK, those are affected by the PCIE 3.0 bandwidth, as shown in the HD7970 review.Games are more or less happy with a PCIE2.0 x8 .
MrSpadge - Thursday, August 23, 2012 - link
A few GP-GPU apps are affected, most aren't. Even PCIe 3 is slow as hell from the perspective of the GPU, so you try to avoid external communication as much as possible.TimoKyyro - Wednesday, August 29, 2012 - link
I was hoping to see some GPU rendering too. I'm using CUDA on Blender and I really need more GPU power. It would be nice to know if there is a difference between 4x 680 or 2x 690 on different PCIe setups.extide - Wednesday, August 22, 2012 - link
Thanks for providing the diagrams of lane routing. I wish ALL manufacturers would supply a diagram with their boards so you know how to set it up when you are building a system. Sadly, these diagrams are the exception, not the rule. :(processinfo - Wednesday, August 22, 2012 - link
For me only EVGA seems worth consideration (I don’t like a fan on chipset though).I have few requirements that others do not meet.
I want PS/2 keyboard port (don’t care about mouse). I don’t see it as legacy. It is still superior to USB for keyboard. Works on interrupts instead of pulling, allows as many keys pressed without ghosting as you wish (know it probably does not matter in real life but I like that anyway).
Display port output is mandatory for me these days. While it is true that this kind of mobo will run dedicated graphics card (or more than one for that matter) I like to have output here for possibility to use it with CPU graphics if my graphic cards breaks and needs replacement (I had that happen and waited almost two weeks for new one). HDMI is no go because does not support high enough resolution.
Gigabyte is out for me because audio chip. Maybe it is better but it does not do 7.1 and I will lose two channels in my Tiamat 7.1 headset.
rwpritchett - Wednesday, August 22, 2012 - link
You should check out some of the newer USB keyboards. I don't know how they do it, but some of them can now do full NKRO without PS/2. My Nighthawk X9 can do full NKRO over USB.processinfo - Thursday, August 23, 2012 - link
Interesting but this is not possible with standard USB keyboard protocol. If it does that it has to use some tricks and most likely custom keyboard driver.Also I have Thermaltake Meka G1 that I like and I purchased because I got tired replacing membrane keyboards so I rather buy motherboard with PS/2 then new keyboard.
My point is that at this price point and clearly meant for gamers (who else is using more than one graphic card in non-workstation pc) they should think about such details especially when they go overboard with other ports, e.g., who needs all 4 kinds of display output on gaming mobo, or 10 USB ports on back plate alone (if you need plenty you can have them on bracket connected to header).
MacGyverSG1 - Wednesday, August 22, 2012 - link
I loved the review. The G1.Sniper 3 was on my short list for a while. Could get back on, though.I'm waiting for the ASUS Maximus V Extreme to get tested next.
I only need a motherboard to complete my new build. I plan on running this new rig for 6+ years so I want a board that can keep up with the times.
just4U - Thursday, August 23, 2012 - link
I am staying away from the Rampage/Maximus lines from Asus this time out as Gigabyte has pretty much brought better value accross the board on their gamer boards. I don't expect Asus to catch up till the next chipset..